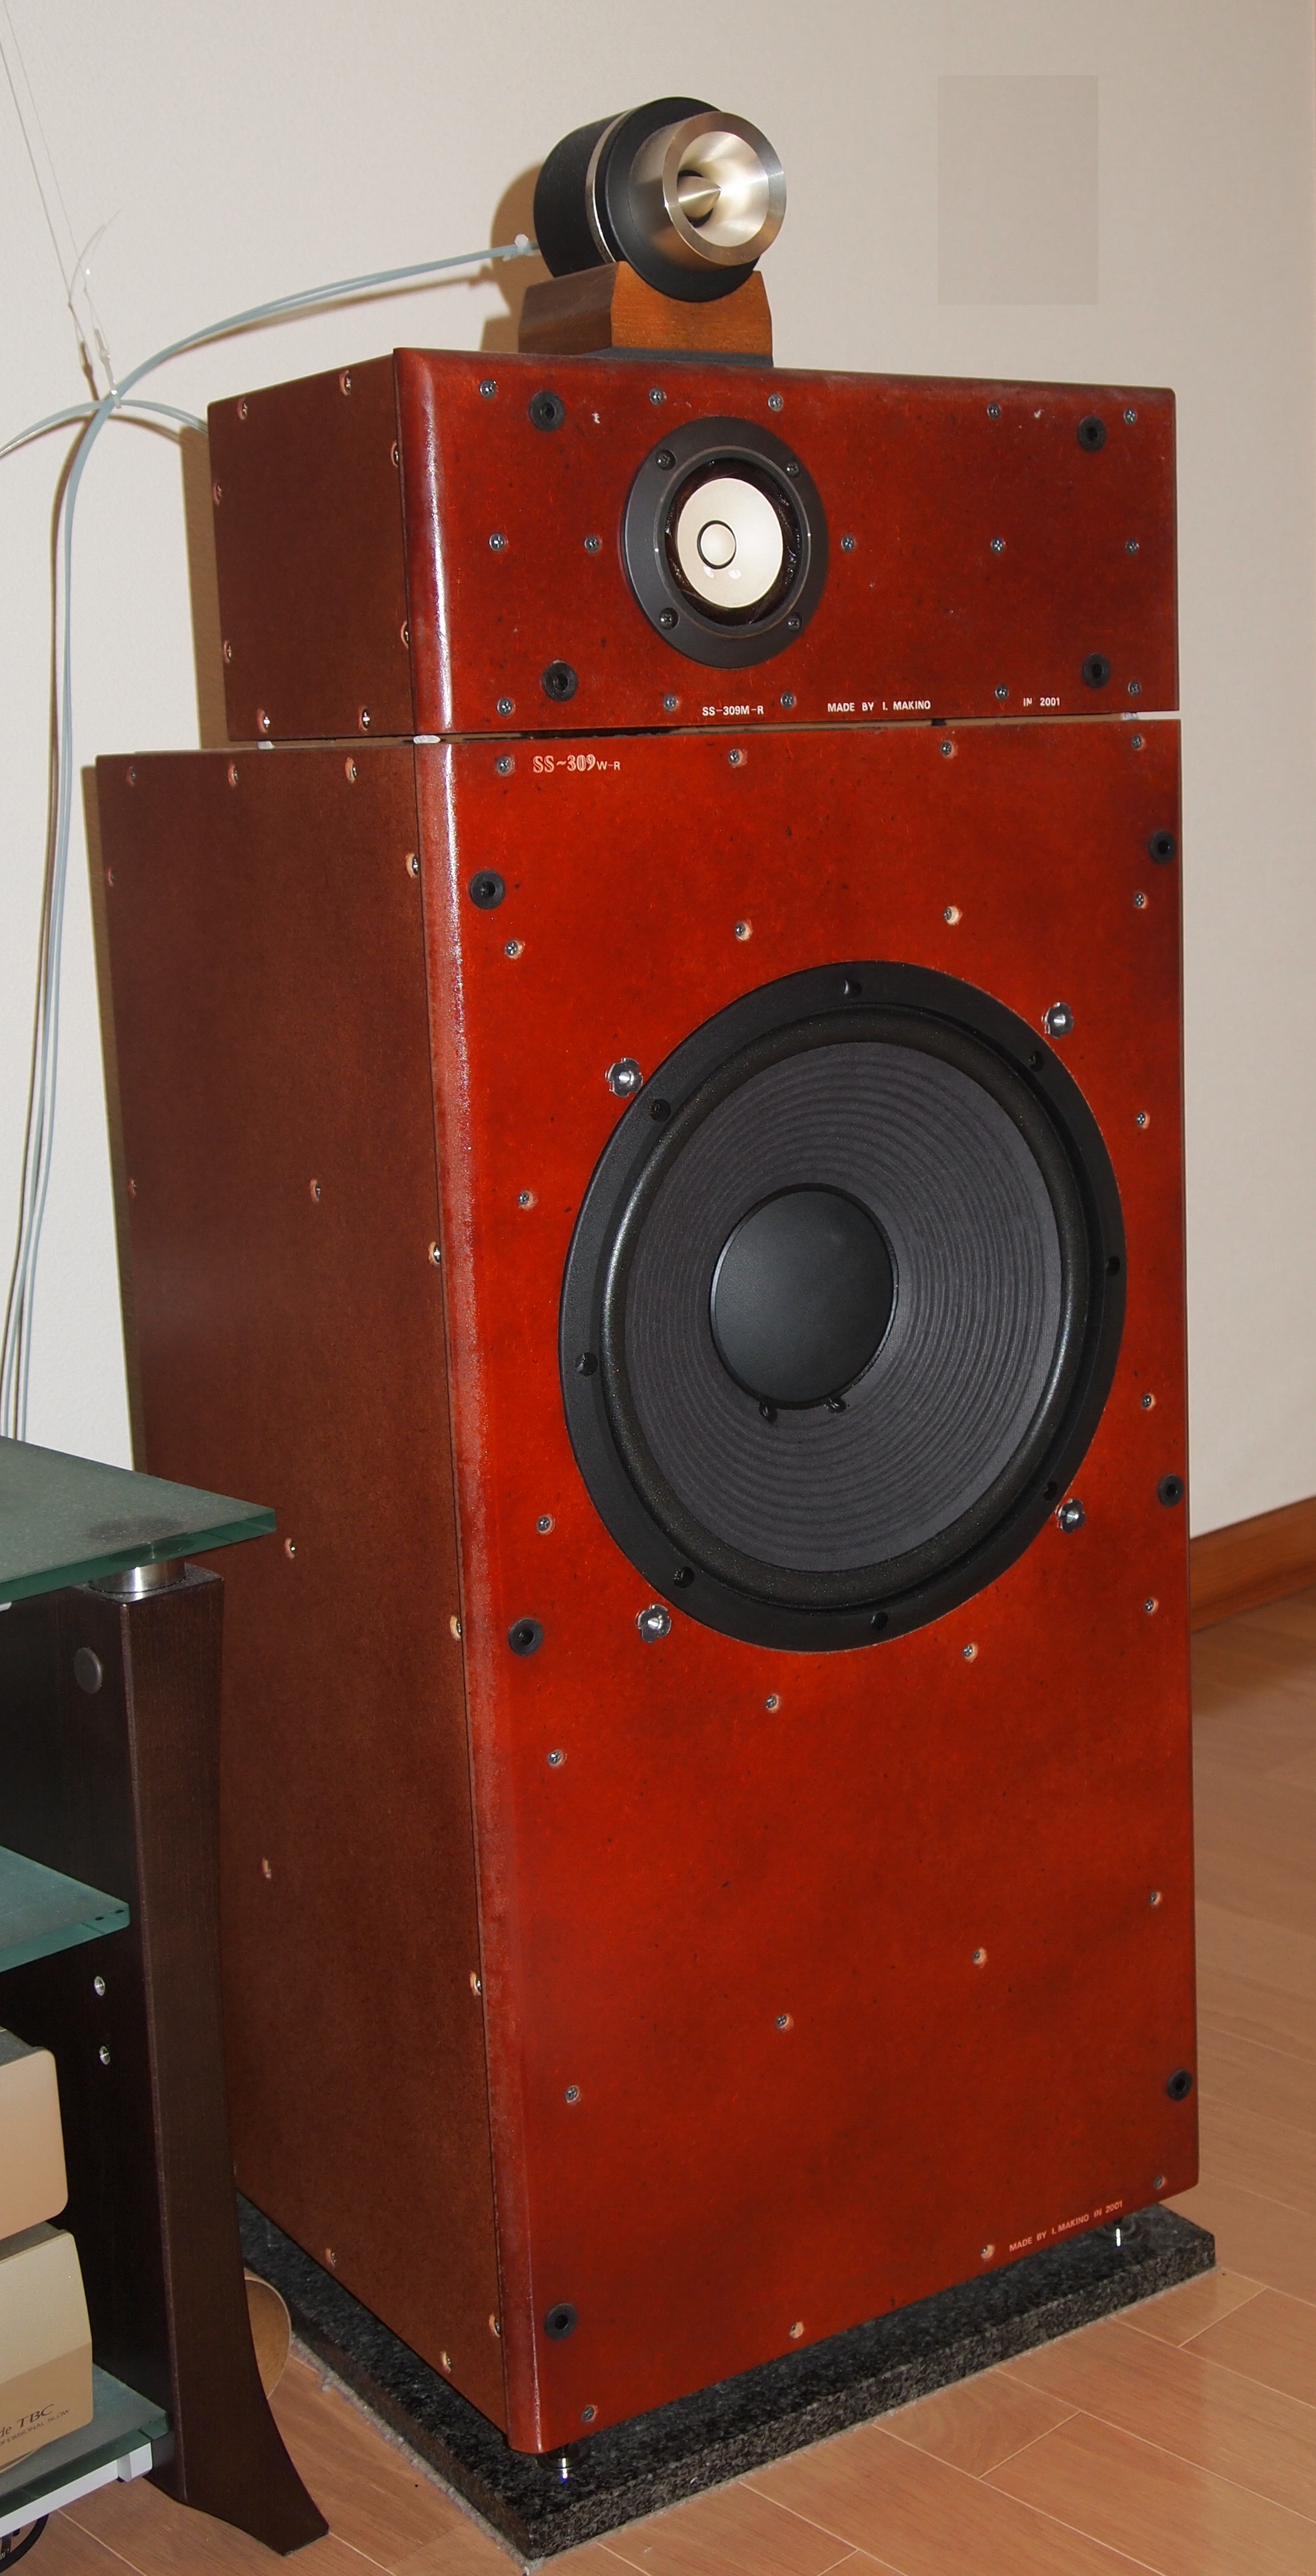
SS-309 Trad
2011/04/03 created
2023/10/16 updated
3-way Speaker Subsystem
Wide-range, Hi-Fi loudspeaker with horn squawker
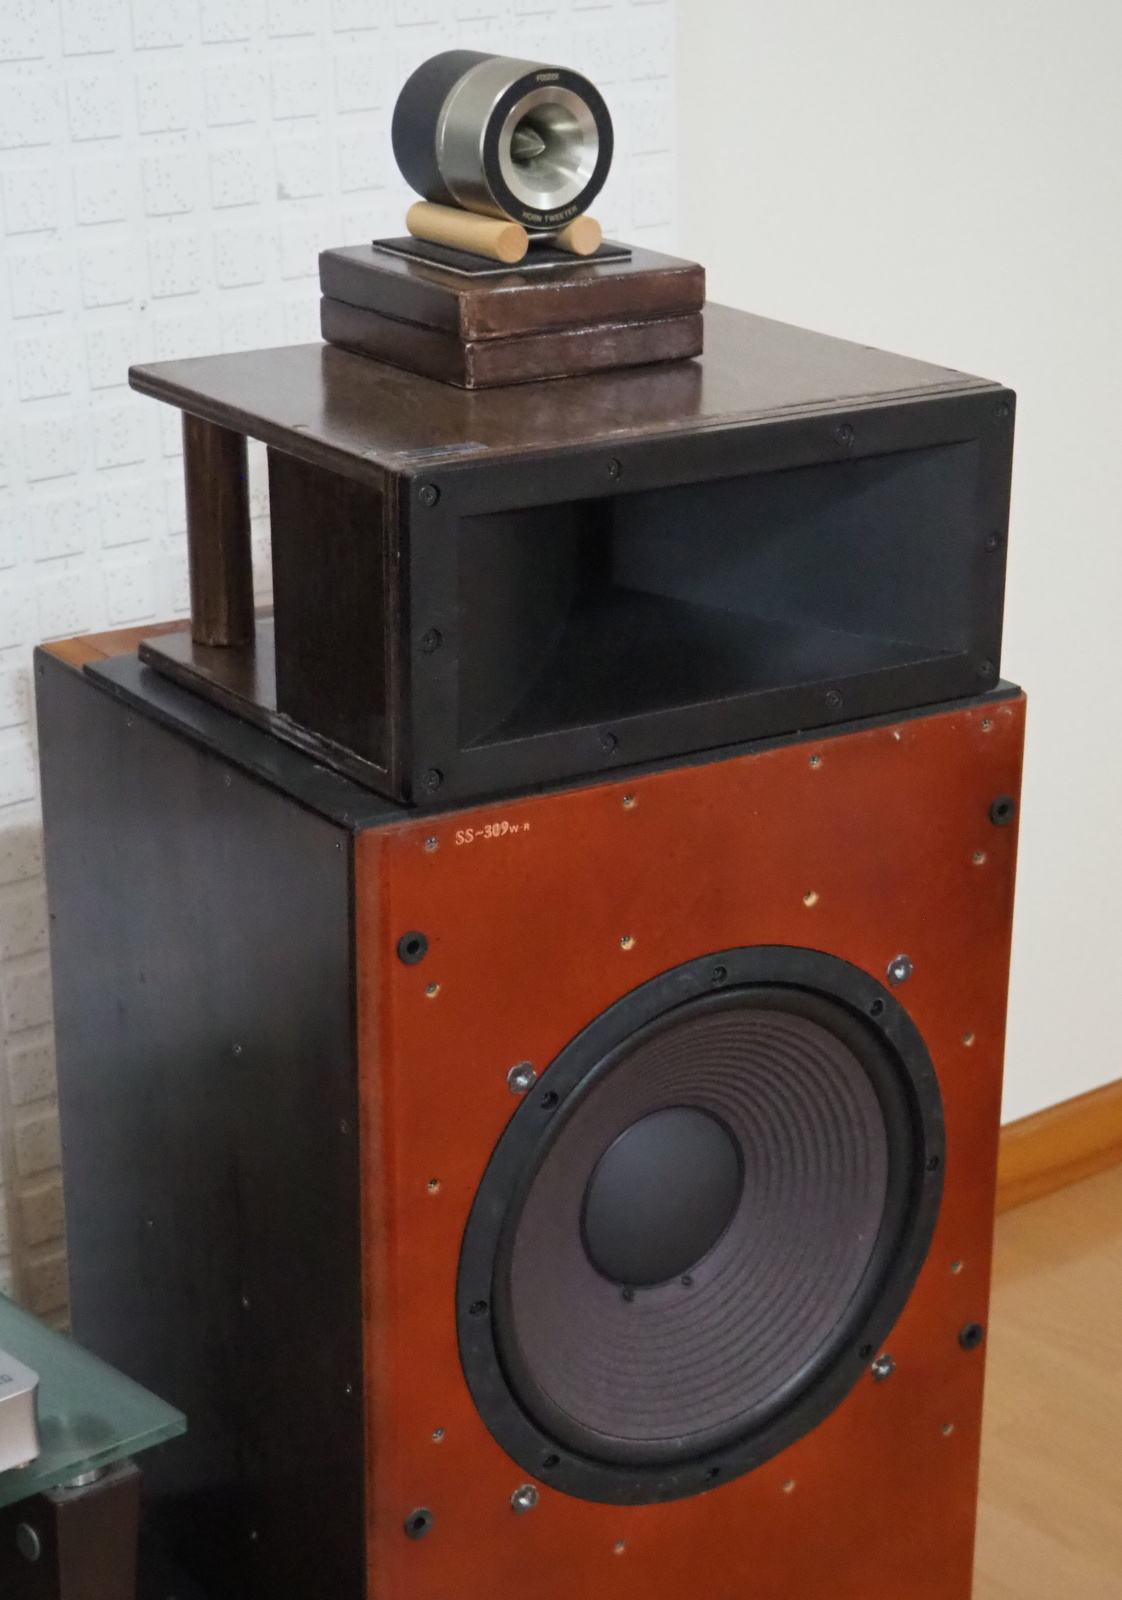
| Configuration | Loudspeaker unit: Fostex T925A (horn tweeter), ClassicPro ED3402 + H4401
(horn squawker), Fostex FW305 (woofer) Enclosure: Closed-box (duct stuffed with urethane mat) |
|---|---|
| Outline Specifications | Frequency response: 25Hz-40kHz. Sensitivity: 108dB/W (tweeter), 106dB/W (squawker), 95dB/W (woofer) (@1m). Dimensions: 402(W) x 752(H) x 352(D) mm (woofer module), Weight: ?kg |
| Cost | Total: approx. 190,000 JPY Tweeter: approx. 56,000 JPY, Squawker: approx. 10,000 JPY, Woofer: approx. 44,000 JPY, Materials of enclosure: approx. 80,000 JPY |
| History | Built in 2001. Revised in 2012 (Rev.A). Revised in 2023 (Rev.B). Being used in Gaudi II. |
The following contents were copied from the page of SS-309 on my previous homepage 'Tonochi's Audio Room'. The page describes my activities concerning this loudspeaker from 2001 through 2012.
Concept
This speaker subsystem was built as the core component in the audio system Gaudi. It is the embodiment of my ideal loudspeaker.
I began believing that a 3-way speaker that consisted of 30cm (12")
woofer and horn-loaded squawker and tweeter was the ideal loudspeaker to
me, just when I took up audio as my hobby at age 13 or 14 (1970-71). This
belief became firmer when I was 16 or 17, when I often stopped by audio
shops in Akihabara and showrooms of audio manufacturers.
In 1974, I designed an audio system that used such a 3-way loudspeaker
, and started building it. It was the beginning of the Gaudi Project. The
first loudspeaker that complies with the system design was SS-307. The
squawker of SS-307 wasn't a horn type since horn squawkers were so expensive.
A full-range LS unit was used instead.
SS-307 was not well-designed. I wasn't satisfied with it. I designed a
new loudspeaker, SS-309, based on SS-307, and built it in 2001.
I am satisfied with SS-309, so I've decided to keep using it in Gaudi II.
I used to call SS-309 'speaker system', but now I call it 'speaker subsystem', because it doesn't include a crossover network and is imperfect as a multi-way speaker.
Nickname and Theme Music
SS-309 hadn't had a nickname. But I wanted a good name for it when I was
planning another improvement (Rev.B) in order to fulfil the requirements
of Gaudi II.
The popularity of Horn-loaded speakers has been declining since 1980s and
they are rare now. I hit upon with the name 'Trad', which means tradition. The word 'tradition' implies that it's old but
still worthy, and traditional things are to be inherited to the next generation.
I'm not an antique lover, but I keep using an old things as long as they
are good in quality and performance.
I chose 'Play Fiddle Play' performed by Isao Suzuki for the theme music.
I wanted to choose a piece of music that features a low-pitched instrument,because
I stick to the large-sized woofer to reproduce deep bass without difficulty.
There are many bands whose leader is a bassist, but only few performances
led by the bass. It's because the bassist is supposed to be a sideman.
The only bassist I know who can play the bass as the lead instrument is
Isao Suzuki. Jaco Pastorius is this type too, but I think Isao Suzuki is
better in this respect.
[Play Fiddle Play (PlayFiddlePlay.mp3)]
Performed by Isao Suzuki Quartet & Kunihiko Sugano (pf) (LP, Isao Sauki
Quartet + 1, Blue City, Three Blind Mice TBM-24)
Hereinafter, the contents are the copy of the page on SS-309 in my previous
homepage 'Tonochi's Audio Room'. The page describes the SS-309 project
from the start of the design in the year 2001 to the replacement of the
tweeters in 2013.
In that period, I had some ideas without scientific grounds, and my way
of evaluation was not strict (because I didn't have know-how in measurement),
and I was strongly influenced by preoccupation (placebo effect) in evaluation
of sound quality. The contents are a bit embarrassing to me now, but I
copy them as they are.
After the copy, I'm going to write my activities concerning SS-309 after March, 2021.
Concept (old)
The concept of SS-309 is an improved version of SS-307. Of course, the
sound quality should be better than SS-307, though, the better appearance
was top priority of this project.
The enclosures of SS-307 were made of ordinary plywood, not painted, only
waxed, and looked shabby. Moreover, after many upgrades and customizes
its appearance had become almost like a junk. My wife often reproached
me, "why did you install those junks in the living room? Throw them
away as soon as possible." It was urgent to build new loudspeakers
that matches the interior of the living room.
I considered that the basic design of SS-307 was so good. As explained
in the page of Gaudi, a three-way speaker system based on a 12" woofer
is my ideal type. Though there are so many types of speakers in the world,
I single out the three-way speaker system as the best. My way of thinking
is simple; for deep bass, a large woofer is the most suitable; for super
high treble, a super tweeter is needed; for the middle range they both
can't cover, a midrange driver should be used.
Of course, I would select a full-range drive-unit if it could produce from
deep bass (25Hz) to super high treble (40kHz) without distortion. But,
in practice, there is no such a drive-unit, and I don't think it will become
a reality in the future, unless a great invention worth Novel Prize is
achieved.
The basic design of SS-309 is the same as that of SS-307: the three-way
multi-enclosure system. The woofer module is placed on the floor, the midrange
module is placed on the woofer module and the tweeter module is placed
on the midrange module. Some might call it only a piled-up speaker boxes
rather than a speaker system. It does not have a network in it, since it
is specialized for a tri-amplified system. The speaker cables are connected
directly to each drive-unit.
As for drive-units, I decided to reuse the ones used on SS-307, because
they were all excellent and I couldn't afford new and higher grade drive-units.
However, the midrange driver, which was originally a full-range driver,
was supposed to be replaced with a horn-loaded midrange in the future.
The midrange module can be switched to the full-range module in Gaudi (and
vice versa). This feature is effective until the midrange module is replaced
with the horn-loaded midrange.
Design
Major Parts/Materials
As mentioned above, the drive-units (loudspeaker units) used on SS-307 were reused.
* Woofer: Fostex FW305 (12" cone type)
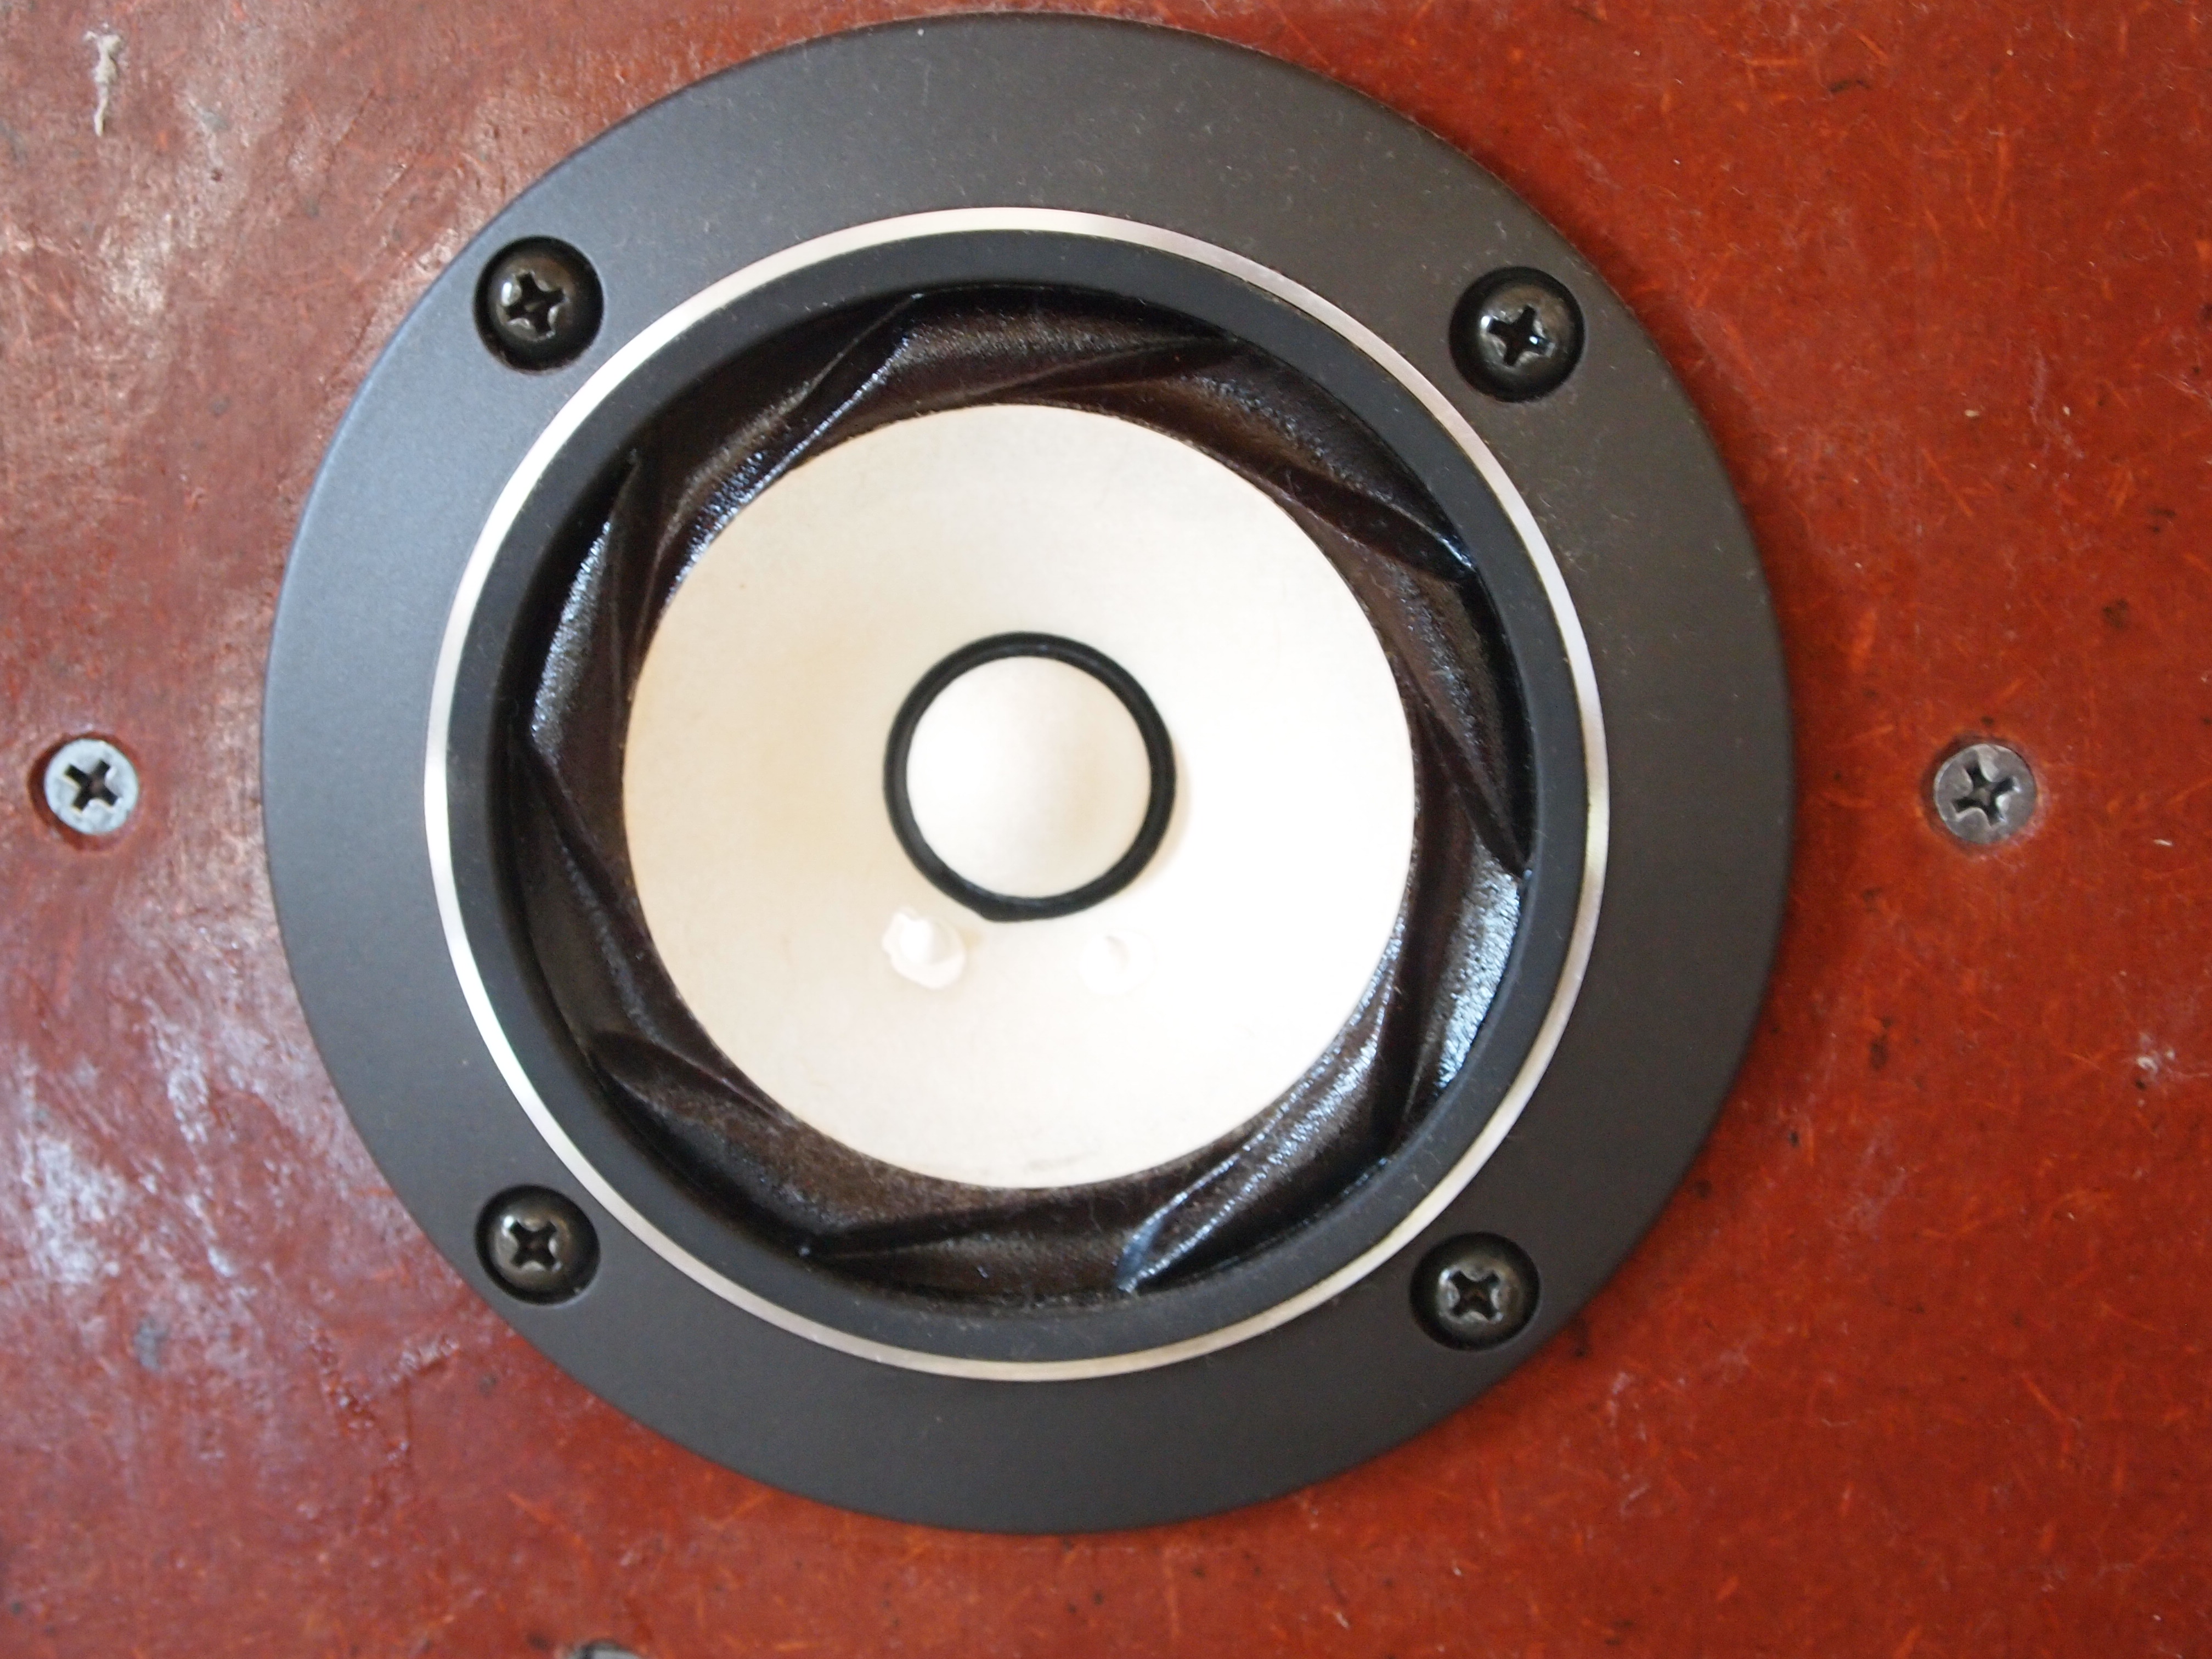
* Midrange: Fostex 6N-FE88ES (3.5" cone full-range)
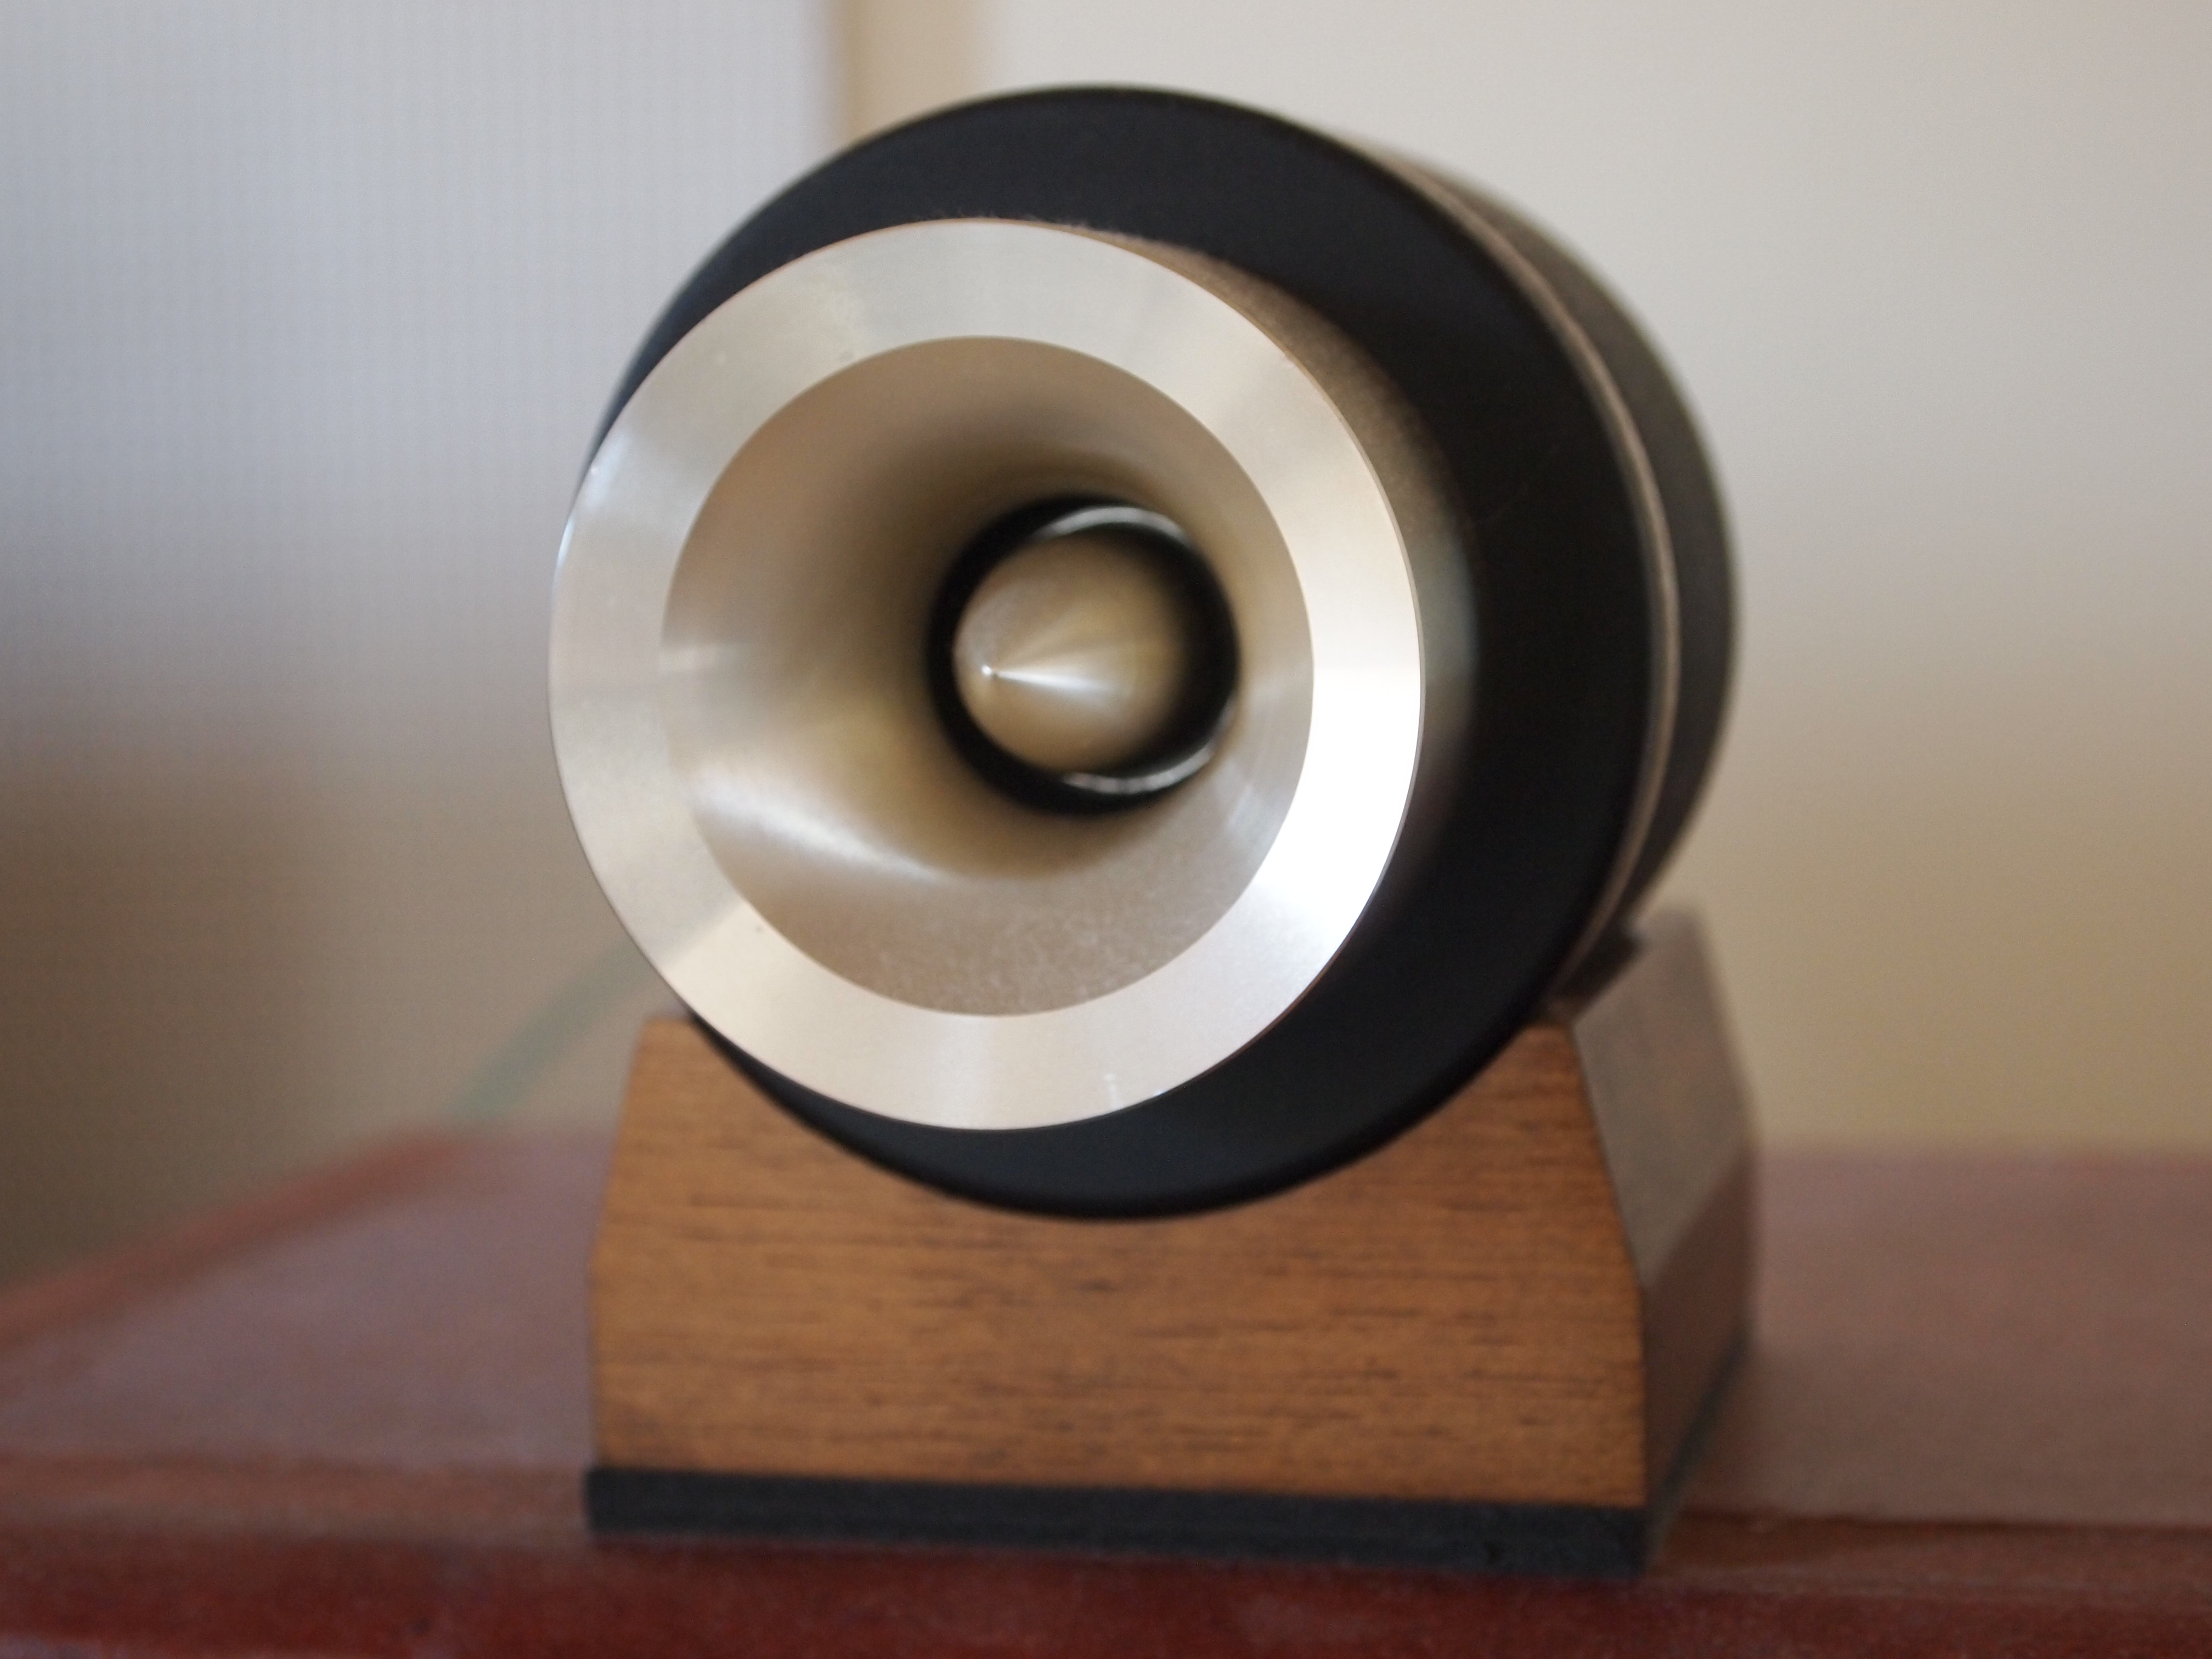
* Tweeter: Fostex T925 (Horn-loaded type)
I believe FW305 is an excellent woofer. It produces comfortably light and
sharp bass. In addition, it can also reproduce deep base like an earth
tremor and dynamic bass that has a strong impact and is felt like a wind
pressure. Its distortion is so low even in the low midrange that it can
be used with rather high fc (the crossover frequency). In my opinion, it
might be superior to W300A, a more expensive woofer produced by Fostex.
6N-FE88ES is one of the best full-range driver I've ever heard. Its sound
is so clear. Most full-range units are not satisfactory because of poor
quality and declining response in high treble region. But 6N-FE88ES produces
so good high treble that it could be used as a tweeter.
T925 is an old tweeter I've been using since 1982. I decided to reuse it
because I didn't detect aged deterioration.
As for the midrange module, as mentioned above, I already planned at that
time to replace it with a horn-loaded driver in the future. I considered
Fostex H400 (horn) and D1405 (driver) as the strongest candidates.
The reason why I singled out H400 was that it was one of few wood horns
available. A metal horn will resonate and produce noise, but a wood horn
not. It is rather hard to eliminate the noise. And, as for the appearance,
a wood horn is apparently better than a metal horn. I wanted a wood horn
at any cost. Only few manufacturers produce horn speakers, and only Fostex
produces wood horns. Among the Fostex wood horns, I chose the smallest
one, H400. Other wood horns were too large for SS-309.
H400 does not need a baffle. To install it, all you have to do is put it
on the woofer module. This easiness is another reason why I chose it.
As for the driver, I have more options, because any drivers with 1"
throat can be used, though, I chose a Fostex again. I'm a fan of Fostex,
because quality of its products is always good, production tolerance is
minimal and reliability is so high. I had two candidates: D1400 and D1405.
D1400 is the top-of-the-line driver using an alnico magnet. I was afraid
that the magnet was so strong that its leakage flux could affect the cartridge
of the record player. And it is often true that the next highest grade
product is more excellent than the highest. Consequently, I selected D1405,
the cheaper one.
I also reused the cables that were used on SS-307, but I don't remember clearly what they were. According to my vague memories, they were:
* For woofer: A coaxial cable manufactured by Mogami Wire & Cable Corp.
I've forgotten its model number. [2015/01/28 corrected] {NEGLEX 2497}
* For midrange: The most popular one among Hitachi Cable's speaker cables
at that time. The color of the sheathe was pink. I've forgotten its model
number.
* For tweeter: I can't remember it at all. But, maybe it was so expensive.
[2015/01/28 corrected] {It was TARA Labs Prism Clara. Not so expensive}
I chose MDF boards for the material of the enclosures. MDF absorbs vibration. It has been spread because of this property. For example, it is often used as floor material of condominiums. MDF boards under a wooden floor prevents noise like a footstep from being heard on the floor below. Though MDF is made from wooden fibers, it is not wood itself. It does not have grain, so there's no limitation for cutting plan. For wood-based material, MDF is not so hard that it is easy to cut and plane it. These properties are helpful for me, who is so clumsy. I decided to create the enclosures with MDF only and not use sliced veneer for finish.
Design of the woofer box
I chose a vented-box system. Though I should have chosen a closed-box system if I had followed my motto, "The best is simple," I didn't because it's difficult to adjust the base response of the closed-box speaker system after it is built. When I designed SS-309, I lived in a condo. I already had a plan to move to a single-family house at that time. So, no choice but I selected the vented-box, which is easy to adjust its bass response.
The targeted lower -3dB cutoff frequency was 30Hz. I decided not to boost bass sound in particular on the assumption that I play music at pretty high volume. Because the preamplifier of Gaudi does not have the loudness and tone controls, it is necessary to turn up the volume high enough to make the frequency response flat.
I determined the dimension of the box by reference to the recommended dimension in Fostex's application note. Exceptionally, I fixed the external width of the box to 402mm so as to fit it to the size of Fostex H400, since I was planning to obtain H400 in the future. The thickness of the walls was 21mm. Not too thick nor too thin. The internal dimension turned to be 360(W) x 710(H) x 310(D)mm, and the internal volume 80l. Though it was slightly larger than the recommended box of 75l, the practical volume is almost same due to volume of bracing.
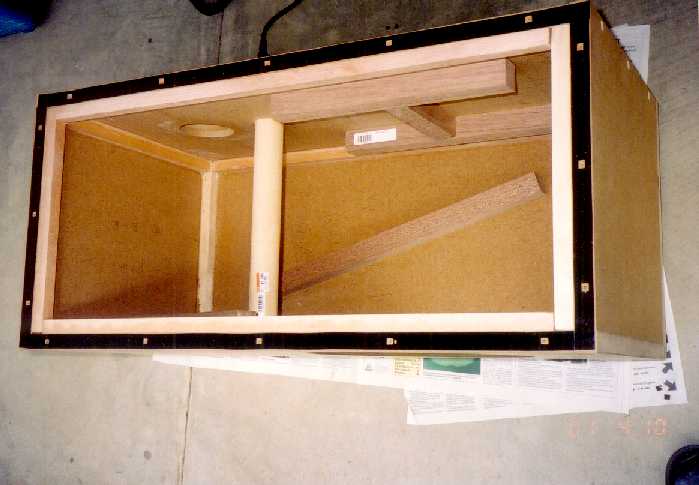
The joints are not processed in particular. The boards are simply glued
by wood bond. Though wood screws are also used, they are only a supplementary
means. The purpose of them is to keep holding the joints till the bond
dries.
One of the side boards is not glued, and fixed with wood screws only. For
most speaker enclosures, the backboard is detachable, though, the side
board is removed when SS-309 is maintained.
The bass-reflex port (vent) is installed in the rear wall (backboard),
in order to prevent the radiation from the back of the diaphragm from interfering
the sound from the front as much as possible.
A variable-length tube, Tritec BR-70, is employed as the part of the port
assy. The port assy is composed of a small wooden board and the BR-70 fixed
in it. The port assy is screwed to the rear wall. It is easy to adjust
the length of the port, as the port assy is detachable.
[Dimensional drawing of the woofer box (SS-309WooferBox.pdf)]
I utilized an Excel spreadsheet for the design of the port. I had made the spreadsheet by quoting the procedure and the formulas
for designing a port from a book I regarded as a guidebook for building
loudspeakers. It took me only five minutes to design it.
I began designing the port with the target fb (the Helmholtz Frequency) of 30Hz, but it turned out to be 28Hz after
calculation. The length of the port was calculated to be 130mm (the diameter
is 68mm), which was the same as the shortest length of BR-70. BR-70 is
composed of two tubes: the inner and the outer tubes. The outer tube slides
on the inner tube to adjust the length of the port. I discarded the outer
tube and used the inner tube only.
[Spreadsheet for designing the port of the woofer box (WooferBoxPortDesign.pdf)]
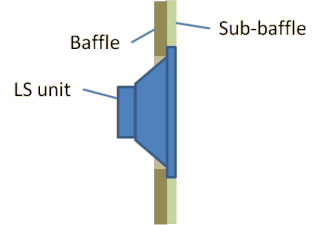
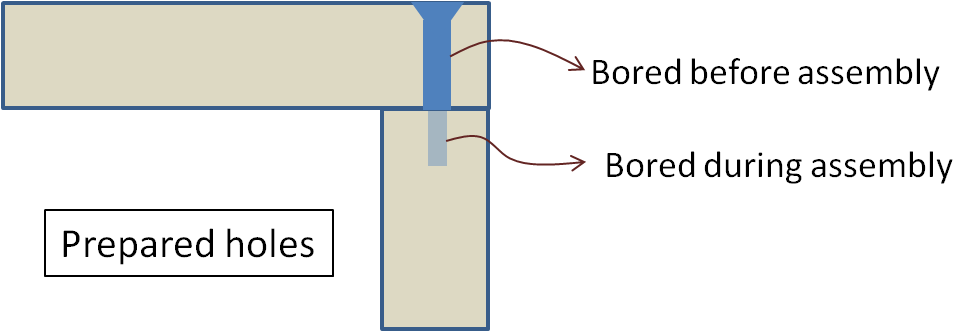
There are chiefly three methods to mount a drive-unit in a baffle as shown in the figure below.
(a) is the simplest method. The drive-unit is mounted on the baffle from
the front. So its advantage is that the drive-unit can be replaced without
disassembling the enclosure. Its shortcoming is that the frame of the drive-unit
protrudes. Unevenness of the baffle surface causes acoustical distortion.
The frame and the baffle should be flush as much as possible.
(b) is a method to mount the drive-unit from behind. This method also has
disadvantage about acoustical distortion. If the baffle is thick, it forms
a circular cylinder attached to the drive-unit. The cylinder adversely
affects the frequency response by making unwanted peaks and dips. This
is called cavity effect.
(c) is a method to reduce the protrusion of the frame by making counter
boring on the edge of the cutout.

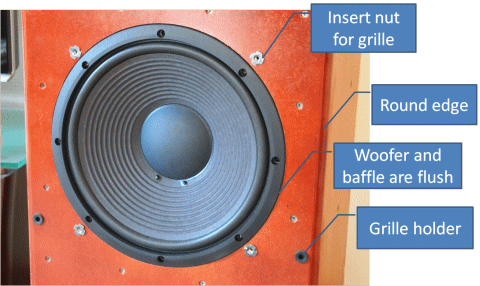
The method (c) seems to be the best, but I am so clumsy that counter boring is too difficult for me. Then, I came up with a good idea. In addition to the method (a), a sub-baffle is added to make the frame of the unit and the baffle surface flush. The thickness of the sub-baffle has to be the same as the protrusion of the frame. It was 15mm for FW305. The sub-baffle cutout for the unit is slightly larger in diameter than the frame.
This method has a couple of more advantages rather than making the baffle
surface flush. The thickness of the baffle becomes as thick as 36mm in
total, so the mass of the baffle increases too. Holding the drive-unit
at a point firmly is another important function of the enclosure other
than keeping the drive-unit's backwave in the box. The heavier baffle has
the greater inertia. Though it is not great enough to be called the mechanical
earth, it surely keeps the drive-unit's frame from vibrating. And, the
edge of the cutout is stronger than the counter-bored edge.
The sub-baffle is screwed on the baffle. It's not bonded to make it removable.
In case of a fault of the drive-unit, there is a possibility that the same
model is not available at that time. The removable sub-baffle can be replaced
with one that fits another drive-unit.
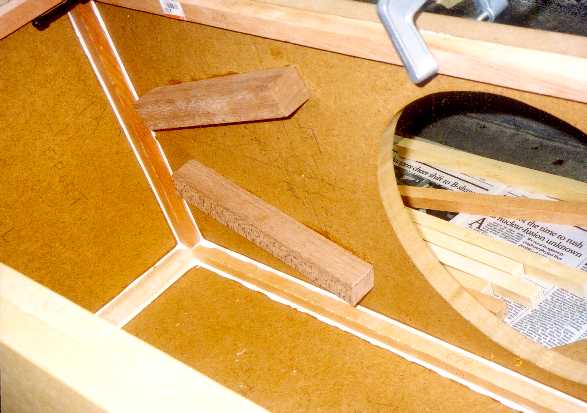
Three kinds of materials are used for bracing of the enclosure. 18mm square spruce pine bars are used as bracing in each corner between all internal walls so that it forms a rectangular frame inside the box. A 40mm diameter cypress bar is used to connect the baffle and the backboard. The walls except the top and the bottom walls are reinforced with 30mm square lauan bars. The dimension and mounting position of each bracing part is shown in the dimensional drawing of the woofer box in blue ink.
I purchased two pieces of 21x1820x910mm MDF and one pieces of 15x1820x910mm MDF. The parts of both the woofer and midrange boxes are cut out of those three pieces of MDF. In the cutting plan, each part is marked with a symbol (one alphabet) shown in the table bellow. There are different sizes of parts with the same symbol; the larger one is for the woofer box and the smaller one is for midrange box.
| F | Baffle |
| S | Side board |
| K | Backboard |
| T | Top board |
| B | Bottom board |
[Cuttingplan (CuttingPlan.pdf)]

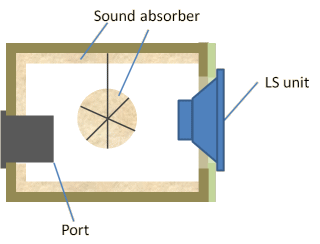
I selected to Micron Wool manufactured by Nihon Muki as filling. Because its fiber is more minute than that of glass wool by far, its degree of sound absorption is so high that even a small amount of Micron Wool works effectively.
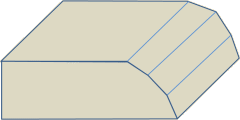
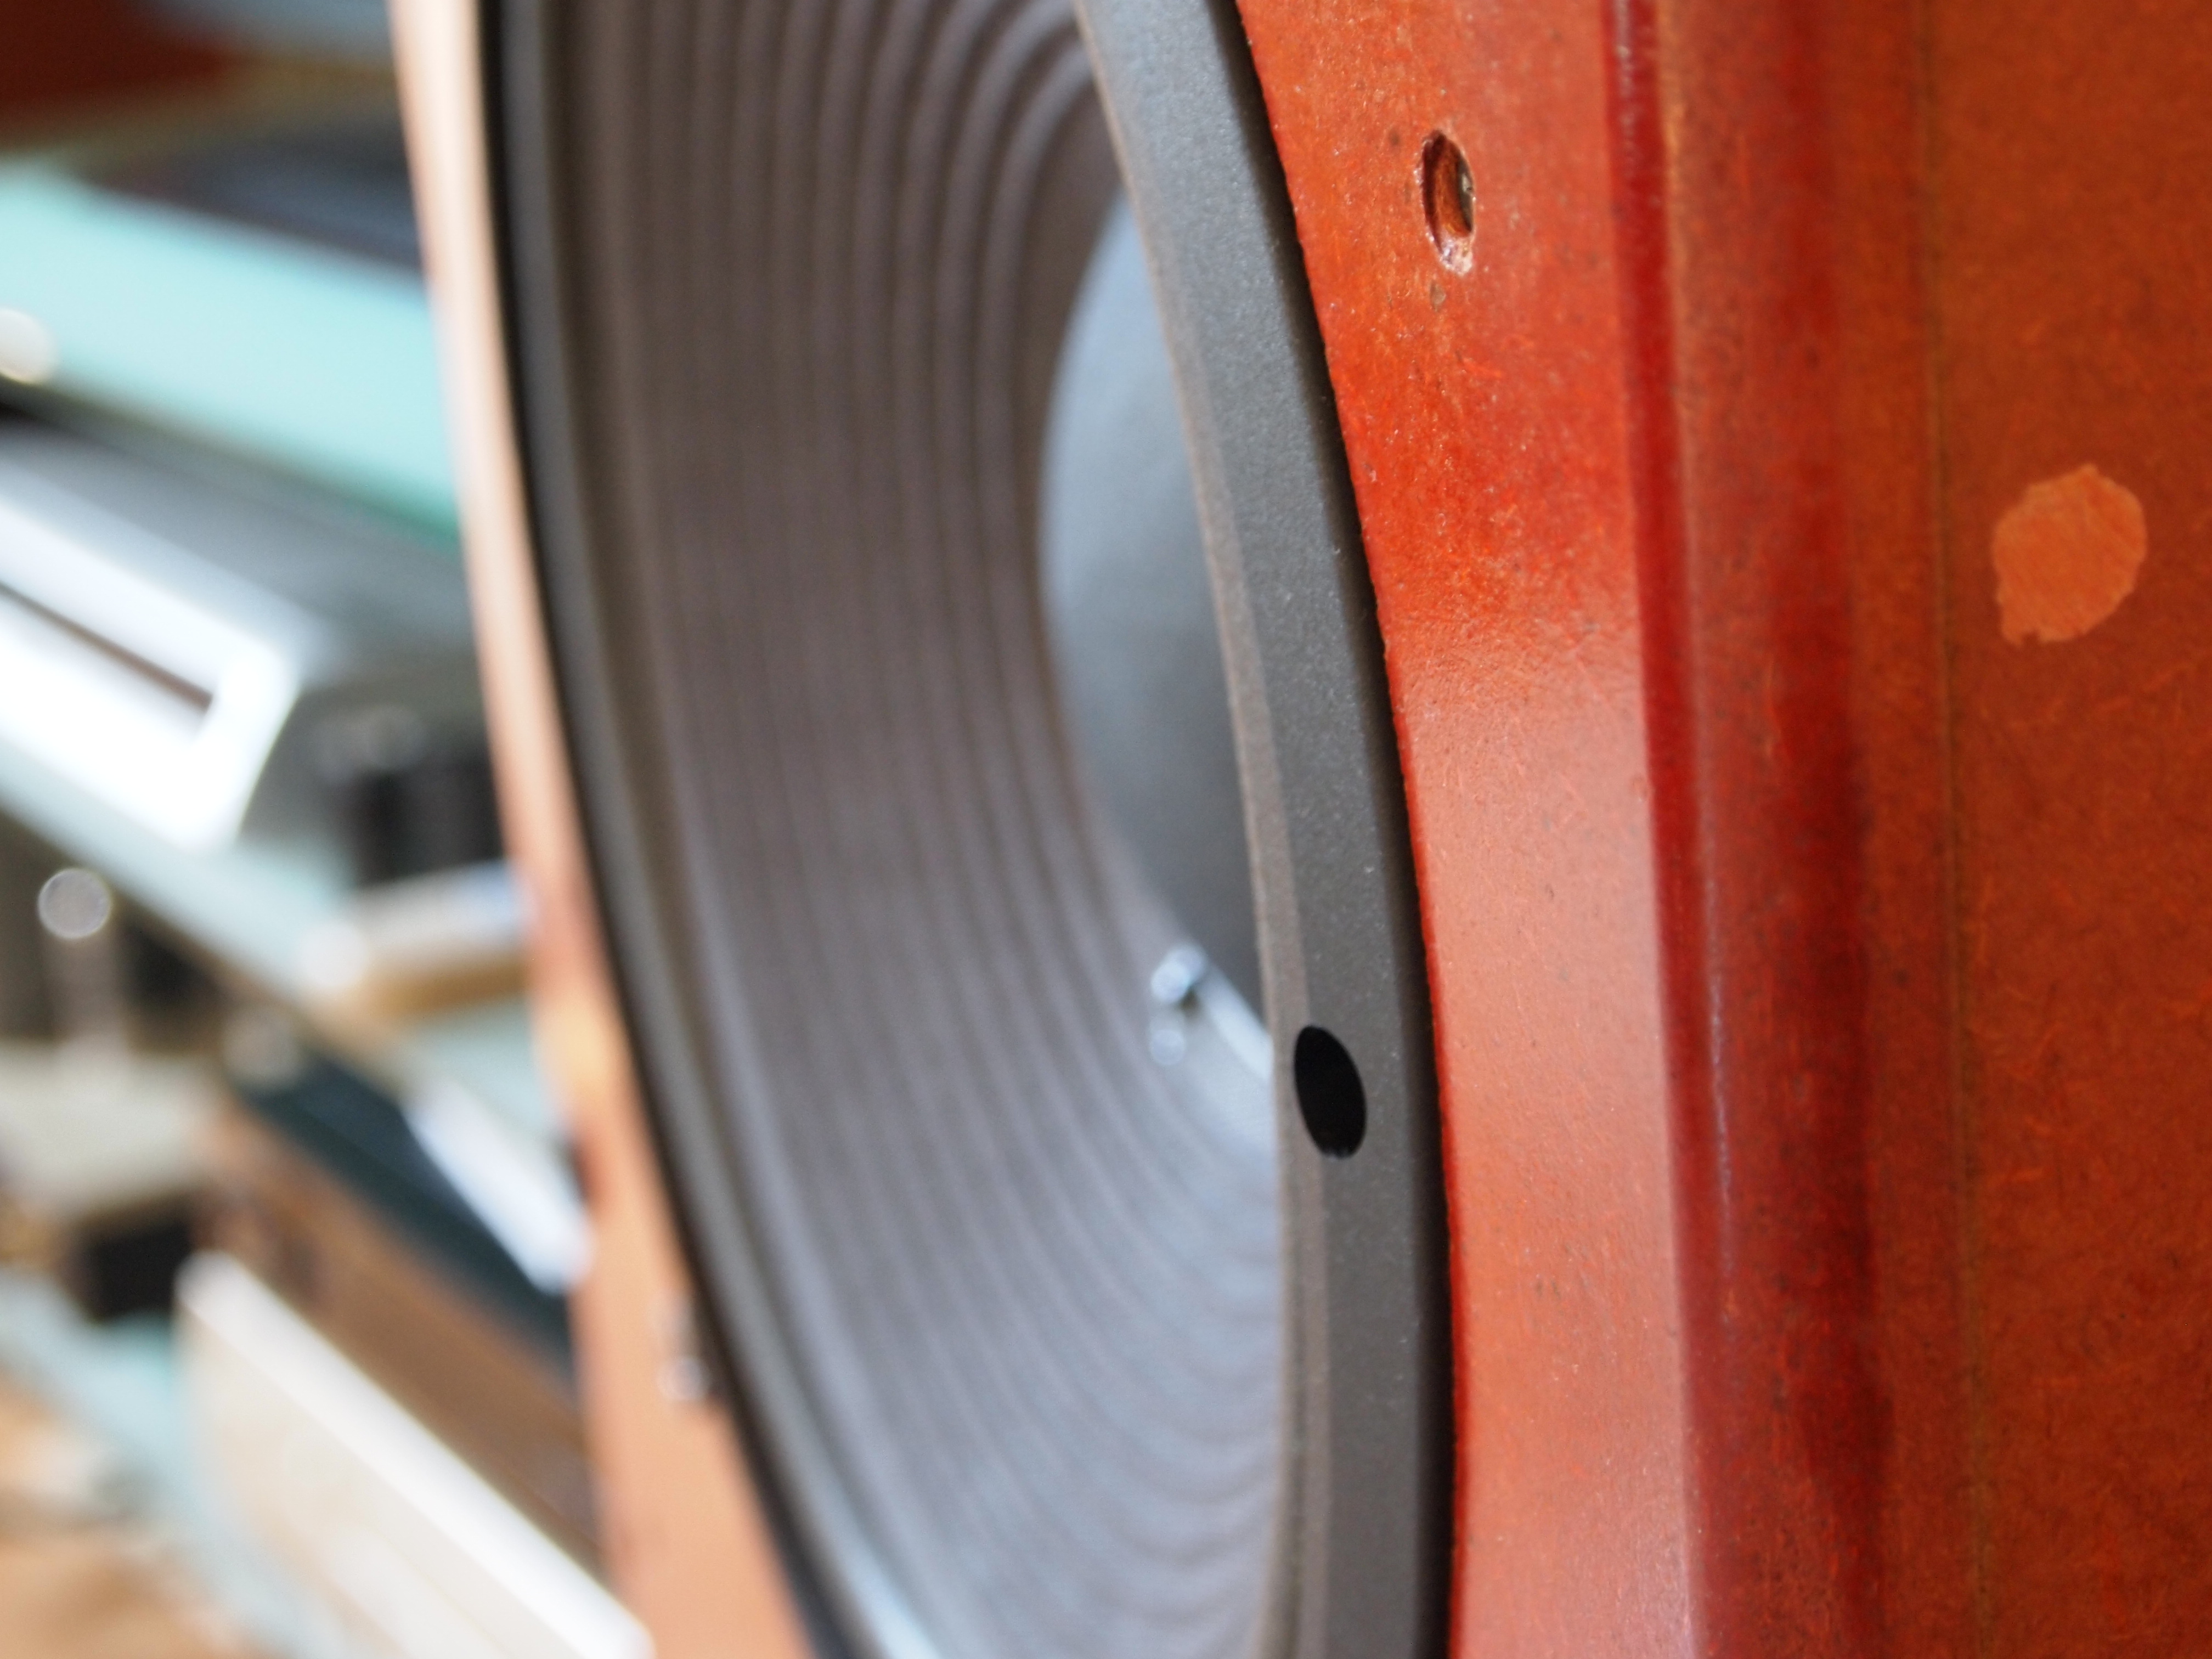
It's generally believed that an acoustical distortion occurs due to diffraction phenomena if the edges of the baffle are not rounded. In practice, the distortion
is so small that it doesn't affect sound quality. Actually, there are many
good loudspeakers with the baffle not rounded.
However, I decided to round the edges of the baffle (sub-baffle, more precisely),
because the rounded edge has decorative value too.
For this purpose, I was going to make a special tool. I described it later
(see "Building").
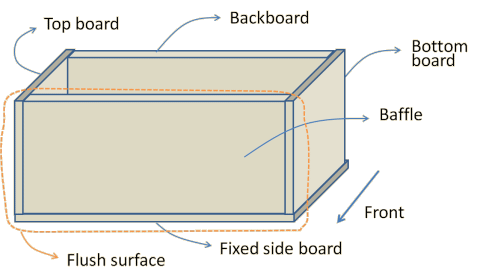
Dimension errors of the parts may cause unwanted gaps and/or protrusion when the box is built. I came
up with an idea to bring all the errors to the back wall side.
(1) Put one side board (hereinafter referred to as the fixed side board)
on a level workbench. (2) Assemble the parts except the other side board
(hereinafter referred to as the detachable side board) on it using wood
bond. (3) Slide each part to make the baffle side flush. Since the parts
are not mortised, they can be slid a bit while the bond is wet. (4) Make
flush the top board side. (5) Screw all the parts with each other.
The kerfs that joint the detachable side board are made flush with a sander,
and rubber sheets are affixed to retain the box air-tight.
The sub-baffle is screwed on the baffle after the box is completed.
I wouldn't like to do something special to finish the enclosure. Anyway, I don't have a proper place to paint it, so I couldn't
do anything special. However, the most important goal of SS-309 was excellent
appearance, so I considered what I could do for it.
When I looked at a real MDF, I knew the surface of MDF is so smooth that
it could be painted after a little sanding. I chose spray colored varnish,
because it seemed to be the easiest mean. The color I chose was maple.
After the varnish was sprayed and dried, instant lettering was affixed
on it, and finally clear varnish was sprayed.
The grille are indispensable item too. Though I don't care if the drive-units are
showing (rather, I like it), my wife hates that not only the drive-units
but also any other things mechanical are showing.
The frame is made of 18mm square spruce bar, which is also used for bracing
of the enclosures. The net is stapled on the frame, after it was cut to
the appropriate size. In order to make the grille detachable, commercially
available grille holders are used. The male parts are screwed on the grilles,
and the female parts are hammered in the baffles.
For your information, I bought all those accessary parts: the net, the
grille holders, the Micron Wool, and Tritec BR-70, at Kimura Musen located
on the fourth floor of the former Radio Kaikan at Akihabara.
[Drawing of the woofer grille (WooferGrille.pdf)]
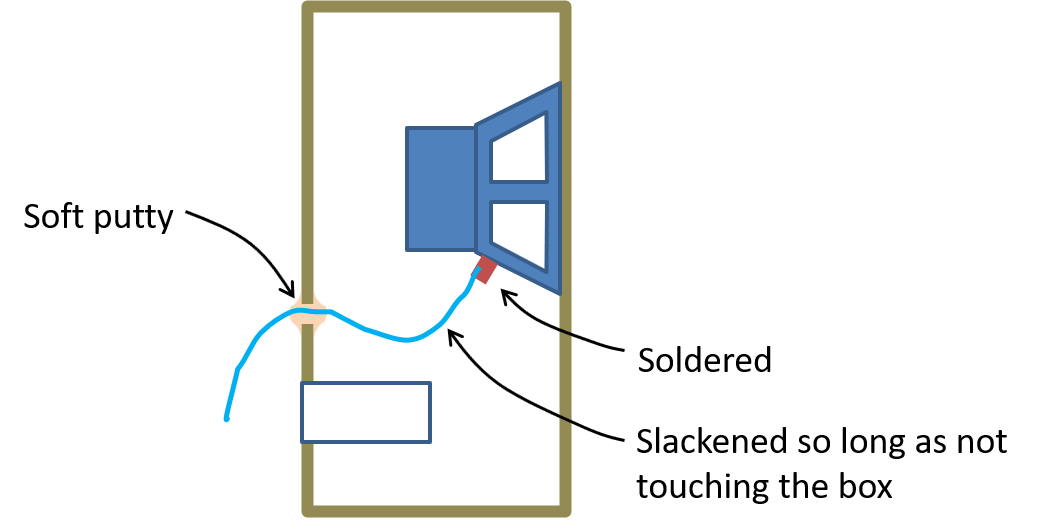
The cable is soldered directly to the driver's terminal, and drawn out of the enclosure
without any terminal. Although it needs a lot of labor to replace the cable
in the future, I chose this direct cabling method, because I learned through
long experience that a contact in a low impedance path through which a
large current flows will impair tonal quality.
Design of the midrange box
The midrange box is also a vented-box system so that it can be used as the full-range module. The port (vent) is installed
in the back wall like the woofer box.
6N-FE88ES is specially designed for a backload horn system, and the maker's
recommended enclosures are backload horn systems. Because its vibration
system is overdamped, it was anticipated that the volume of bass sounds
would not be enough. But, I didn't consider particular countermeasures
like raising Q to make a peak in the low frequency band. And I aimed to
make the frequency response as flat as possible at frequencies higher than
the lower cutoff frequency, in return for setting it relatively high. The
response at the frequencies lower than the cutoff frequency would be sharply
cut off like a typical vented-box speaker system.
The f0 of 6N-FE88ES is 110Hz, so I set the target fb to 100Hz, and designed the
midrange box by the same way as the woofer box.
[Spreadsheet for designing the midrange box (MidrangeBoxPortDesign.pdf)]
As the result of the calculation, the box volume was determined 6.9l. As for the dimension, I made the width the top priority. The width has to be the same as the woofer box, 360mm internally and 402mm externally, so that the midrange box can be integrated with the woofer box. The next priority was given to the height. The height needs to be low so that the tweeter is not too apart from the midrange. I decided the internal height is 120mm and the external one is 150mm. Automatically, the depth was calculated to be 160mm internally, and 190mm externally.
The parts of midrange boxes are cut out of the same pieces of MDF for the woofer boxes. Only the side boards are 21mm thick. The other parts are 15mm thick, the same thickness as the sub-baffles of the woofer boxes. Fostex P49 is used as the port (vent) tube after it is cut to the designed length.
The construction is the same as the woofer box. The widths of the baffle, backboard, and top and bottom boards are all 360mm that equals to the internal width. In a way, those parts look sandwiched by the side boards. The way of assembling is the same as the woofer box too. The fixed side board is put on a workbench, then the baffle, backboard, and top and bottom boards are assembled using bond on the fixed side board. After the adjustment, all the part are fixed with screws.
[Dimensional drawing of the midrange box (SS-309MidrangeBox.pdf)]
The midrange box is so small that I didn't consider installing bracing.
The baffle is two-ply like the woofer box. This is not aimed to make the frame of
the drive-unit and baffle surface flush, but to double the mass of the
baffle. The frame of 6N-FE88ES is designed so that it is simply mounted
on the baffle from the front.
Like the woofer box, the sub-baffle is screwed on the baffle, not glued.
The filling is Micron Wool, the same as the woofer box.
Many uneven wood bars are affixed to the inside of the top and bottom walls, in order for prevention of standing waves. The uneven surface diffuses acoustic waves and results in preventing standing waves from occurring. Later, I realized this method is not sufficient and an additional countermeasure is needed.
For prevention of diffraction phenomena, the edges of sub-baffle are rounded like the woofer box.
The box is assembled so that dimension errors of the parts do not appear in the front and the top of the box, just like the woofer
box.
Due to the cutting plan and the order of cutting, the baffle, backboard,
and top and bottom boards, which are sandwiched by the side boards, could
be cut out in the exactly the same width. Consequently, the kerfs that
joint the detachable side board should be flush.
To make sure, I show the cutting plan once again (the same as one in 'Design
of the woofer box').
[Cutting Plan (CuttingPlan.pdf)]
The design of the grille of the midrange box is common to that of the woofer box. The basic construction is the same, though the size is smaller.
[Drawing of the midrange grille (MidrangeGrille.pdf)]
The cable is soldered directly to the terminal of the driver and drawn out of the
box without any terminal just like the woofer box.
Building
Woodwork
I used to cut a wooden board with a saw or a power saw I rented. But, this
time, I decided to have the MDF boards cut by a professional for the first
time, because I didn't have enough space for woodwork in my condo and the
number of parts was too large for me to cut out with hand tools.
It is commonly believed that the dimension error of the parts must be 0.1mm
or less to make an exactly rectangular and air-tight box. I thought I couldn't
afford if I ordered the cut to a workshop that guarantees that precision,
so I ordered it to a do-it-yourself store in my neighborhood (the store
is closed now), where I bought the pieces of MDF.
A craftsman of the store said the tolerance was 1mm. I asked him, "Please
make the precision as high as possible, because these materials are going
to be the parts of speaker enclosures." He had craftsmanship and accepted
my request. In spite of my little worry, the dimension of the parts cut
out by him were so precise. I was relieved.
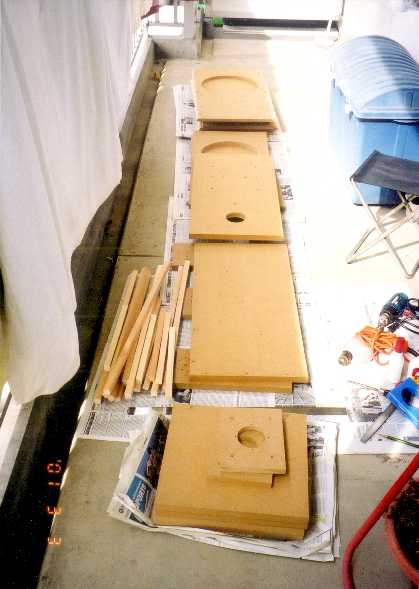
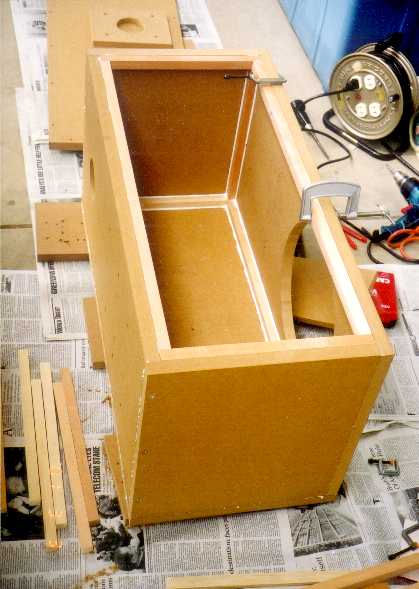
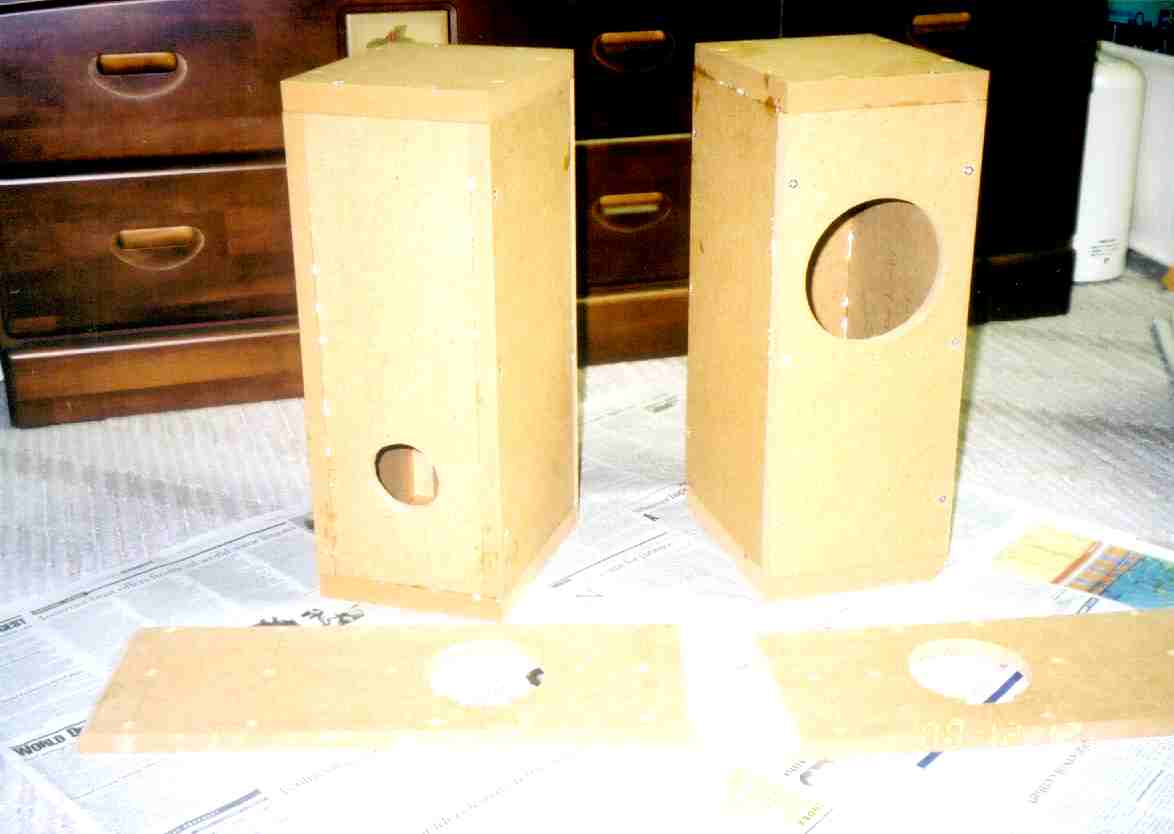
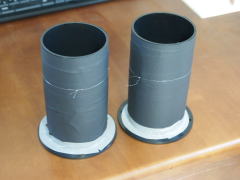
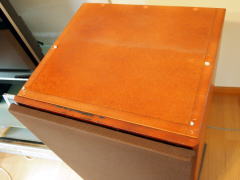
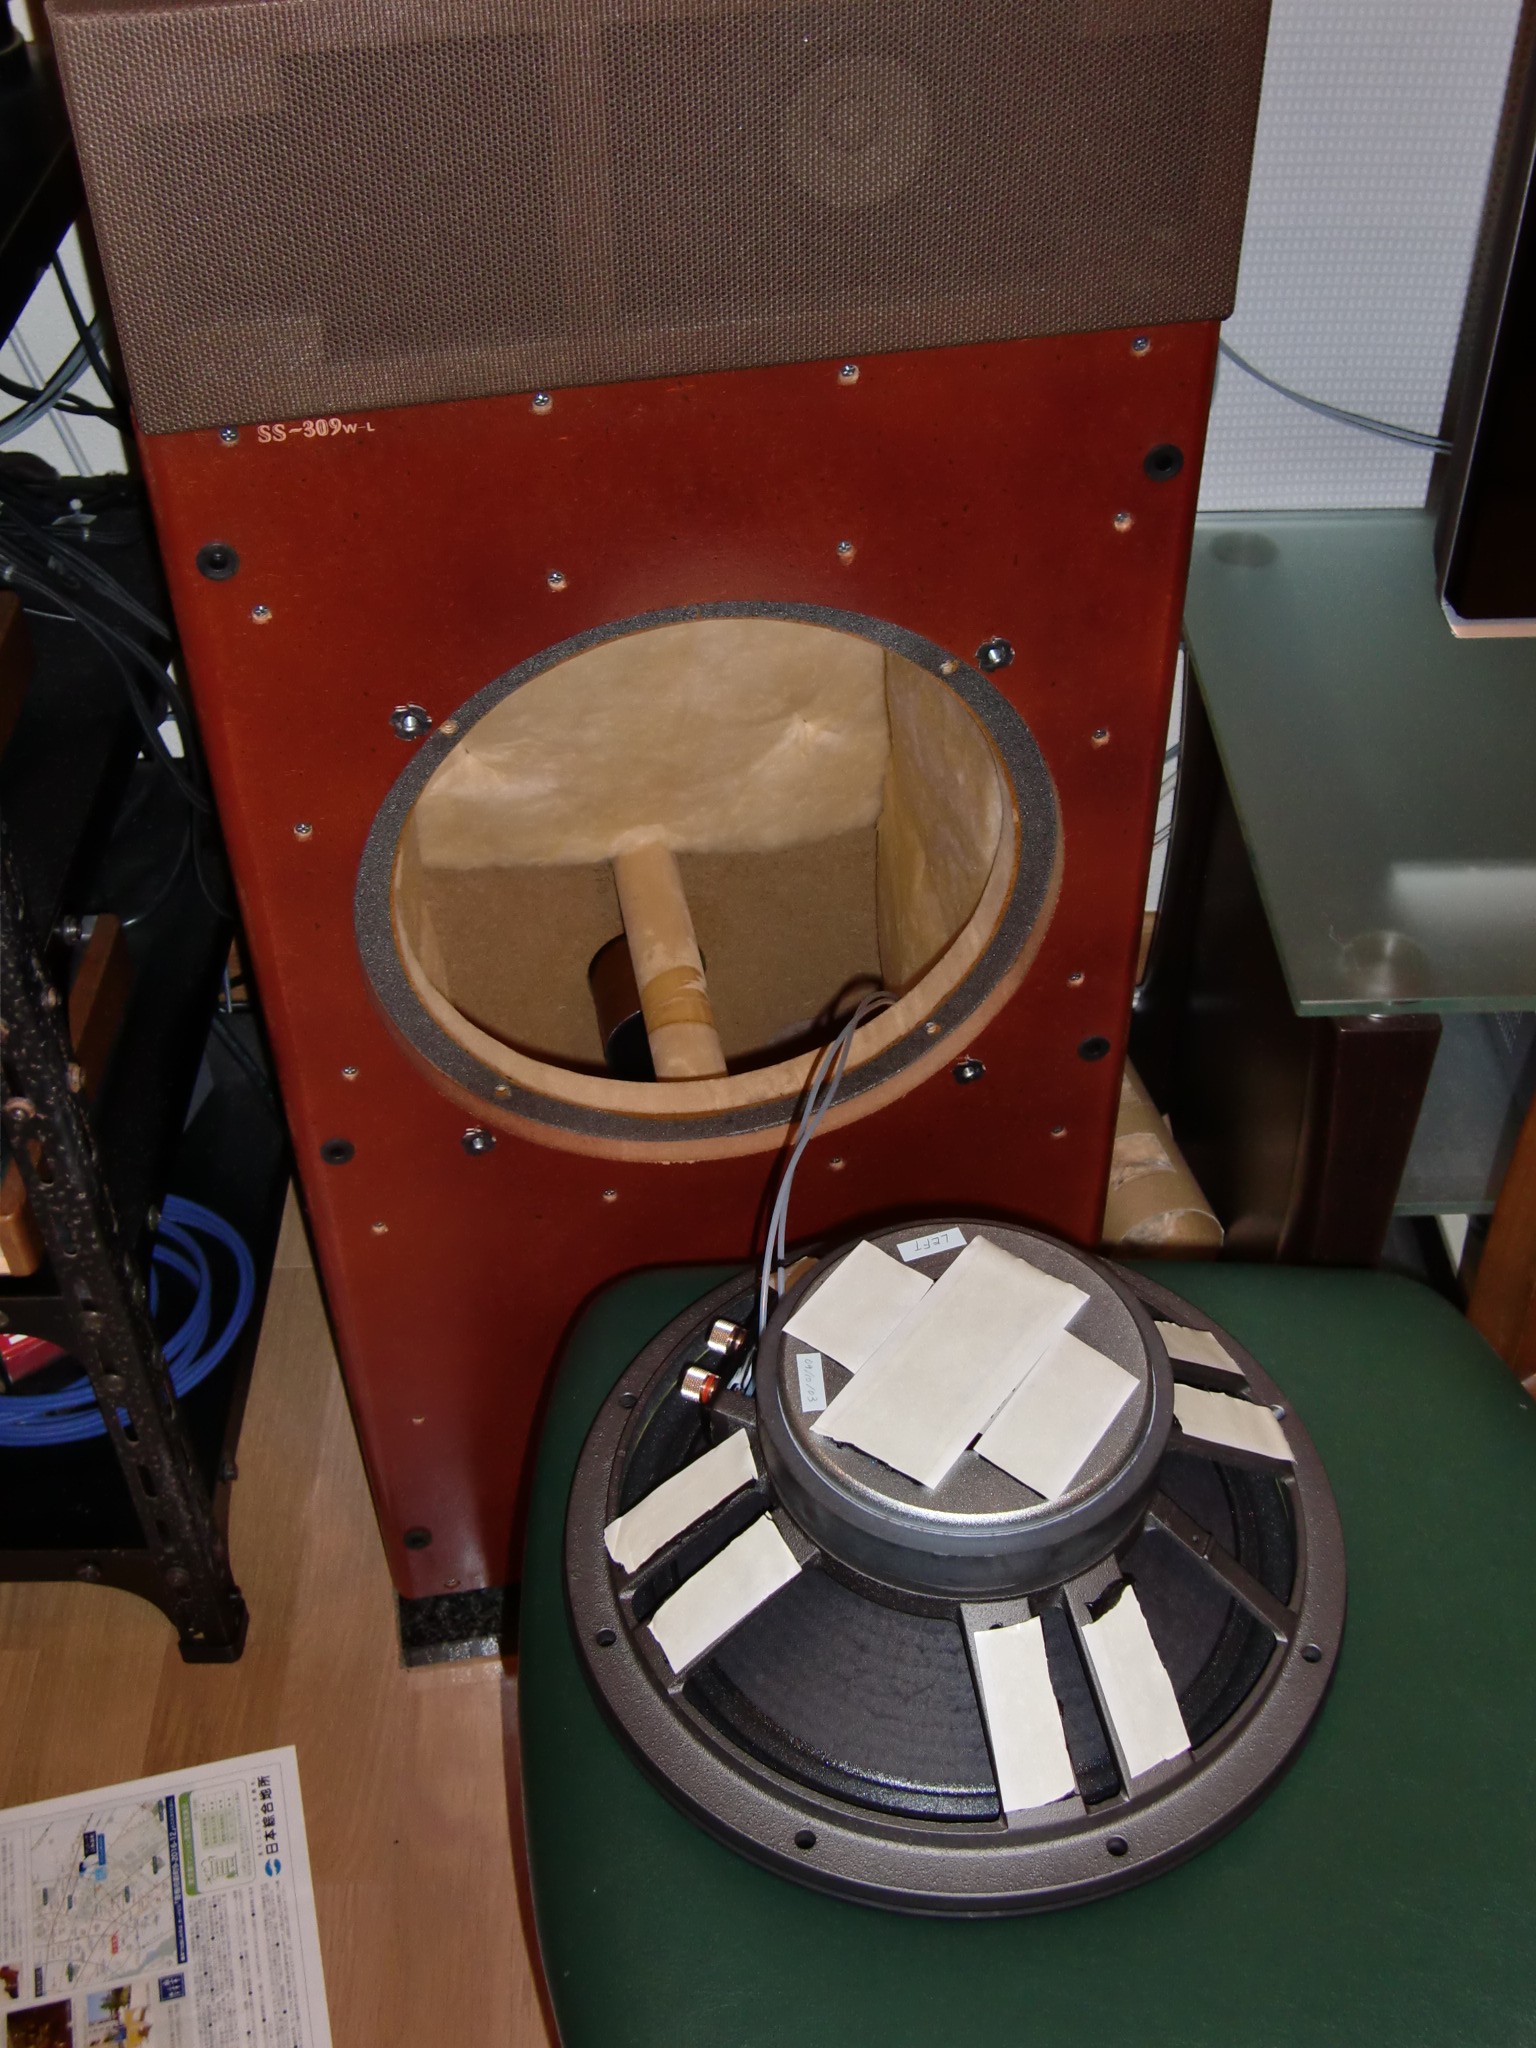
The store usually didn't accept an order of a large circular cutout like
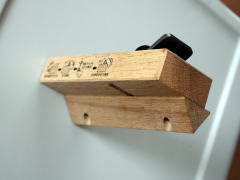
one for woofer, but the craftsman did it. The photo on right-hand side
shows the parts for the woofer boxes.
I cut out the parts for bracing and the grilles for myself.
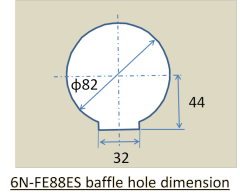
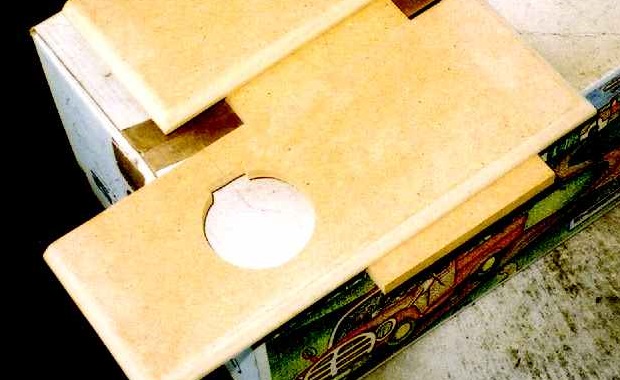
I cut out the sub-baffle hole for the driver for myself, because the hole for 6N-FEE88ES is not a simple circular form. Since I am so clumsy, I had to concentrate keenly on the work. I managed to cut out the hole as specified in the drawing.
 |
 |
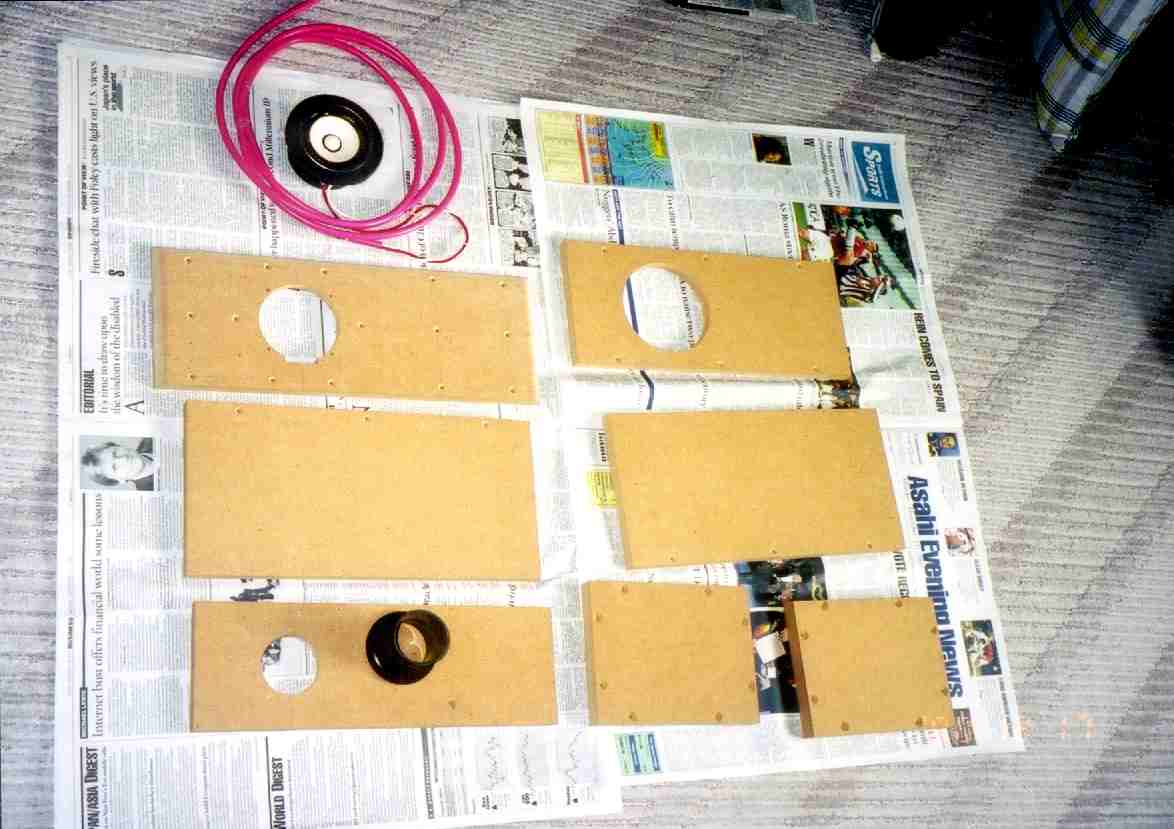 |
| 6N-FE88ES baffle hole dimenstion | The processed sub-baffle for the midrange box | The parts for the midrange box |
I rounded the edge of the sub-baffles with a molding plane and a special
tool I made.
The molding plane can plane the edge of the board at the angles of 30,
45 or 60 degrees.
My self-made tool is a special file to round the work with radius 15mm.
I made it by cutting a 30mm internal diameter PVC pipe for water pipe into
a handy length, cutting it vertically into two halves, and affixing sandpaper
on the inner surface of the half pipe with double-stick tape.
 |
 |
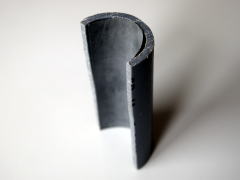 |
| Chamfer plane | Chamfered sub-baffle edge | Handmade tool for rounding the edges |
 |
Sub-baffle with rounded edges |
I drilled only prepared holes for wood screws that pass through the boards beforehand. I decided to drill prepared holes in kerfs just before screwing. I was afraid that a pair of prepared holes may be misaligned if the one in the kerf is drilled beforehand and the joint may be slid when the wood screw is tightened.
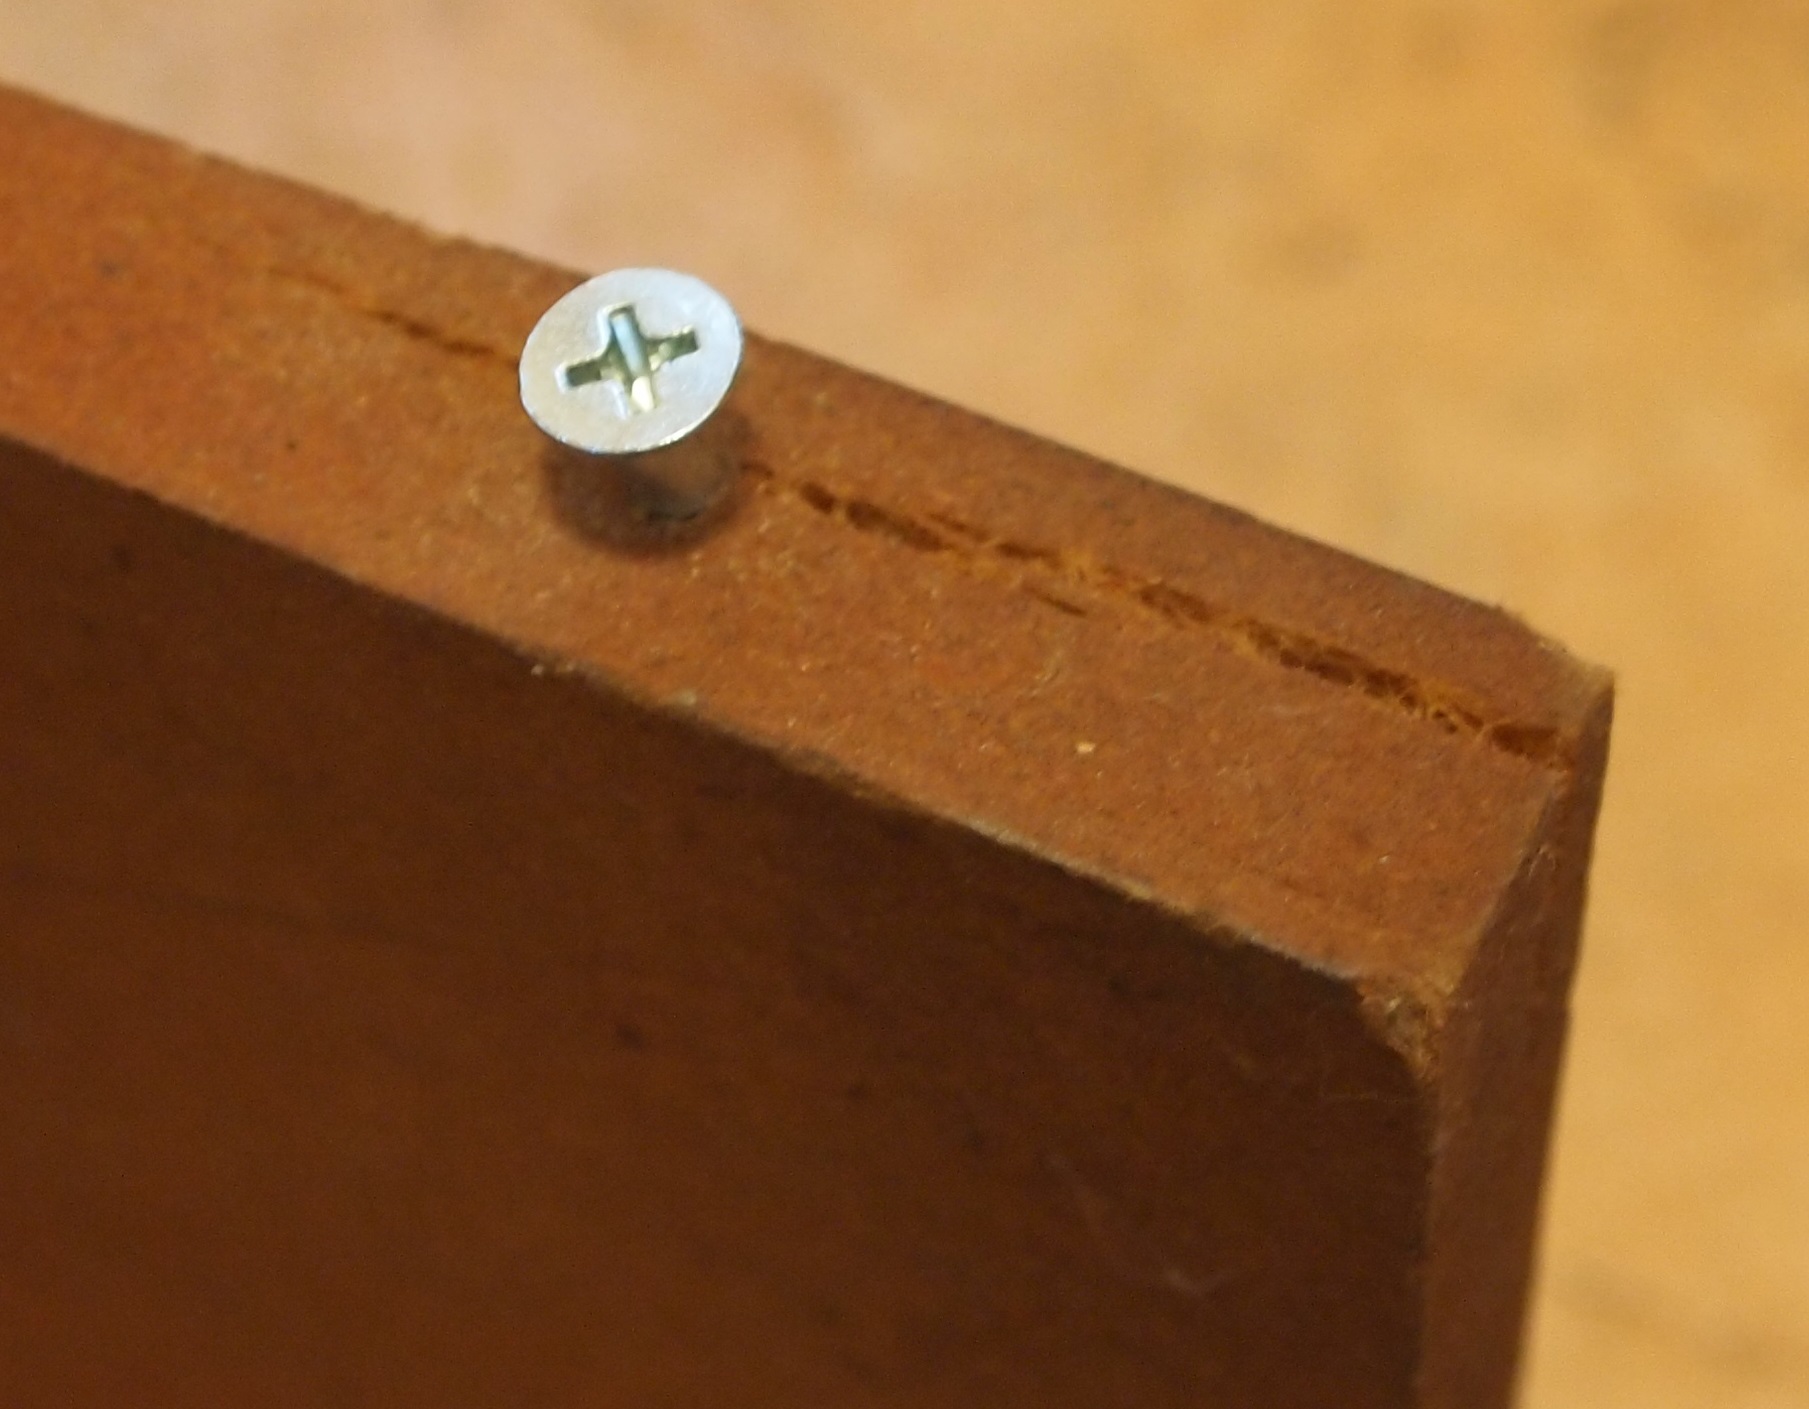
Before the assembly, I screwed a wood screw in a kerf of a leftover piece
of MDF as a trial. I found out MDF is unexpectedly vulnerable and splits
easily, although I had guessed MDF is a solid material like plastic. In
fact, it is layered like many thin cardboards are stuck. So, it is likely
to split if a thick wood screw is used or many wood screws are screwed
in the kerf.
For SS-309, wood screws are not used to fix the joints permanently, but
to fix them temporarily till the bond dries instead of cramps. So I decided
to use the minimum number of thin wood screws required to fix the joints
temporarily.
Assembly
I assembled the boxes following the procedure specified in the design phase.
Both the woofer and midrange boxes were assembled in the same procedure.
The fixed side board was put horizontally, the baffle, backboard, and top and bottom boards were put vertically on it, and the parts were glued each other with wood
bond. Bond was applied plenty so that, in case that a slit occurs at a
joint, the bond will fill it. Bracing was glued in each corner between
all walls of the woofer box. By the way, the bond I used was a commonly-used
type, not a quick-drying type.
While the bond was still wet, each part was adjusted in position to make
the front and top surfaces flush.
After the positions of all parts were fixed, screw holes were drilled in
the kerfs by inserting the bit of an electric drill into the prepared holes
that had been drilled beforehand. This work needed an extra care not to
move the parts.
Each wood screw was not tightened individually. First, all the screws were
screwed halfway. Then, in order to keep the joints from sliding, one screw
was tightened a little with a screwdriver (not an electric screwdriver),
then another was tightened in the same way, and so on, till all the joints
were secured. Finally, all the screws were tightened firmly with an electric
screwdriver.
The above process must be done quickly before the bond dries. When the work was done, a lot of bond leaked out of the joints. I left it as it was.
When the bond became adhesive, I turned over the box with care not to slide the fixed side board. Then I screwed it on the box. Now the box was rigid.
Next, the sound deadeners were fixed with wood bond and wood screws.
Then, the detachable side board was going to be screwed. Because the dimensional errors were so small,
the kerfs were flush. I decided to use insulating tape instead of rubber
sheets to keep the box air-tight. The tape is cheaper and easier to use.
The tape was affixed on the kerfs and small holes were cut out at the positions
of the prepared holes for the wood screws. The detachable board was screwed,
and the box had all six walls at last.
Finally, the box was completed by fixing the sub-baffle on the baffle. The sub-baffle is fixed with only wood screws. Bond was not used.
 |
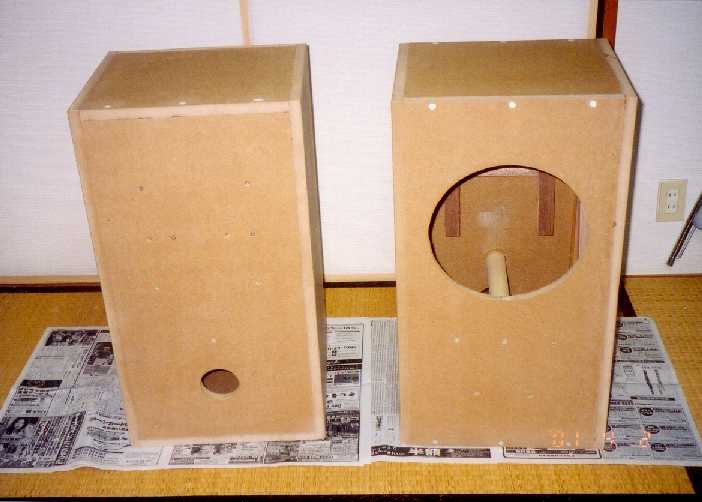 |
 |
| Woofer box just before detachable side board was attached | Woofer boxes just before sub-baffles were attached | Midrange boxes just before sub-baffles were attached |
 |
 |
 |
| The back of woofer box; the assembly accuracy is not bad (June, 2013) | The back of midrange box; the assembly accuracy is not bad (June, 2013) | The inside of midrange box w/ the driver temporary installed |
The frames of the grilles were made of the 18mm square spruce bars, which was the same material
as the bracing of the woofer boxes. Fast-drying type of wood bond is used
to assemble them, and neither wood screws nor nails are not used.
The net was stapled on the frame after it was cut into a piece of an appropriate
size.
Finally, the grille holders (male part) were screwed on the frame. The
grille was completed.
 |
 |
 |
Because the female part of the grille holders were going to be attached to the sub-baffles, the prepared holes were drilled in the sub-baffles. Besides, the prepared holes for the insert nuts for a Fostex genuine grille were drilled on the sub-baffles of the woofer boxes too.
Finish
First of all, I cut off the bond sticking out of the joints with a cutter.
I applied putty on the heads of the wood screws that would never be removed.
After the putty got dry, I sanded a little the outer surfaces of the boxes
with an electric drill with a circular sandpaper attached.
Now, it was time to paint the boxes. I made a temporary workroom by using cardboards on the balcony
of my condo, where I painted them.
Soon I realized that it is very difficult to spray varnish evenly. Even
though I did my best, the sprayed varnish became uneven. But, this uneven
varnish looked terrific like oil stain paint. So I continued to spray the
varnish. The color of the varnish was maple, and if it's painted on MDF,
the color became rather reddish. I was attracted to this color too. I sprayed
the baffle four times, and its appearance became so cool (the other surfaces
were painted three times).
I affixed instant lettering to read my brand name (NOBODY) and the model number (SS-309), then sprayed clear varnish three times. This finished the paint work.
The heads of the wood screws that would possibly be removed (not covered with putty) were painted metallic dark gray for better appearance.
Mouting theDrive-Units and Other Small Parts
The female parts of the grille holders were hammered into the prepared holes on the baffles after varnish was completely dried. On the baffles of the woofer boxes, the insert nuts for the Fostex genuine grilles were hammered in too.
Because the port tube for the woofer box, Tritec BR-70, is a simple plastic tube, it needed
to be deadened. It was rapped with a 0.1t brass sheet and cloth tape on
it.
The tube was mounted on a small MDF board to form a port assy. The port
assy was screwed to the backboard. Since it is detachable, it is easy to
replace the port.
The port tube for the midrange box, Fostex P49, was cut to be 60mm long
(the inner diameter is 49mm). It is mounted on the backboard with double-faced
adhesive tape.
 |
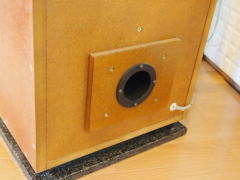 |
| Deadened port tubes | Port assy mounted on woofer box |
The last step was installing the drive-units and the filling. The detachable side boards were removed temporarily.
The drive-units were all removed from SS-307, and the cables remained soldered to the drivers' terminals. I mounted the drivers on
the baffle with wood screws, after I made the cables pass through the holes
for the cable. At that time, I was very careful so that I won't damage
the drivers with the tip of the screw driver.
The diameters of the holes for the cables were matched to the external
diameters of the cables, so that it is not necessary to seal the holes
with putty.
I lined the filling, not filled, since both the woofer and midrange boxes are bass reflex type.
By the way, I mounted the drivers and ports to the midrange boxes temporarily before I painted the boxes, and played music for adjustment of the filling. Then, I removed the drivers and ports, and painted the boxes.
 |
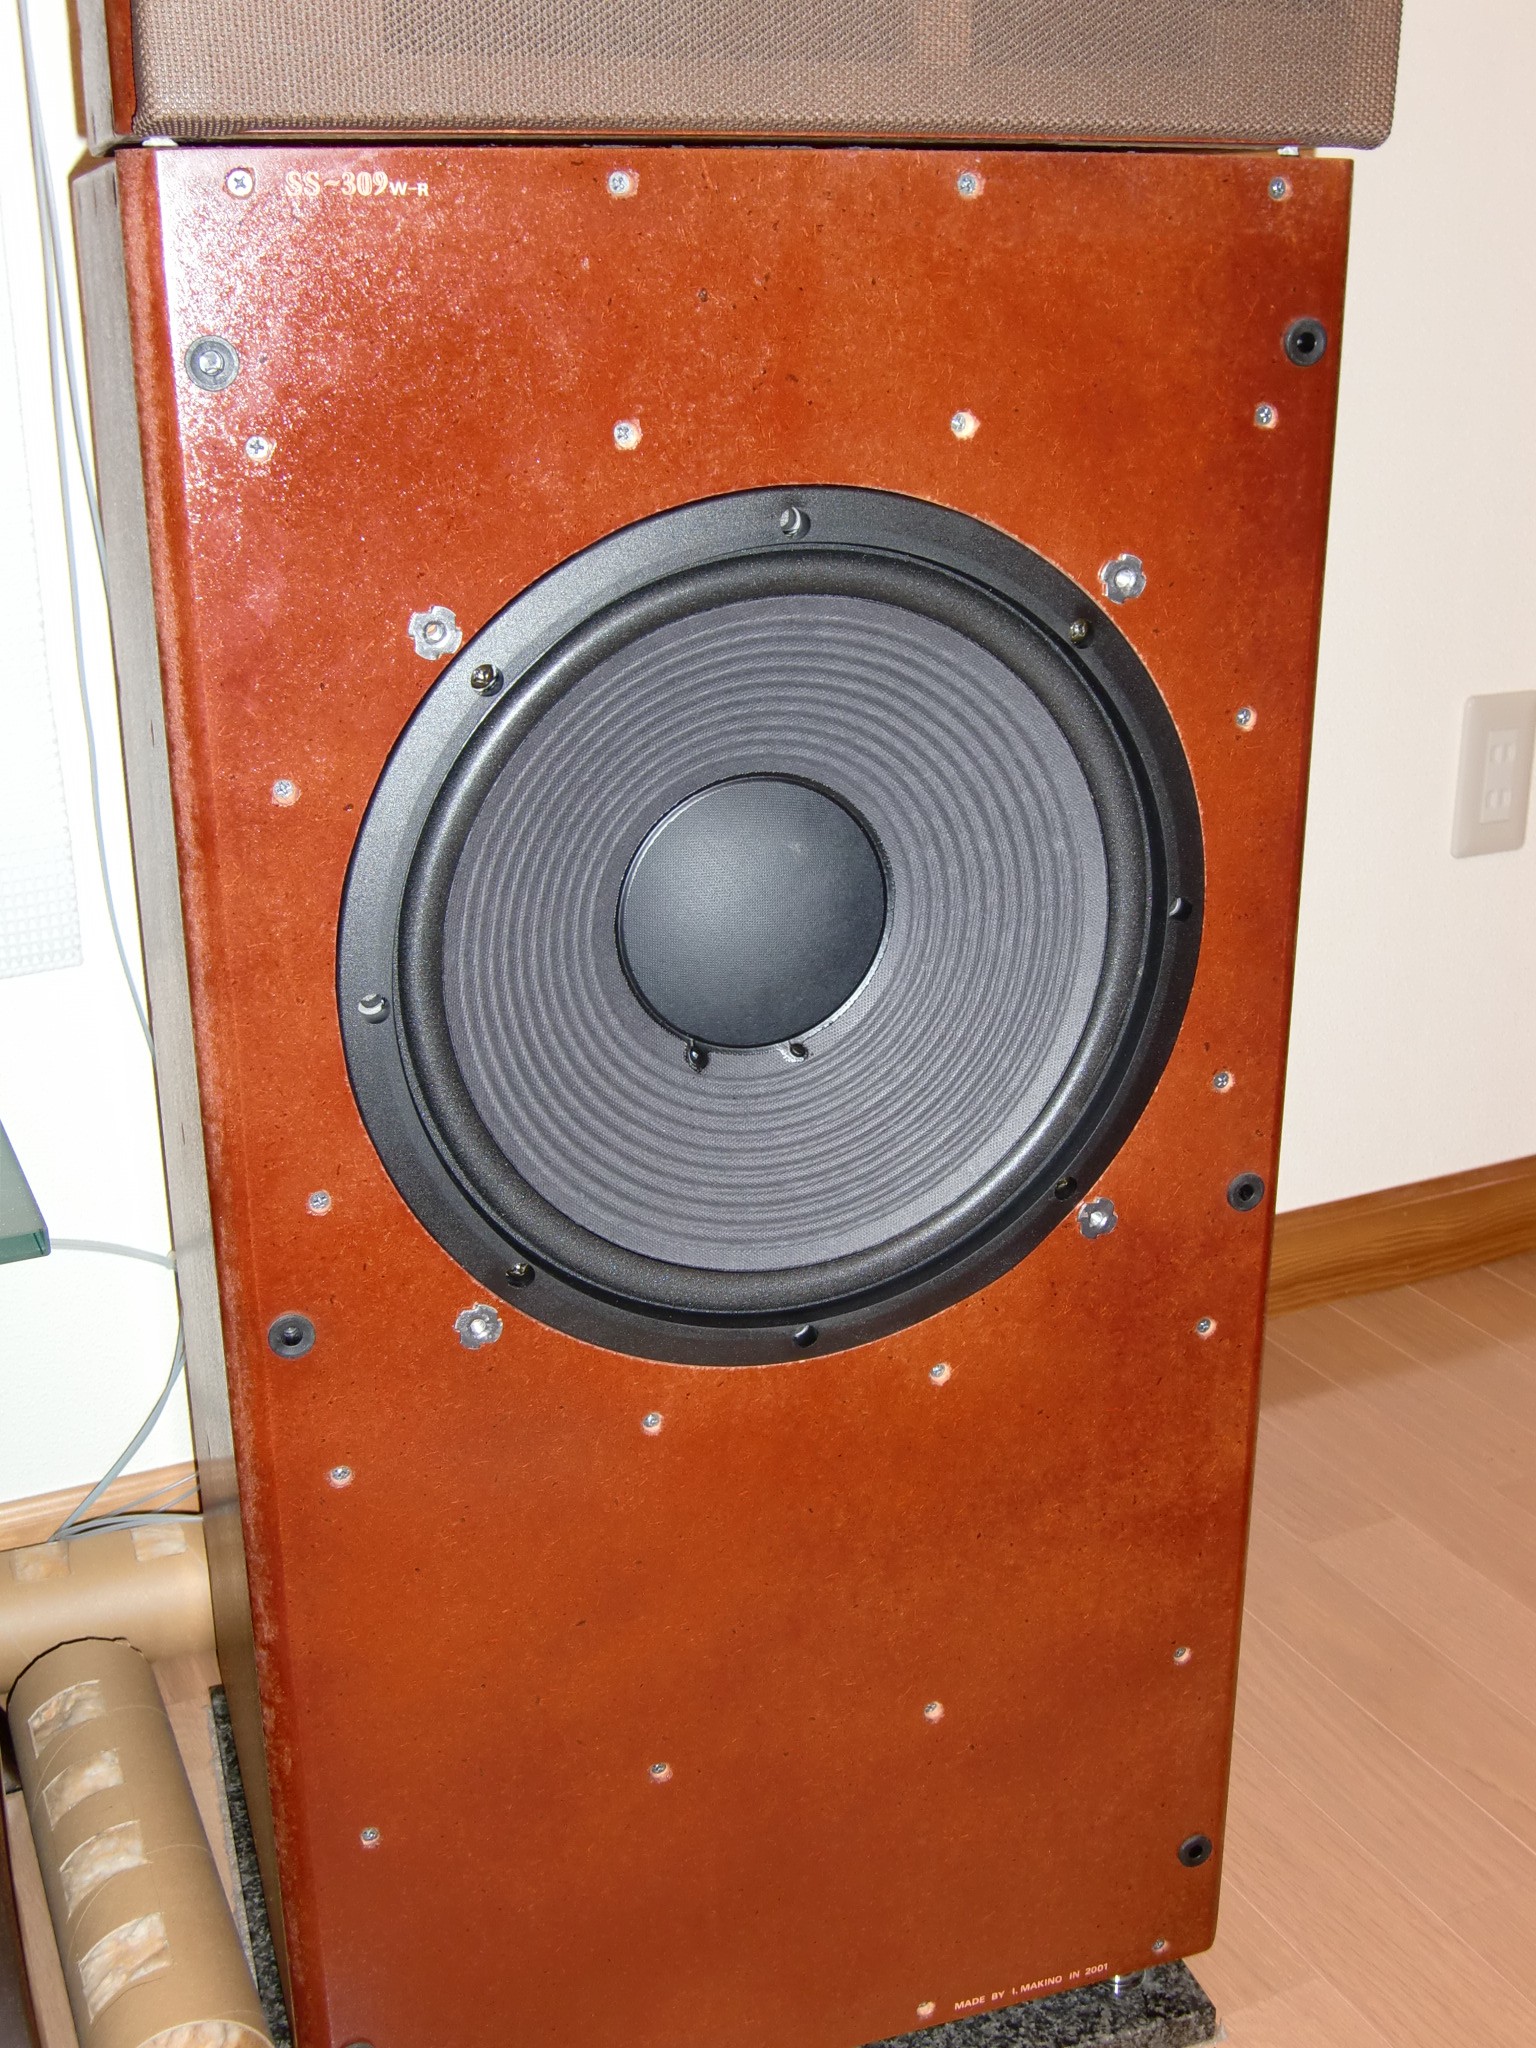
Completed baffle of woofer box |
 |
 |
 |
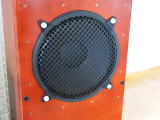 |
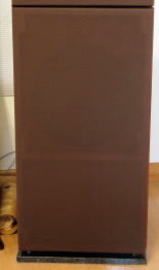
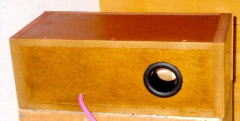
| Completed woofer box (front) (photo taken in 2009) |
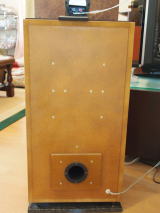
Completed woofer box (back) (photo taken in 2013) |
Woofer box w/ grille |
Woofer box w/ Fostex grille |
 |
 |
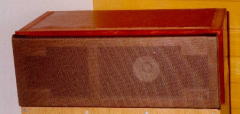 |
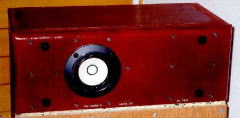
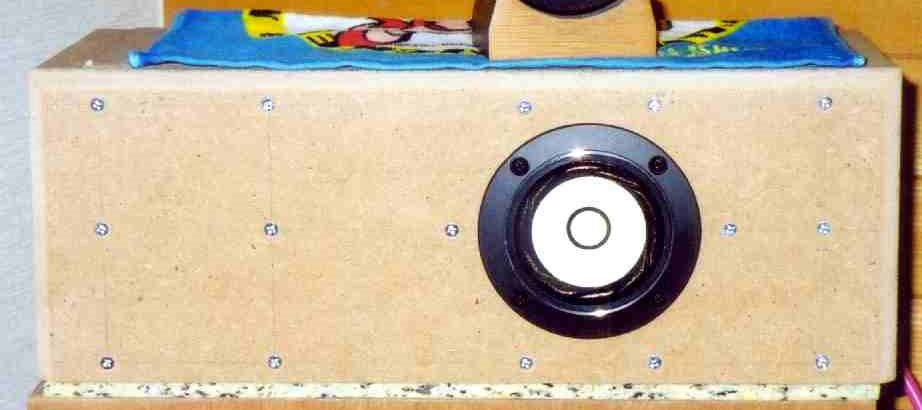
| Completed midrange box (front) | Completed midrange box (back) | Midrange box w/ grille |
Installation and Tuning
Tuning of the midrange module preceded painting. The driver, port and filling were installed temporarily.
I set up the midrange module as a full-range speaker, and played various
kinds of music. Its crystal-clear sound was so impressive that I can never
forget it. The tonal quality was totally different from SS-307. I keenly
felt that different enclosures have so different tone even with the same
driver.
When I listened very carefully, I felt a bit unpleasant echo, and supposed
that it was resulted from standing wave in the box. I came up with a countermeasure;
I crumpled up a piece of Micron Wool into a ball, tied it with a string
and hanged it from the top wall of the box.
This countermeasure was more effective than expected. It made the sound
clearer furthermore. This midrange module was the the finest one-way speaker
I had ever heard, if its poor bass response could be neglected.
I didn't care much about bass response, since this midrange module would
be used mainly as the midrange speaker. And the driver 6N-FE88ES was designed
for a backload horn system, so I accepted a certain level of non-flatness
in the bass response. As a result, the bass response was not bad, except
for poor deep bass response. The upper bass response was so good.
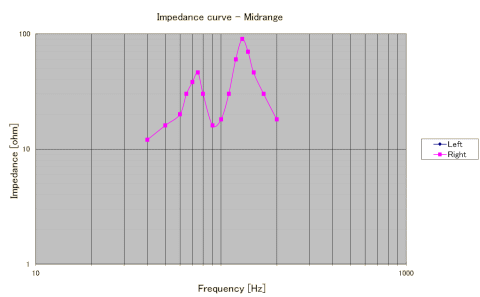
I couldn't measure the characteristic, as I didn't have required measurement
instruments and environment. The only data I could measure was impedance
vs frequency response. The curve had two peaks, which is typical for a
vented-box.
Although I was once satisfied with the midrange module from the bottom
of my heart, I was disappointed later. It was painting that slightly lowered
the sound quality. After painting the enclosure, I set up the midrange
module the same as the first trial listening. I played various kinds of
music again. The sound was no longer as clear as it had been.
I hadn't known the fact that painting influences tonal quality. The influence
might be significant particularly to sound-absorbing materials like MDF.
I suppose the painting makes the surface solid like plastic, and that increases
unwanted radiation from the enclosure.
I tried affixing a piece of felt to the surface of the baffle in order to absorb the unwanted radiation. But it didn't work. On the contrary, it worsened sound quality. I had to remove the felt for the better result. At that time, the surface layer of the varnish was removed too. The appearance got worse.
Later, I found an article in IPSJ (Information Processing Society of Japan)
Magazine that focused on the relation between tone of musical instruments
and their measured data. The article showed an interesting example; one
craftsman make two identical violins; the only difference between them
is varnish; these violins have different tones to human, though their characteristics
measured by the best measurement instrument are the exactly the same.
It is necessary to study the relation between the enclosure finish and
tonal quality furthermore.
I determined the amount of filling by intuition and lined it on the inner
walls of the woofer boxes. Soon I set up the woofer modules as full-range speakers. The first impression was very good. I said to
myself, "It's perfect!" I really felt so without any concrete
grounds. Therefore, I decided to use them as they were without any actual
tuning.
I have been using the woofer modules without tuning since then, though
I once replaced the port with a shorter one to boost bass. After all, I
replaced the port back with the original one. As of August 2013, I still
use them in the initial setting. I don't feel like tuning them, because
I am afraid that I would spoil these perfect woofer modules if I change
anything about them.
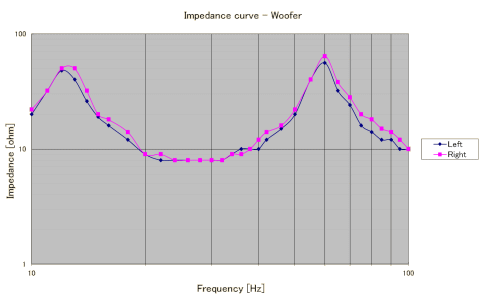
The impedance vs frequency response of the woofer modules were nearly ideal curves with two peaks. The Helmholtz Frequency fb was approximately 26Hz. The response was extended down to the 25Hz band at full level.
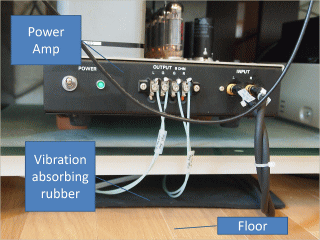
At last, it was time to install SS-309. I placed the woofer modules where the pair of SS-307 were installed (the corner of the living room of my condo). The speaker bases of SS-307 were reused. They were merely old magazines put on the floor. They were pressed by the weight of the speaker system and made flat and solid. Since a pile of papers is a good sound absorber, it might be an ideal speaker base.
A vibration proof rubber mat was put on the woofer module, the midrange
module was placed on it, and the tweeter module on the midrange module.
The midrange module was designed asymmetry. It was placed so that the driver
was positioned near the center of the system. The tweeter was placed just
above the midrange driver. The tweeter module was composed of the tweeter
T925 and a stand that came with T925. A vibration proof rubber was affixed
to the bottom of the stand.
The speaker systems were toed in a little.
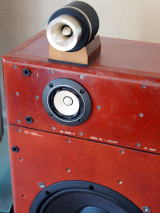 |
Positions of the drivers The R-ch unit: Midrage driver is positioned near the left end of the eonclosure. The tweeter is positioned above the midrage driver. |
The configuration of the amplifiers remained unchanged. The setting of the network CD-206 was also unchanged. The crossover frequencies were 800Hz and 8000Hz.
A loudspeaker sounds differently according to its position in the room.
Especially, bass response is greatly influenced by the distances from the
boundaries of the room. But I couldn't choose the best position because
my room was not spacious. I had no option but to place the SS-309s at the
corners of the room; each speaker was placed 20cm from the wall behind
it and 10cm from its respective sidewall.
The bass was boosted and sounded so rich. But it was not unpleasantly boomy
bass. I liked this rich and pleasant bass.
It took me a lot of time and labor to adjust the position of the tweeter back and forth. The crossover was 8000Hz, and the wave length at the frequency is about 43mm. If the tweeter was moved by 21mm (the half of the wave length) back or forth, the phase difference between the tweeter and the midrange would be 180 degrees, and the tone would change significantly. While playing music, I moved the tweeter little by little until the sound became the most natural.
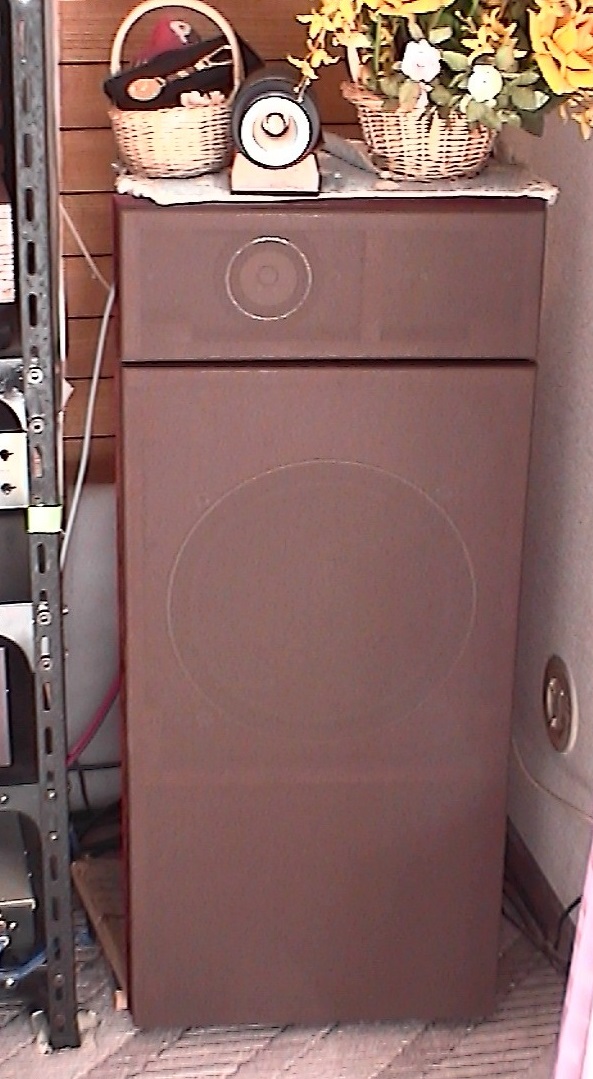
The photo on the right side shows SS-309 (R-channel) just after the installation. (June 2001)
My Own Review
Looks
The main purpose of this project was make good-looking loudspeakers. I
flattered myself that the purpose was achieved. My wife, too, admitted
that, and said, "It's OK to install them in the living room."
She hates naked loudspeakers (the drive-units are not covered with the
grilles). On the contrary, I feel SS-309 looks good without the grilles.
Besides, the grilles slightly impair sound quality.
 |
 |
 |
Sound Quality
The woofer FW305 delivered its potential performance compared with SS-307. It exhibits
good transient response at low frequencies. It was so brisk that I felt
so good when I heard the sound of a bass in jazz. Though the volume of
bass was high, it was not pushy, and sounds of low-pitched instruments
were never exaggerated.
In addition, the woofer module can produce deep bass that is felt more
than heard and dynamic bass like rambling of the earth. For example, the
sound of a big taiko drum of Ondekoza (its fundamental frequency is 28Hz)
made me feel so good (CD, Ondekoza, Ondekoza (I), Victor VICG-5373). I
felt a wind pressure radiated from the taiko drum, and the realistic sound
made me feel as if I had been listening to a real live performance. And,
when the scene of launching the rocket in the movie APOLLO 13 was played
(DVD, APOLLO 13, SUD-29954), I really felt rambling of the earth. I thought
SS-309's ability of reproducing deep sound favorably compared with a movie
theater's public address system.
Though FW305 does not employ any novel mechanism nor special materials,
I love it. I like a simple, back-to-basics audio parts like FW305. I would
like to keep using it as long as possible.
The midrange module offered pretty high quality in midrange and upper midrange, though painting
had slightly impaired the clarity of the sound. For most full-range drivers,
treble is rolled off at a relatively low frequency, or trebles are distorted,
so it's better to add a tweeter in many cases. But trebles of 6N-FE88ES
were so good that I even thought it could be used as a tweeter.
Although full-range drivers perform very well when they are used as a full-range
driver, they tend to lower the system's total sound quality when used as
a midrange driver, because their performance are not as good as the woofer
and tweeter. But 6N-FE88ES was excellent as a midrange driver too. I believed
that's because its performance from upper midrange to treble is so good
that it could be used as a tweeter.

When the midrange module is used as a midrange speaker, the bass reflex
port should be stuffed up. The rear of the diaphragm emits the same sound
pressure as the front of the diaphragm in opposite phase. The sound leaks
from the port and interferes with the sound from the front. This distorts
midrange sounds in particular. Although the midrange module sounds so good
when it is used as a full-range speaker, when it is used as a midrange
speaker with the port open, its sound quality is not as good as the tweeter
and woofer because of the distortion. So the port should be stuffed up
in order to balance its tonal quality with the tweeter and woofer.
I had expected closing the port would not be necessary because SS-309 had
employed the rear port system. But it was necessary after all against my
expectation. I decided to stuff up the port with a rolled urethane mat
when the midrange module is used as the midrange speaker, though it is
a little troublesome.
The midrange module can be switched to the full-range speaker in Gaudi
(and vice versa). In that case, it is used with the port open. That is,
it works as the bass reflex system.
I have been using the tweeter T925 since 1982. I don't think it has deteriorated by aging yet, and still have confidence in it. It is a super tweeter rather than a tweeter, so I set the crossover to 8,000Hz. Although it reproduces only upper treble, T925 contributes a lot to the system's overall sound quality . It greatly affects not only treble but nuance of midrange and bass. SS-309's high quality of bass sounds is resulted from not only the high performance of the woofer but also that of T925.
User-friendliness
SS-312 is compact and floor-standing type. It's easy to install it. I think
the book-shelf type is rather difficult to install.
SS-312's lower body functions both as a stand and a CD/DVD rack. It is
more convenient than I expected.
I think SS-312 is a user-friendly speaker.
Summing Up
I think I've got the intended results. SS-312 is a good speaker system
to enjoy background music at my leisure time.
Its construction is simple, and no special technique is needed to build
it. It's recommendable for easy-going DIY audio.
This tweeter's most attractive feature is its capability to offer the texture of the sound source (instruments and voices). For example, it reproduces sounds of cymbals in jazz not as mere, rhythmical treble sounds but sounds produced by hitting a heavy metal disc. T925 sounds as if you could see the instrument. I would like to use it until its life will end.
Low directivity is known as the shortcoming of horn tweeters. But, on the
contrary, I take it to be an advantage. A horn tweeter can deliver acoustic
energy toward the listener's ears with a least loss. I believe this fact
is deeply related to the above-mentioned sound quality that makes the listener
feel the texture of instruments and voices.
A dome tweeter, which has high directivity, cannot offer enough acoustic
energy directly to the listener, and a fair amount of sound is reflected
by the boundaries and reaches the listener indirectly. Indirect sounds
become beautiful echoes in a very large room like a concert hall, because
the indirect sounds significantly delay to reach the listener. But in domestic
rooms, the time difference between the direct and indirect sounds is so
small that the sound may be heard distorted and/or the sound image may
be blurred.
I firmly believe that horn tweeters excel dome tweeters, unless the room
is very spacious or the walls and ceiling are made of sound absorbing materials.
So far, I reviewed each module. It is a tough question to evaluate SS-309
as a whole. SS-309 is composed of the self-contained modules, and it is
not a complete speaker system until combined with the network and power
amplifiers.
Compared with SS-307, I thought SS-309 was at much higher grade. SS-309
sounded more vividly. Especially, sounds of brass instruments were remarkably
lifelike, maybe because the tweeter was horn-loaded. In addition, I felt
SS-309 could reproduce very low level sounds so precisely. I realized I
almost achieved my goal: dynamic, vivid, yet precise sound.
Usability
The speaker cables are soldered directly to the terminals of the drive-units except the tweeters, so it takes a lot of labor to change the cable. It
is a weak point, in terms of usability. However, in the world of audio,
it happens quite often that high usability worsens sound quality. This
is the case. Through my long experience, I know (a) contact(s) between
the power amp output and drive-unit blurs the sound. I believe the direct
soldering is the best solution in spite of its low usability.
And, experience shows that if a cheap cable and an excellent cable are
connected in series, the sound quality will turn to be the same as the
cheap one only. In the future, a more excellent cable may be invented.
If only the external cable is replaced with the new cable, it will not
bring about a good result. The internal cable is also to be replaced with
the new one. As for SS-309, the cables directly connect the power amps
and the drive-units. There is no distinction: 'internal' and 'external'.
When the cable is replaced, it means the entire cable (both the internal
and external cables) is replaced. This makes it sure to maximize the performance
of the new cable.
When I was designing SS-309, I already had a plan to move to a single-family
house. So I designed the woofer box so that the Fostex genuine grille could
be attached. The grille was made of metal and so rigid. It was so useful
when we moved.
I bought Fostex genuine grilles for 6N-FE88ES too. It was attached to the
midrange box with adhesive tape. The box itself wasn't designed to attach
the genuine grille.
Summing up
I think I have achieved the goals for both the appearance and sound quality.
I feel Gaudi got another step closer to the high-end audio system.
However, Gaudi hasn't exactly conformed to the original system design yet.
The full-range units are used in the midrange modules as substitutes of
midrange units. Even though a full-range unit sounds good in its original
usage, in general, it is inferior to midrange units when used as a midrange
driver. The same thing applies to SS-309. The performance of 6N-FE88ES
is apparently insufficient compared with FW305 and T925. It is desirable
to upgrade the midrange modules as soon as possible (as described below,
I upgraded the midrange modules by changing the drive-units to horn-loaded
midrange units at last in 2012).
Improvements
Move to my new house (May 2003)
My new house is a well-insulated, air-tight, two-story wooden house. Though
it is not particularly constructed soundproofed, its thermal insulator
and double-paned glass in the windows excel in soundproofing too.
The living room, where Gaudi is supposed to be installed, is located at
the north end of the second floor unlike ordinary houses. There is no attic
above the living room, so the ceiling is high and slanting. Because sound
has the property of going upward, the high ceiling reduces the distortion
caused by reflection. In addition, the slanting ceiling prevents standing
waves from occurring, since it is not parallel with the floor.
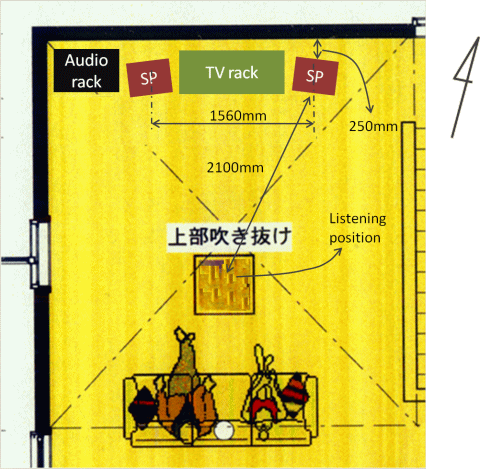
The living room is designed so that Gaudi is installed against the north
wall, which has no window. I put each SS-309 250mm away from the north
wall and distant from its respective side walls (see the figure below).
The distance between the speakers is not long (1560mm). I wanted to put
them more distant from each other, but I had to compromise because the
room is the living room and a TV set is also installed there.
The listening position is 2.1m away from each speaker. The distance is relatively short, though, it is desirable because the percentage of reflection from the boundaries in the total of sounds the listener hears is kept low. And, there is a large space behind the listening position. This is also desirable for a good sound quality.
I spent much time and effort to adjust the distance between the speakers
and the wall behind them, because it is an important factor for the volume
of bass sounds. In practice, however, the volume didn't vary much according
to the change of the distance. The volume was always a little short.
The low frequencies might not be reflected by the wall but go through it,
because the inner side of the wall is made of ordinary plaster boards.
And, I've heard that bass sounds of a rear-vented speaker is not boosted
even if the speaker is near the wall behind it.
I attempted to boost bass by shortening the port (130mm->113mm). This
countermeasure was a little effective, but not enough. I took another measure
at a later date.
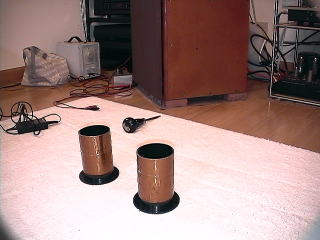
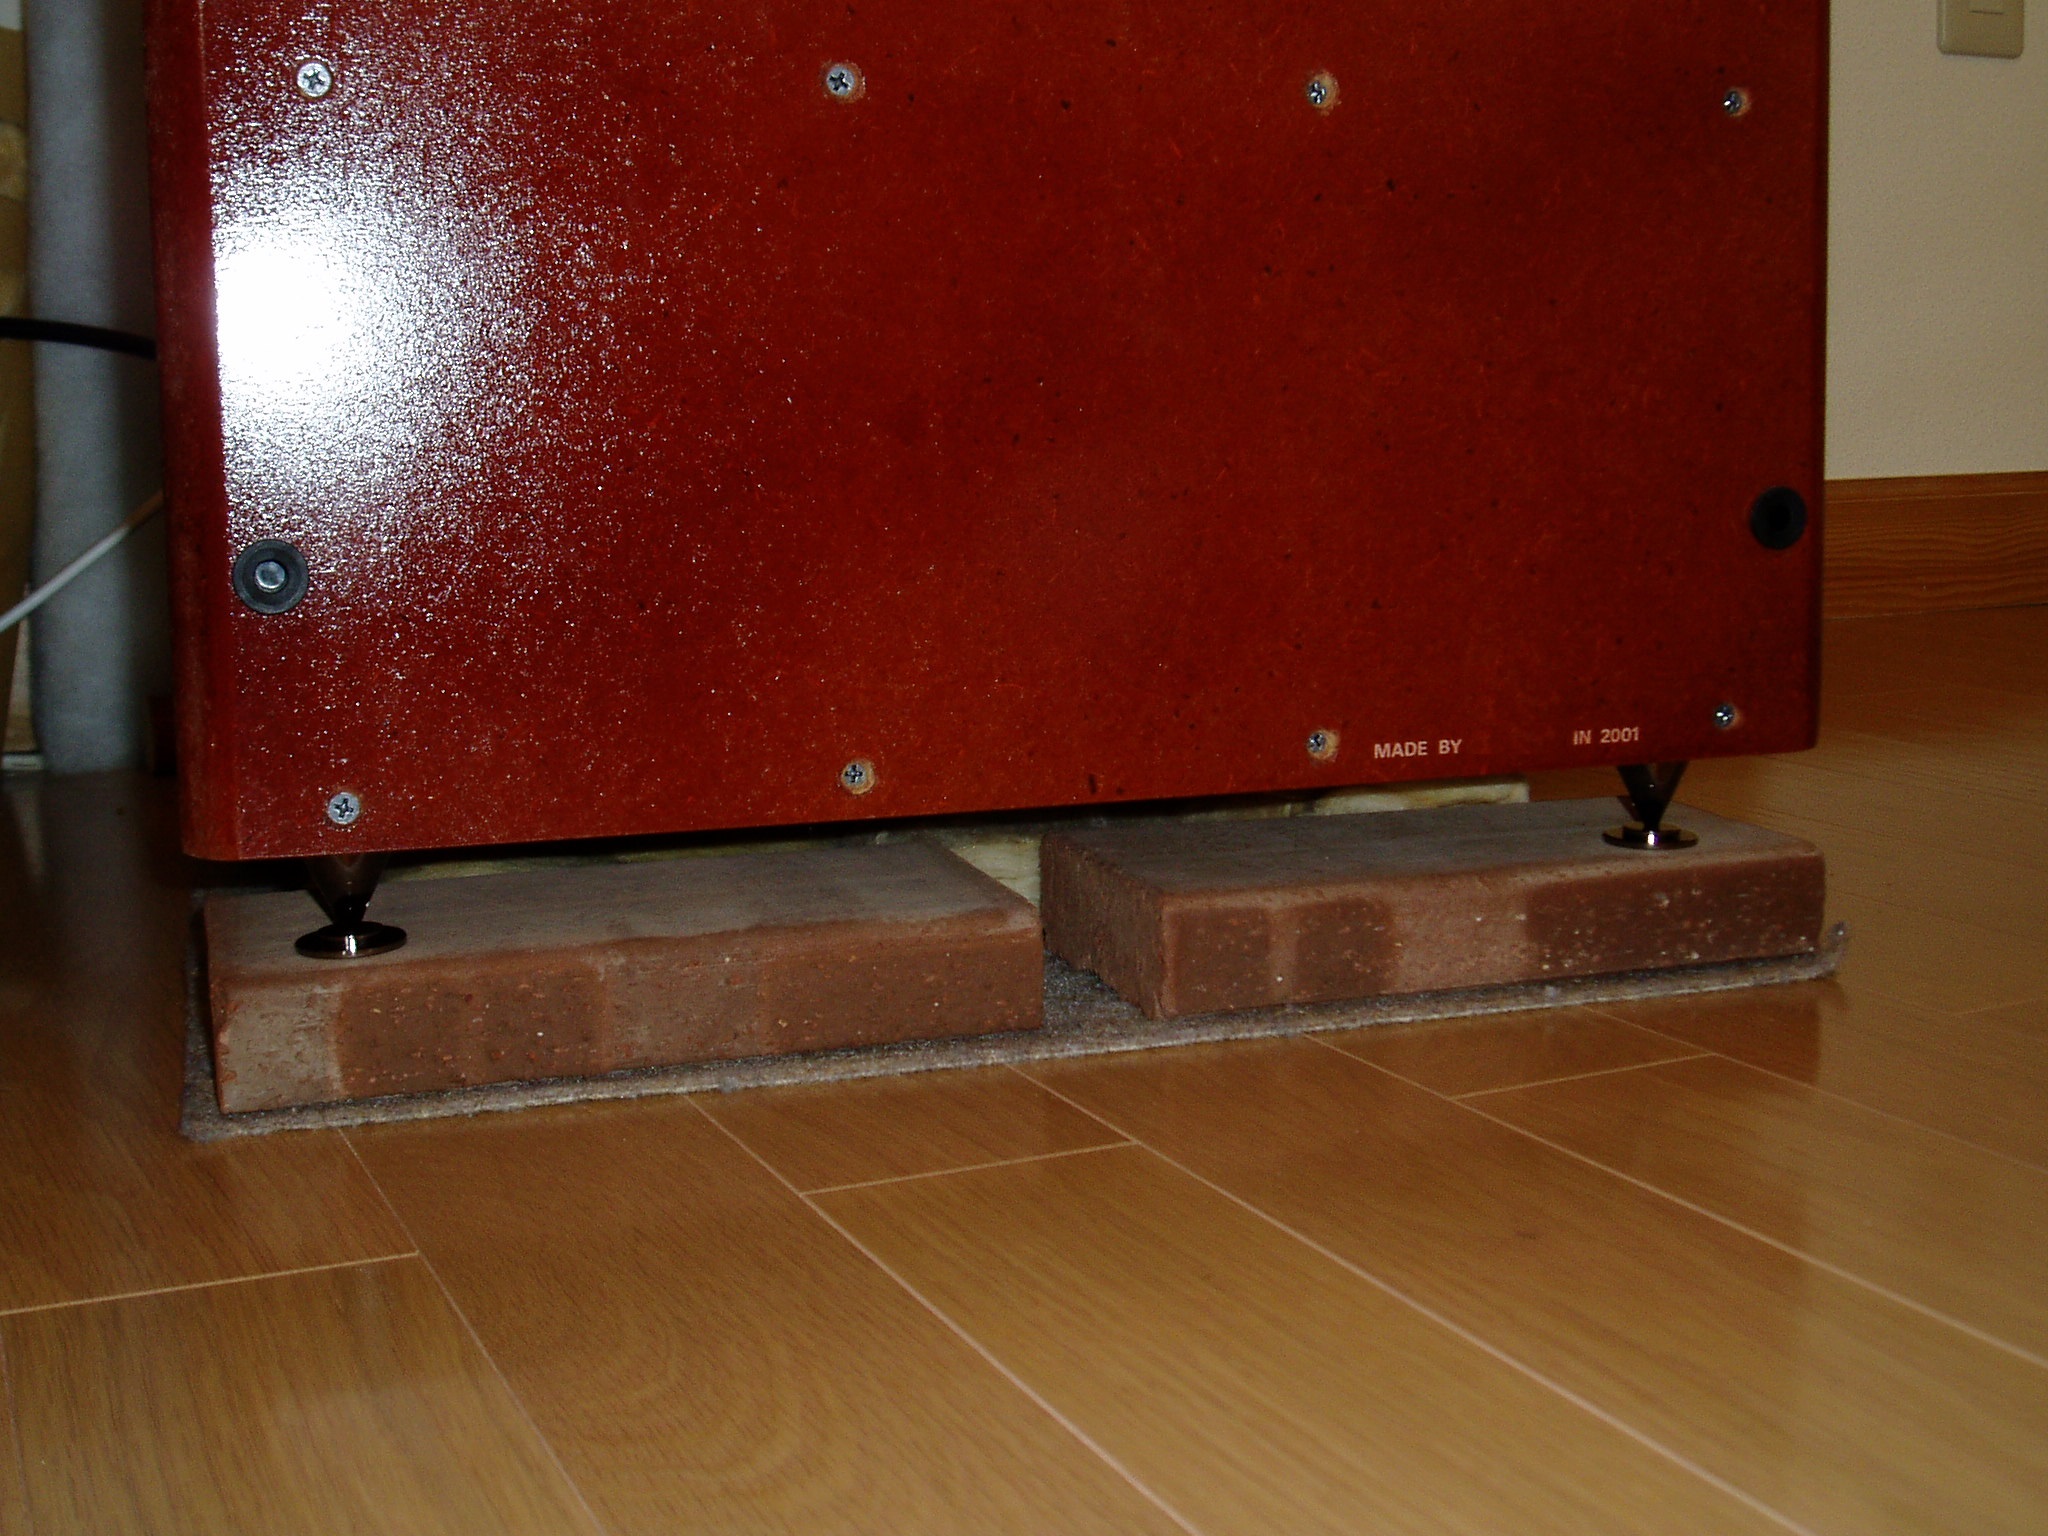
I thought using old magazines as a speaker base is not suitable for the
brand-new house, and decided to use a piece of carpet and four bricks for
each speaker. This resulted in the obviously worse sound quality than the
old magazines. I knew bricks are so easy to resonate.
I planned to add spikes under the speaker enclosure to reduce the resonance.
I looked for good spikes at an audio shop where I was a regular customer,
and chose Dali's spike set because it was reasonable and the height was
adjustable.
The spikes improved sound quality to some extent, compared with putting
the speakers directly on the bricks, but I was still not satisfied. Spikes
may not be so effective to prevent vibration from propagating as their
claims. [2015/01/27 corrected] {I used the spikes in a wrong way. For further details, see 'Correct use
of the spikes (Nov. 2013)'}
Improvement of the speaker base (Nov. 2004)
I considered using heavier objects instead of the bricks. I looked for
a shop that sell stones in Rakuten Ichiba (http://www.rakuten.co.jp/) and
found a good shop that cuts stones like granite and marble stones according
to the customer's plan at reasonable prices. The shop was MG Sekigahara
(http://www.rakuten.co.jp/mgs/). I ordered two granite boards of which
dimension was 20x401x390mm. The total price was about 8,500 yen.
The granite board is rather heavy, so it acts as a mechanical earth. It
improved sound quality. I felt the speaker became able to offer higher-resolution
sound.
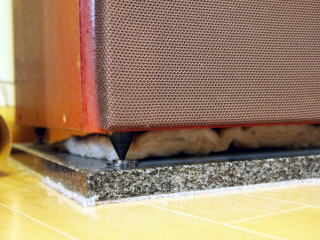 |
Improved speaker base From the bottom, a piece of nylon carpet, 20t granite board and DALI spikes. A piece of filling (Micron Wool) is placed between the enclosure and the granite board. |
I considered changing the insulator between the woofer and midrange boxes
from the vibration absorbing rubber mat to spikes too. But spikes are so
large that the gap between the woofer and midrange boxes becomes rather
wide. I decided to use a substitute.
I found an interesting information on Internet that a 10-yen coin is a
good insulator. I tried it out soon. It was true. It improved sound quality
a little. I tried out a 100-yen coin too. It was not as good as the 10-yen
coin. I experienced such a thing many times that the more expensive an
audio accessary is, the poorer sound quality is.
I used the 10-yen coin insulator for some months, but I re-considered it
and reached a conclusion that the point contact is better than the surface
contact. I decided to use small pointy stones. I picked up about 20 small
stones that are all the same in size from my graveled backyard. Then, I
selected two quads of the stones that make the midrange box not shaky.
I put each quad under each midrange box's four bottom corners. This led
to better sound quality, and I was satisfied at last.
 |
 |
 |
Upgrade of crossover network (Feb. 2005)
I upgraded the crossover network from CD-206 to CD-211 A-NET.
The lower crossover of CD-206 was 800Hz (18dB/oct) and the upper one was
8000Hz (12dB/oct). As for CD-211, they were 720Hz (18dB/oct) and 7200Hz
(18dB/oct), respectively. The filter for the tweeter cut off more rapidly
below fc. This reduced the current flowing the tweeter voice coil below
fc, and improved clarity of treble. The potential performance of T925 was
successfully drawn out.
I used CD-211 in that setting for a while. One day, I found a bump at the
fc region between the woofer and midrange bands, and I decided to change
the characteristic of the filters. I changed the -3dB cutoff frequency
of the woofer filters from 720Hz to 530Hz, whilst the lower cutoff of the
midrange filter remained unchanged (720Hz). The attenuation at fc became
-6dB. The continuity from the upper bass to the lower midrange was much
improved, so that SS-309 played sounds neutrally as if it had been a one-way
speaker.
In theory, the attenuation at fc should be -3dB in order to flatten the
system frequency response. But the bump would be developed unless the midrange
unit is separated from the woofer by a large spacing.
Upgrade of the speaker cable (Sept. 2009)
As for the speaker cable, I tried out various types of many manufacturers
since I built SS-307. But I didn't think any one of them was obviously
superior to others. Though each manufacturer's catalogue or something like
that said how excellent their products were with many plausible advertising
statements, I felt they were sort of extravagant advertisement. I began
believing a simpler cable was better than high-tech cables these days just
like amplifiers.
One day, I looked at the web site of Oyaide Denki (an Akihabara-based cable
vendor, http://oyaide.com/catalog/) and was attracted to a 0.4mm solid
wire manufactured by 47 Laboratory (http://www.47labs.co.jp/). In fact,
I knew the wire a long time before, and had e-mailed an inquiry about it
to Oyaide. At that time, I judged it was not good because it was made of
very cheap materials. This time, I was attracted because most of the user
reviews about it gave it five-star praise, and decided to employ this simplest
wire. FYI, the conductor is tough pitch copper without plating and the
sheath is 1mm-thick polyethylene. No other material is used. So simple!
All the speaker cables were replaced with the new ones. However, I chose
0.65mm solid wire for the woofer cables, because the 0.4mm wire has a little
too high resistance and that may reduce the damping of the woofer. The
low damping makes bass sounds boomy.
I bought the wires online from Oyaide. The price of the 0.4mm solid wire
was 273 yen per meter, the 0.65mm was 315 yen (for the simplest wires,
the prices were not so cheap, were they?).
I made the speaker cable by twisting the two wires at 30cm (1 foot) pitch.
The end of the wires was only stripped because they were going to be soldered
to the terminals. The only exception was the end that was going to be connected
to the midrange amp Flying Mole DAD-M100Pro. Because this amp's terminals
were unable to be soldered, I decided to attach banana plugs to the end
of the cable that was connected to this amp. A special banana plug for
the 0.4mm wire was available from 47 Laboratory. I bought four of the plugs
for the cable.
This plug is designed based on a seemingly crazy idea; contacting the wire
core directly to the terminal of equipment. The plug is made of Delrin
and hollow to insert the wire in it. The tiny hole is bored at the tip
of the plug to draw out the wire core through it. The wire core is bent
180 degrees and looped around the part of the plug that is inserted into
the terminal. Inserting the plug makes the wire core contact the metal
part of the terminal directly.
I realized this plastic plug had several problems. First, bending the wire
core 180 degrees produces unwanted inductance and some of the current is
reflected at the bending point. Those lead to distortion of the signal.
Second, since the wire core is not plated, it corrodes rapidly even at
room temperature. And, the terminal of DAD-M100Pro is plated with nickel.
Contacting different metals accelerate corrosion. Third, the dimension
accuracy of this product is so low. One of the plugs was a little too thick
and could hardly be inserted into the terminal. Another one was so thin
that it was not secured in the terminal and came out easily.
In spite of these problems, I used the plastic plugs for a few months.
When one of the plugs became faulty because of corrosion of the wire core,
I stopped using the plugs. I am so disappointed since the plug was not
cheap (483 yen at Oyaide). I used banana plugs for measurement instruments,
instead. Though it was cheaper than the plastic plug by far, it excelled
the plastic plug in sound quality. I experienced that again, "The
more expensive an audio accessary is, the worse its sound quality is."
[2015/02/14 added] {I stopped using the banana plugs. The cable cores are directly connected
to the terminals now. Wako Technical Titan Audio Oil are applied to the
cable cores to prevent them from corroding}
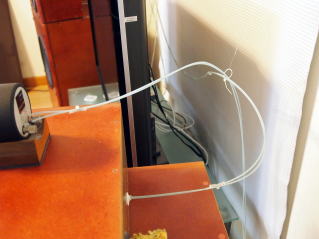
I read an explanation on 47 Laboratory's Web site that cables were so vulnerable
to vibration. At that time, I didn't think speaker cables were so microphonic,
because they conducted large signals and microphonic noise was too minute
to negatively affect sound quality. But, as a trial, I followed 47 Lab's
recommendation; hanging the cables in midair to prevent vibration. The
speaker cable I made weighed only a dozen grams or so per meter, so hanging
it was easy. I fitted up hooks on the wall near the ceiling, hanged strings
from the hooks, and hanged the speaker cables with the strings. For the
parts of the cables that inevitably touched the floor or the speaker enclosures
I put vibration proof rubber mats beneath them.
This method was more effective than expected. The grade of sound rose one
step higher. I really felt Gaudi sound was approaching that of high-end
audio further.
 |
 |
Gaudi was successfully upgraded. It was proved that my motto, "the
best is simple," was applied to speaker cables too. In addition, it
came to light that the following theory was not right; the thicker the
cable core is, the better sound quality is.
I guess too thick cable core distorts the signal, because its surface area
is so large that high frequency currents that flows the surface due to
skin effect causes eddy current and produces distortion in treble band.
It is often said that a thin speaker cable does not conduct deep bass.
The same opinion was written in the homepage of 47 Laboratory too. However,
I don't feel Gaudi cannot reproduce deep bass after the speaker cables
were changed. I believe the theory that reproduction of deep bass needs
a thick cable is a superstition. Perhaps, the fact that to produce bass
sounds by playing a stringed instrument the thick string is used leads
to this superstition.
In practice, a thin cable makes deep bass boosted, because its relatively
high resistance weakens damping of the woofer just like using a power amplifier
with low damping factor.
Renewal of the woofers (Oct. 2009)
The surrounds of the woofers were broken due to aging. I had to repair
them.
I checked up Koizumi Musen's Web site (http://www.koizumi-musen.com/),
and found that fortunately FW305 was still in production and available
on the Web site. I decided to buy new FW305s instead of repairing the surrounds,
because I was anxious about the result of the repair. Besides, the new
drivers would extend the life of SS-309. I think Fostex Company should
be praised for it produces products like FW305, which are excellent in
spite of the old designs, continually for long term.
The price was raised compared with the old FW305. I bought the old ones
also at the Koizumi Musen, a loudspeaker shop at Akihabara district, and
the price was about 18,000 yen per unit, if I remember correctly. The new
one's price was about 22,000 yen. But I was convinced when I saw the new
FW305 for the first time. The many parts, at least visible ones from outside,
like the frame, surround and terminals were improved.
After replacing the drivers, I realized sound quality was apparently improved.
What I did can be said to be upgrade rather than a mere repair.
I replaced the port back with the original one (68mm-diameter x 130mm-long) after the new FW305s were well broken in.
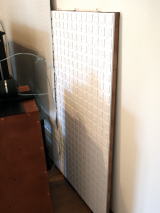
Installation of acoustic panels (Sept. 2012)
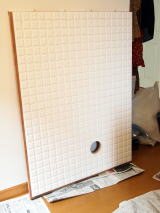
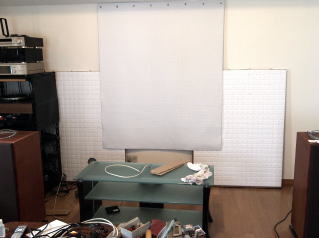
Though I was satisfied with the volume of bass sounds when SS-309 played very loud, I was a bit dissatisfied at normal listening volumes. The interior wall behind the speakers is an ordinary one and made of 12.5mm thick plasterboards with wall paper on them. It reflects mid to high frequencies while gets low frequencies through it. To solve the problem, I hit upon an idea of making acoustic panels that absorbs mid to high frequencies and reflects low frequencies, and installing them behind the speakers.
The base was a 18x1220x910mm MDF board. Sound absorbing boards made of
rock wool (Yoshino Gypsum (http://yoshino-gypsum.com/en/index.html) Solaton
Cube Cross 6T) were nailed on it.
The acoustic panels were installed as they leaned against the wall behind
the speakers.
 |
 |
 |
These acoustic panels improved not only bass response but also stereoimaging. Before that, sound localization tended to lean to the left-hand side. But now the localization was more accurate.
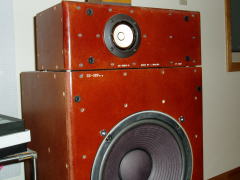
Rev. A: Upgrade of the midrange module (Nov. 2012)
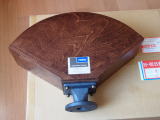
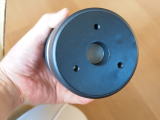
Finally, the time came to replace the midrange modules with horn-loaded drivers. It was the time the loudspeaker system I had considered as the ideal since 1974, when I was 17 years old, became reality.
The LS units I employed were Fostex H400 wood horn and Fostex D1405 driver. These were the LS units I had already chosen when I designed SS-309.
 |
 |
 |
 |
The two pairs of H400 and D1405 cost me about 180,000 yen. It was very unusual decision for me, who don't like spending much money for audio, to buy such expensive audio components. The point is that I believed (now still believe) the loudspeaker dominates the system's overall sound quality and the midrange unit is the most influential component in the speaker system. My theory is, "The midrange unit determines sound quality, and the tweeter determines tone." I think it is a waste of money to spend much money for power amplifiers, because they are less influential in the system's overall sound quality. In the audio system, it is the midrange unit that is really worth a high price.
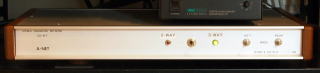
The recommended crossover frequency fc of D1405 was 850Hz or higher, but
the lower cutoff frequency of the midrange filter of the network CD-211 A-NET was 720Hz. I customized CD-211 to change the cutoff to 880Hz,
and that of the woofer filter from 530Hz to 720Hz.
CD-211 had two more features to be customized.
One was adding attenuators to the midrange outputs. The gain of the midrange
amp, Flying Mole DAD-M100Pro, was so high that the signal had to be attenuated
quite a bit with the input attenuator. Until then, the attenuation was
about -20dB. The sensitivity of 6N-FE88ES was 90dB/W(@1m), whilst that
of D1405 was 104dB/W. The attenuation had to be increased by 14dB, but
the maximum attenuation of DAD-M100Pro's input attenuator was -30dB. Therefore,
I added the attenuators to the midrange outputs. The attenuation was fixed
to -20dB.
The other one was a functional change. Until then, the midrange outputs
of CD-211 was switchable from midrange to full-range, and vice versa. Adding
full-range signals possibly damages D1405, so I customized the function
so that the outputs are switchable from midrange to midrange + treble,
and vice versa. When the switch on the front panel is set to '3-way', 880-7200Hz
band is output from the midrange outputs. When the switch is set to '2-way',
frequencies above 880Hz are output.
It took a lot of time and labor to customize CD-211. Though it was Oct. 2011 when I bought D1405s and H400s, they couldn't be installed till Nov. 2012, when the customize was completed and the suffix A is added to the model number (CD-211A).
I had one more thing to do before installing the wood horns. There was a possibility that leakage flux from the driver's strong magnet adversely affects the pickup of the analog disc player PS-104. To prevent this, I attached a magnetic shield board made of Permalloy to the audio rack.
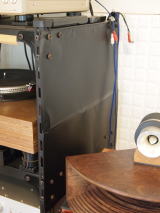 |
The magnetic shield board attached to the audio rack The black thin board attached to the right side of the audio rack is the magnetic shield board made of Permalloy that covers the analog disc player. |
The installation of the horns itself was easy. First, I screwed the drivers to the horns. Then, I put vibration proof rubber sheets on the woofer boxes and the midrange horns on them. On the midrange horns I placed the tweeter modules. Finally, I made cables with 47 Laboratory 0.4mm solid wires, and connected the midrange drivers to the power amplifiers, Flying Mole DAD-M100Pro.
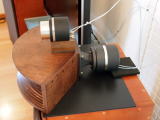 |
 |
(Nov. 2012) |
The tuning of the speakers was less troublesome than expected.
First of all, I adjusted the level of each drivers. While playing a test
CD that contains sine waves of ISO recommendation 2661/3 octave frequencies
(20Hz, 25Hz, 31.5Hz, ..., 16kHz, 20kHz), I measured the relative SPL with
a microphone (audio-technica AT-822) and an IC recorder (TASCAM DR-1) and
adjusted the levels to flatten the frequency response. Next, while playing
various kinds of music, I fine-tuned the levels such that they sounded
maximally natural to my ears. It took me about one week to achieve a satisfactory
result.
When 6N-FE88ES was used as the midrange driver, the adjustment of the levels
was a very troublesome task. The method using a microphone and a VU meter
was unreliable. The only dependable measurement instrument was my ears.
It took me a month or two to tune the speakers those days (see 'Tuning').
At the end, I adjusted the position of the horns in front-back direction.
It was unexpectedly easy too. But there's a possibility that the horns
are still not placed at the best position due to my lax adjustment.
As for the point of interest, which is sound quality of course, I got as good a result as I had expected.
My first impression was, "Beautiful!". Beauty has been added
to Gaudi sound that was attractive thanks to its vibrancy and vividness.
Especially, harmony of strings or chorus is breathtakingly beautiful so
that I am entranced with the music without knowing. For example, the sound
of cascading strings performed by Mantovani (CD, Mantovani Orchestra, Mantovani,
Encore!!, Victor VICP-5618) is so beautiful that it makes me filled with
a feeling of happiness. Of course, not only strings but every kind of musical
instruments such as wood winds, brass winds and the percussion sound better
than before. I feel their sounds became more precise and lifelike.
I had been anxious that the sound might become a little 'honky' colored, but I realized it was a pointless concern. And, though I had been worried that sound quality wouldn't be good until the drivers were aged enough, it was a needless concern, too. I felt the new midrange drivers sounded okay from the beginning just like the new FW305s installed in 2009. Fostex might ship its products after aging them enough in its factory.
One more thing I noticed is that the quality of bass sounds has been improved.
Although the woofer modules and their related components haven't been changed
at all, bass sounds became more dynamic and clearer. Unlike typical commercial
loudspeakers of which bass character is intentionally boosted and boomy,
SS-309A reproduces comfortably sharp and lean bass sounds. Though they
are dynamic, they do not sound exaggerated but precise and realistic. The
sound of a wood bass in jazz music are so realistic that I feel like I
were listening to a live performance.
Another merit of SS-309A that deserves special mention is clarity of both
speaking and singing voices. It is so easy to catch lyrics of songs. As
for English songs, the pronunciation is heard so clearly that I can catch
the meaning of the lyrics without effort. I often find myself immersed
in a world an English lyric depicts insomuch that I forget the lyric is
written in English without realizing. Now Gaudi is the best hi-fi system
I've ever heard when it comes to ease of catching lyrics.
I think it was a wise decision to employ the horn-loaded drivers. The horn-loaded
driver can reproduce minute sounds precisely because its ultra light diaphragm
and voice coil are driven by the very strong magnetic circuit. And it also
can play super-loud with ease because the horn drastically increases the
efficiency with which electrical power is converted into acoustic power.
Its high sensitivity reduces the burden of the power amplifier and speaker
cable, and makes it possible to simplify them.
Nowadays horns are largely disappeared from domestic audio use, though,
I believe they deserve to be revalued.
This upgrade resulted in a big success, but one problem was revealed; residual noise comes from the midrange. It includes susurrus
that is nearly pink noise and 'gee, gee, gee, ...' noise that might be
harmonic components of hum noise.
I was surprised because the specification of the midrange amp, Flying Mole
DAD-M100pro, is excellent (SNR:120dB, residual noise:25uV, etc).
The sound of piano is so realistic, but when I listen to it very carefully,
I feel its lingering sound is a bit dull. This might be an adverse effect
of the residual noise. [2015/01/26 corrected] {I found out later that this was caused by the lack of break-in of D1405.
Noises, which are components not relating to the signal, doesn't make the
sound dull. The real cause is distortion, which is deformation of the signal}
If the noise includes hum, it may damage the midrange drivers. I observed
the waveform and frequency spectrum of the residual noise with the instrument
(PicoScope 6) at once. I did it with the input of the power amp short to
ground and the output connected to the driver D1405.
The peak frequency was 393kHz and the level is 171mVrms. Probably, it is
the clock frequency of DAD-M100Pro. The noise level in the audioband was
quite low in spite of my concern. Hum was not found. The noise level is
so low that it won't possibly damage the drivers, but it is surely a problem
not to be overlooked.
 |
Waveform of the residual noise |
 |
Frequency spectrum of the residual noise |
I consulted some books and learned that the problem is not unique to DAD-M100Pro
but common to all class-D amplifiers. The conclusion is that class-D amplifiers
shouldn't be connected directly to horn-loaded drivers.
Class-D amplifiers have a passive (inductor/capacitor) low-pass filter
between the final stage and the output terminal in order to cut off frequencies
above the audioband (RF). But the passive filter cannot eliminate RF to
zero. A small amount of RF, especially the clock frequency of the amplifier,
pass through the filter as shown in the figure above. The direct radiator
won't convert RF into acoustic wave, because its moving parts such as the
diaphragm and voice coil are too heavy to respond it. In contrast, the
horn driver's moving parts are vibrated by RF, and RF is modulated to audible
frequencies. So the noise is heard.
For example, the user's manual of Rasteme RDA-560, a 6-channel class-D
amplifier for tri-amplified audio system, includes a caution that says
the amp may generate white noise or damage the driver, if it is a horn-loaded
super tweeter (FYI, I heard Rasteme went bankrupt).
The midrange amp must be a linear amp. After all, I already had a plan to design and construct a new midrange amplifier, MA-215 Arabesque. I made up my mind to give the first priority to MA-215 and suspend the construction of a headphone amplifier HA-213 and the design of a phono equalizer PE-114 Petit. Of course, MA-215 will be an ultra low noise linear amplifier.
Correction of the Use of the Spikes (Nov. 2013)

[2015/01/27 added]
The spike without the pedestalI noticed that pedestals that came with the
Dali's spikes were still placed under the spikes. They are needed when
the loudspeakers are installed directly on the floor. They are not needed
for SS-309 because it is installed on the stone board. But they are placed
under the spikes since November 2004 (see 'Improvement of the speaker base
(Nov. 2004)').
Using these pedestals spoils the effect of the spike (reflection of vibration).
The vibration of the speaker used to propagate to the floor such that I
felt the vibration with my fingers when the speaker played very loud and
I touched the floor in front of the speaker.
I noticed this mistake at last, and removed the pedestals. The photo on
the right-hand side shows the removed pedestal behind the spike. The vibration
of the floor significantly reduced.
I felt self-hate for this entry-level mistake. However hard you work on
designing and building amplifiers and loudspeakers, a small mistake like
this impairs sound quality. I won't repeat a mistake like this.
Replacement of the tweeters (Dec. 2013)
[2015/01/30 added]
I felt inadequate HF attenuation and suspected the tweeter T925 had reached
the end of its life. I measured the HF response with my portable digital
recorder (TASCAM DR-1), microphone (Audio Technica AT822) and a test CD.
As I felt, the response above 12.5kHz was steeply cut off. I decided to
replace the tweeters as soon as possible.
The T925 was already discontinued. I had to choose another tweeter. The candidates were three of Fostex T series horn tweeters: T900A, T925A, T90A. I wanted only horn tweeters and there were only few manufacturers that
were producing horn type. In addition, T925 kept me satisfied more than
30 years. So I didn't consider horn tweeters other than Fostex T series.
I excluded T500A from beginning, because it was too expensive and I doubted
the quality of the pure magnesium diaphragm. I once attended a launch event
for Fostex G2000 and it gave me a bad impression. I supposed the pure magnesium
diaphragm couldn't offer vividness nor a feeling of vitality, which are
the goal of Gaudi sound.
T925A was the most adequate choice, since it is the upper version of T925,
which had been my favorite tweeter for more than 30 years. I expected it
would offer refined sound quality with the same tone as T925.
I was also attracted by T900A. It was not only more expensive than T925A,
but also it was designed more recently. I thought the higher sound quality
could be expected. But its high price, nearly 100,000 yen for the pair,
and its slightly worse spec than T925A made me hesitate to choose it.
The most attractive one was the most inexpensive T90A. It was apparently
smaller than T925A and looked cheap, though, its spec was as good as the
other candidates. Tonochi's way to select audio parts is "if function
and performance are almost same, choose the smaller one." It is not
unusual that the cheaper one excels the more expensive one.
I wavered over choosing which one, T90A or T925A. I could hardly decide.
So I searched for other's reviews on Internet, though it is unusual for
me. I found an American audiophile who owned all the T series tweeters
and whose audio system was multi-amplifier system. I read his comment and
other comments in a forum he administrated. It seemed that T90A was the
best.
I almost chose T90A, but I changed my mind at the last minute. The reason was the appearance. The good appearance is the most important in the concepts of SS-309. I thought T90A would look too small on the wood horn H400. However highly evaluated T90A was, I thought the difference between T90A and T925A in sound quality was so slight that it would be OK to choose T925A for its good appearance.
FYI, the spec of each candidate was shown the table bellow. The spec of T925A is the same as T925 except the magnet type (the alnico magnet is used for T925A), and the horn of T925A is thicker than that of T925 though it was not shown in the spec. The list prices are as of Jan. 2015.
| Model | T90A | T925A | T900A |
|---|---|---|---|
| Impedance | 8 ohm | 8 ohm | 8 ohm |
| Frequency range | 5kHz-35kHz | 5kHz-40kHz | 5kHz-38kHz |
| S.P.L. | 106dB/W (1m) | 108dB/W (1m) | 106dB/W (1m) |
| Music power | 50W | 50W | 60W |
| Magnet weight | 100g (alnico) | 240g (alnico) | 240g (alnico) |
| Net weight | 800g | 2kg | 3.5kg |
| Recommended crossover frequency | 7kHz < (12dB/oct) | 6kHz < (12dB/oct) | 7kHz < |
| Cutoff frequency | 3.6kHz | 3.5kHz | 3.6kHz |
| List price (Jan. 2015) | 19,000 JPY | 34,000 JPY | 47,000 JPY |
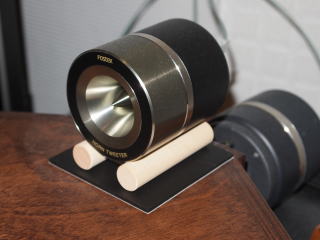
I've bought all the LS units (except used one) from Koizumi Musen at Akihabara since I took up the hobby of building audio equipment in 1971. This time too, I bought the pair of T925A at Koizumi Musen as always. The purchase price was 27,800 per unit.
The installation was not troublesome. In the first place, the tweeters were merely placed
on the wood horns. All I had to do is place the new tweeters at the same
places. I used the wooded stands came with T925A, and I sold the old stands
with T925.
Only item I prepared for the installation was Hanenite rubber sheets. I
put them under the stands.
I didn't replace the speaker cables. The end of the cables used to be plated
with silver solder and corroded because the major component of the silver
solder was tin. I cut the cables by 10cm and applied Wako Technical's Titan
Audio Oil to the stripped cable ends to prevent corrosion.
Only adjustment I did was adjusting the position of the tweeters. I didn't customize the network CD-211A A-NET, and even didn't adjust the levels of each tweeter. The lower cutoff frequency is 7.2kHz (18dB/oct) as it used to be.
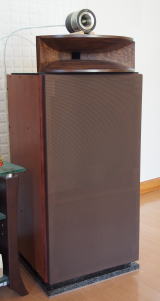
As for sound quality, my first impression was that it sounded beautifully but not powerfully. However, as break-in goes on, the sound of T925A is getting like T925. I wouldn't like to jump to the conclusion yet.[2015/02/26 added] {I found out the cause of the less powerful sound. I had connected the tweeters in antiphase.The fact that the power amplifier for the tweeters (MA-208) was an inverting amplifier slipped out of my mind, since I installed the tweeters for the first time in ages. The tweeters must be connected in the different polarity. After re-connection, the T925A came to sound powerfully and make me feel the textures of the musical instruments just like T925. Again, I learned that only one fault in the audio system impairs the sound quality of the system as a whole}
As for looks, my wife complained that the unpainted stands of the tweeters were not matched with the color of the wood horn. I am reluctant to paint them because the paint might make them easy to resonate. But as my wife said, the stands are a little too conspicuous. I'm going to paint them in the same color as the wood horn in the near future.
I sold the pair of my old T925s at a nearby secondhand shop for 15,000 JPY. I was surprised that the 31-year-old half-broken tweeters were worth 15,000 yen. Maybe, T925 is more popular than T925A among audiophiles.
The above contents are the copy of the page on SS-309 in the former homepage of mine 'Tonochi's Audio Room'.
The following section describes improvements I've done since March 2021.
Rev. B: Improvement of Woofer Box and Addition of Tweeter Rack (July 2022)
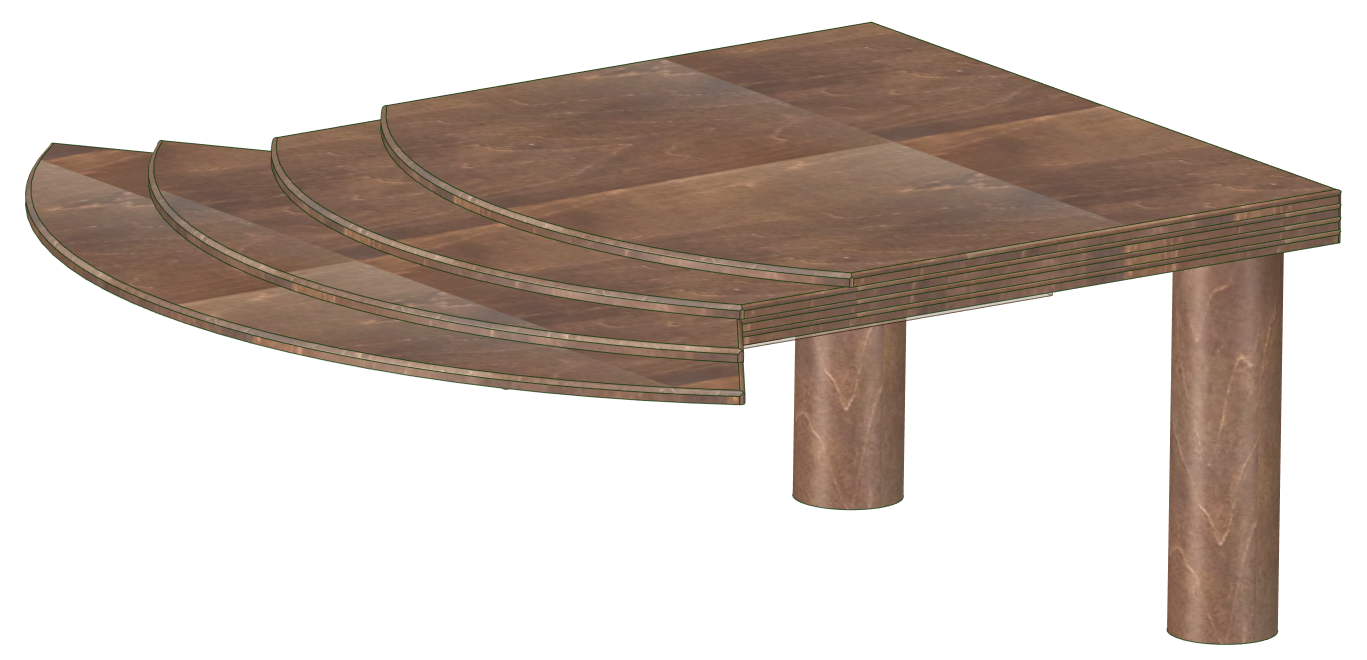
The following 6 improvements have implemented.
- Improvement 1: New squawker driver
- The squawker driver Fostex D1405 is replaced by Classic Pro ED3402.
- Improvement 2: Side panels added to Woofer Box
- Originally, Woofer Box was designed so that 3mm thick panels would be fixed on both sides of the box. But I haven't made the side panels since I built the box. If the material of the side panel is different from that of the box, deadening effect is expected. I've decided to make the panels and fix them on the sides of Woofer Box.
- Improvement 3: Woofer amp is attached to Woofer Box
- Amp Holder (a fitting for woofer amp) is fixed on one side of Woofer Box to attach the woofer amp to Woofer Box.
- Improvement 4: Woofer is fixed with bolts and nuts
- Bolts and nuts are used instead of the wood screws to fix the woofer, because the wood screws could be loosened after fixing and unfixing several times.
- Improvement 5: Addition of Tweeter Rack
- Tweeter Rack is newly built. It is placed on the squawker horn, and tweeter is placed on it. It is used to adjust the position of tweeter so that the z-coordination of its diaphragm is mached with that of the squawker diaphragm.
- Improvement 6: New speaker cable
- All the speaker cables (Audio Technica AT365S for tweeter and squakwer, 47 Lab Stratus for woofer) are replaced by Canare 4S6G.
Replacement of Squawker Driver
The frequency response of Fostex D1405 is not good. The treble is rolled
off. The response at 10kHz is lower than at 1kHz by -10dB or more. I had
expected that it could be compensated by using an equalizer. But SQ (sound
quality) wasn't improved by this method.
I tentatively installed the digital crossover network dbx DriveRack VENU360
in Gaudi Rev.2.11, and used the equalizer in VENU360. SQ got worse. It
probably due to the poor transient response resulted from the high level
compensation that exceeded 10dB.
I searched for drivers for 1" throat on the website of Sound House, and found Classic ProED3402. The price was as cheap as 2,580 JPY, but it looked like a good driver for SS-309. Though the price is only one twelfth of D1405 I had bought for 29.800 JPY, I expected ED3402 was better than D1405, since I had several experiences that a cheaper device was better than expensive one in SQ.
 |
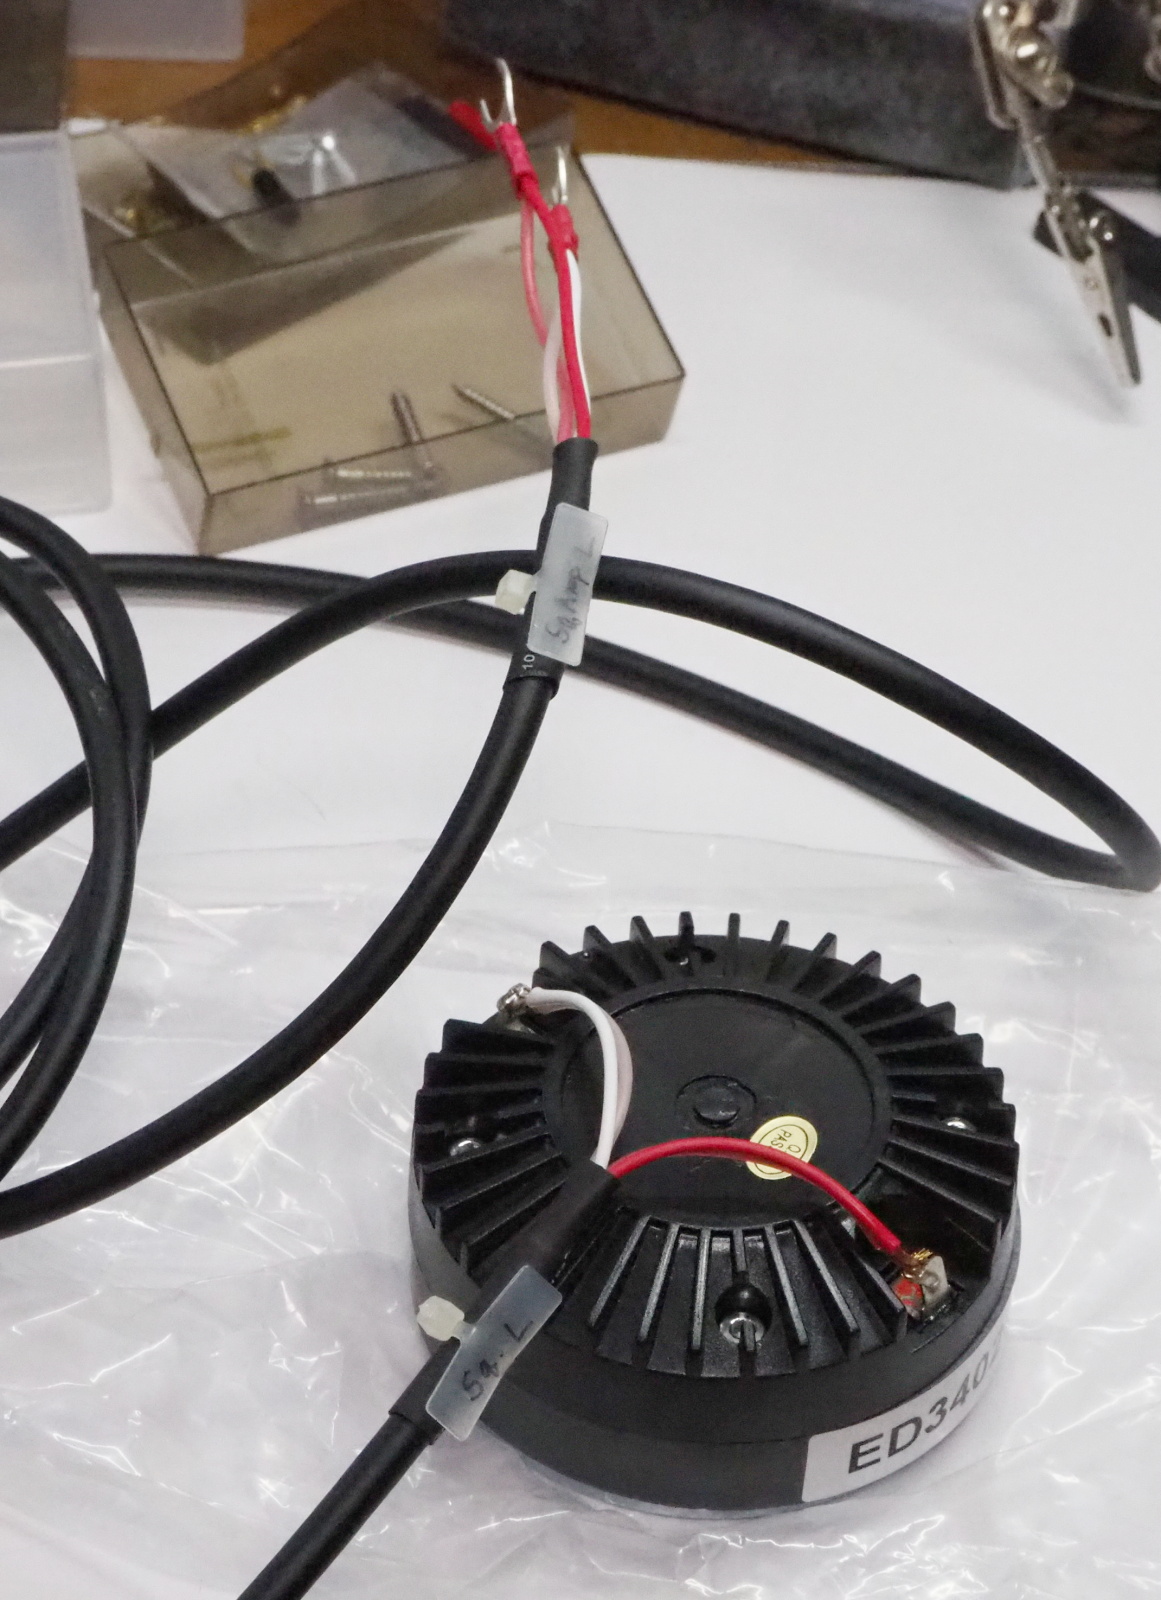 |
 | |
| Classi Pro ED3402 Looks like a quality driver. |
Speaker cable is soldered. Cable: Canare 4S6G |
ED3402 attached to Fostex H400. |
ED3402 is a replacement part for a PA loudspeaker rather than a product.
The detailed specification is unknown.
The frequency response is released. The low end is 600Hz. The response
sharply dropps at the lower frequencies than 600Hz. The -10dB cutoff is
500Hz. The high end of the flat response is 6kHz. Above 6kHz, the curve
undulates. We can't see -10dB cutof in the chart, though, it is 20kHz or
higher. It might be used as a tweeter too.
Side Panel
In the original design, the thickness of the side panel was 3mm. So, the sub-baffle is 6mm wider than Woofer Box, and the sub-baffle projects by 3mm on each side of Woofer Box (see the figure below).
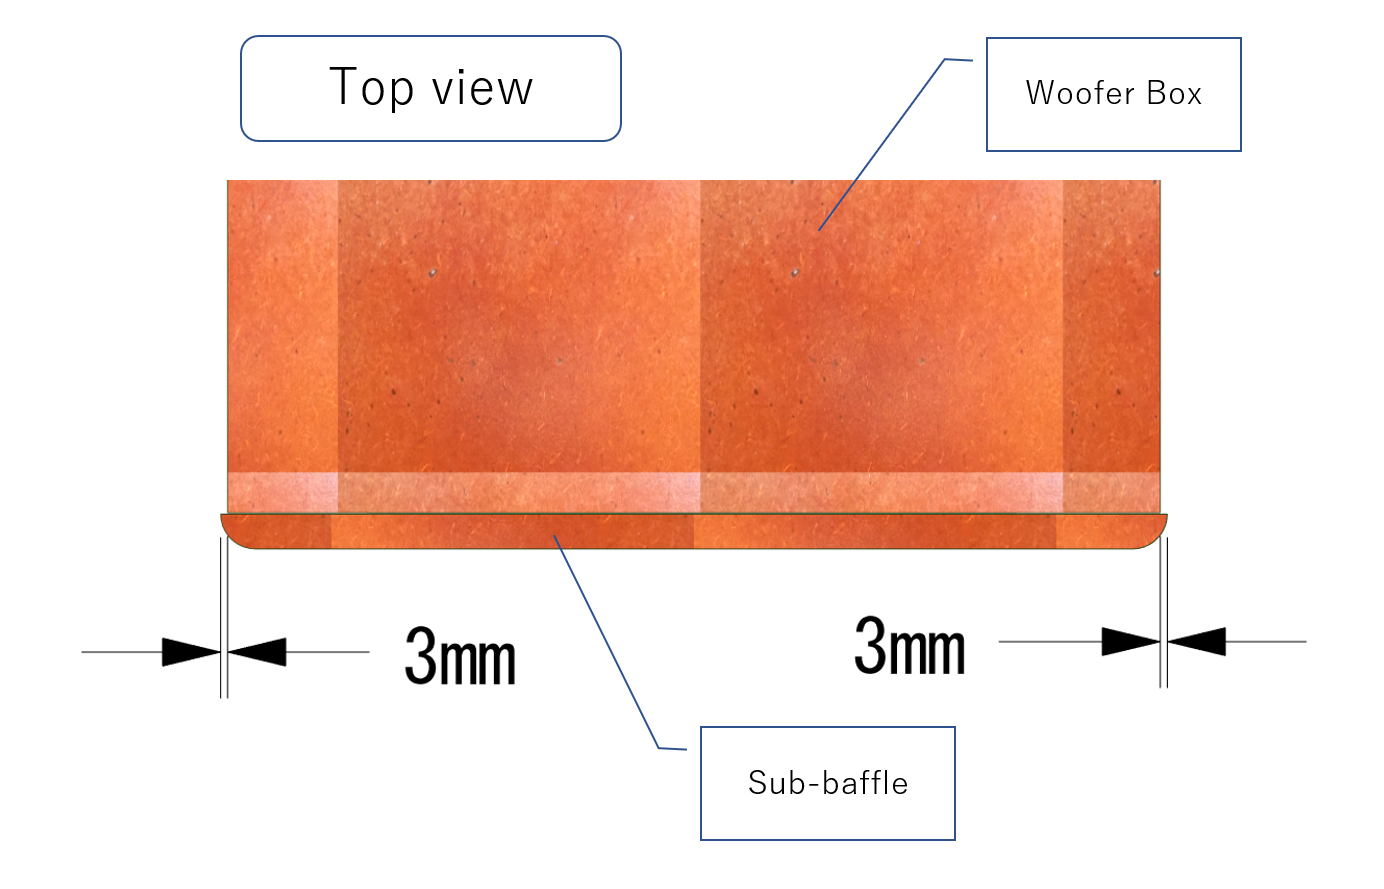
I wanted to 3mm thick sino plywood for the side panels, but only 4mm thick one was available at a nearby DIY shop. I compromise to use it, though the kerf would show in the front view. I chamfer the edge of the side panels for better look.
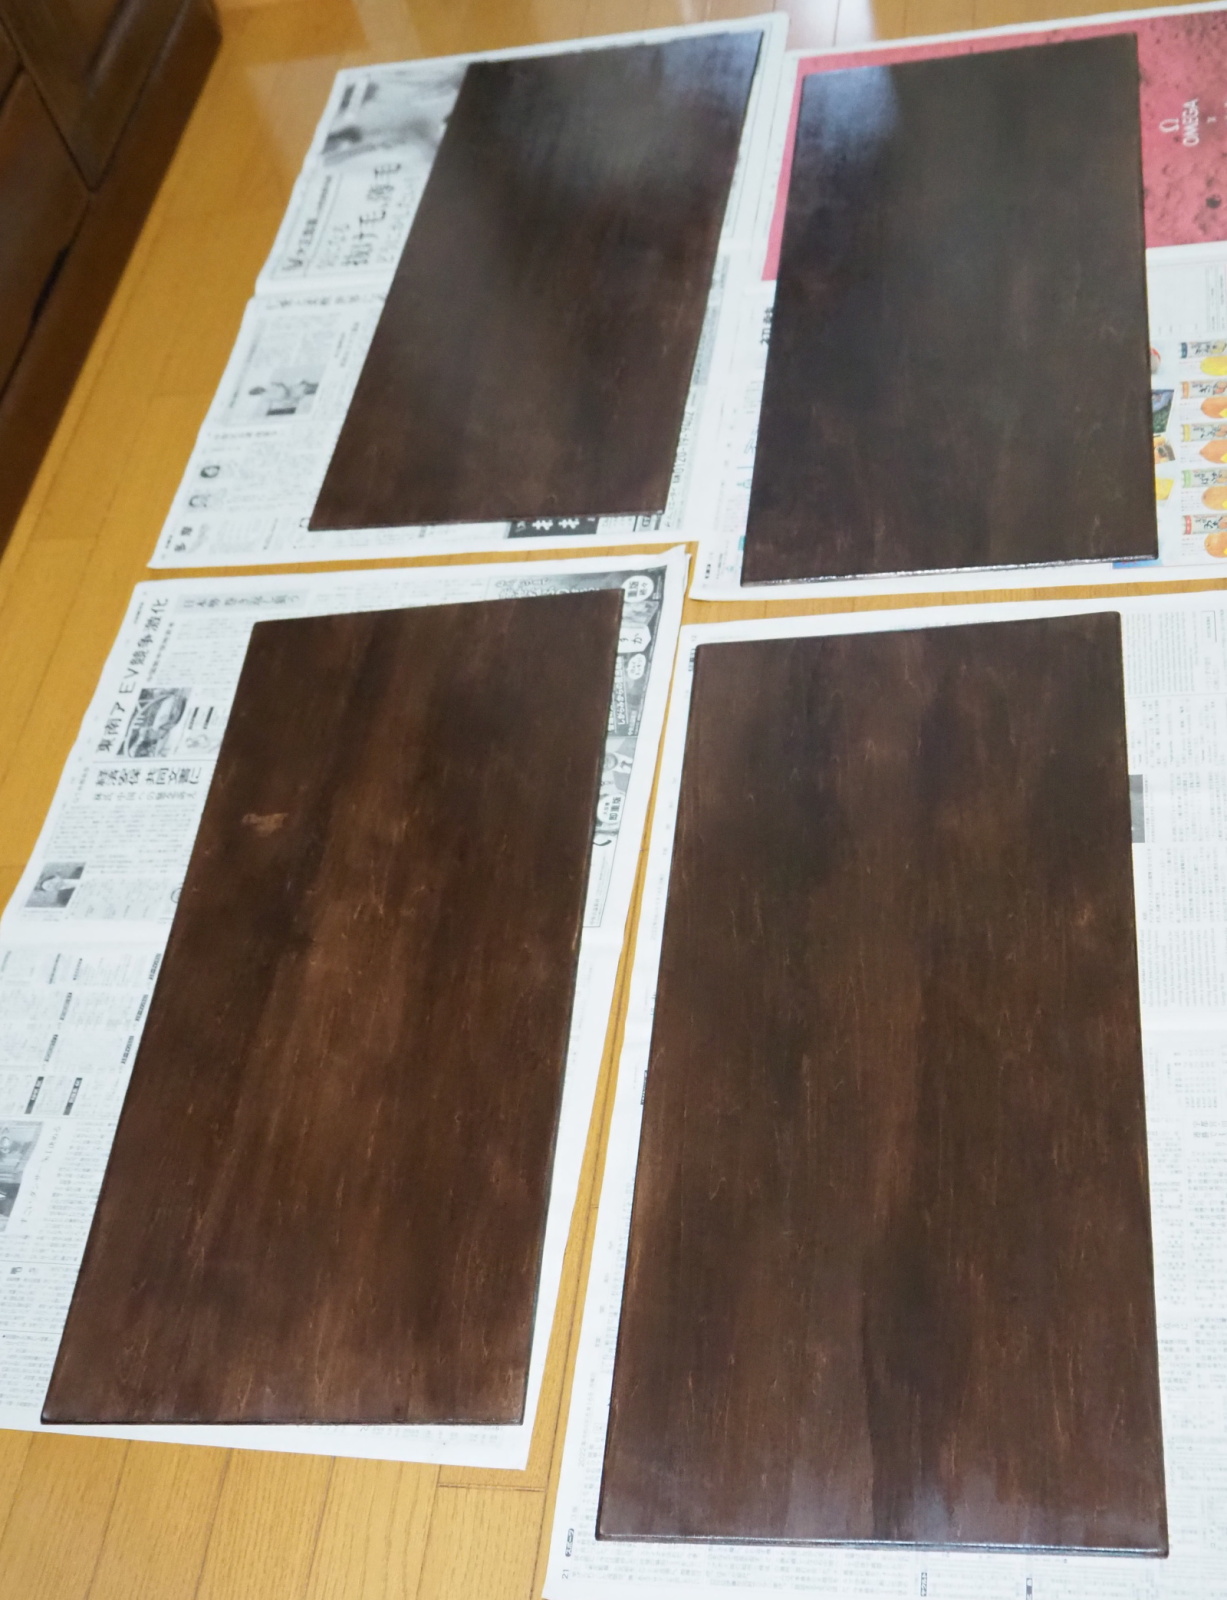 |
 |
 | |
| Finished Side Panels Material: Sino plywood Dimension: 4x352x752mm Finish: Stain paint (chocolate) + clear varnish |
Stain paint (chocolate) Washin NeoStein (water-based paint) I wanted to paint it only one time, but actually twice for even application. |
Clear varnish Washin Urethane Color Varnish (clear) I applied it twice too. |
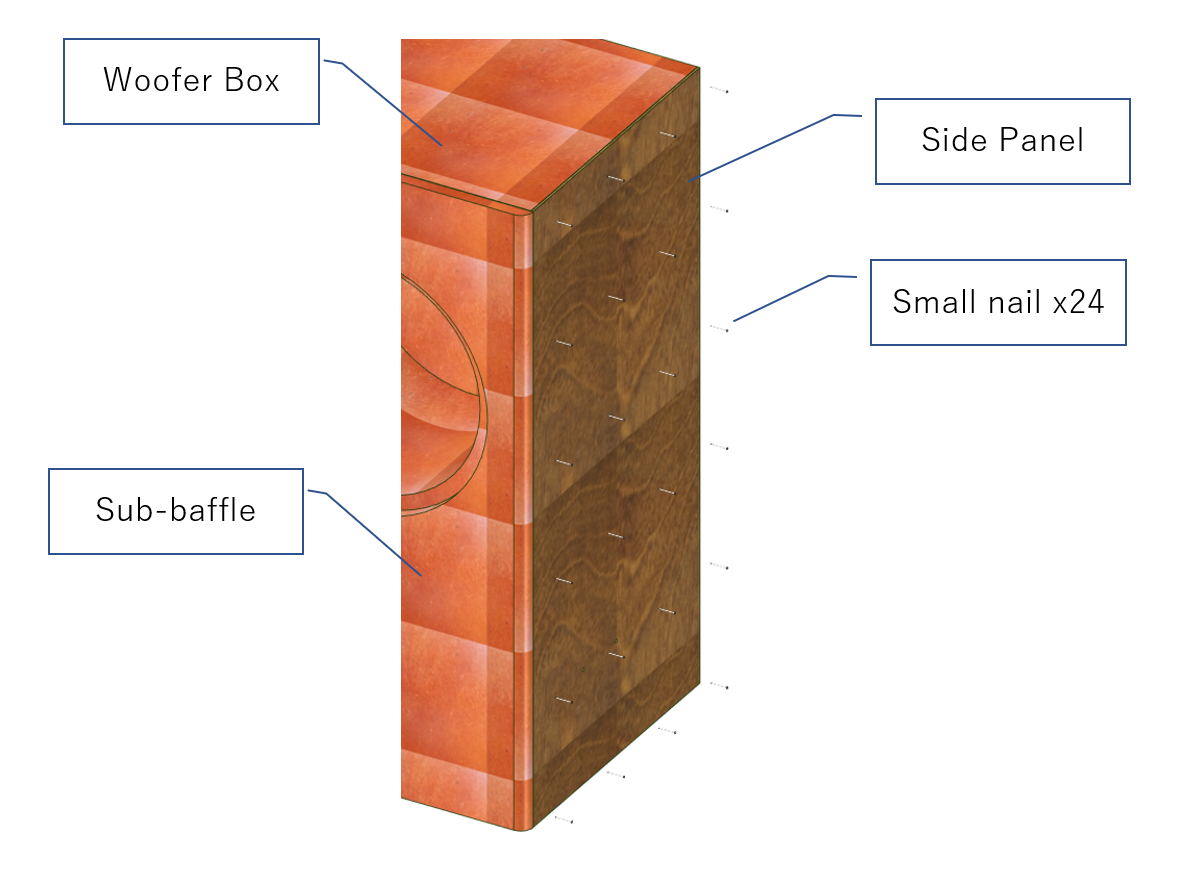 |
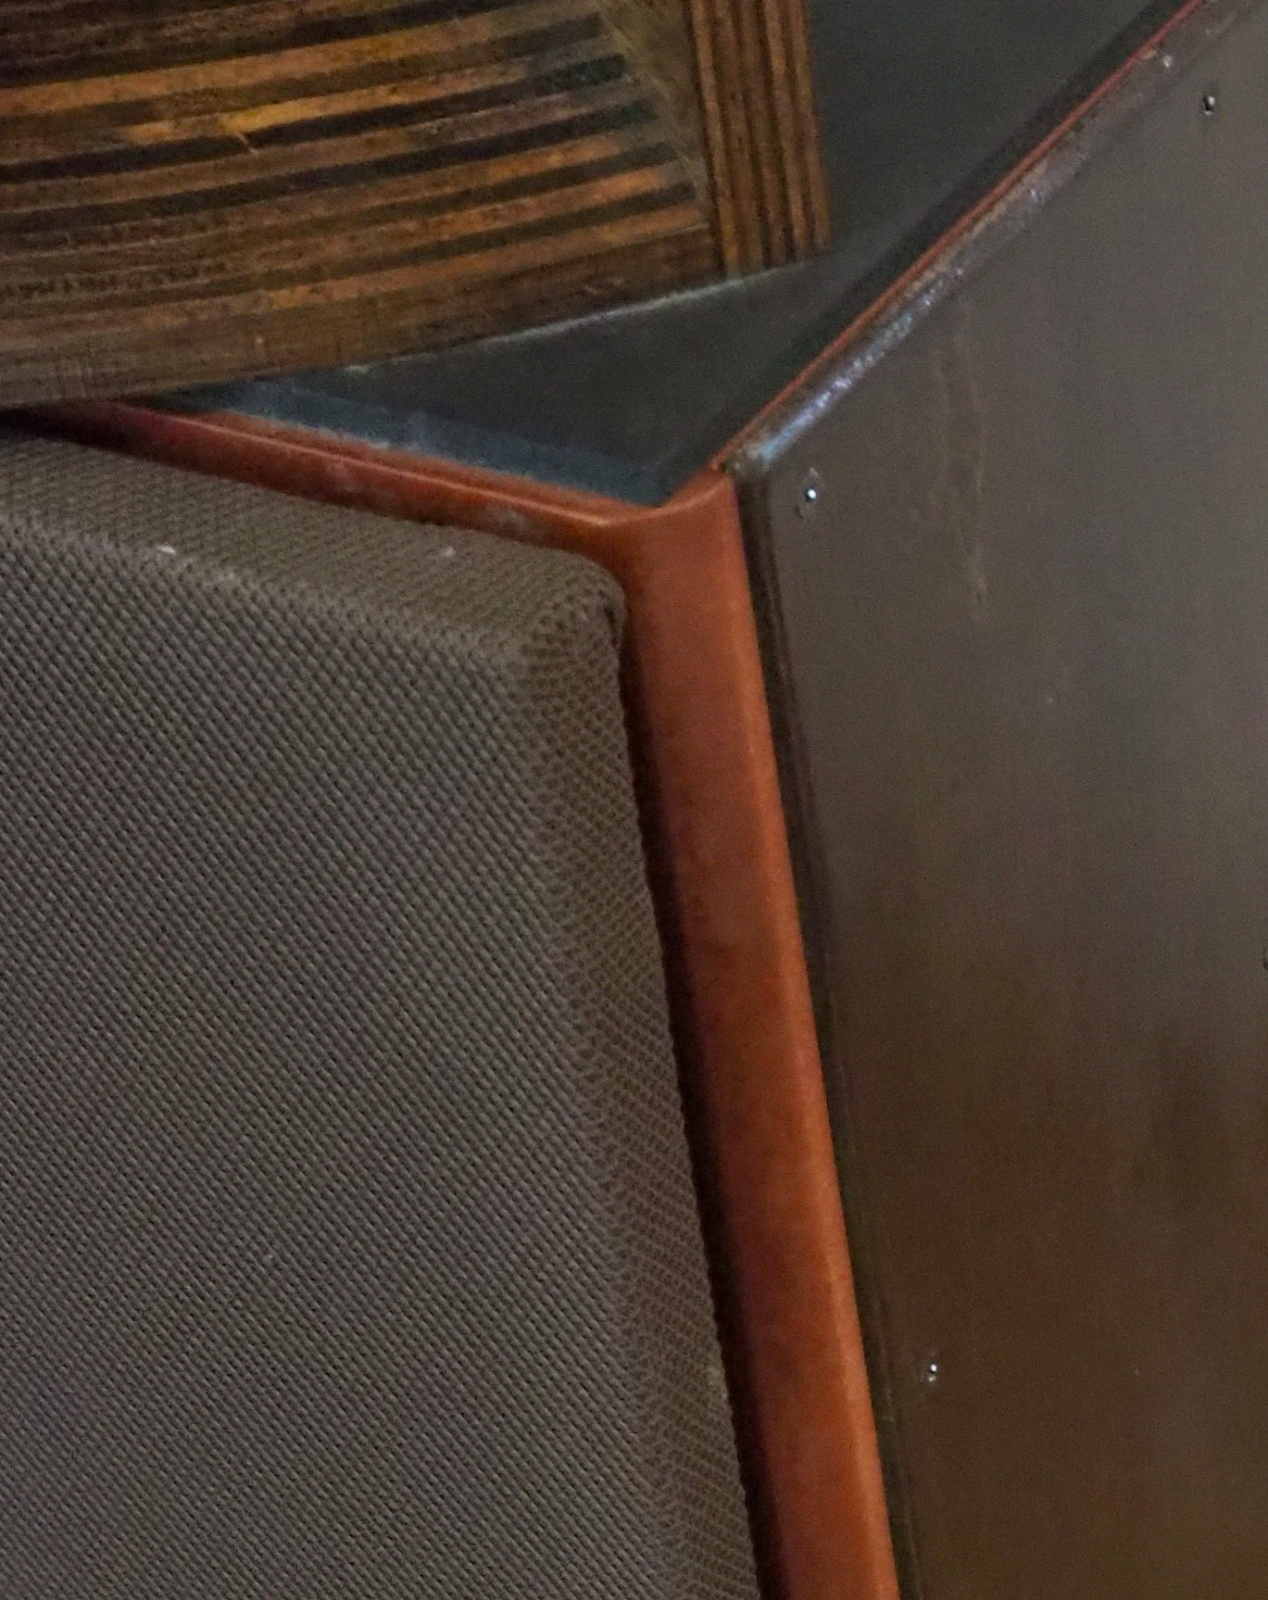 | |
| Attaching side panels Bond and 24 small nails are used. |
Side Panel attached The edge of the Side Panels are rounded. |
Amp Holder
I found a aluminum L-shape angle (3x50x50mm) in my stock. I made Amp Holder from it by cutting it 2 pieces of 180mm long.
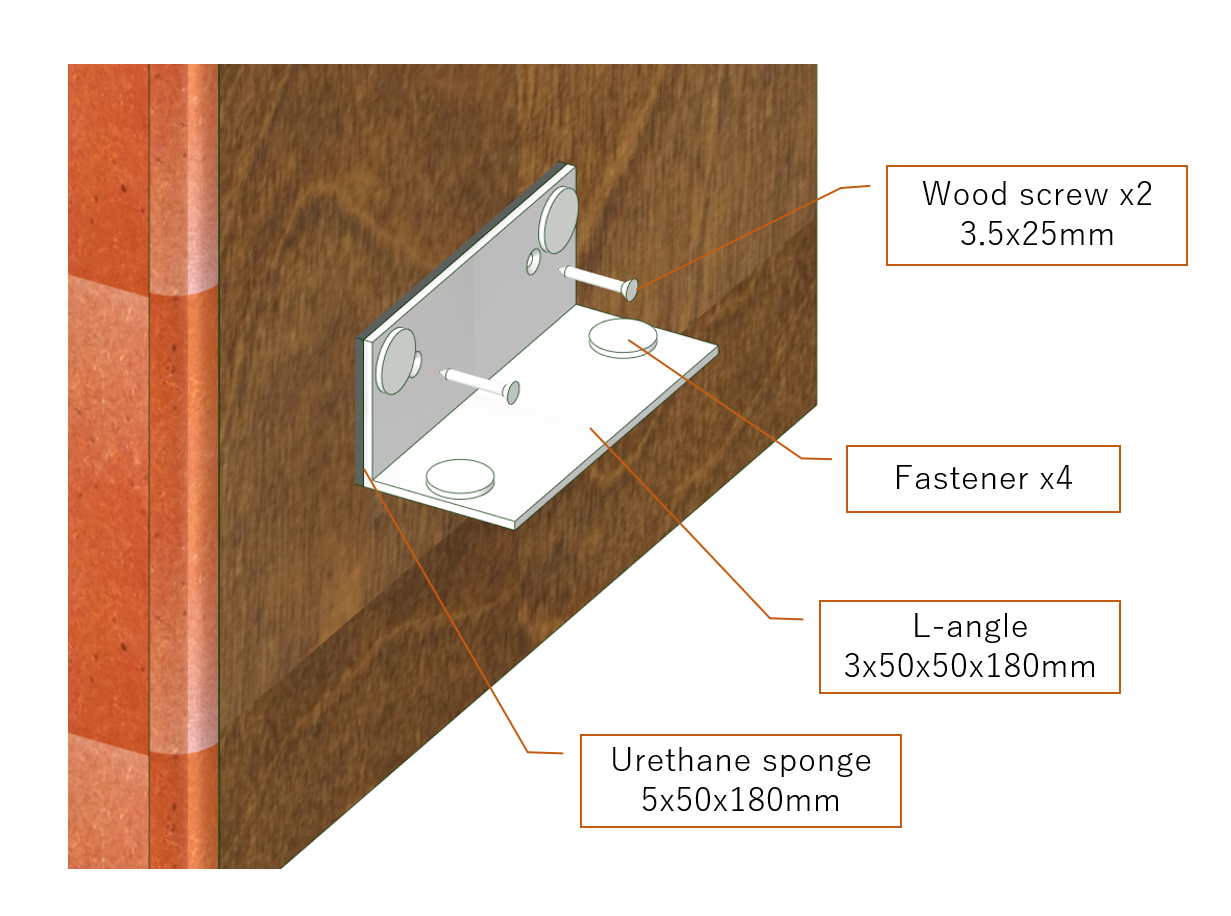 |
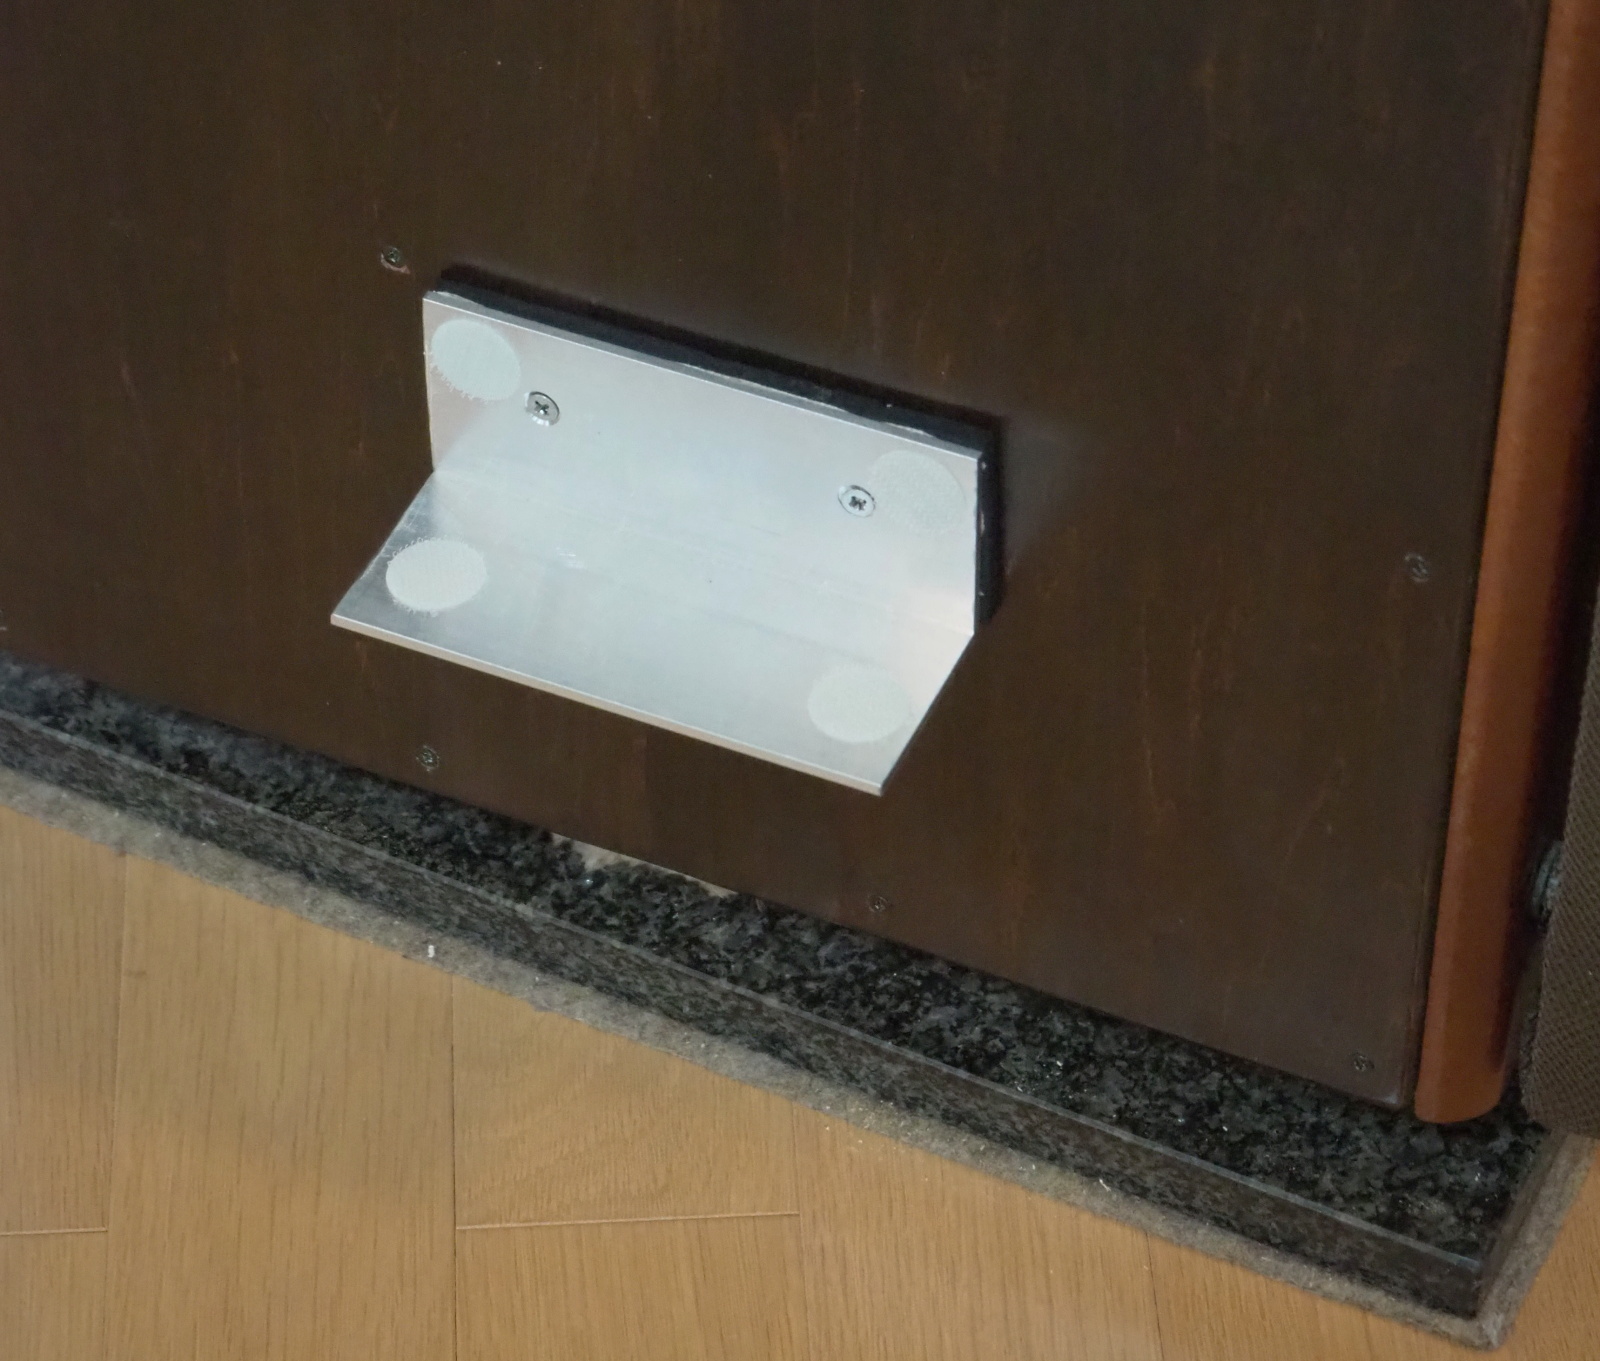 |
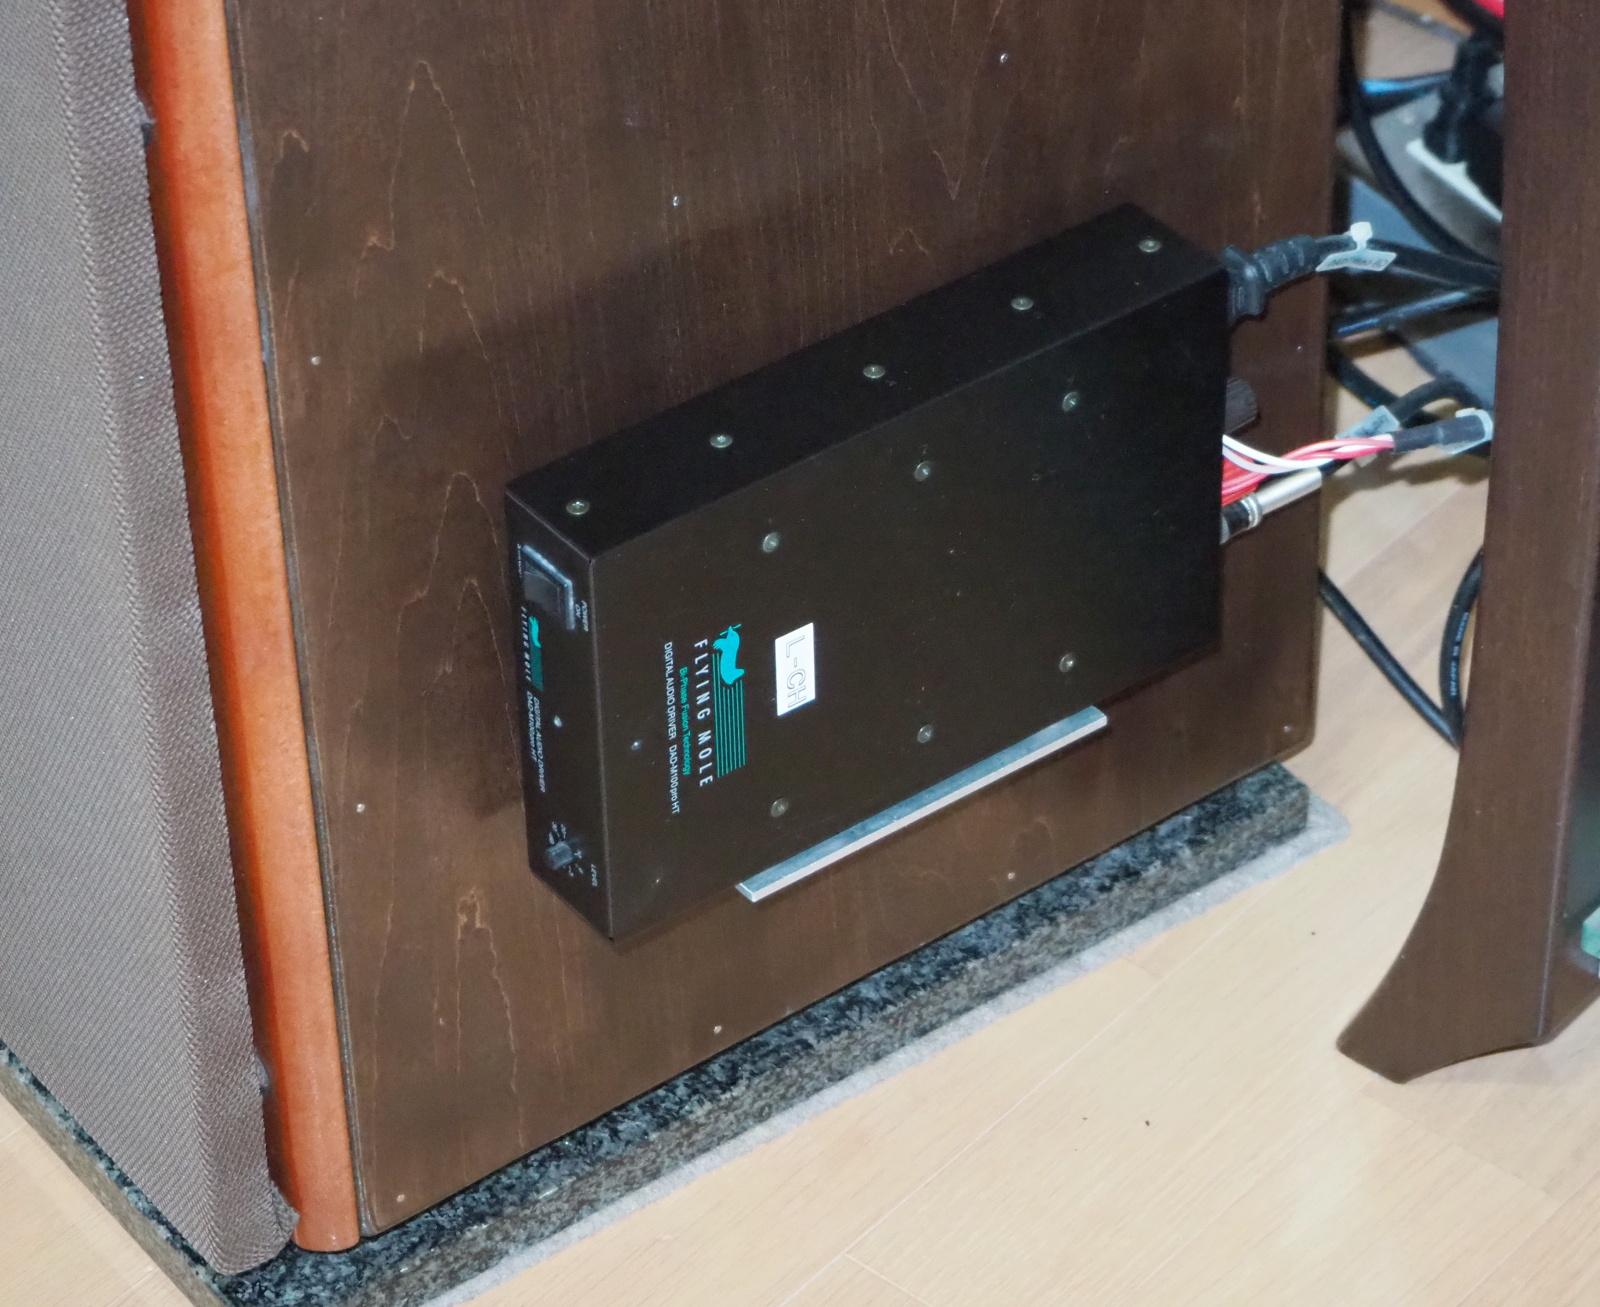 | |
| Plan of Amp Holder Amp Holder is fixed by two wood screws. 5mm thick urethane sponge is inserted between Amp Holder and Side Panel. Woofer Amp is attached by using four fasteners. |
Amp Holder fixed |
Woofer Amp attached |
Woofer Amp is loosely attached thanks to the fasteners and sponge. It feels like floating. I think the vibration of the woofer is blocked.
Fixing bolts for the woofer
Insert nuts are mounted so that the woofer is fixed with bolts.
Both insert nuts and bolts are the accessary parts of FW305.
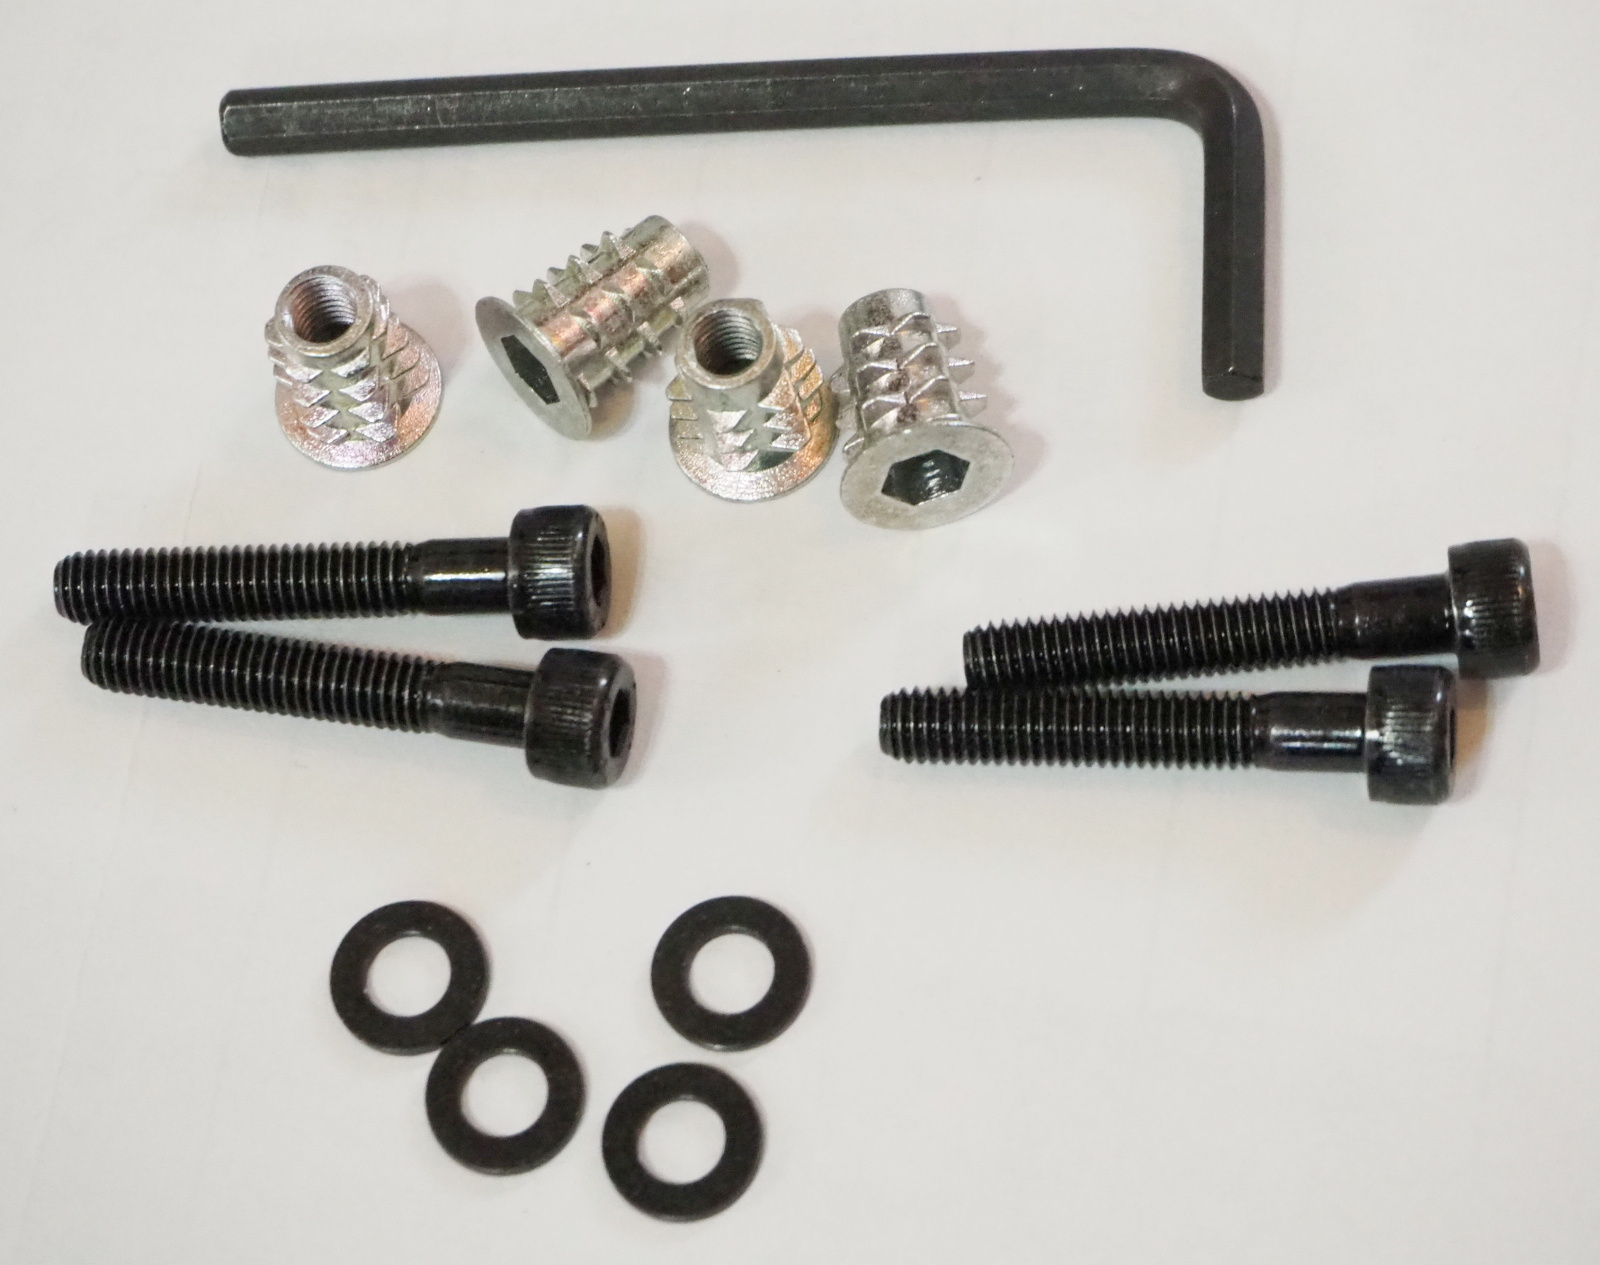 |
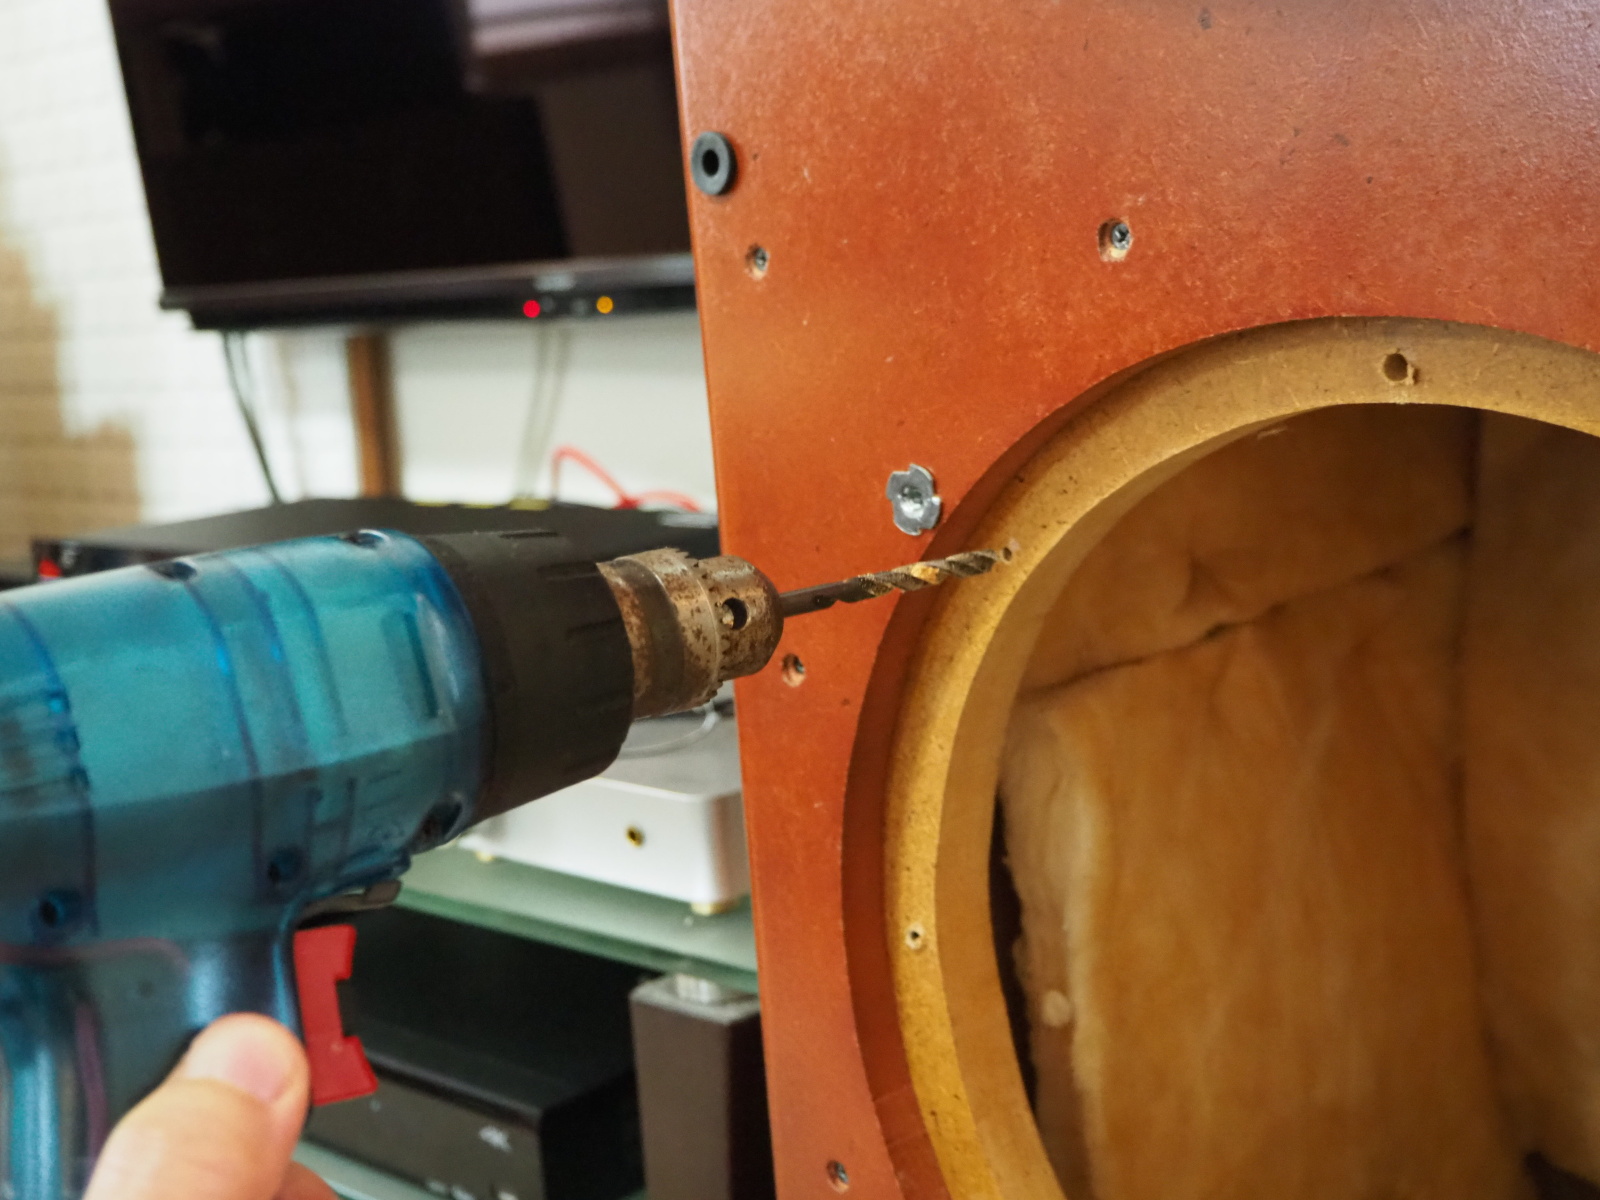 |
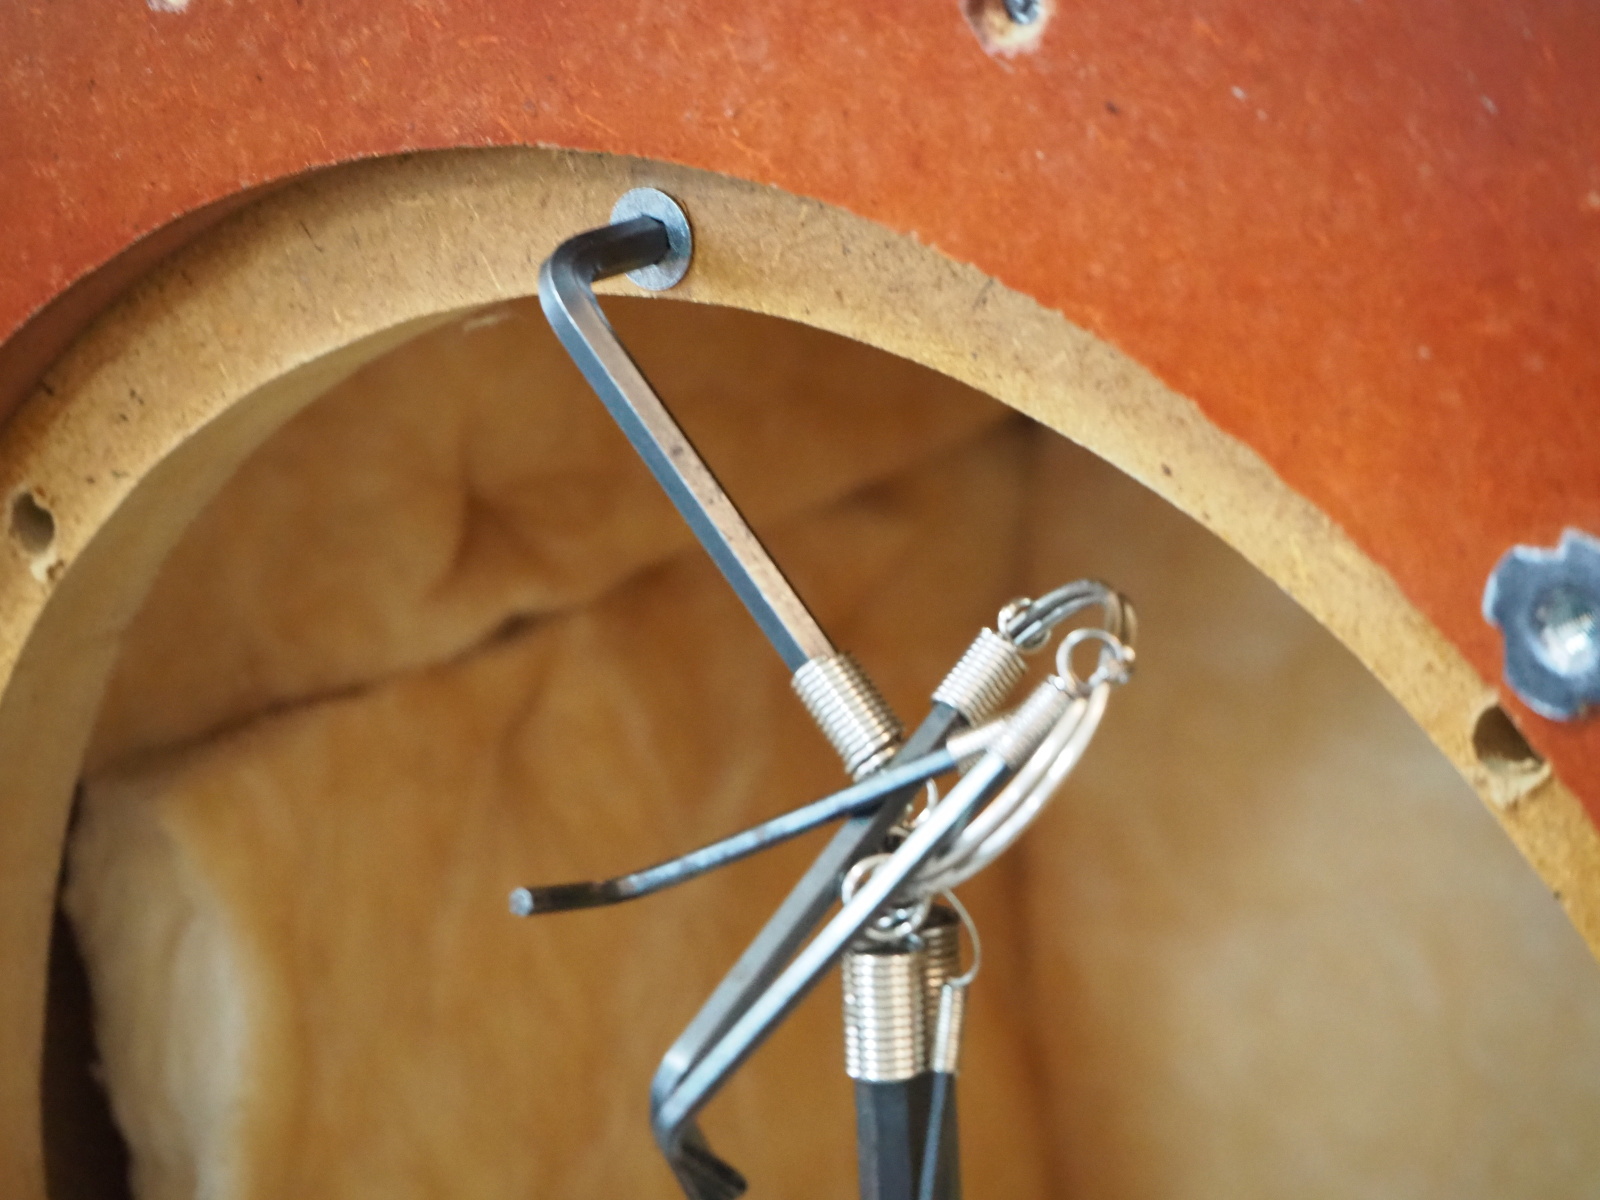 | |
| Accessary of FW305 Allen wrench is included. |
Boring holes for wood screws Expand the holes for the insert nuts. |
Woofer Amp attached Fit in the insert nuts with Allen wrench. Note that this wrech isn't the accessary of FW305. The accessary wrench is for the bolts. |
Tweeter Rack
Tweeter Rack was built for Gaudi Rev2.11. It was used to make time alignment of tweeter and squawker.
I failed to paint it. It didn't look good. I remove the coat and re-paint
it.
I used two 24mm-thick lamber-core boards to lift tweeter to the higher
position in Gaudi R2.11. I paint them as well.
I had painted Tweeter Rack with spray varnish, but it wasn't good because
the material absorbs the varnish and the coat became uneven. This time,
I paint it in the same way as Side Panels.
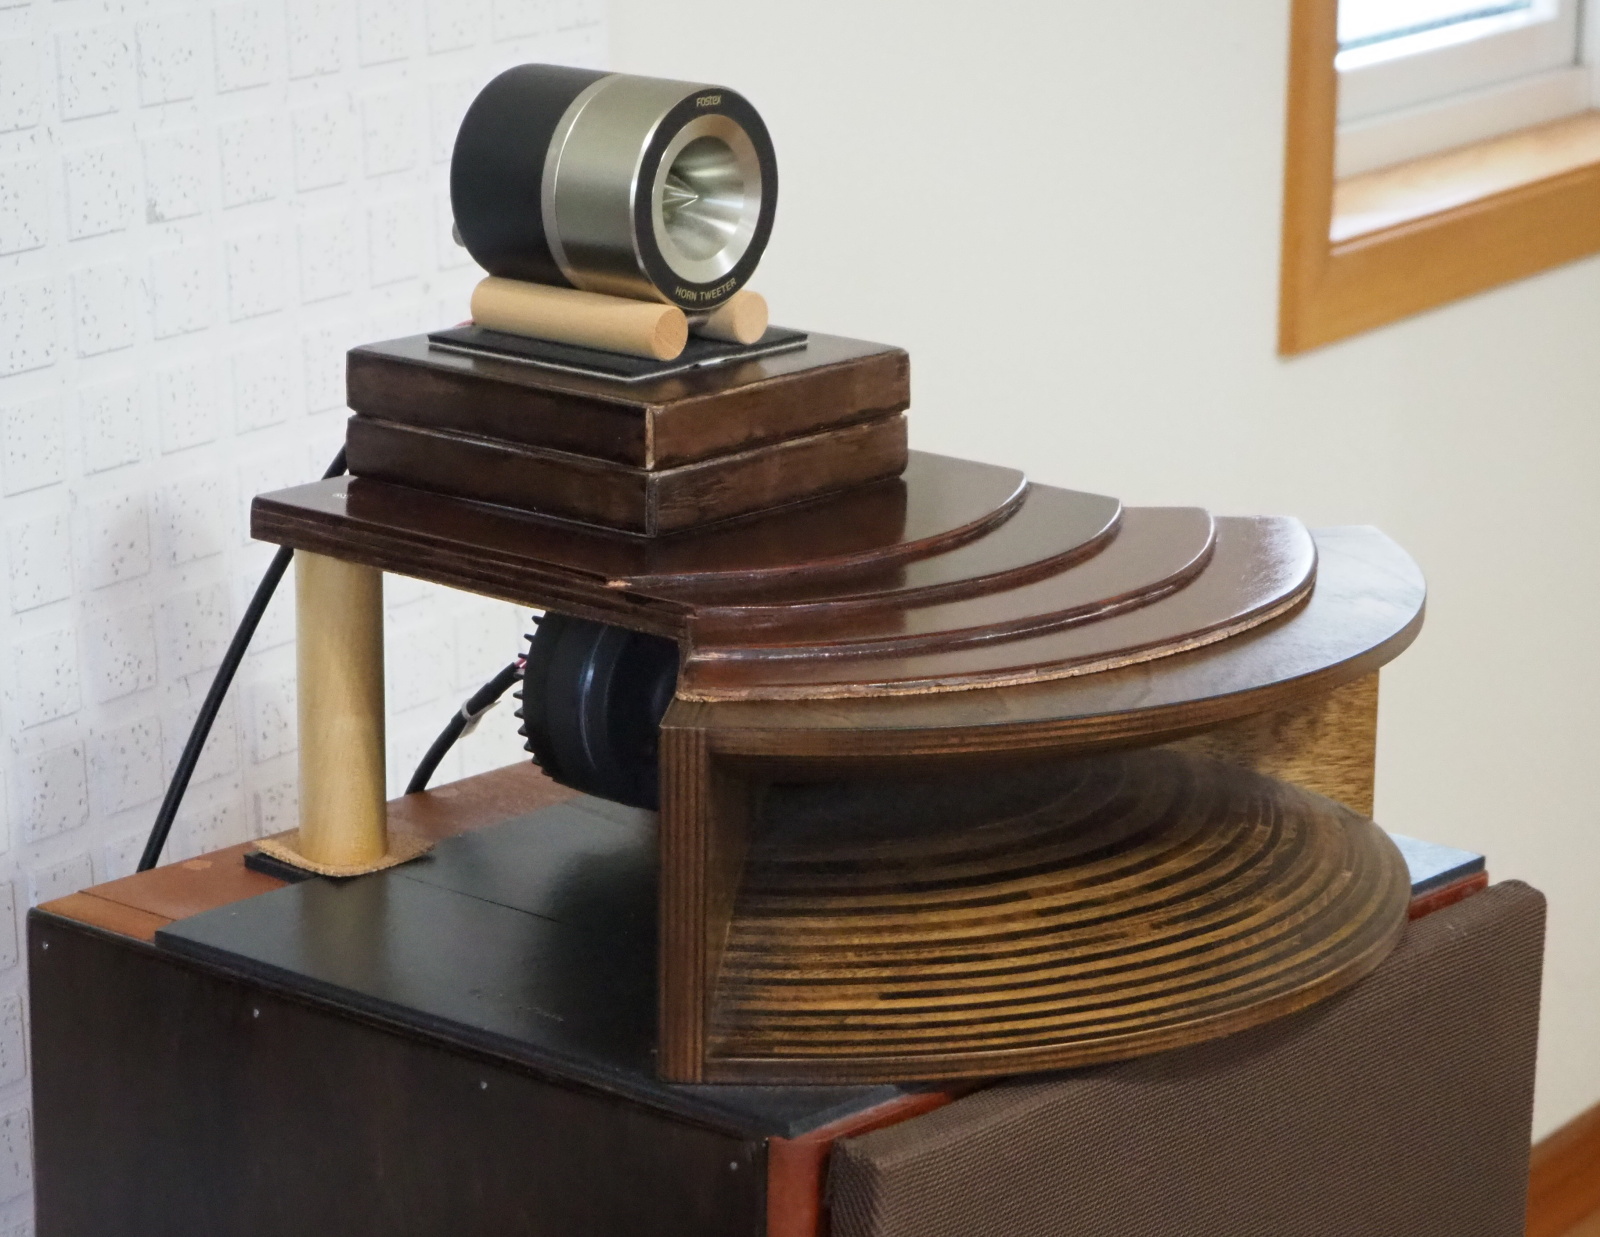 | |
| Re-painted Tweeter Rack and Wood Spacer Washin NeoStain and Clear Vanish are applied twice just like Side Panel |
Tweeter Rack and Wood Spacer installed I call Tweeer Rack "anomalocaris" because its appearance reminds me of that champion in Cambrian period. |
Tweeter Rack and Wood Spacer are officially the accessary parts of SS-309B now.
Speaker Cables
I employed Canare 4S6G in replacement of Audio Technica AT365S (for tweeter and squawker) and
47 Laboratory 0.65mm single wire (for woofer).
I already used 4S6G for SS-312A, and confirmed it was an excellent cable.
It is quad-core type. The core is made from OFC. It is so popular in professional
audio field.
| Wire (Model#) |
Length | Amp end connector (Model#) |
Speaker end connector (model#) |
Note | |
|---|---|---|---|---|---|
| Tweeter | OFC AWG20, 4-core (Canare 4S6G) |
2.7m | Spade terminal, Phi3.5 (Nichifu TMEX 1.25Y-3.5) |
Spade terminal, Ph8 (RS Pro 613-948S) |
Use genuine tools for spade terminals |
| Squawker | OFC AWG20, 4-core (Canare 4S6G) |
2.7m | Spade terminal, Ph8 (RS Pro 613-948S) |
Soldered | Use genuine tool for spade terminals |
| Woofer | OFC AWG20, 4-core (Canare 4S6G) |
2.4m | w/o terminal | Spade terminal, Ph8 (RS Pro 613-948S) |
Use genuine tool for spade terminals |
The lengths of the cables are longer than the system design (Ver.2.3), because the longer cables are handy for experiments and tuning. After completion of the future components (CC-218, MA-219, MA-220, AR-421, MV-222), I'm going to shorten the cables as specified in the system design.
I have been believing for many years that the current that flows through
the SP cable is up to 1A, so the best connection is soldering. But I put
aside the firm belief and tried the spade terminals. Solderless terminals
have already been used in countless electronic devices and their reliability
is undoubtedly proved.
By using the terminals, SP cables can be easily attached/removed. On the
contrary, if the cables are soldered, it takes some labor to remove them.
So, I don't feel like making experiments and/or measurements. It has been
a big demerit.
I documented the design of the SP cables. I assembled the cables following
the document.
[SS-309B_Design_Cables.pdf]
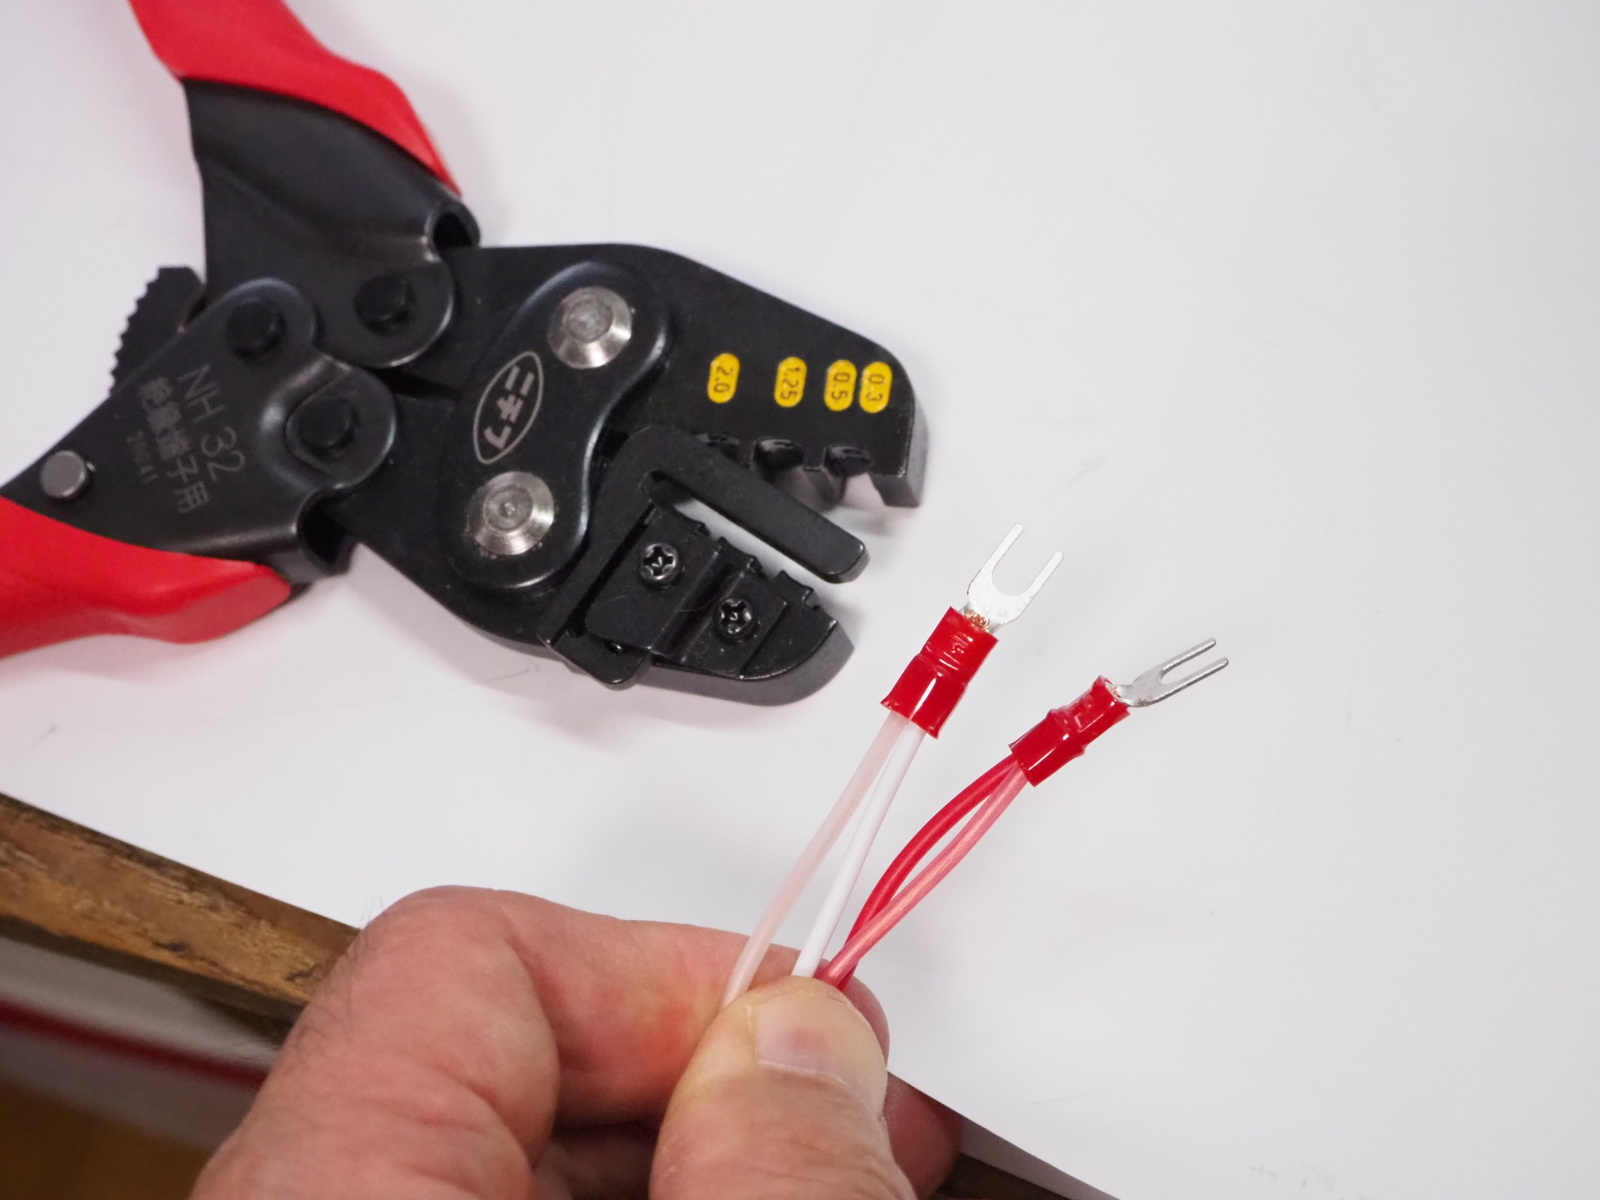 |
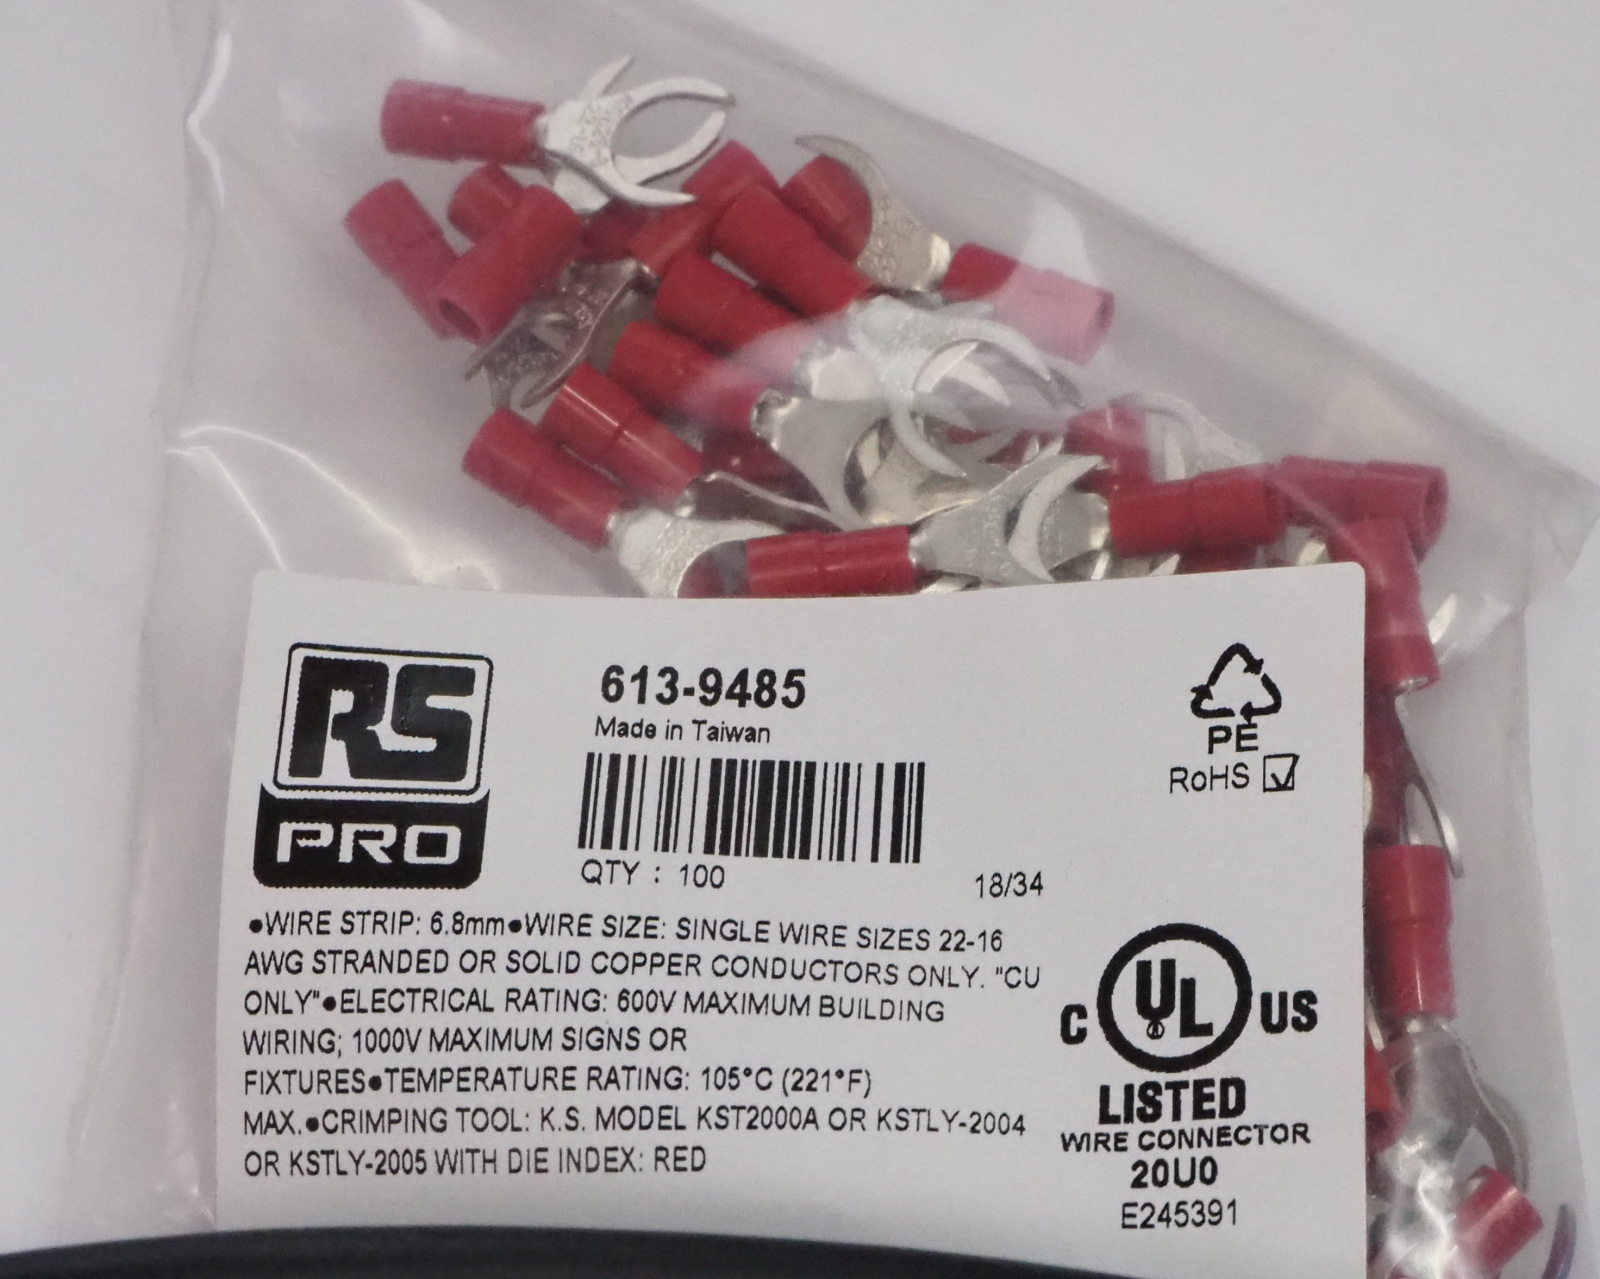 |
 |
| Nichifu spade terminal and genuine tool Terminal: TMEX 1.25Y-3.5, Tool: NH32 The tool is as expensive as 11,720 JPY |
RS Pro 613-9485 Spade terminal that fits in with M8 screw. The price was 1,682 JPY for 100 unit package |
RS Pro Genuine tool It is included in the solderless terminal kit (534-828). The price of the kit was 3,075 JPY! So cheap! |
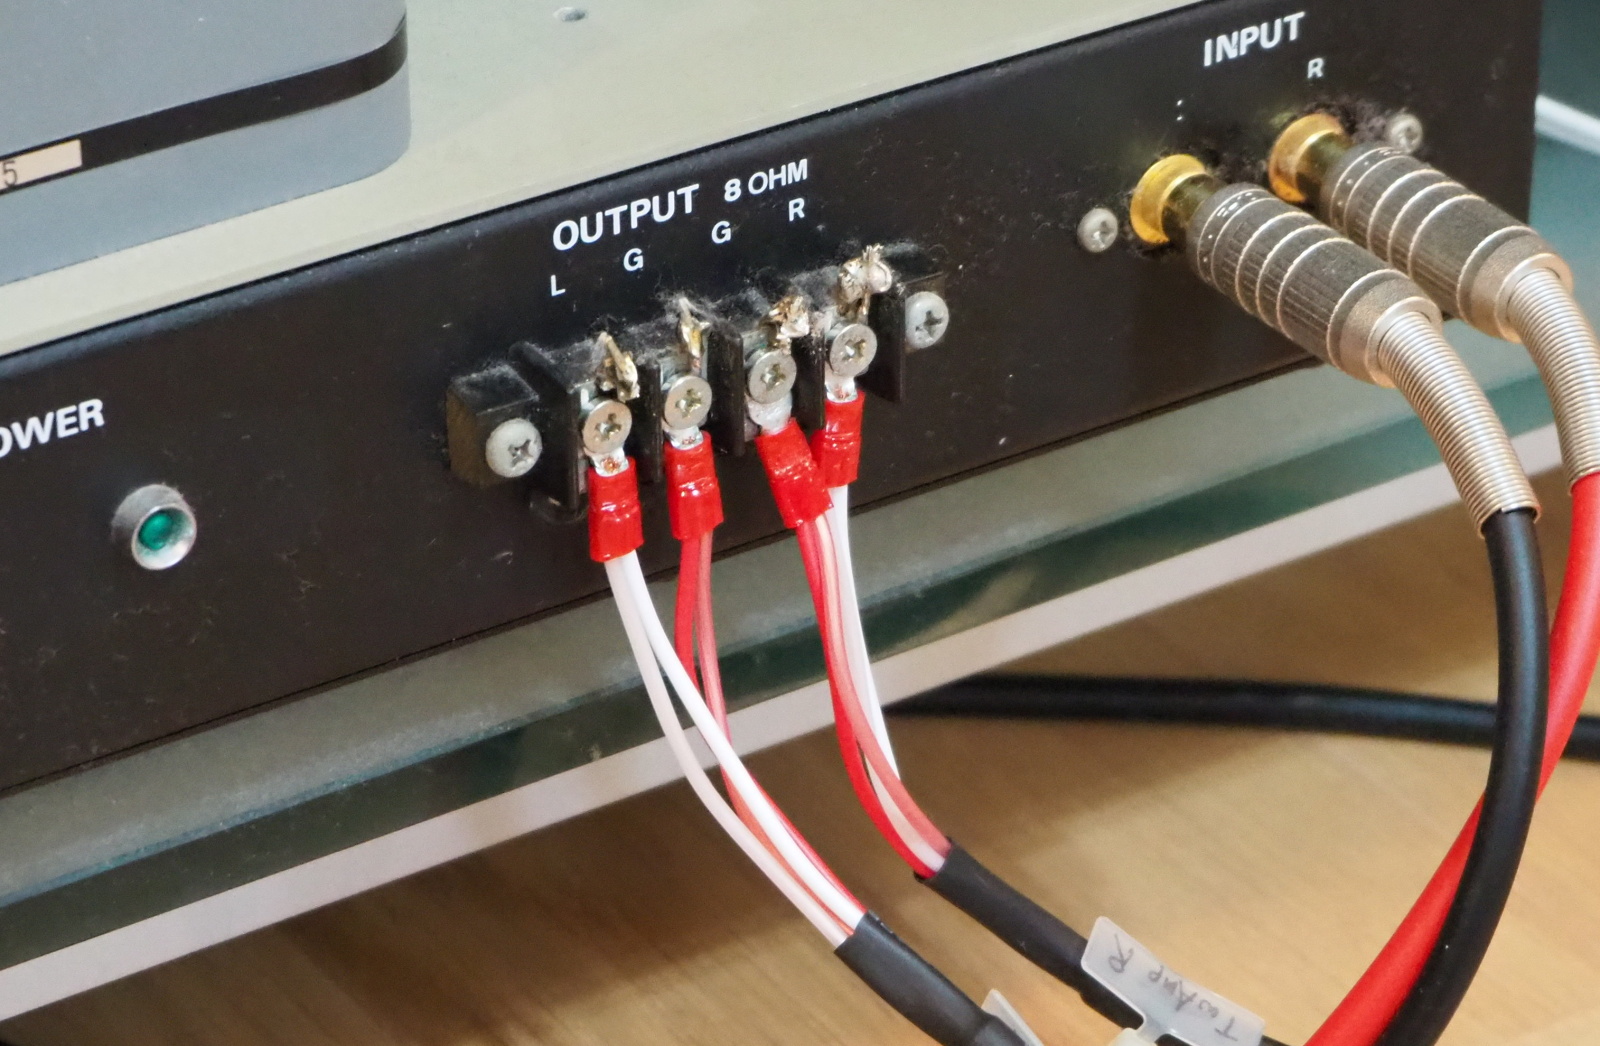 |
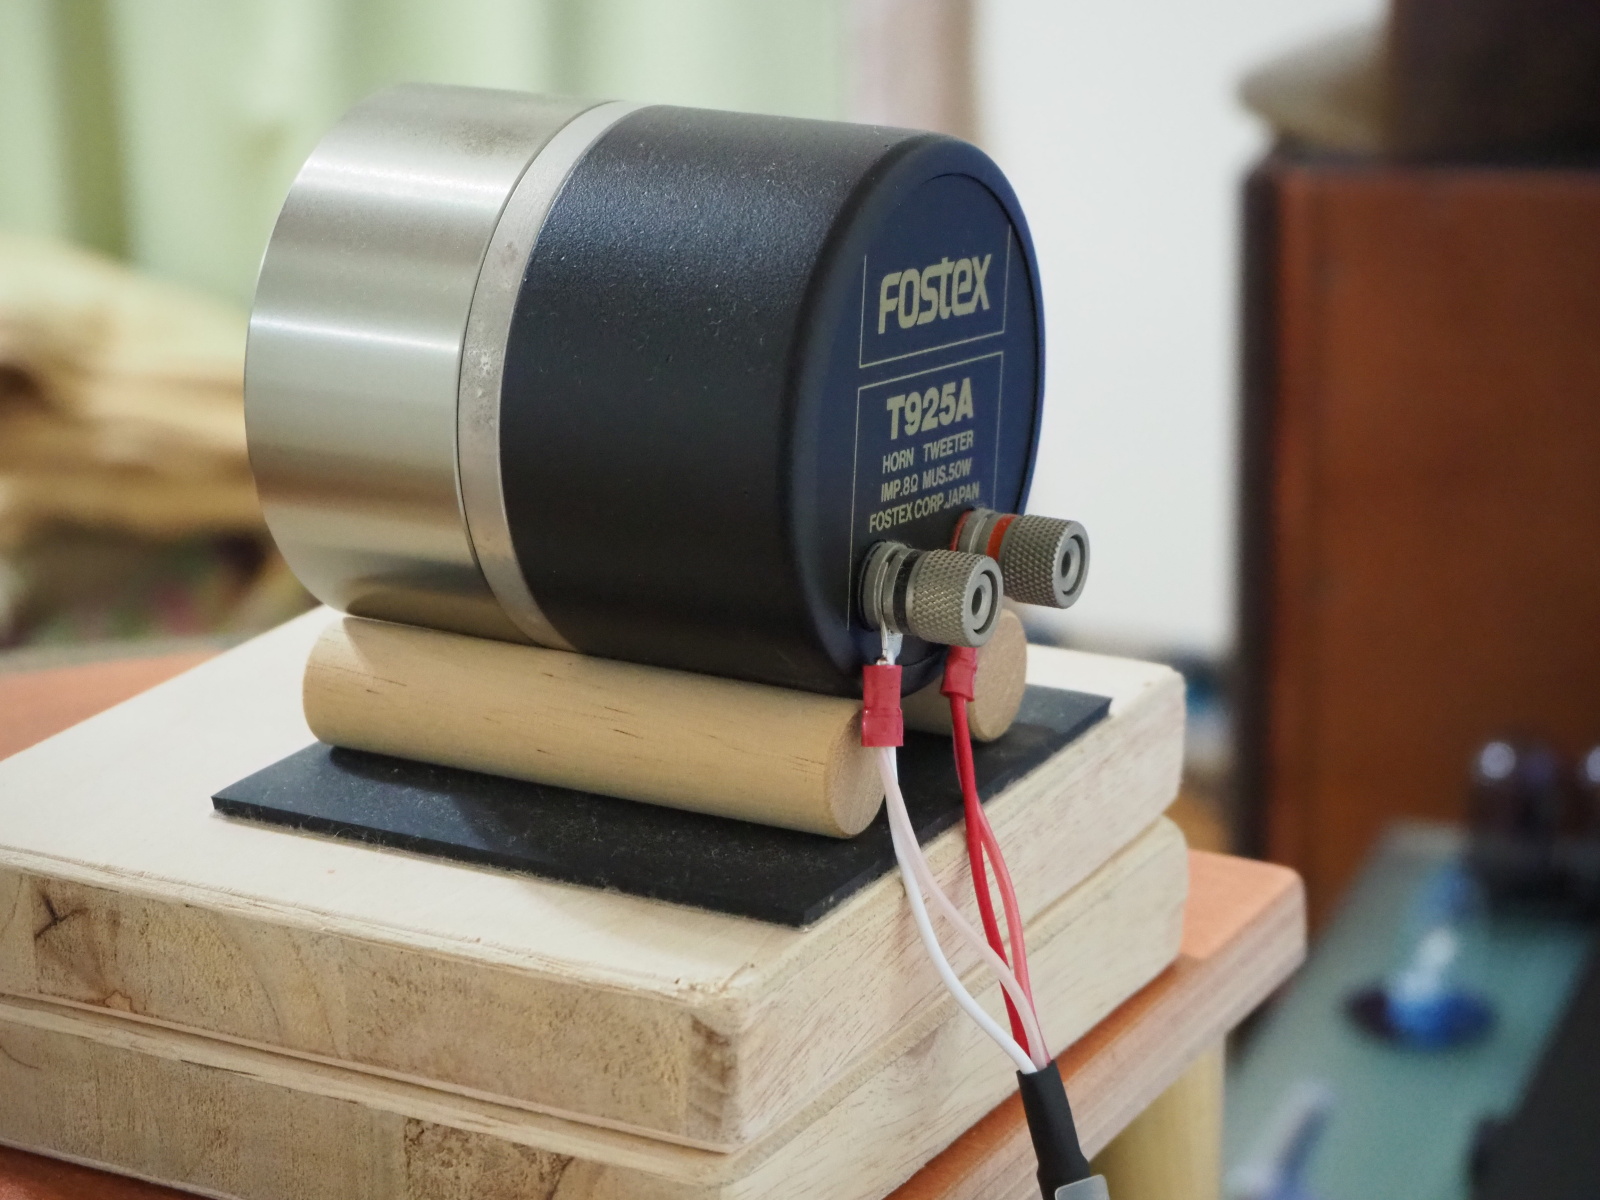 |
| Tweeter Cable (amp end) The cable used to be soldered. Now it is connected in standard way |
Tweeter Cable (speaker end) The cable used to be bound around the tweeter terminal. Titan Audio Oil was applied to the stripped wires |
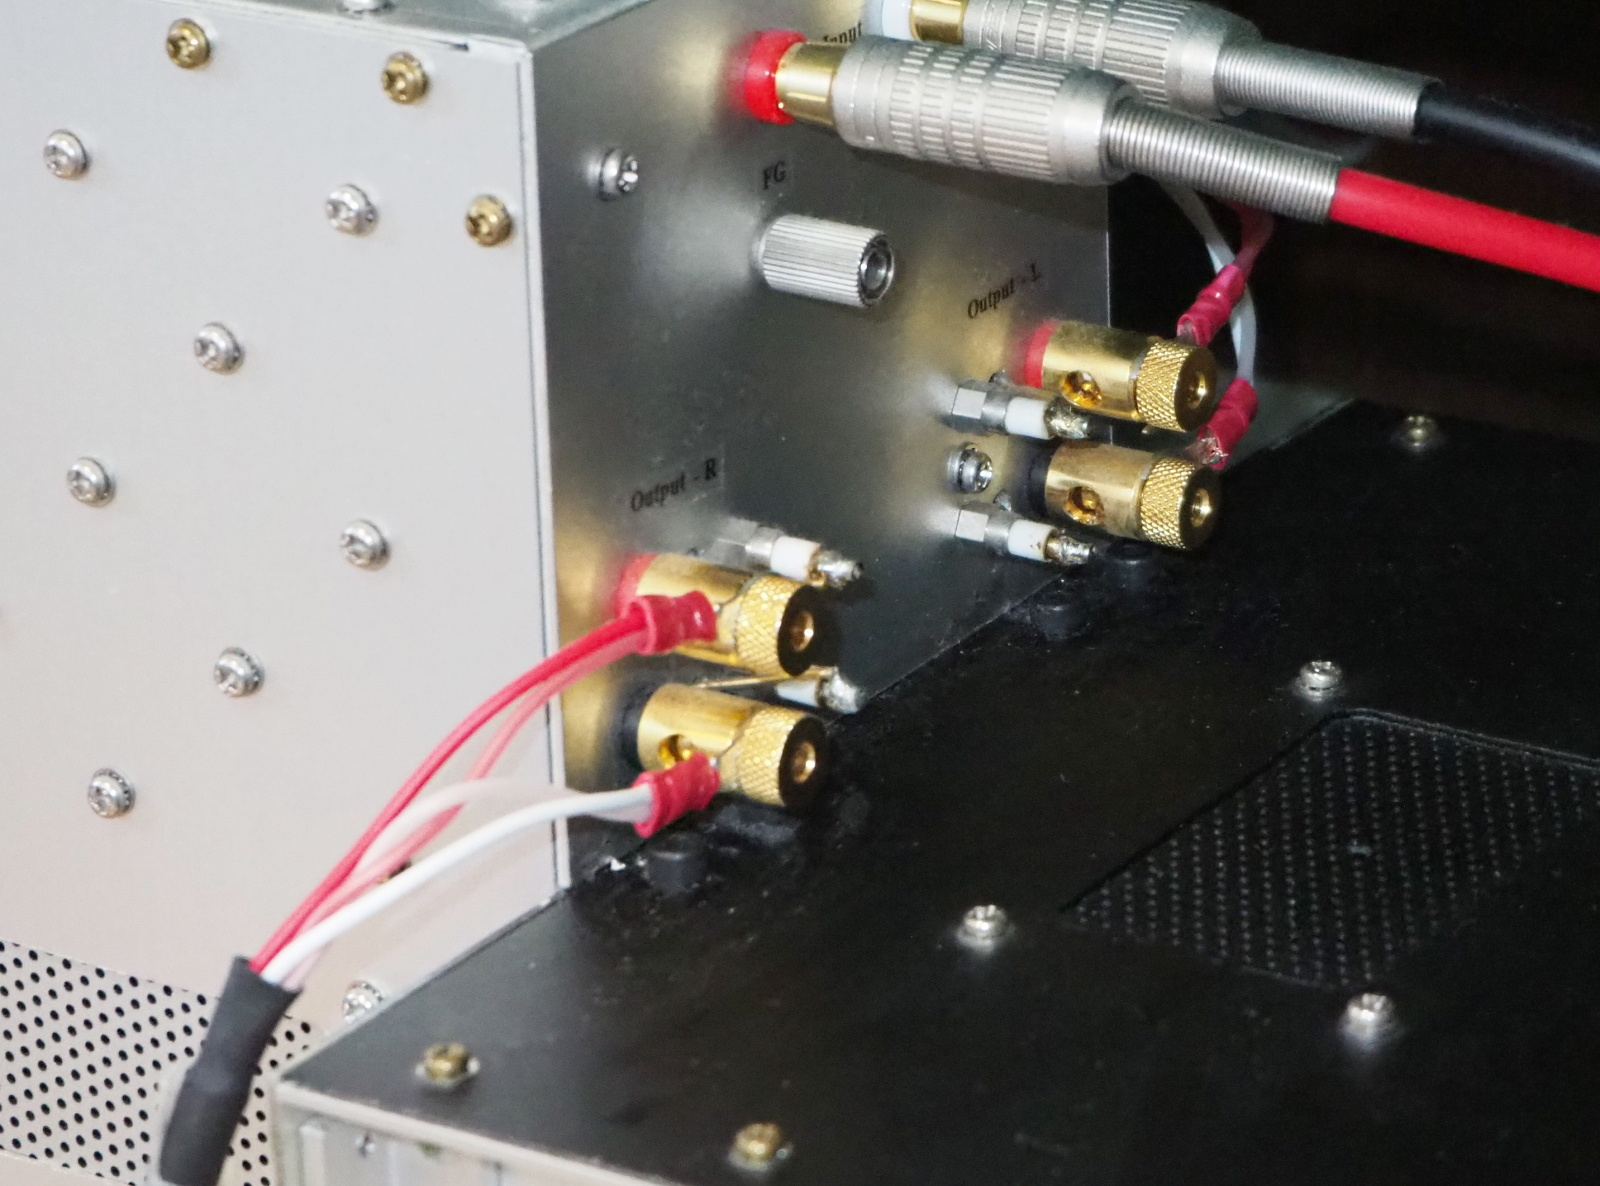 |
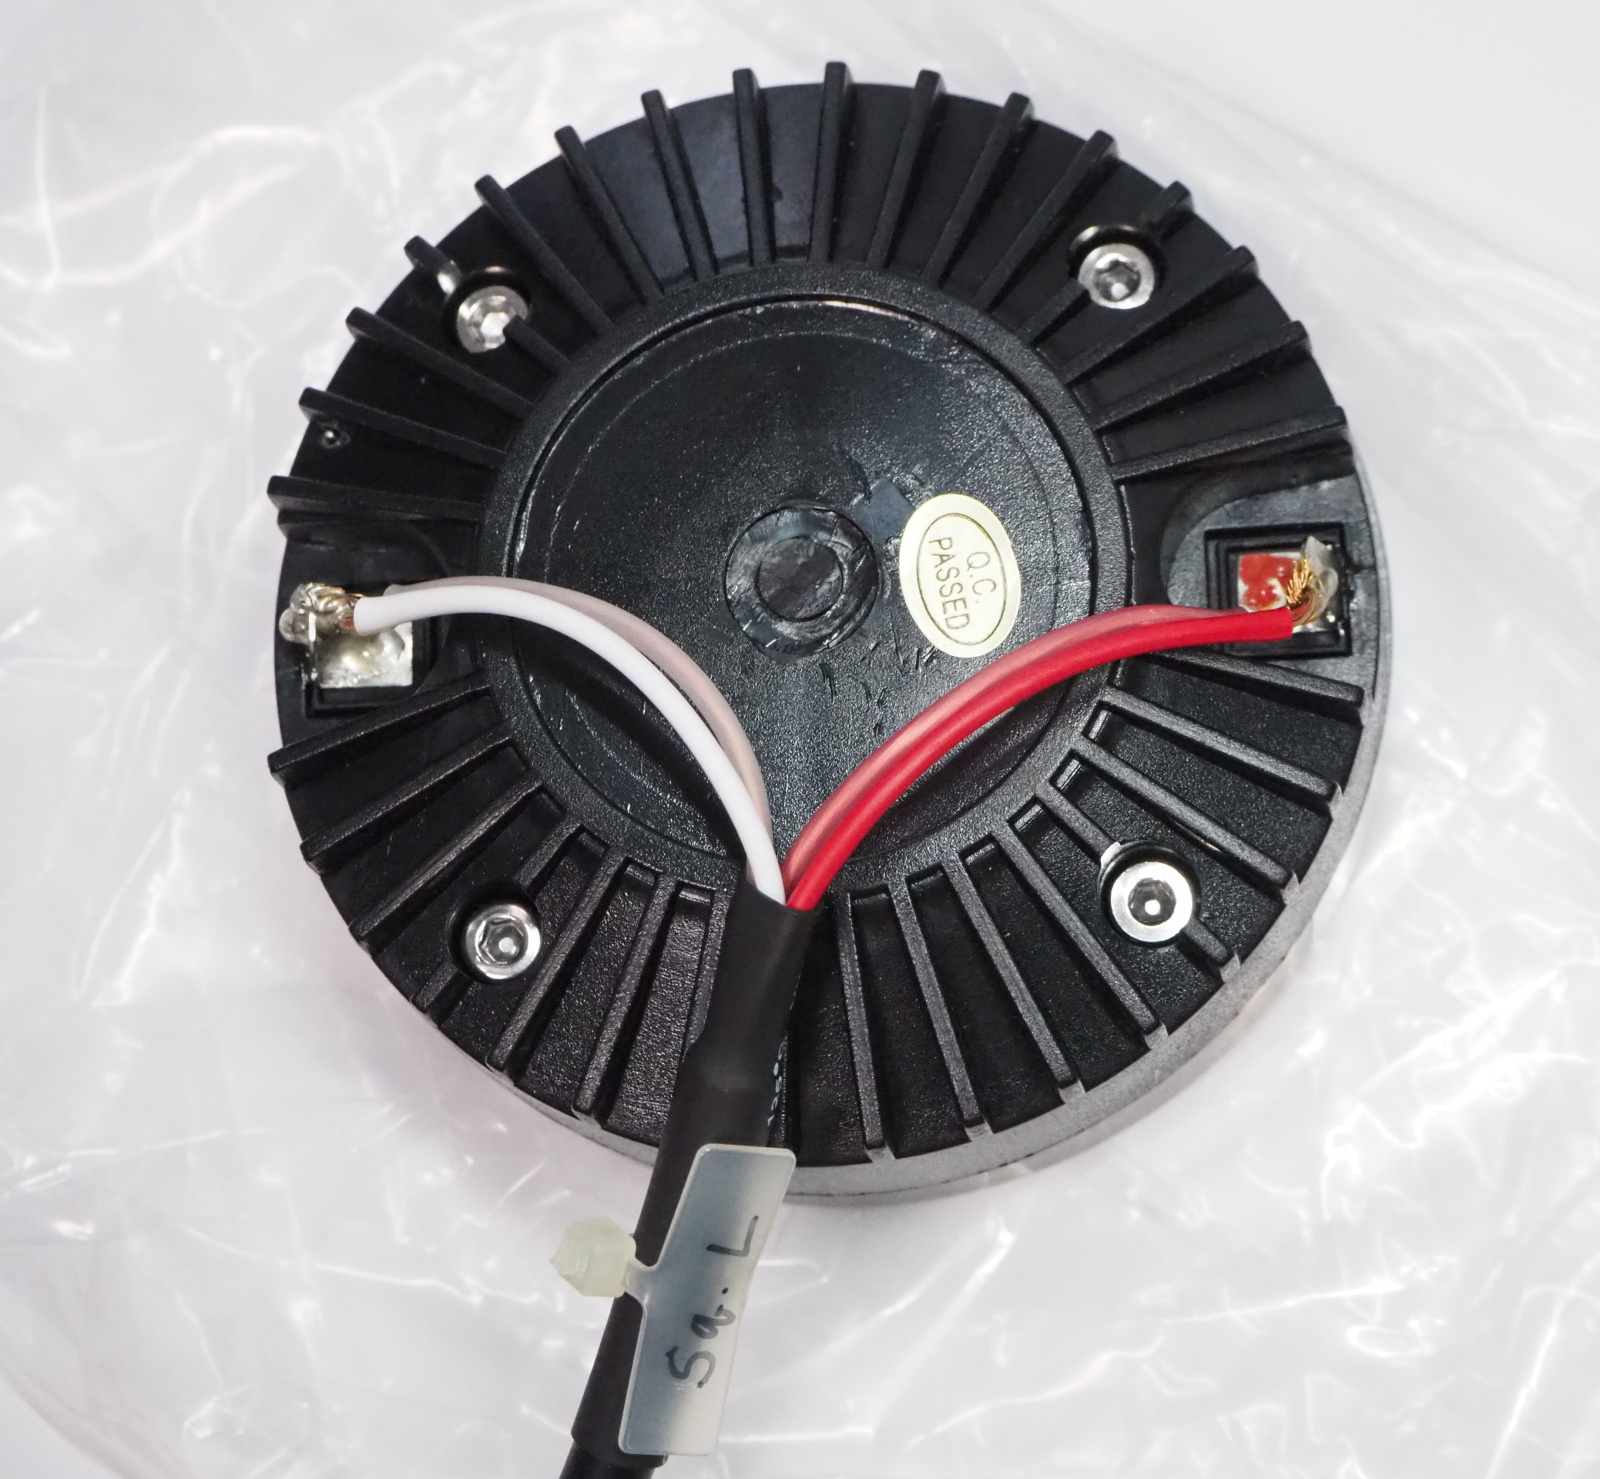 |
| Squawker Cable (amp end) The cable used to be soldered. Now it is connected in standard way |
Squawker Cable (speaker end) The cable is soldered to faston tab |
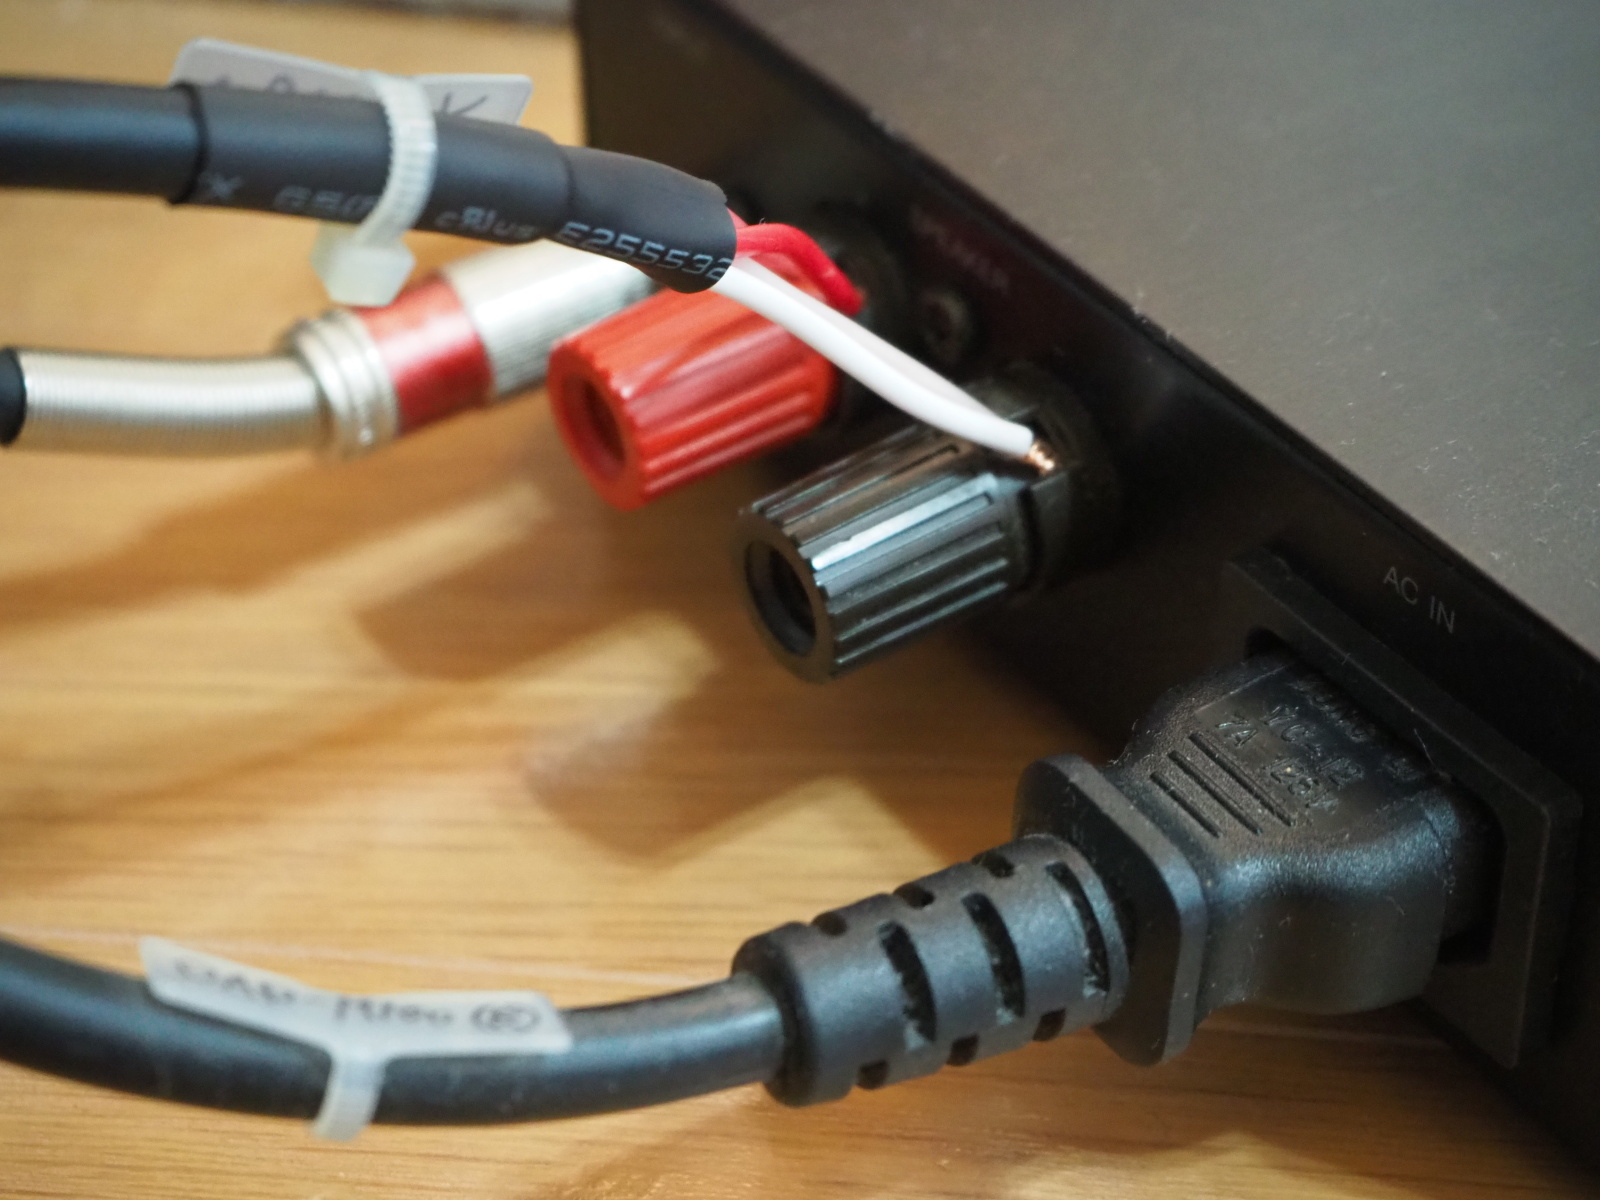 |
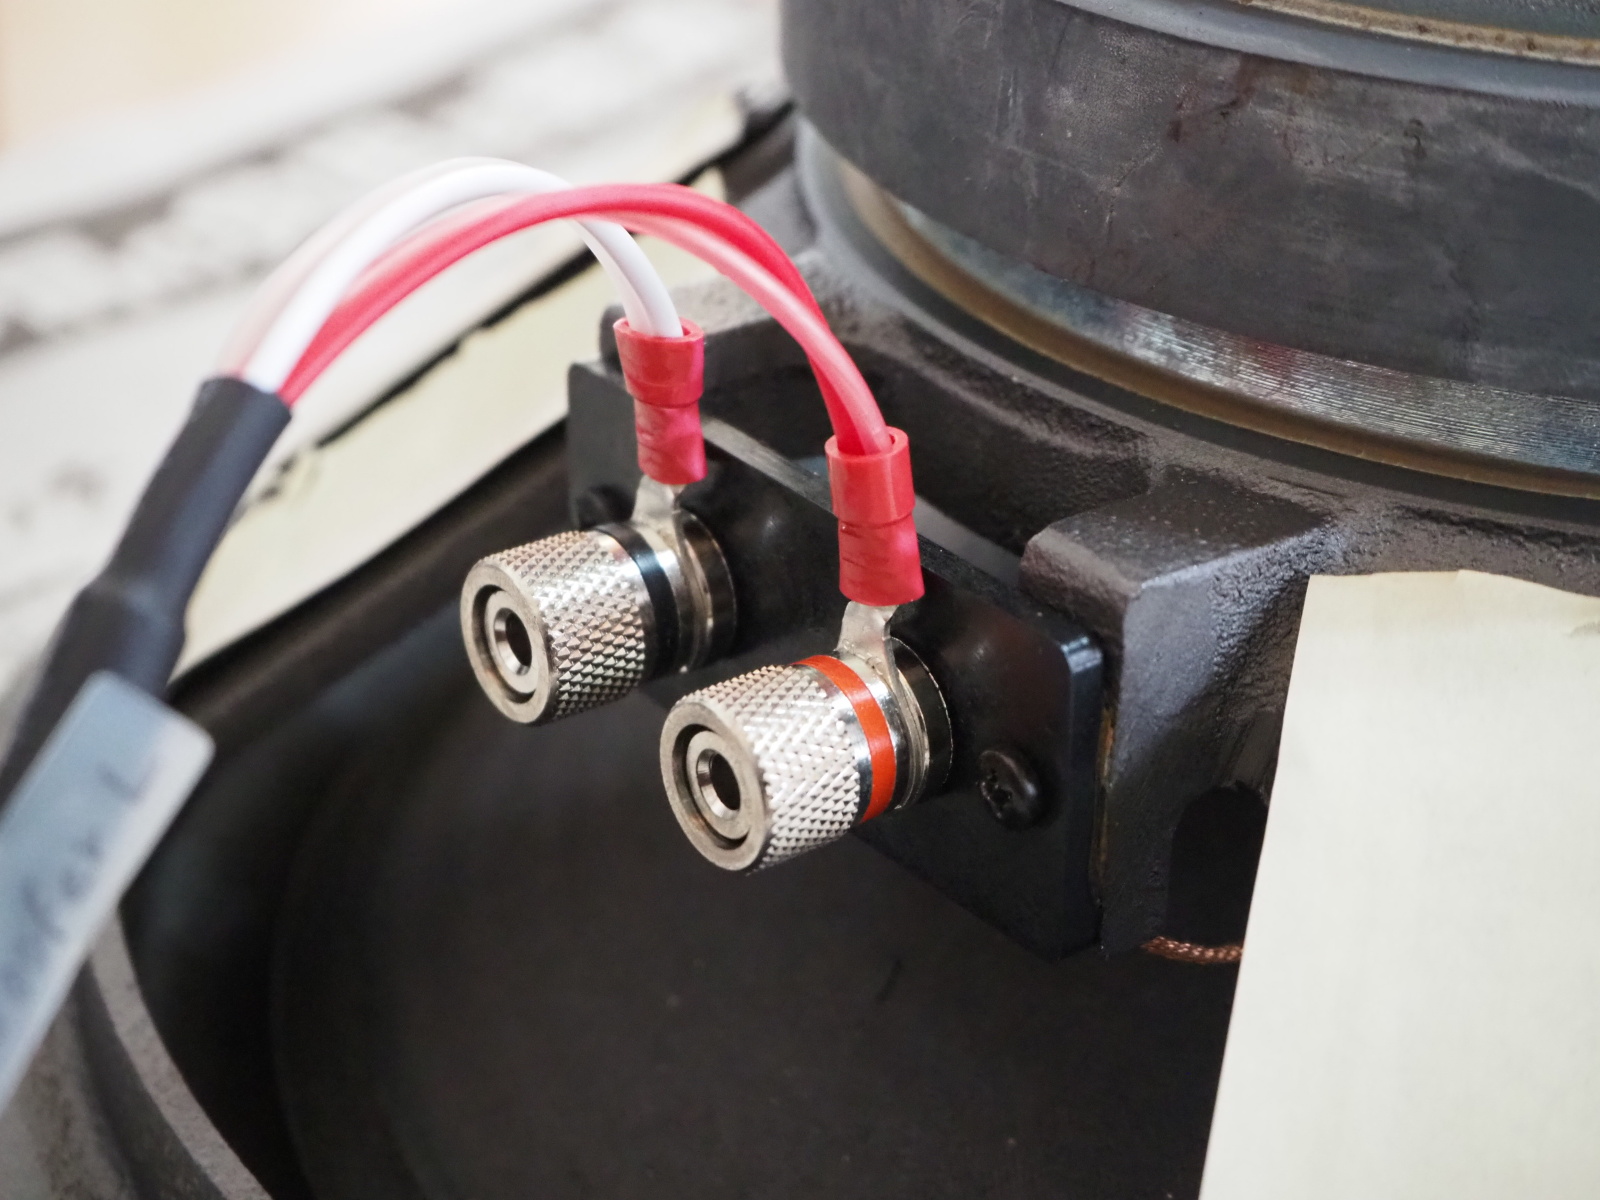 |
| Woofer Cable (amp end) The amp's terminals don't accept spade terminal, so the cable is connected as it was. However, Titan Audio Oil is NOT applied |
Woofer Cable (speaker end) The cable used to be soldered, but Fostex warns the soldering may cause a damage. Now the cable is connected in standard way |
Finally, I can do away with the 47 Lab's 0.65mm solid wire I've been thinking
questionable.
I also quit using Wako Technical "Titanium Audio Oil". I found
Wako Techinical's solder for audio has some harmful impurity that erodes
tips of a solder iron. Now I no longer trust Wako Technical, and quit using
its products.
Recently, I have upgraded my components by replacing expensive pasts with
inexpensive ones. This improvement of SS-309 is not exception. The cost
of Woofer Cable has been halved.
0.65mm solid wire: @315JPY/m ==> 4S6G: @132JPY/m.
The per-piece cost of the spade terminals is 16~17 JPY. So cheap.
As for cables for tweeter and squawker, they were already repalced with cheap cable: Audio Technica AT365S (@125JPY/m).
Measurements and Evaluation
SS-309B was installed in Gaudi II Rev.2.2, and measurements were made.
The measuments show the ringing of the squawker is caused by the horn,
NOT by the driver.
I used a single-period sine wave of 900Hz to measure the transient response
of the squawker. The frequency is equal to the lower crossover frequency
(fc1) of Gaudi II. I generated this signal for time alignment adjustment. I
realized it is also useful to measure the transient response.
The filter setting of the crossover network is LR12 (2nd-order Linkwitz-Riley,
12dB/oct). I chose the 2nd order because the higher the order, the less
good the transient response. The good transient response is required to
see the transient reponse of the loudspeaker.
 |
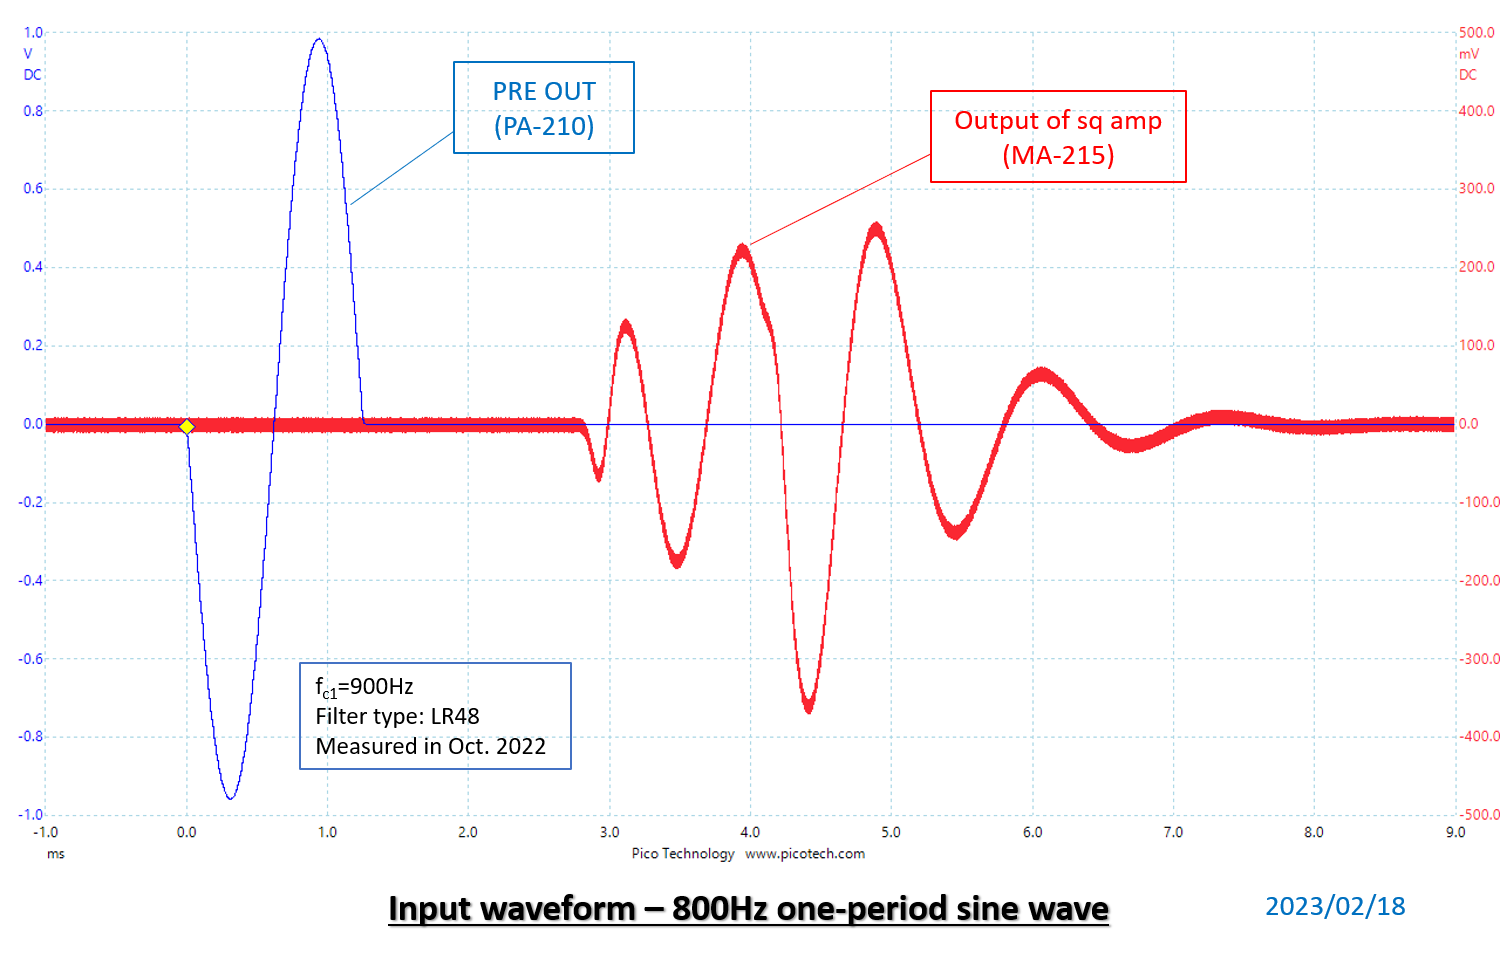 |
| Test signal (900Hz sine wave) The blue waveform is the output of preamp. The phase is reversed because preamp (PA-210) is an inverted amp. The signal passes through preamp --> crossover(VENU360) --> squawker amp (MA-215) --> squawker. The red waveform is the output of squawker amp. |
w/ higher order filter (LR48) The high order filter (8th order, 48dB/oct) causes a big ringing. |
Even LR12 adds the half period, but I accept it.
The ringing is surely caused by VENU360. Squawker amp (MA-215) amplifirs
the waveform precisely.
I observed waveforms of sound waves emitted from ED3402+H400 by using the
test signal.
I was surprised at the waveform of ED3402+H400, because it generated a
big ringing like D1405.
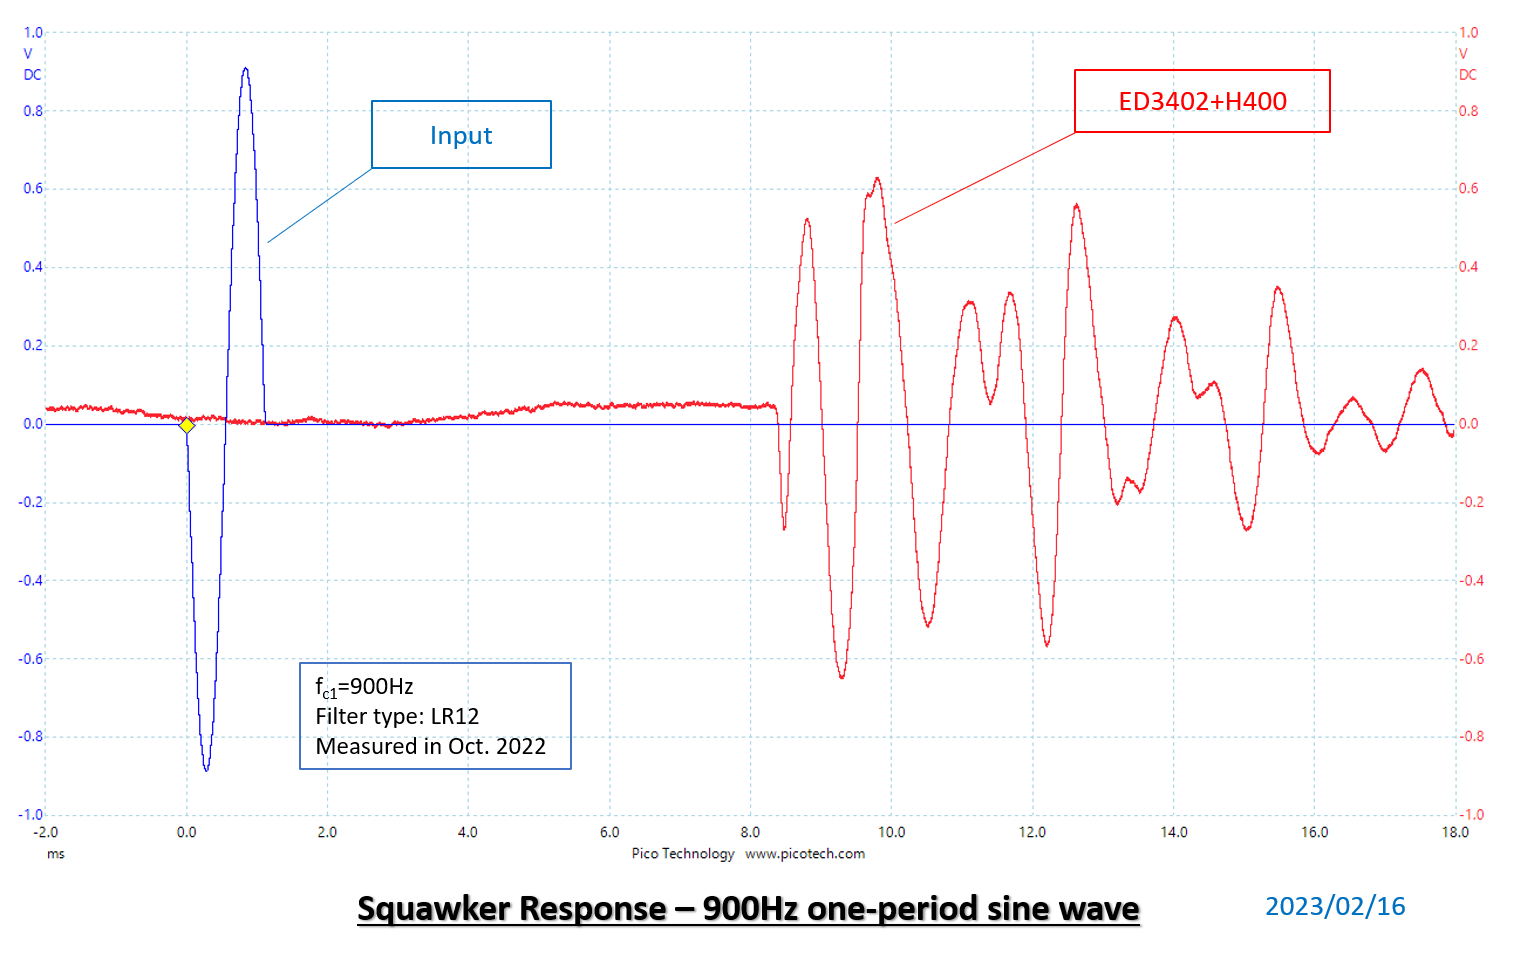 |
 |
| ED3402 + H400 ED3402 generates a big ringing just like D1405 |
ED3402 vs D1405 (w/ H400) The responses of the two drivers are much alike |
I observed waveforms of the driver with the horn detached.
In this case, the waveforms look alike. The frequency of the riging is
about 740Hz.
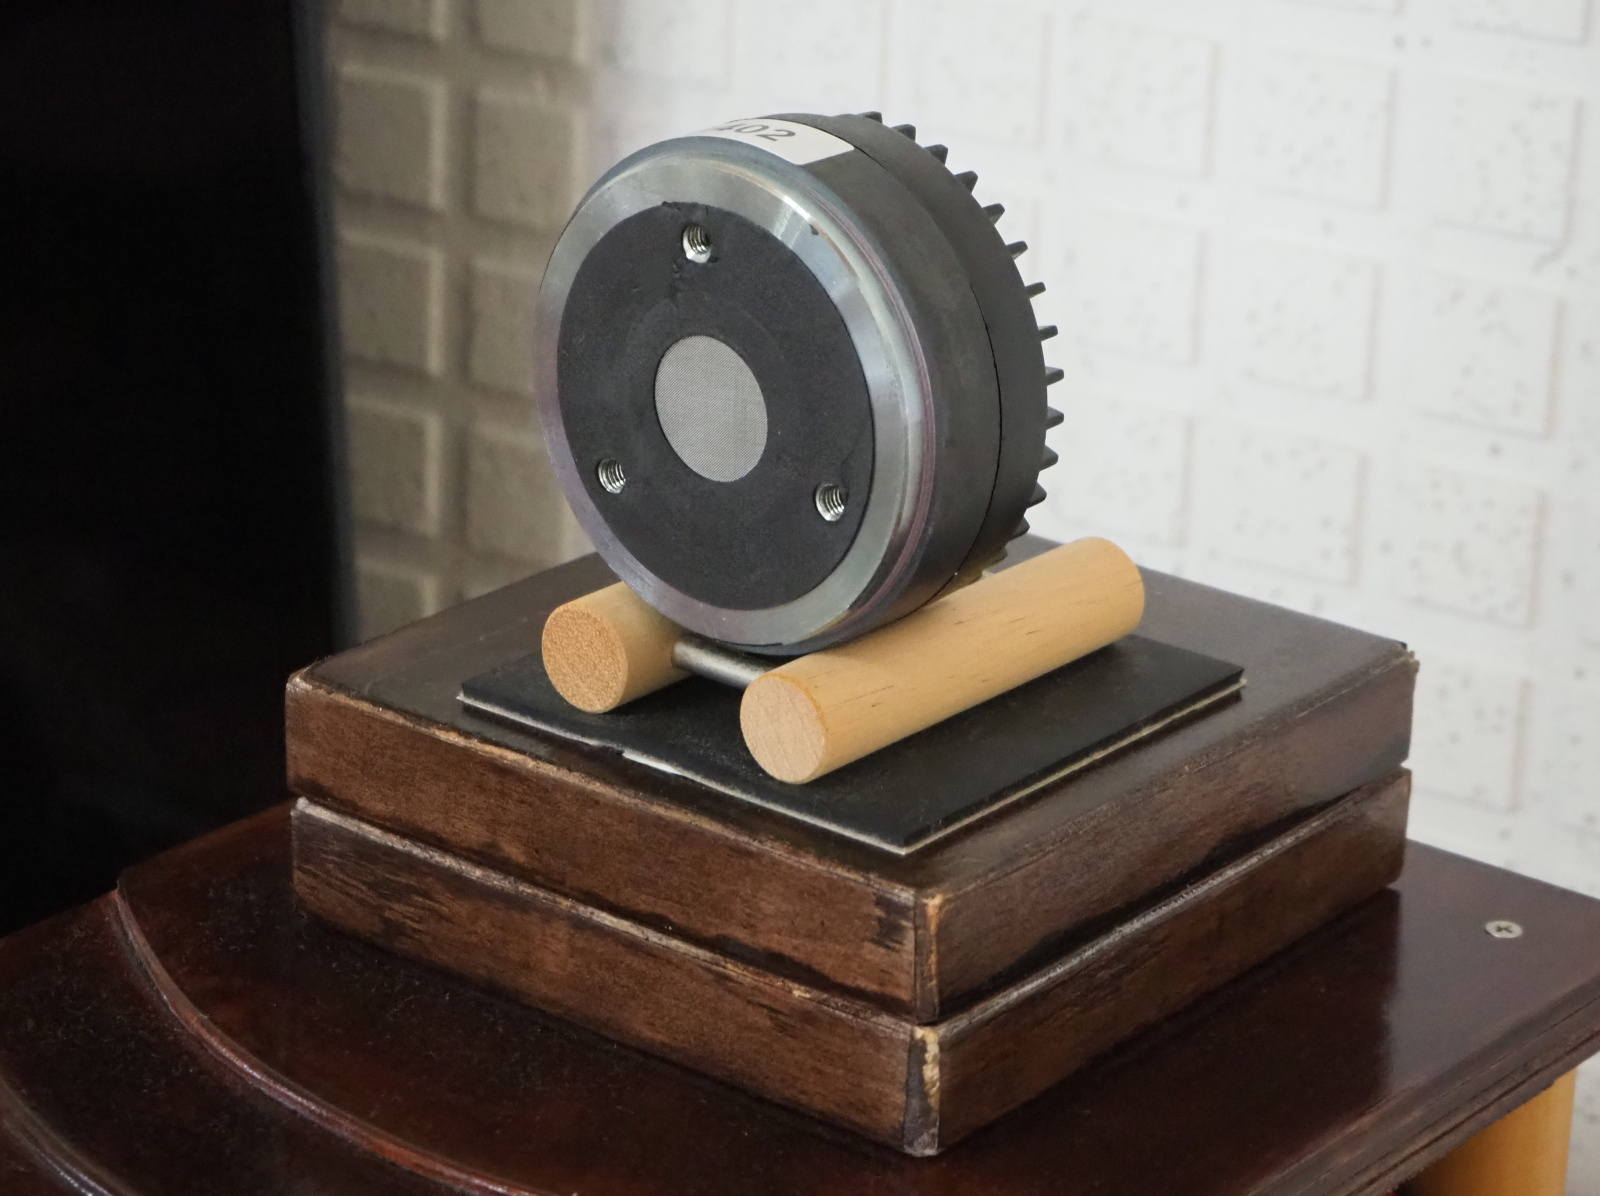 |
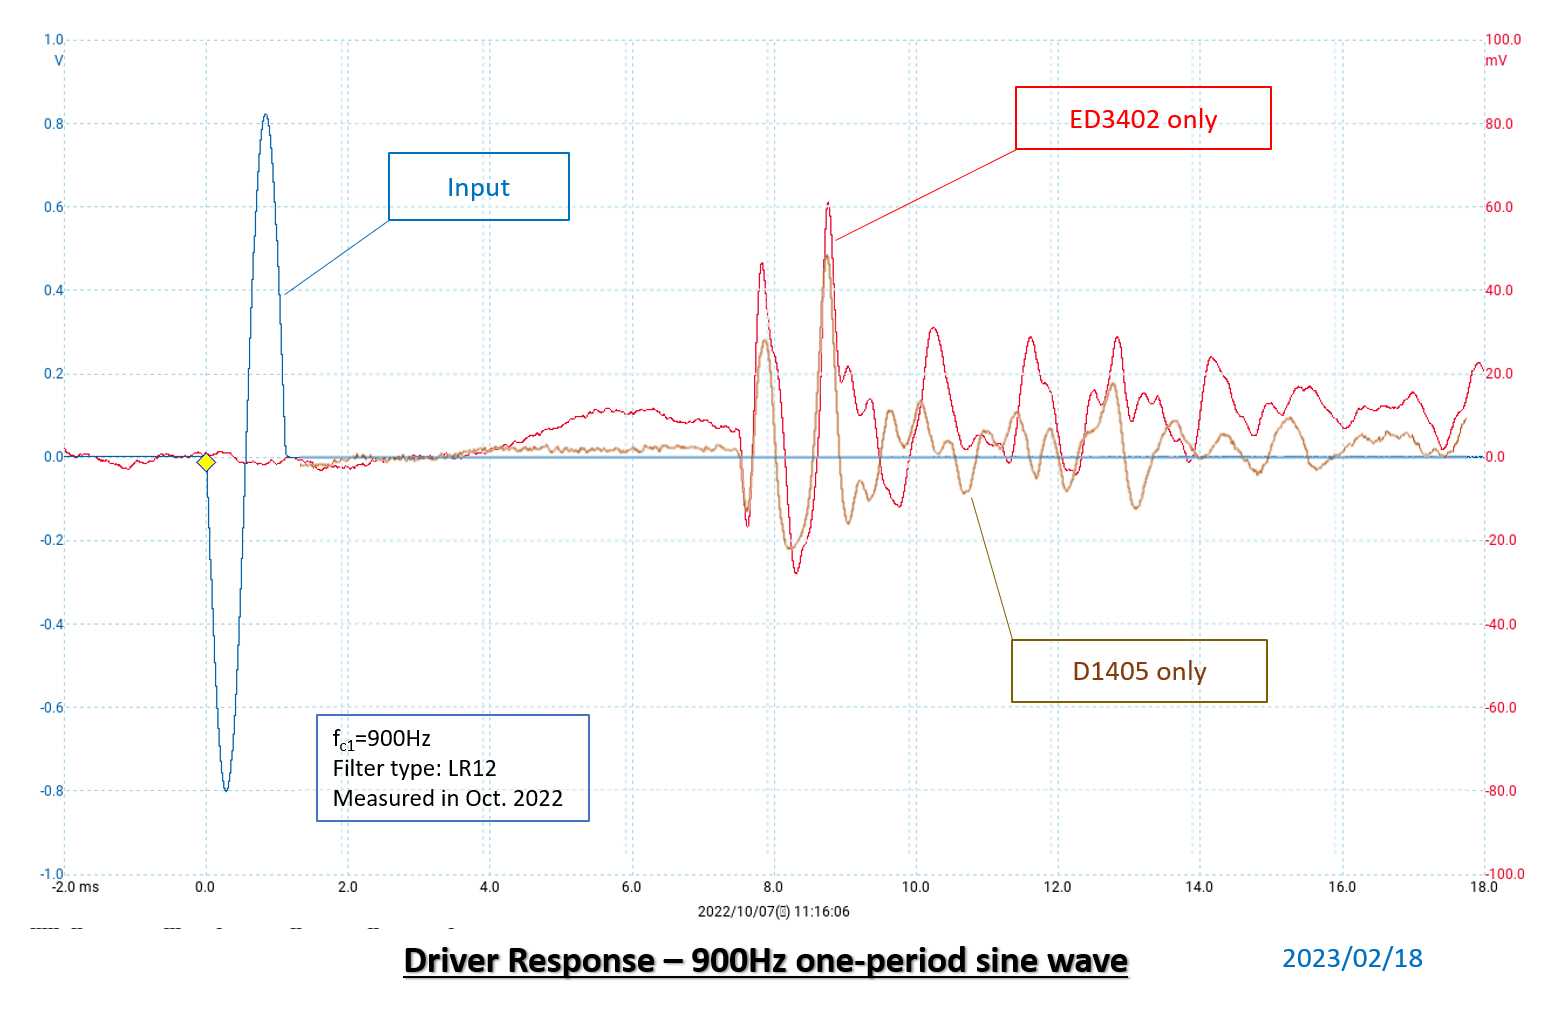 |
| Measurement of driver only |
ED3402 vs D1405 (w/o horn) The responses of the two drivers are much alike without horn |
I was almost at my wit's end, but I pulled myselft together, and tried
out another horn.
Although there are only few models available in the market, I found a good
one produced by the same maker (Classic Pro) of ED3402. The model is H4401. It seems like a maintenance part of a PA loudspeaker like ED3402. The
specification isn't provided, but I thought it can be used in SS-309B because
of its size. The unit price was 1,980 JPY.
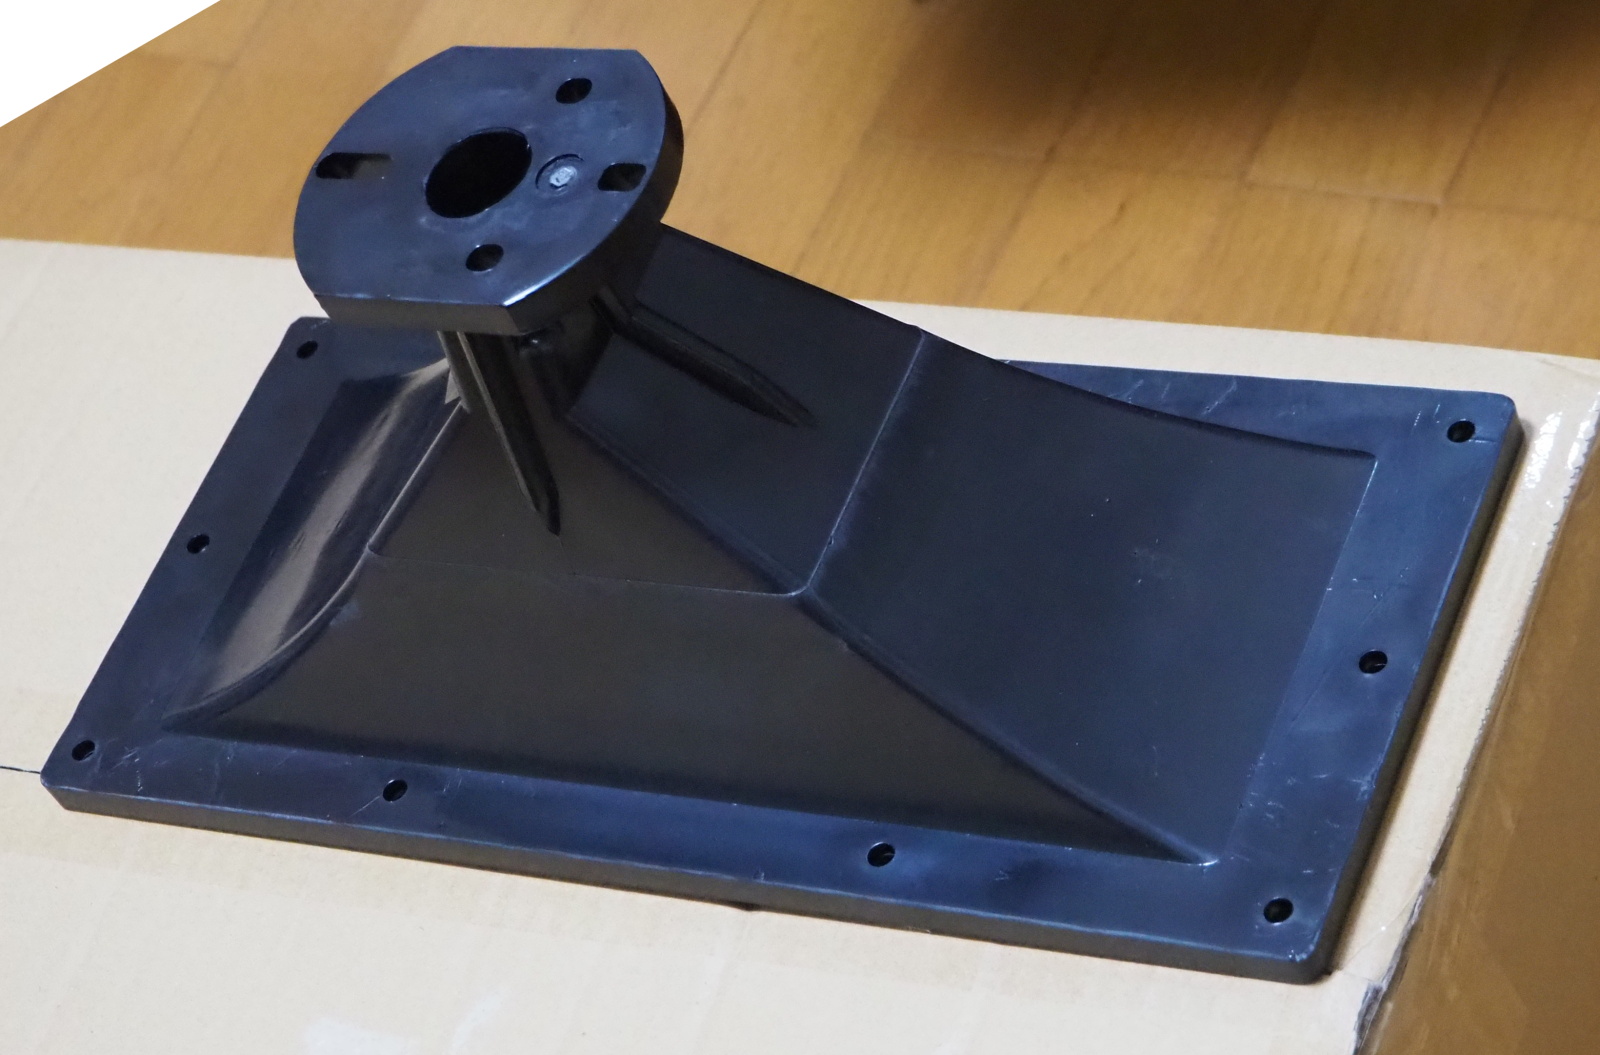 |
 |
| Classic Pro H4401 It is made from plastic, and looks so cheap |
Measurement of ED3402 + H4401 I placed it on a cushion because I don't have a baffle for it |
I made measurements of the horn with the two drivers attahced on it.
|
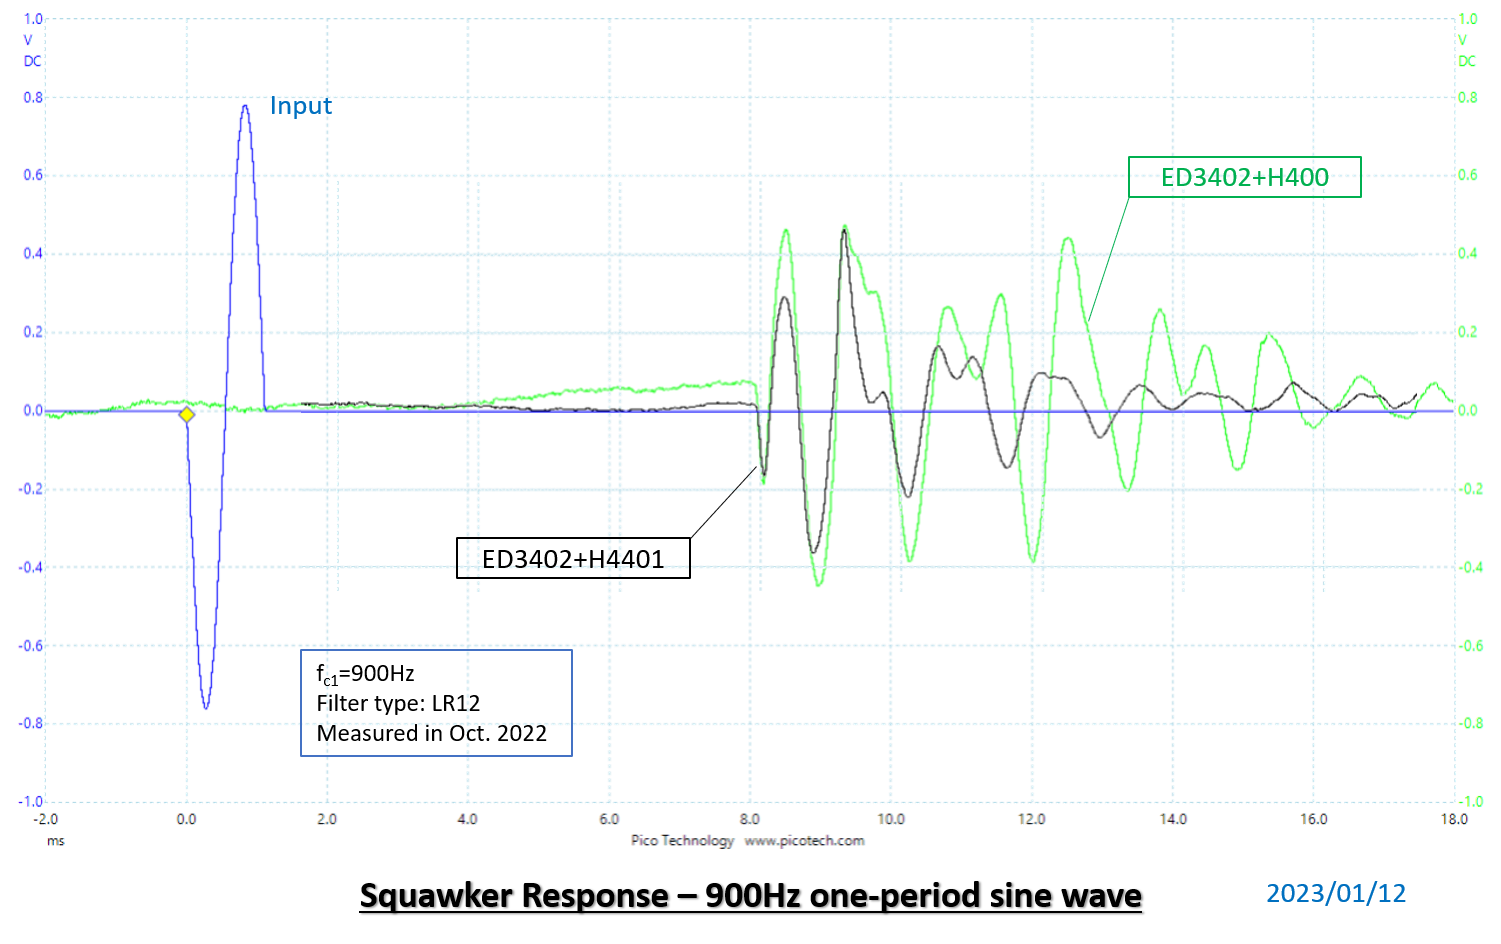 |
| ED3402 vs D1405 (w/ H4401) Both waveforms look alike, though ED3402 is a bit better. |
H4401 vs H400 (w/ ED3402) Ringing is apparently shorter with H4401 than H400 |
I realized I was wrong that I belived D1405 caused the ringing. H400 causes
the ringing!
There are four combinations since I have the two drivers and and the two
horns. Of these, ED3402 + H4401 is the best, according to the measurements.
I won't choose D1405 + H4401, because D1405 has the other drawback: the
roll-off at high frequencies.
To install H4401 in SS-309B, a pair of baffles are required. I decided to make it.
Rev. B (addition): Building Squawker Module (Feb. 2023)
I thought I should have changed the revision to Rev.C, but the improvements written above were not completed and not made use of in Gaudi II yet. So, I consider this new squawker module as a part of Rev.B.
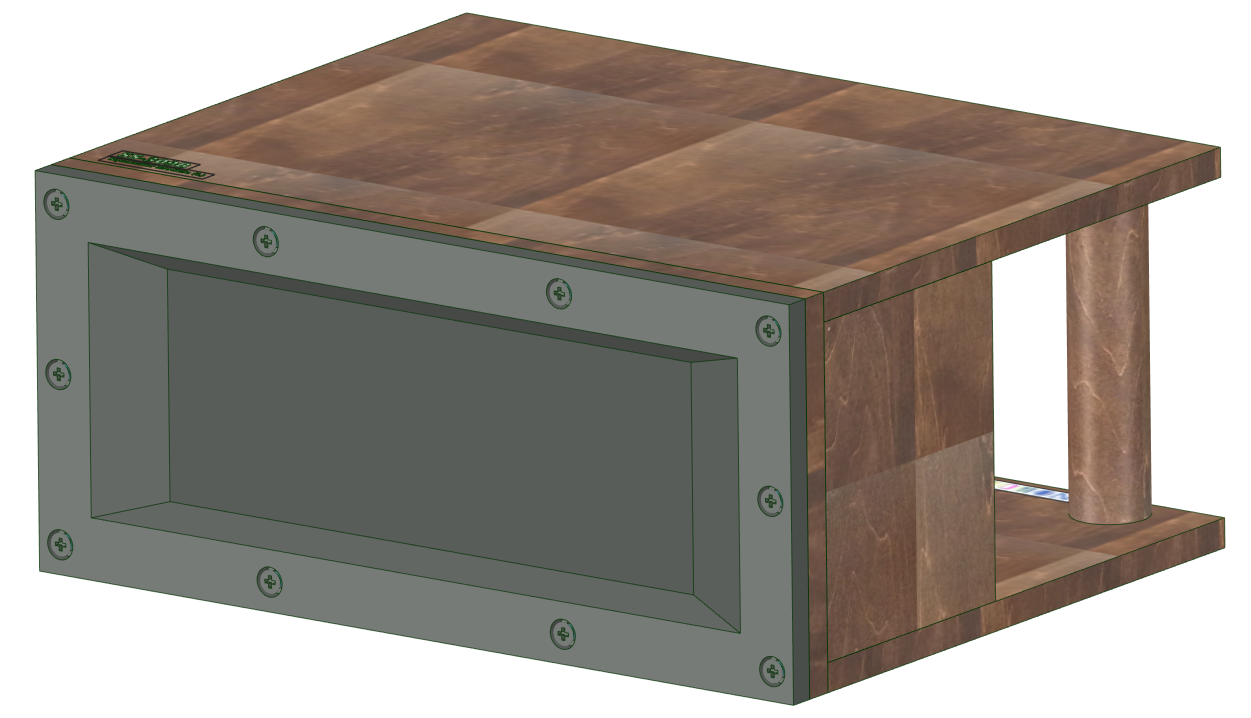 |
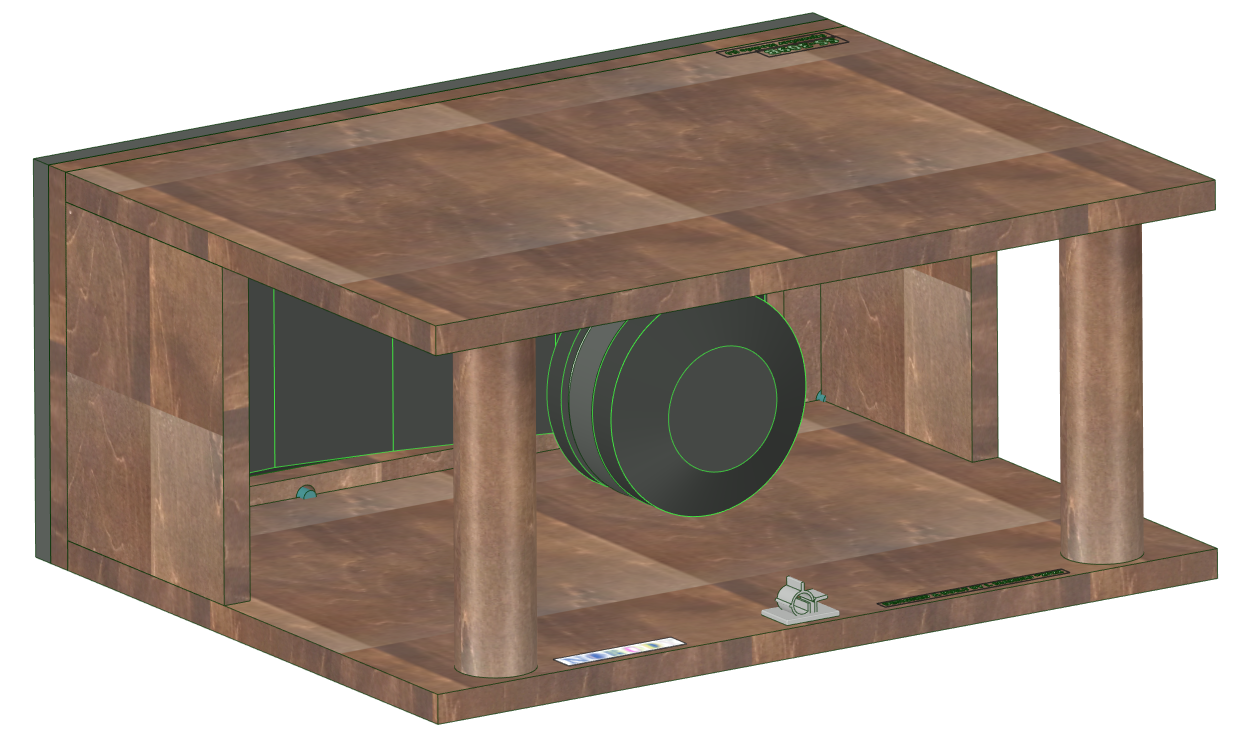 |
| Squawker Module (front) A frame that fits with H4401 is built |
Squawker Module (back) |
The frame that fits with H4401 is built to accomodate ED3402 + H4401.
I named the frame Sqauwker Box (or Sq Box), because, at first, I planned to build a box on which a full-range LS
unit can be mounted as well. But, on second thought, I decided to make
the open frame because it is simpler and easy to make. I didn't change
the name. I still call it Squawker Box (or Sq Box).
Squawker Module (or Sq Module) is the combination of the squawker (ED3402 + H4401) and Squawker Box.
I still want to try a squawker other than the horn type. So, I decided to make a baffle that fits in with Sq Box to mount a dome squawker.
As soon as I made my mind, I searched for a good dome squawker. But I could
hardly find any, probably because 3-way , 4-way loudspeakers are no longer
popular lately.
Finally, I found Dayton Audio RS52FN-8. I bought a pair of RS52FN-8, since I trust Dayton Audio because it's
the same manufacturer of my measurement mic (UMM-6). The unit price was
12,342 JPY.
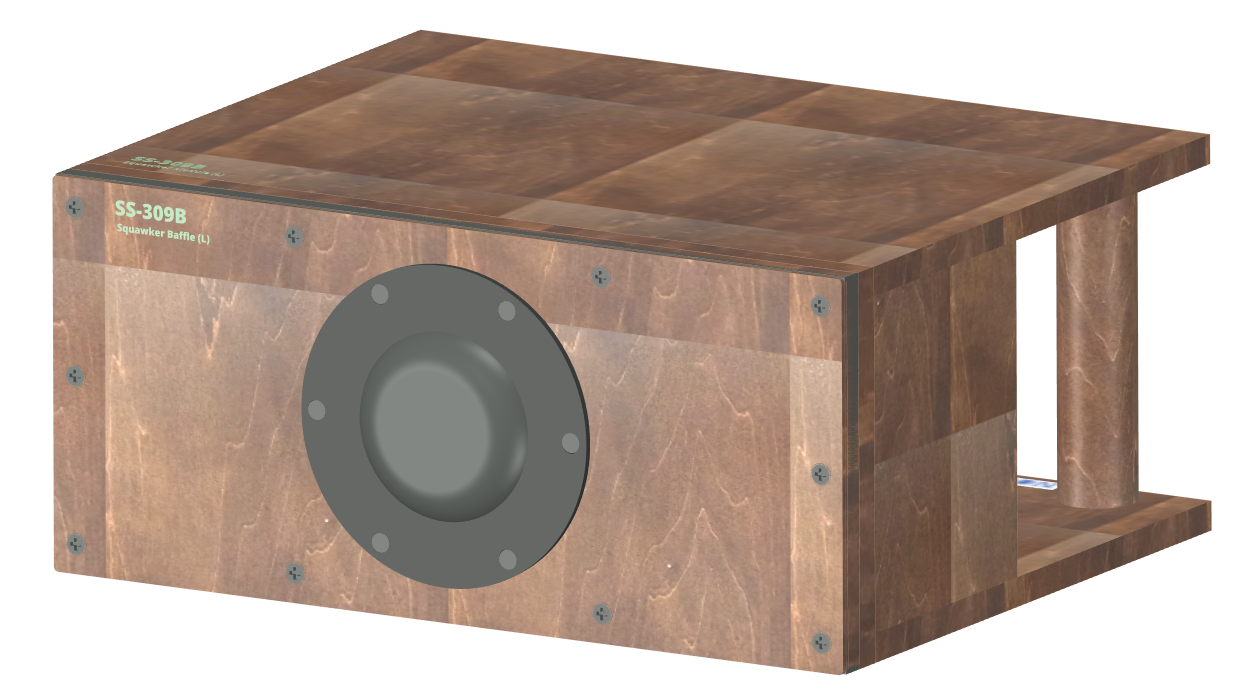 |
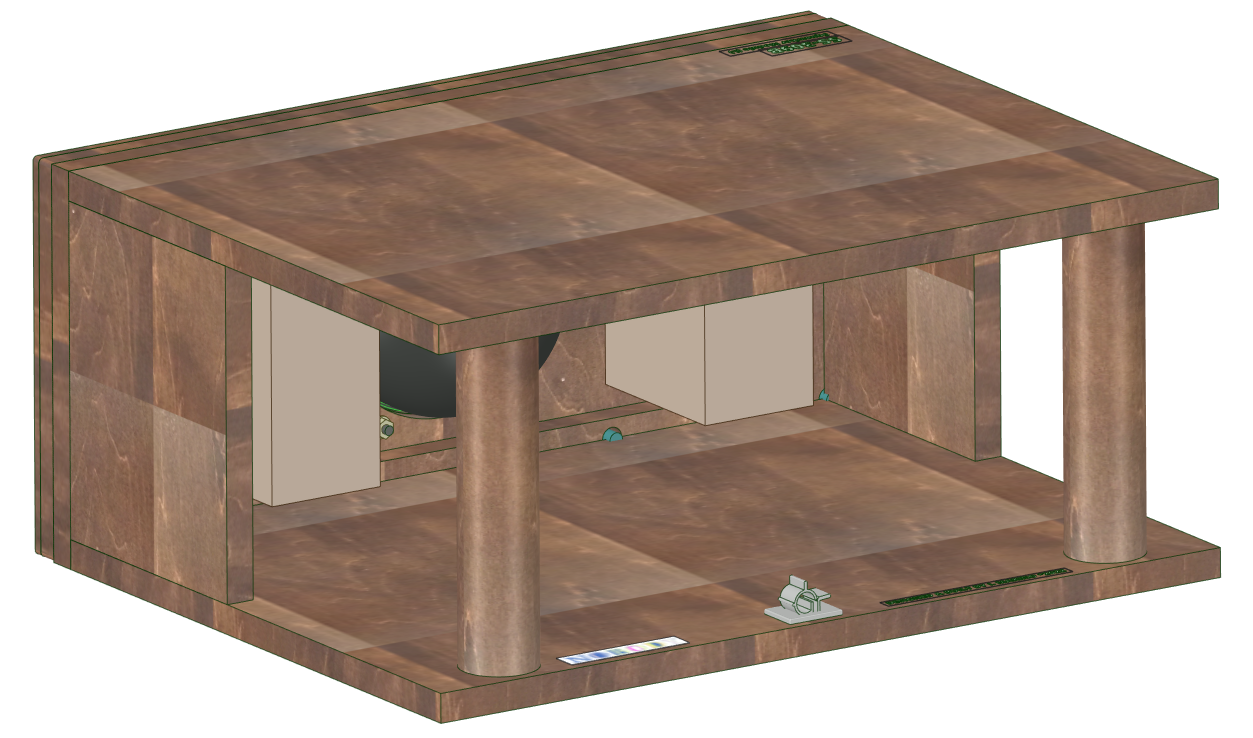 |
| Squawker Module (dome, front) | Squawker Module (dome, back) |
Design of Squawker Box and Squawker Baffle
The width and hight of Squawker Box are the same as those of H4401. Box
is not seen when viewed from the front.
Insert nuts are driven into the Box so that the horn can be mounted with
bolts.
The side panels are so small that the user can reach the throat of the
horn to attach/detach the driver.
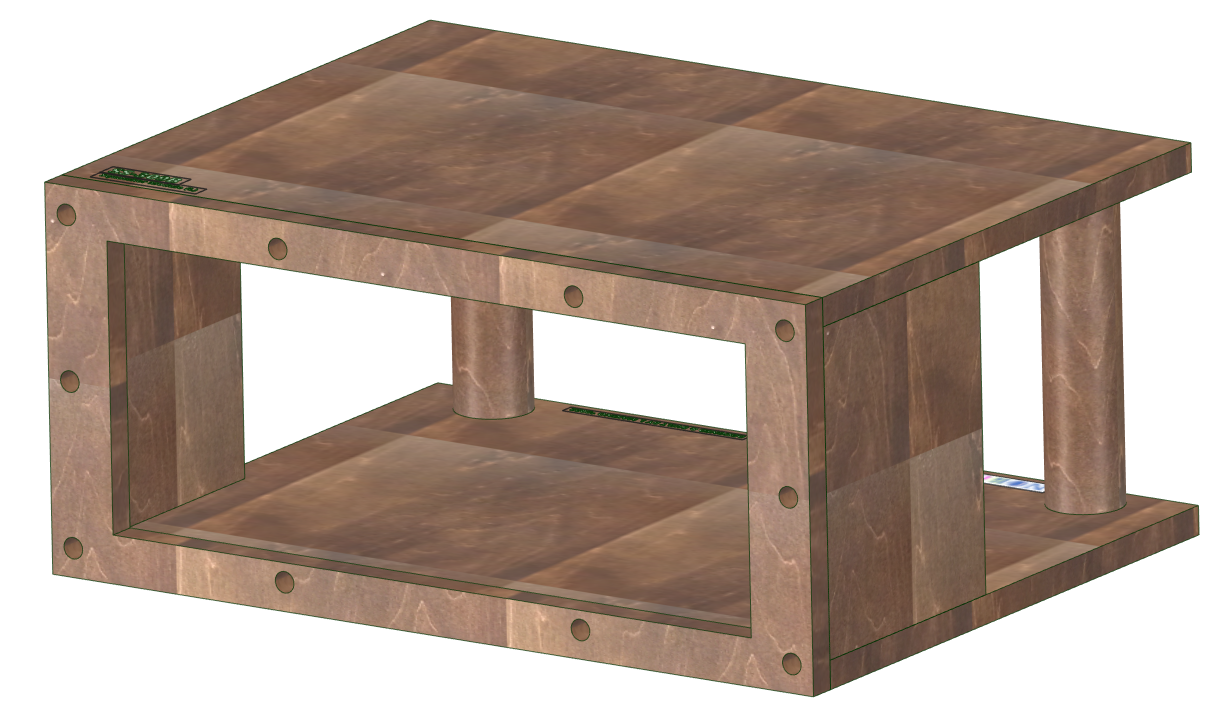 |
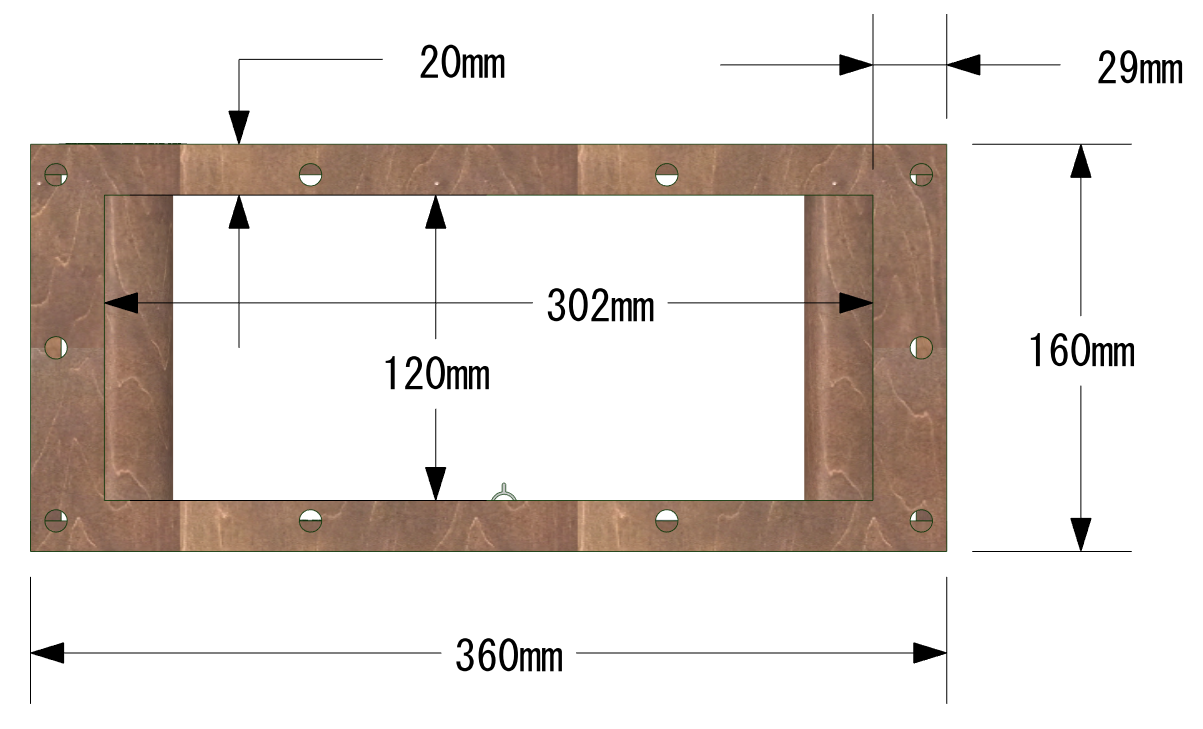 |
| Redering of Squawker Box Composed of Sino plywood boards (T=12mm) and hiba round bars (Phi=32mm) |
Dimension of Squawker Box (front) |
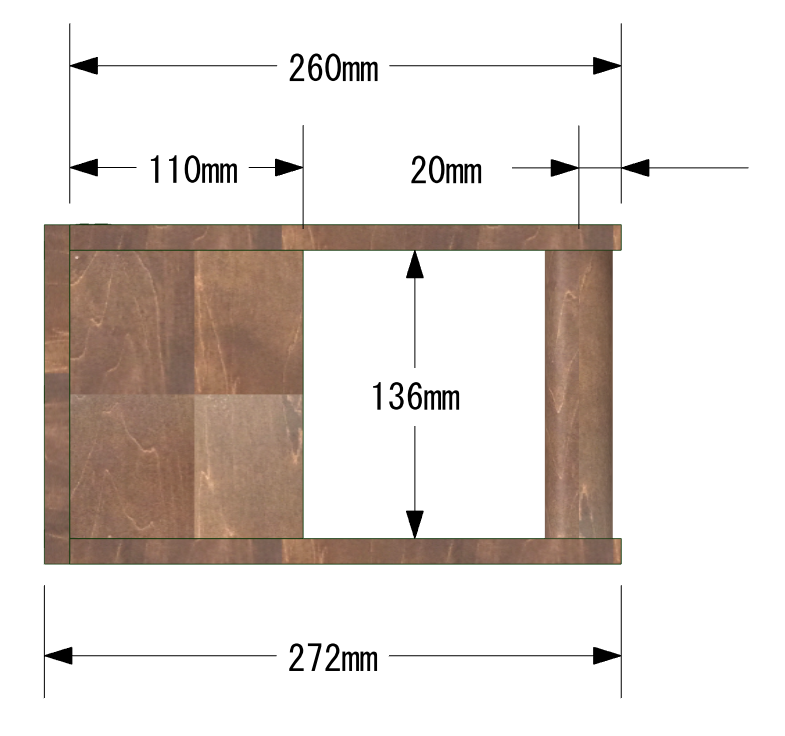 |
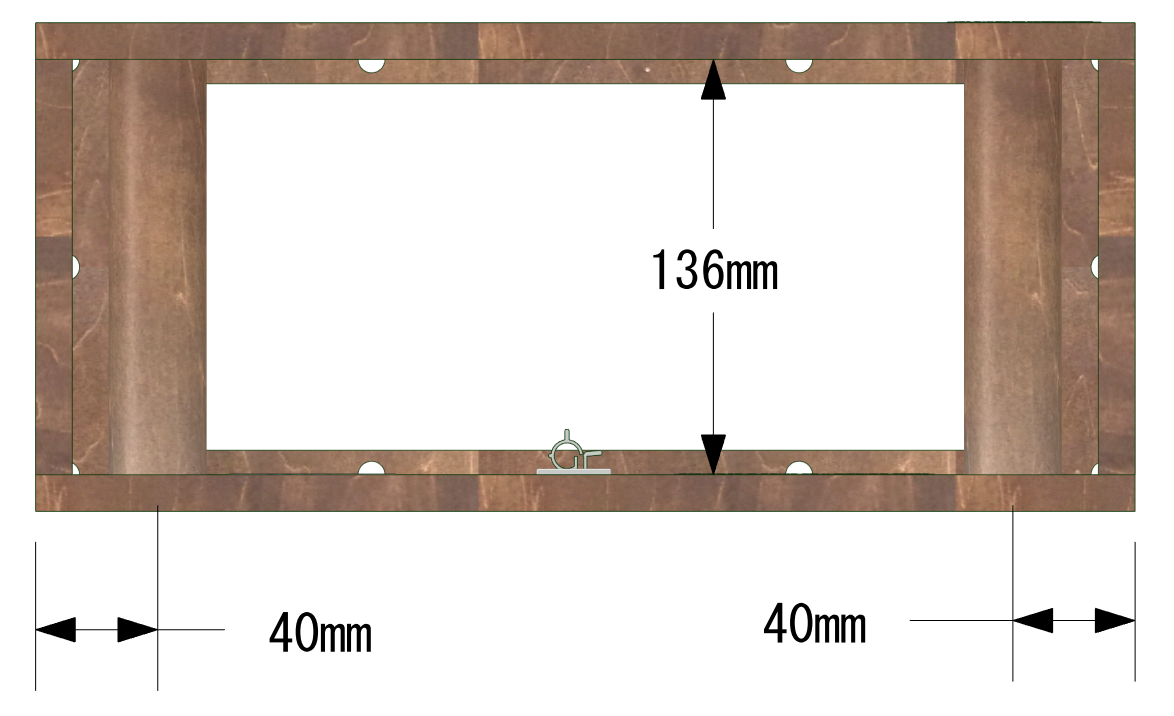 |
| Dimension of Squawker Box (right) | Dimension of Squawker Box (back) |
Squawker Baffle can be fixed on Sq Box with the same bolts.
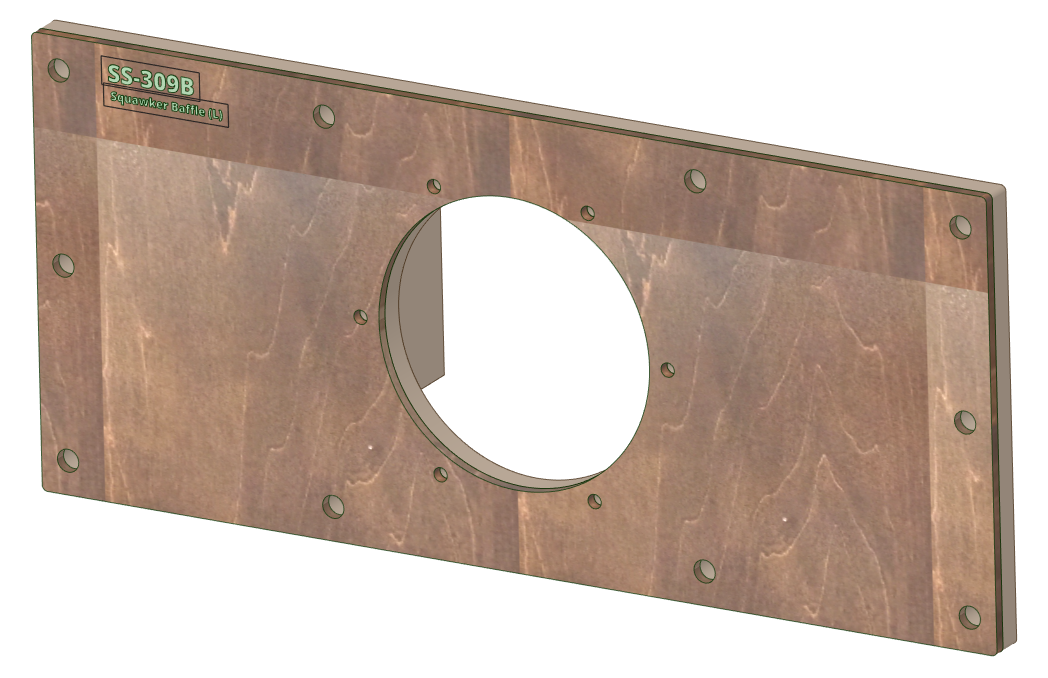 |
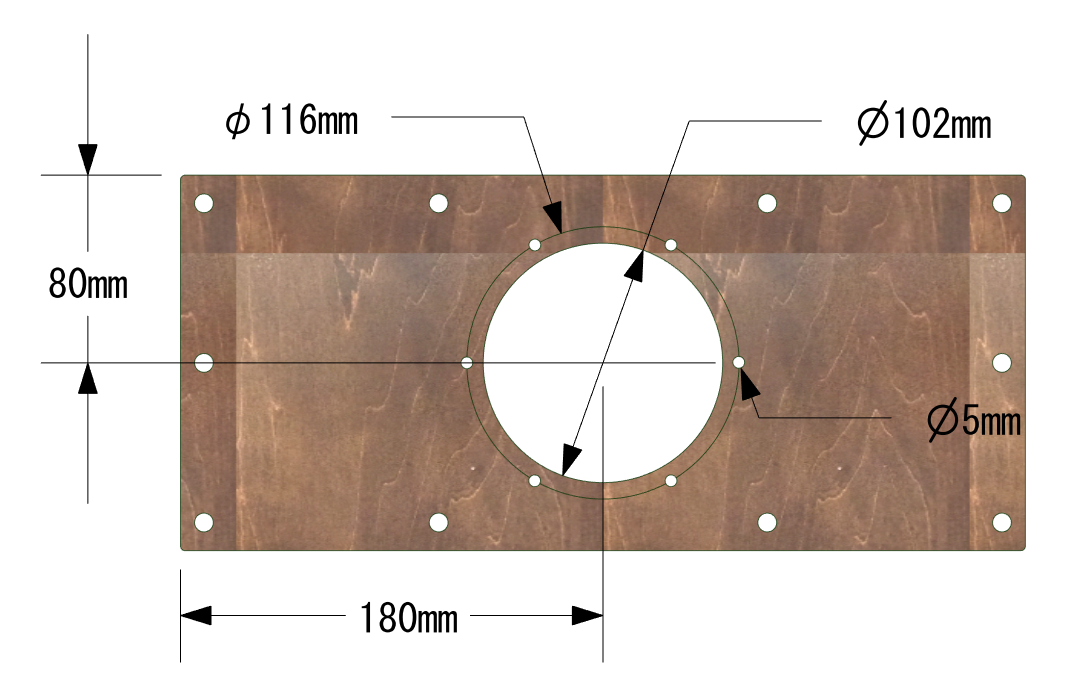 |
| Redering of Squawker Baffle MDF (T=9) and sino plywood(T=4) are bonded. The width and height are the same as the horn (H4401, 360x160mm) |
Cutouts of Squawker Baffle The cutout of the squawker is centered |
For the detailed information about the design, see the following documents:
Drawings: SS-309B_SqModule_Design.pdf
Woodwork manual: SS-309B_SqModule_Woodwork.pdf
Assembly manual: SS-309B_SqModule_Assy.pdf
Finishing manual: SS-309B_SqModule_Finish.pdf
Final assembly manual: SS-309B_SqModule_Final.pdf
Building Squawker Box and Squawker Baffle
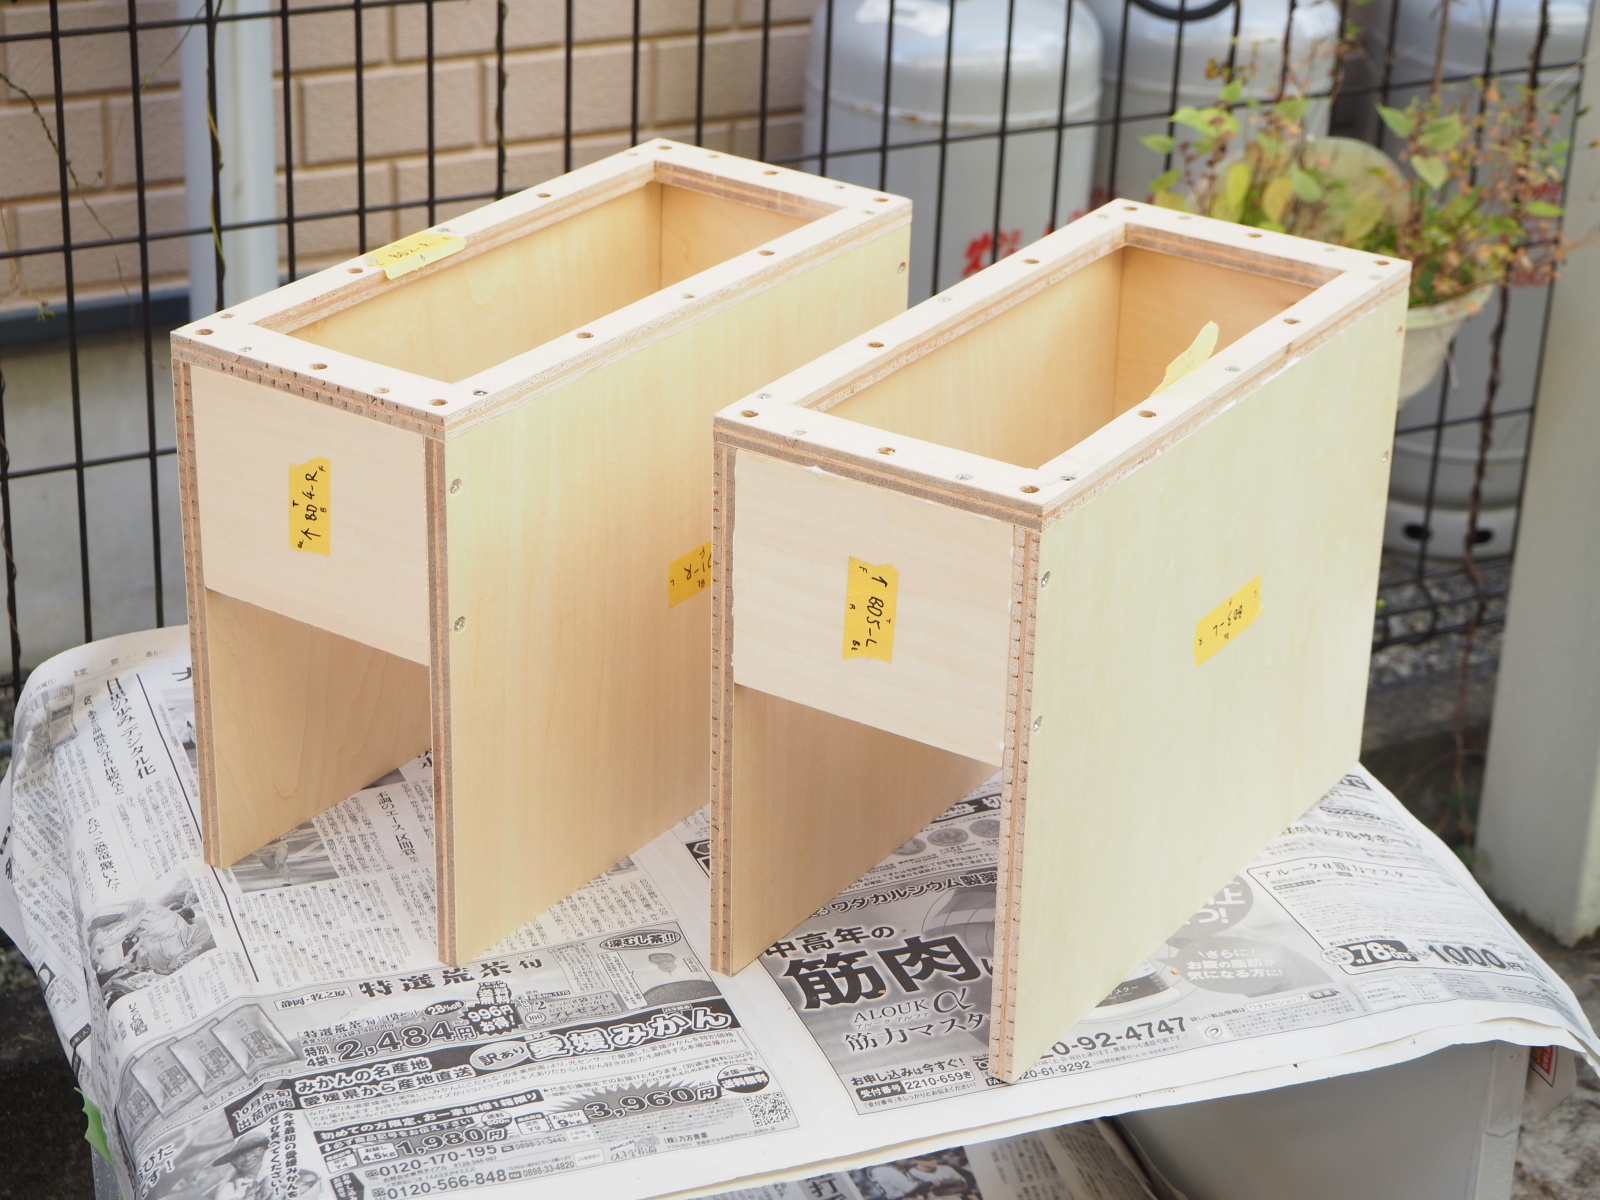 |
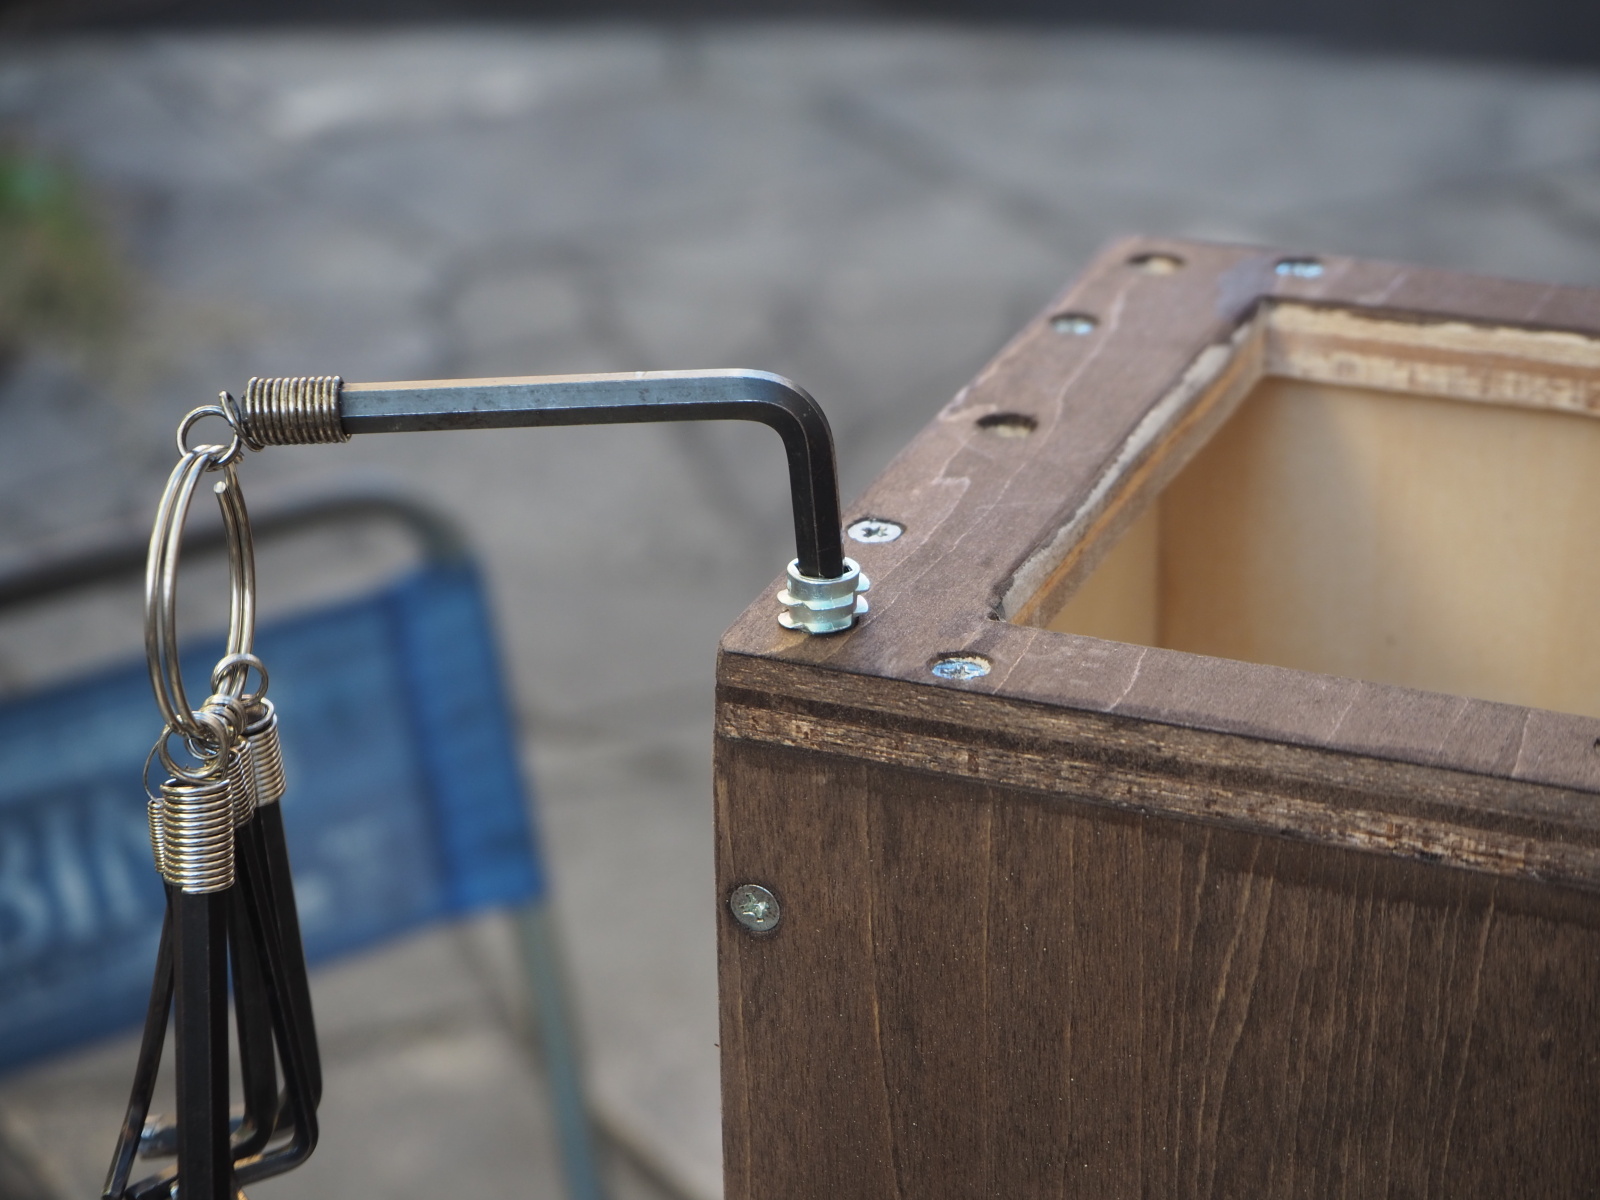 |
| Assembling Squawker Box I had the Sino plywood board cut at a DIY shop where I bought it. The dimensional error is as little as 0.1mm. So, it was easy to assembly. |
Driving insert nuts The insert nut is M6x13mm, type E. I realized the proper size was M5, but it was too late. |
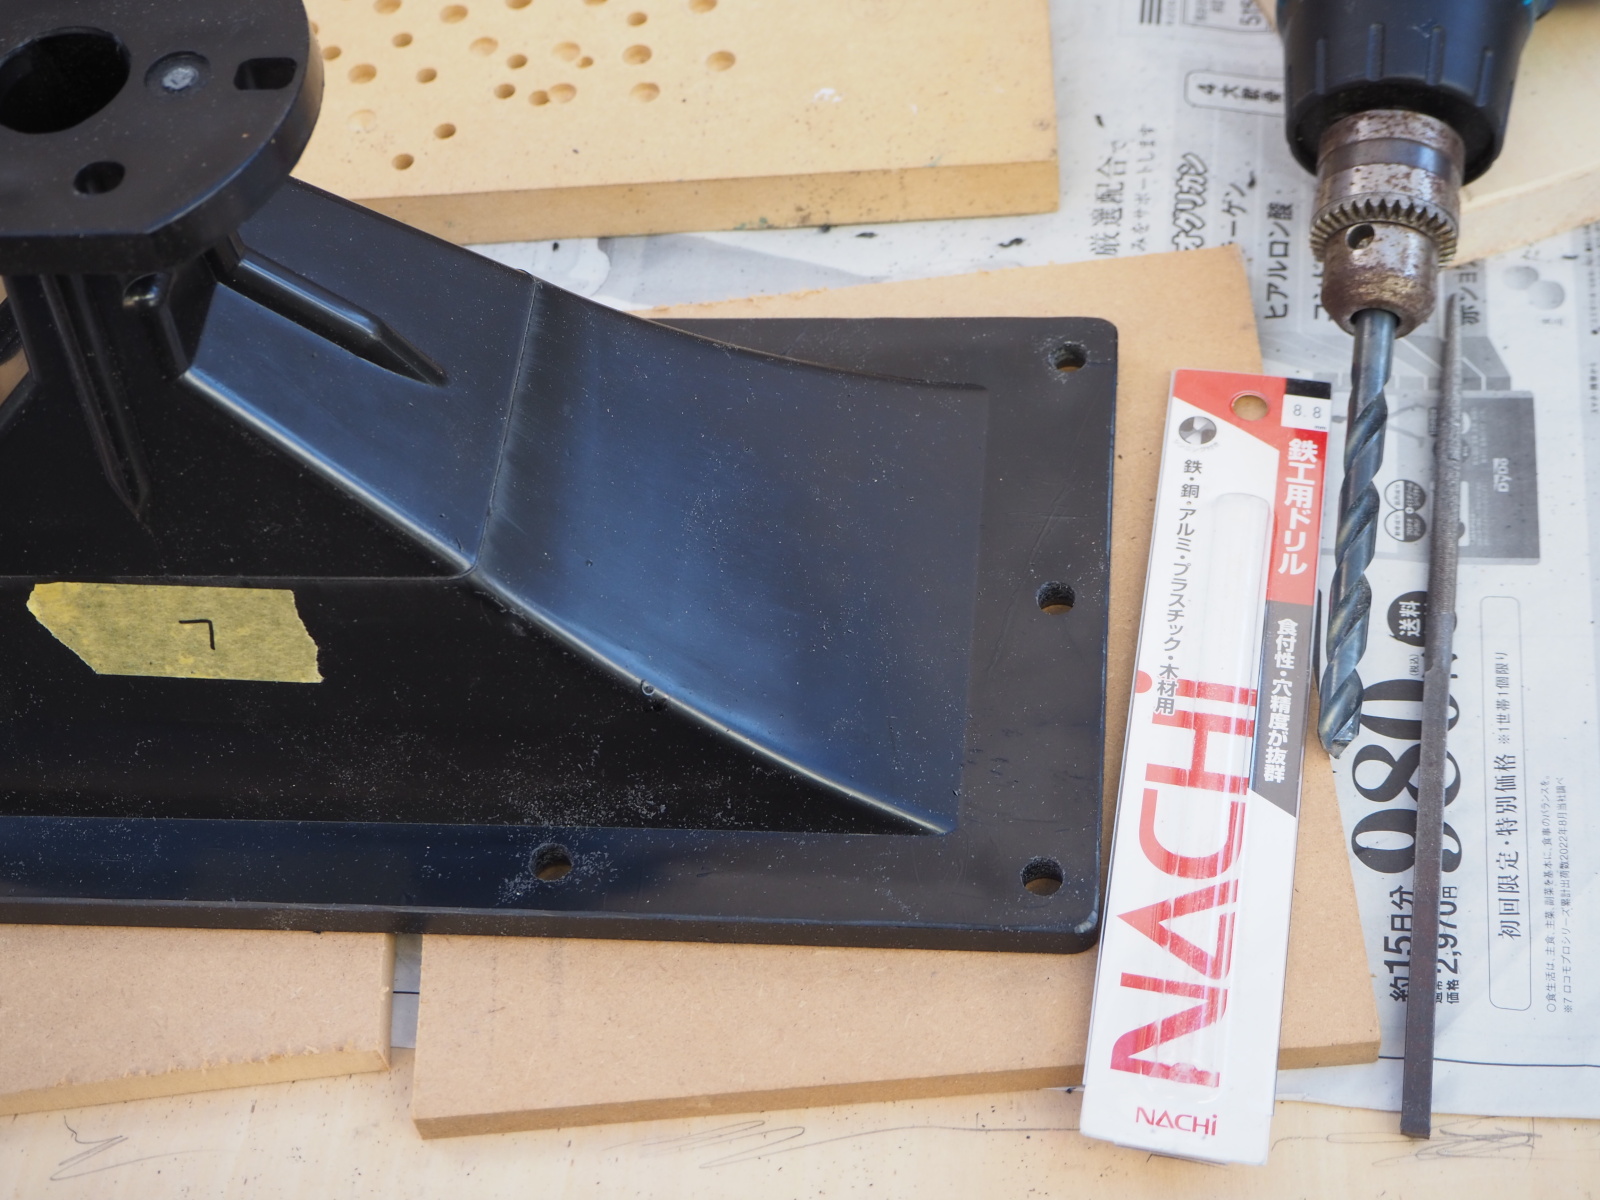 |
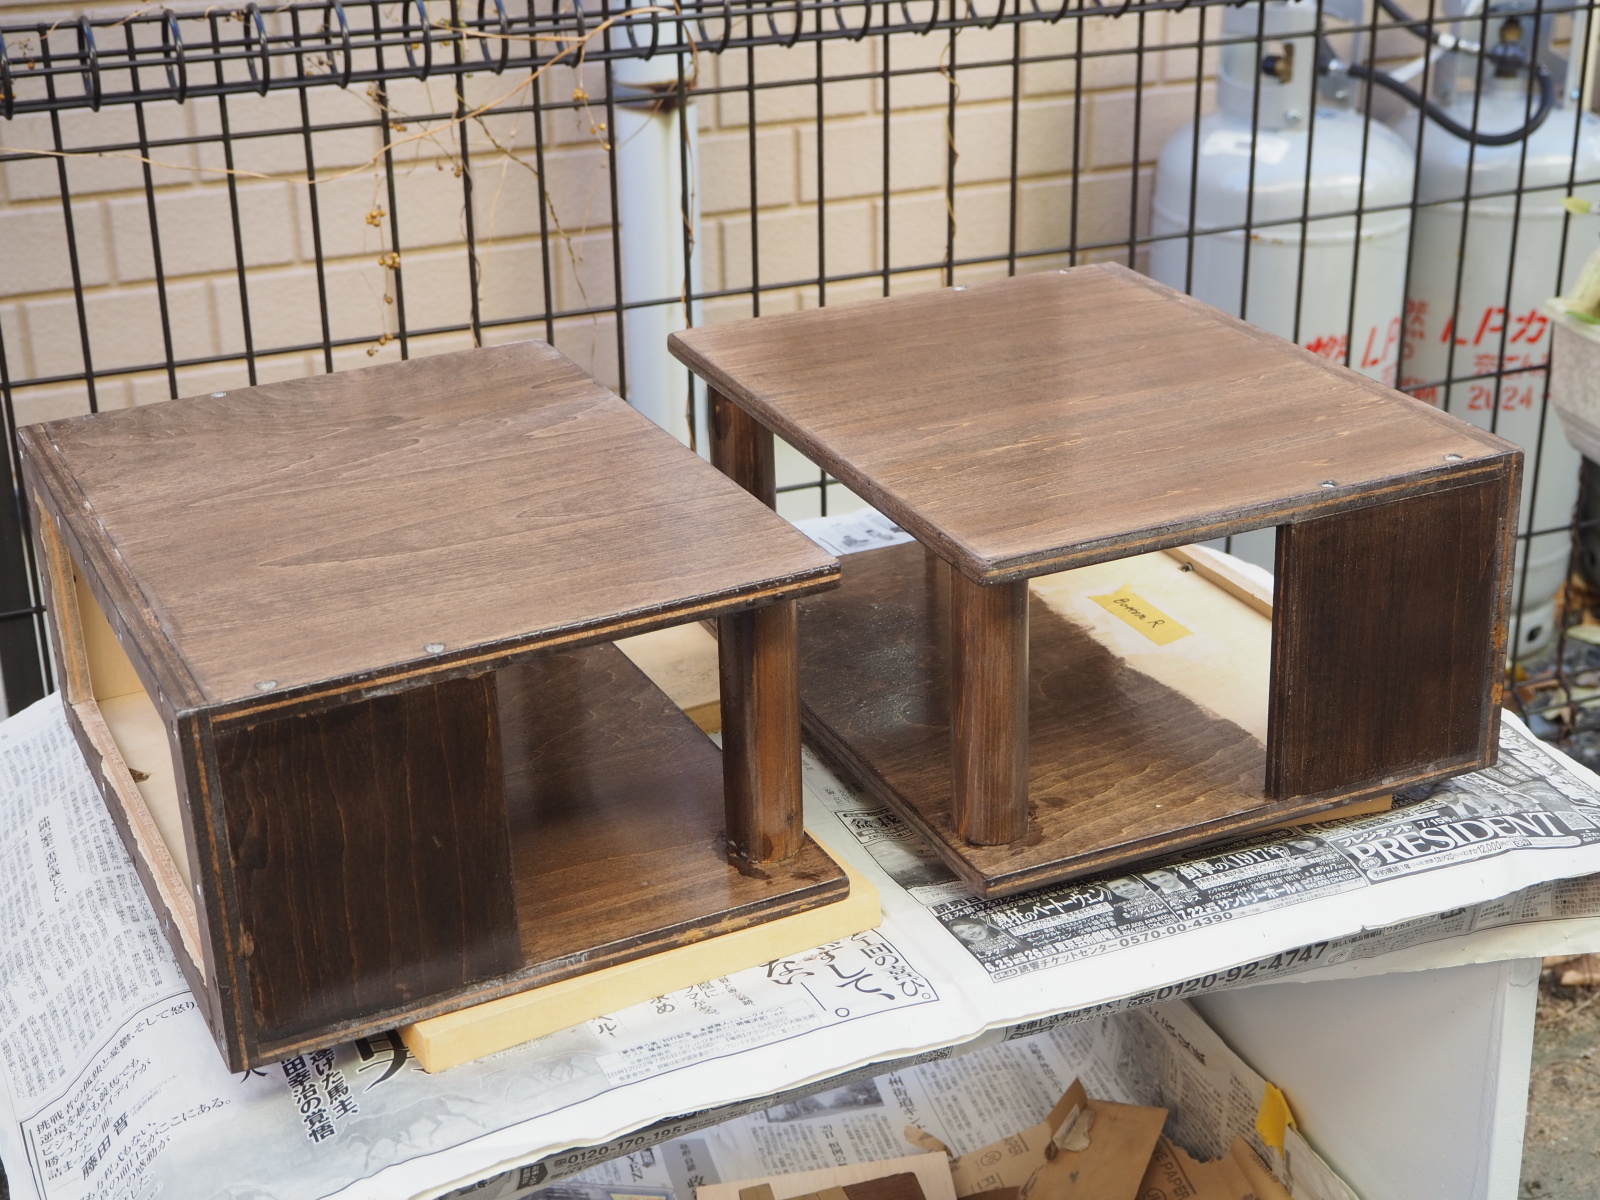 |
| Modifying H4401 I broadened the screw holes of H4401 by using an 8.8mm drill so that M6 screws can be used. |
Finished Squawker Box As always, I am not good at painting. I painted the side panels one more time because the coat was so uneven. Their color became too thick. |
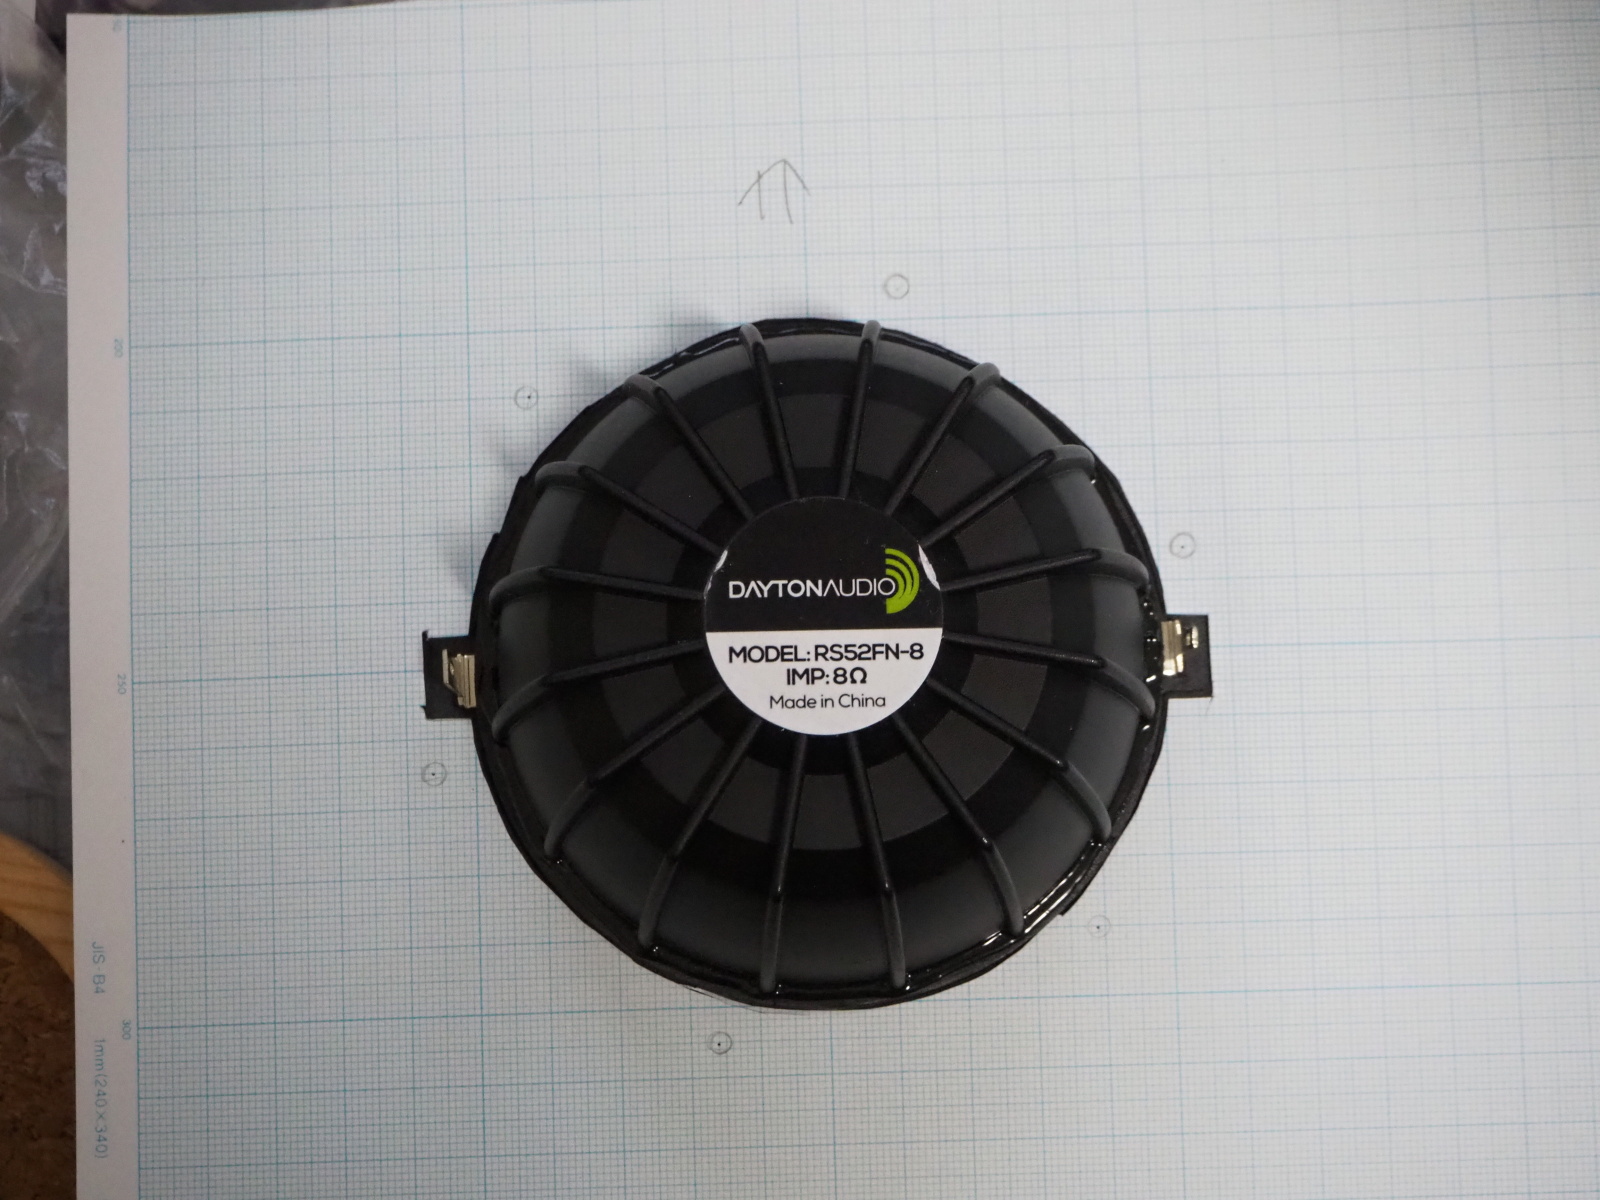 |
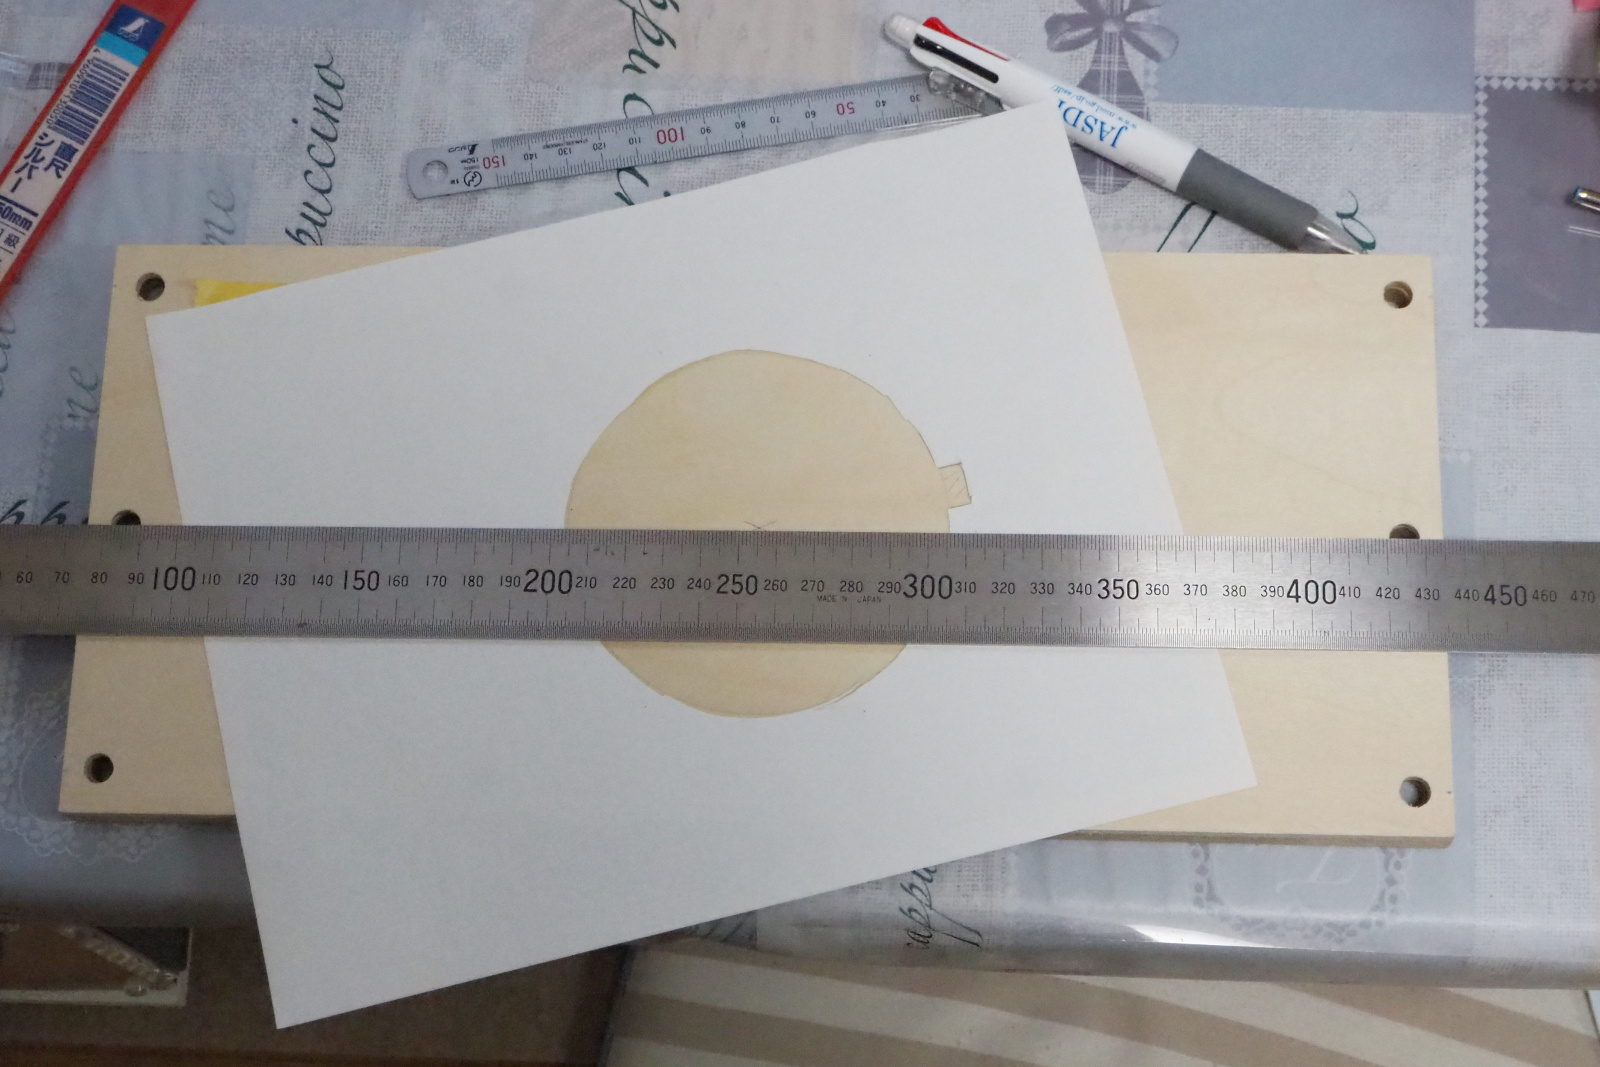 |
| Stencil of cutout for RS52FN-8 The data sheet of RS52FN-8 is so poor that it even doesn't have the drawing of the cutout. I made the stencil for myself. |
Making marking-off on Squawker Baffle I made marking-off by using the Stencil. |
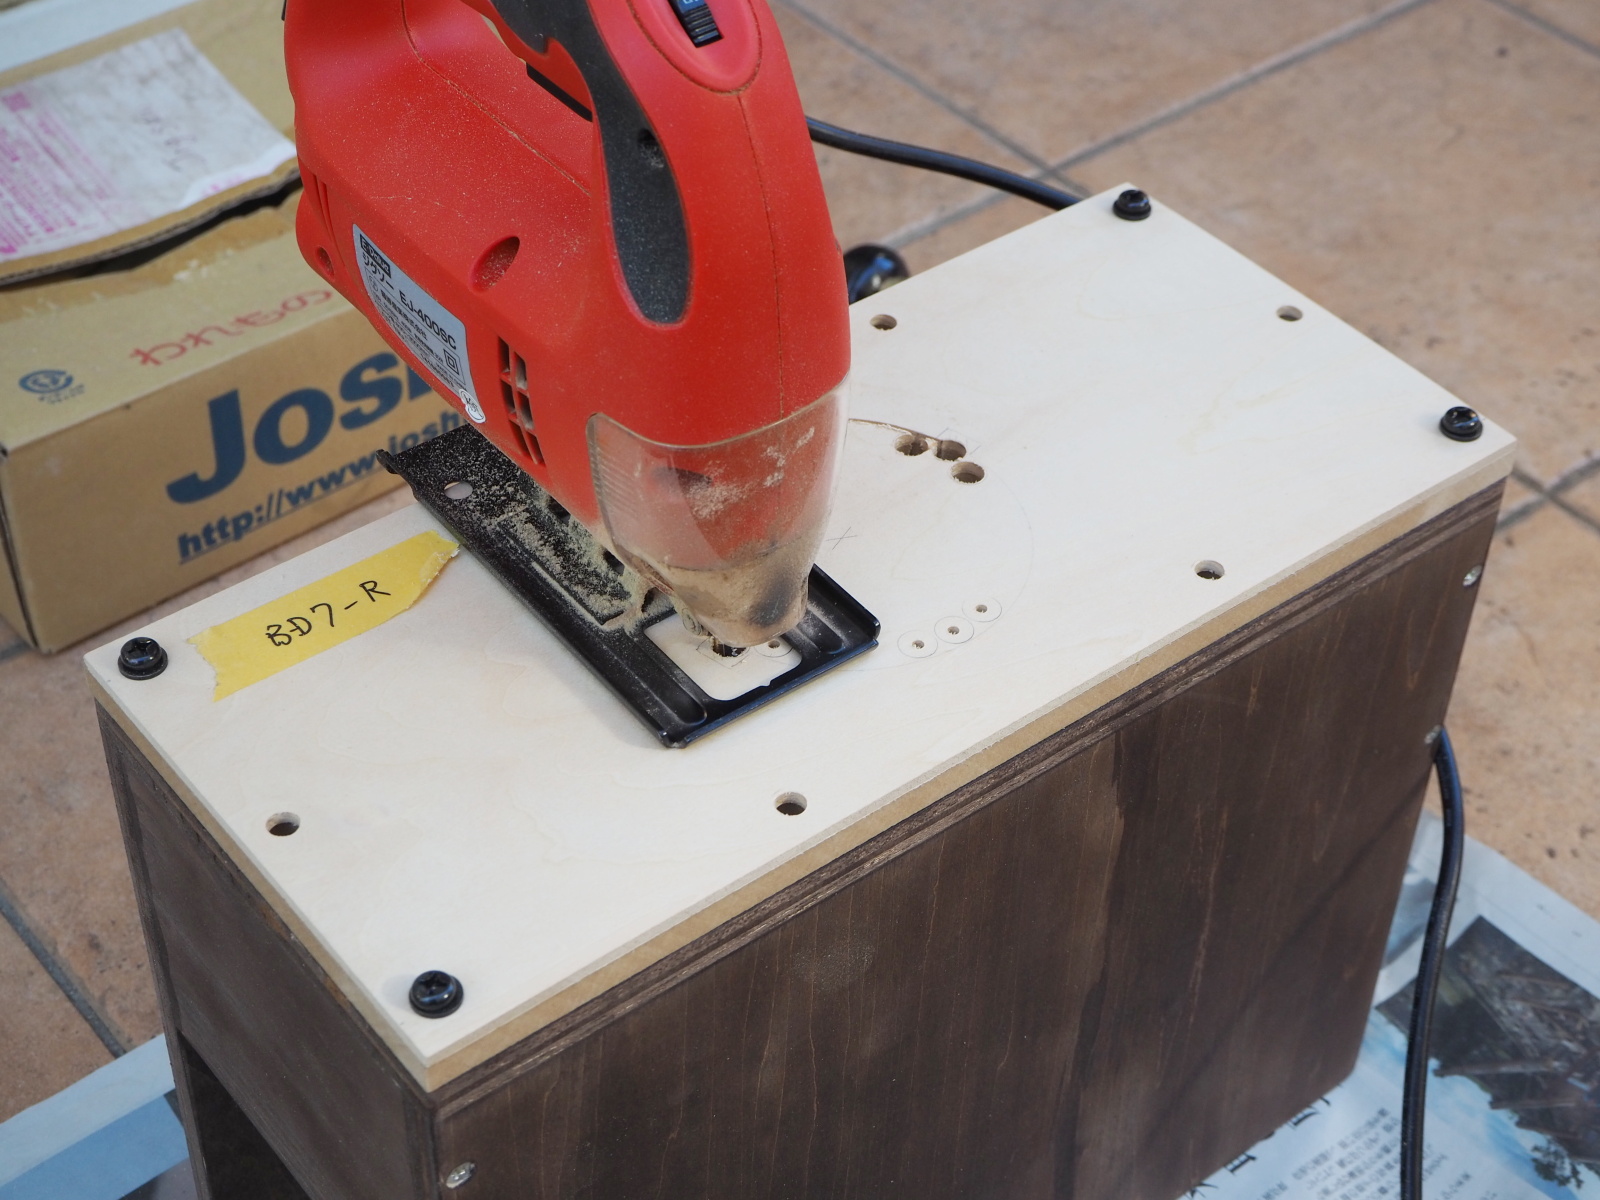 |
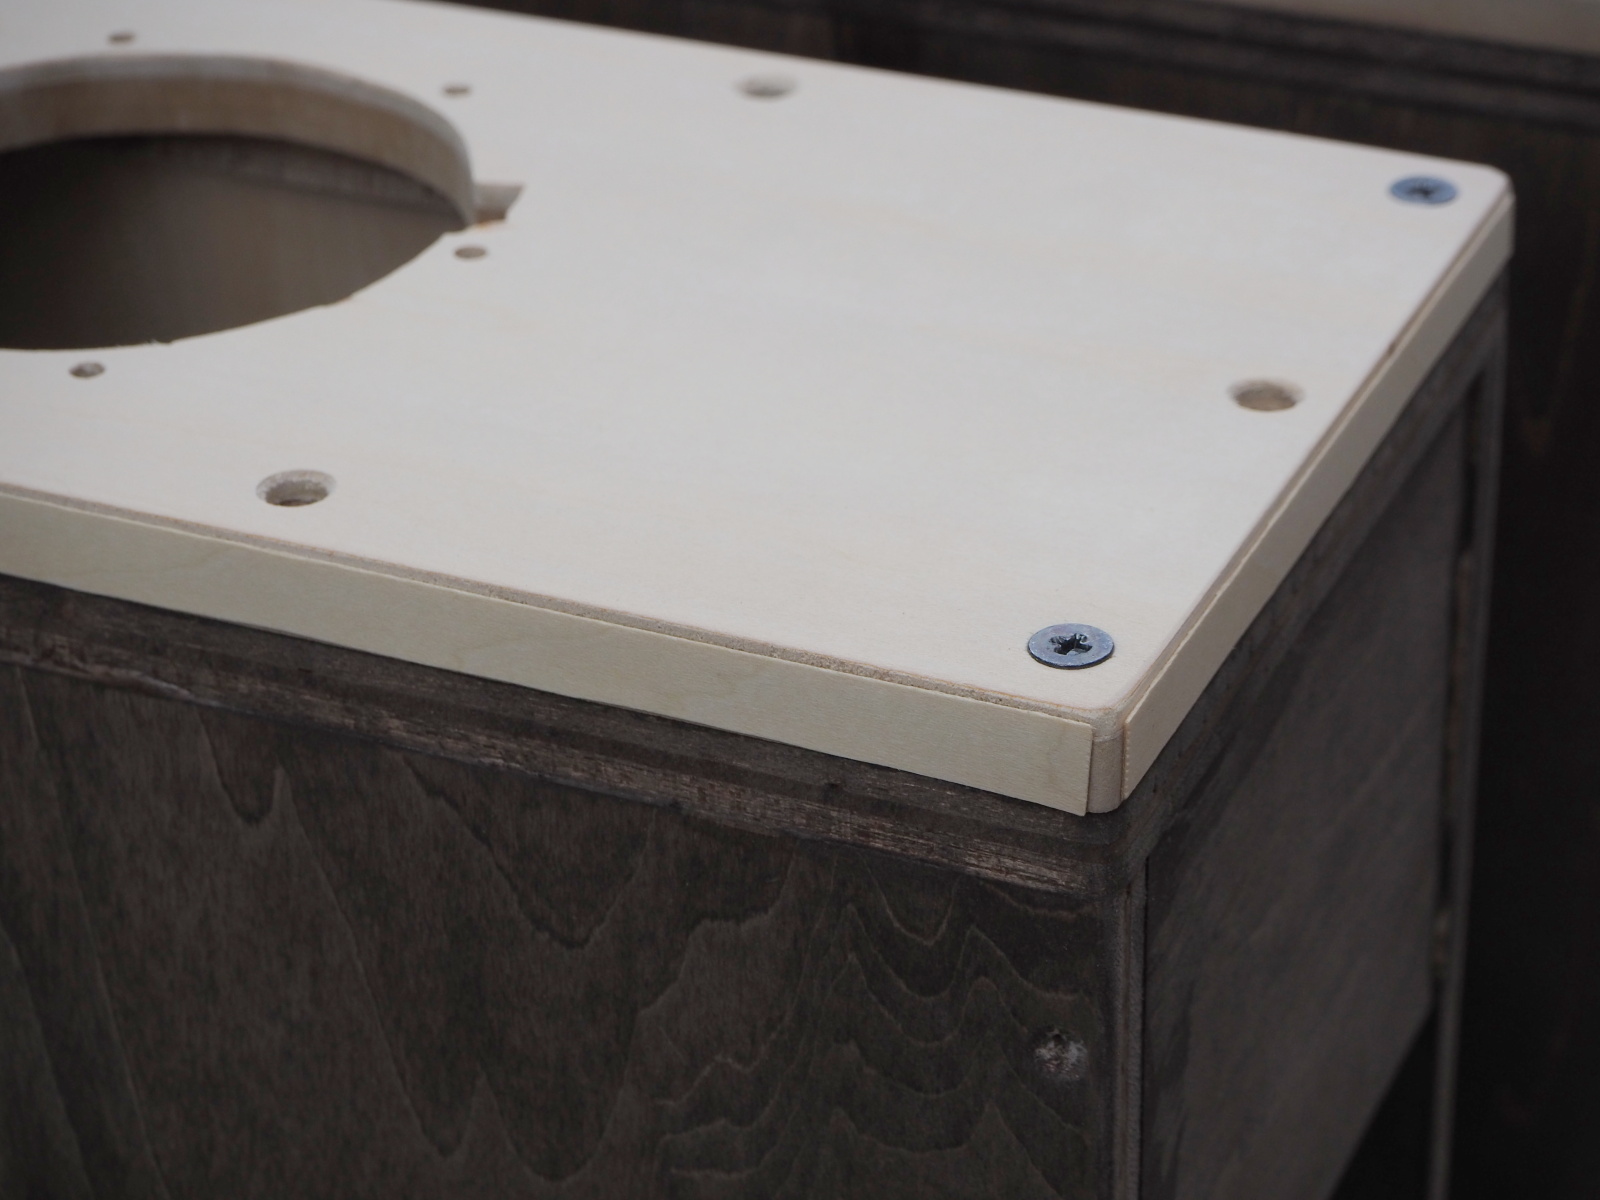 |
| Making cutout for RS52FN-8 The cutout was made with a power jigsaw. I utilized Sq Box as a workbench. |
Affixing kerf tape on kerf Again, I used Sq Box as a workbench. |
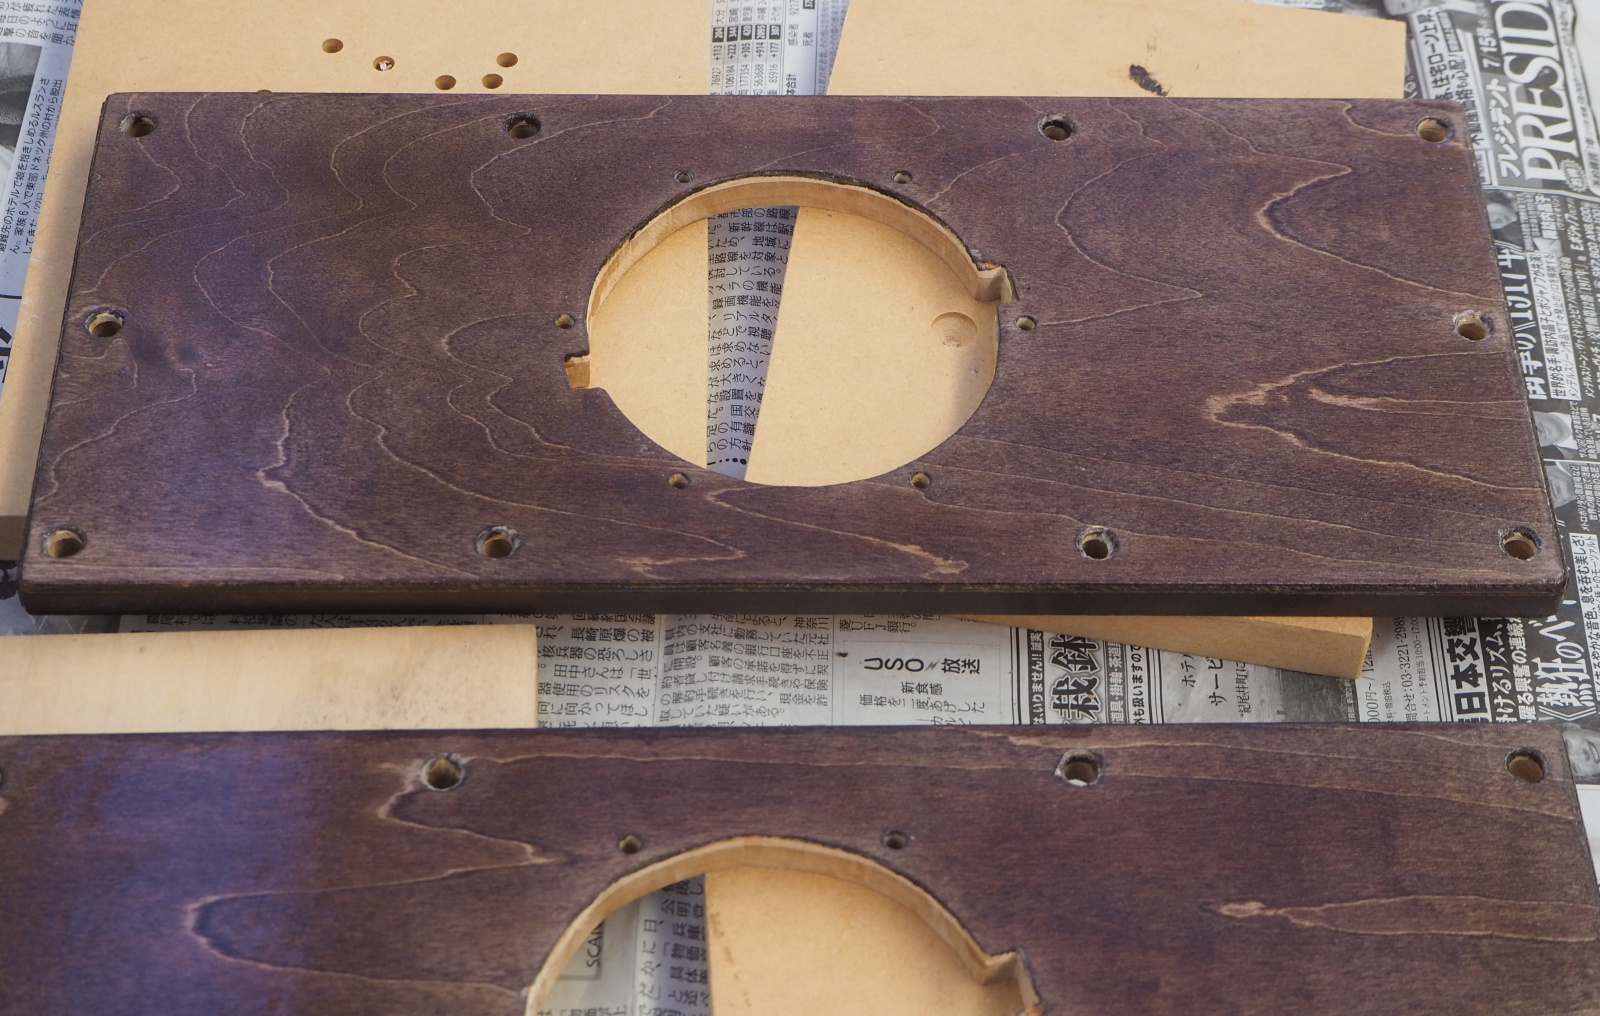 |
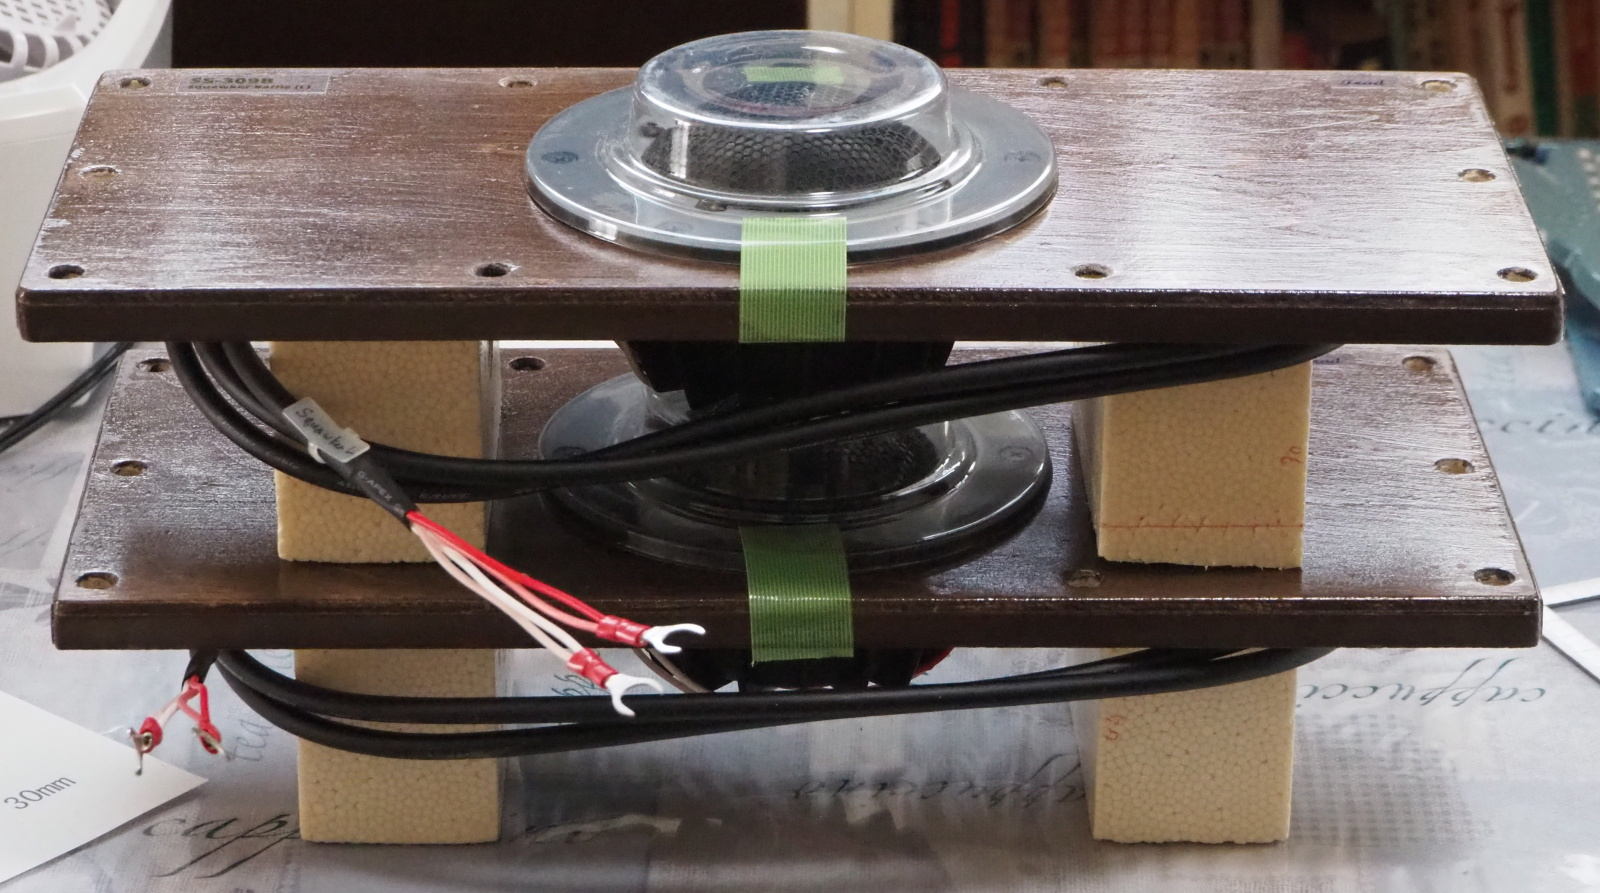 |
| Painted Squawker Baffle It is fairly good as Tonochi's work (?) |
Completed Squawker Baffle The protected cover is attached. Sq Baffle can be stacked as shown when put away in a closet. |
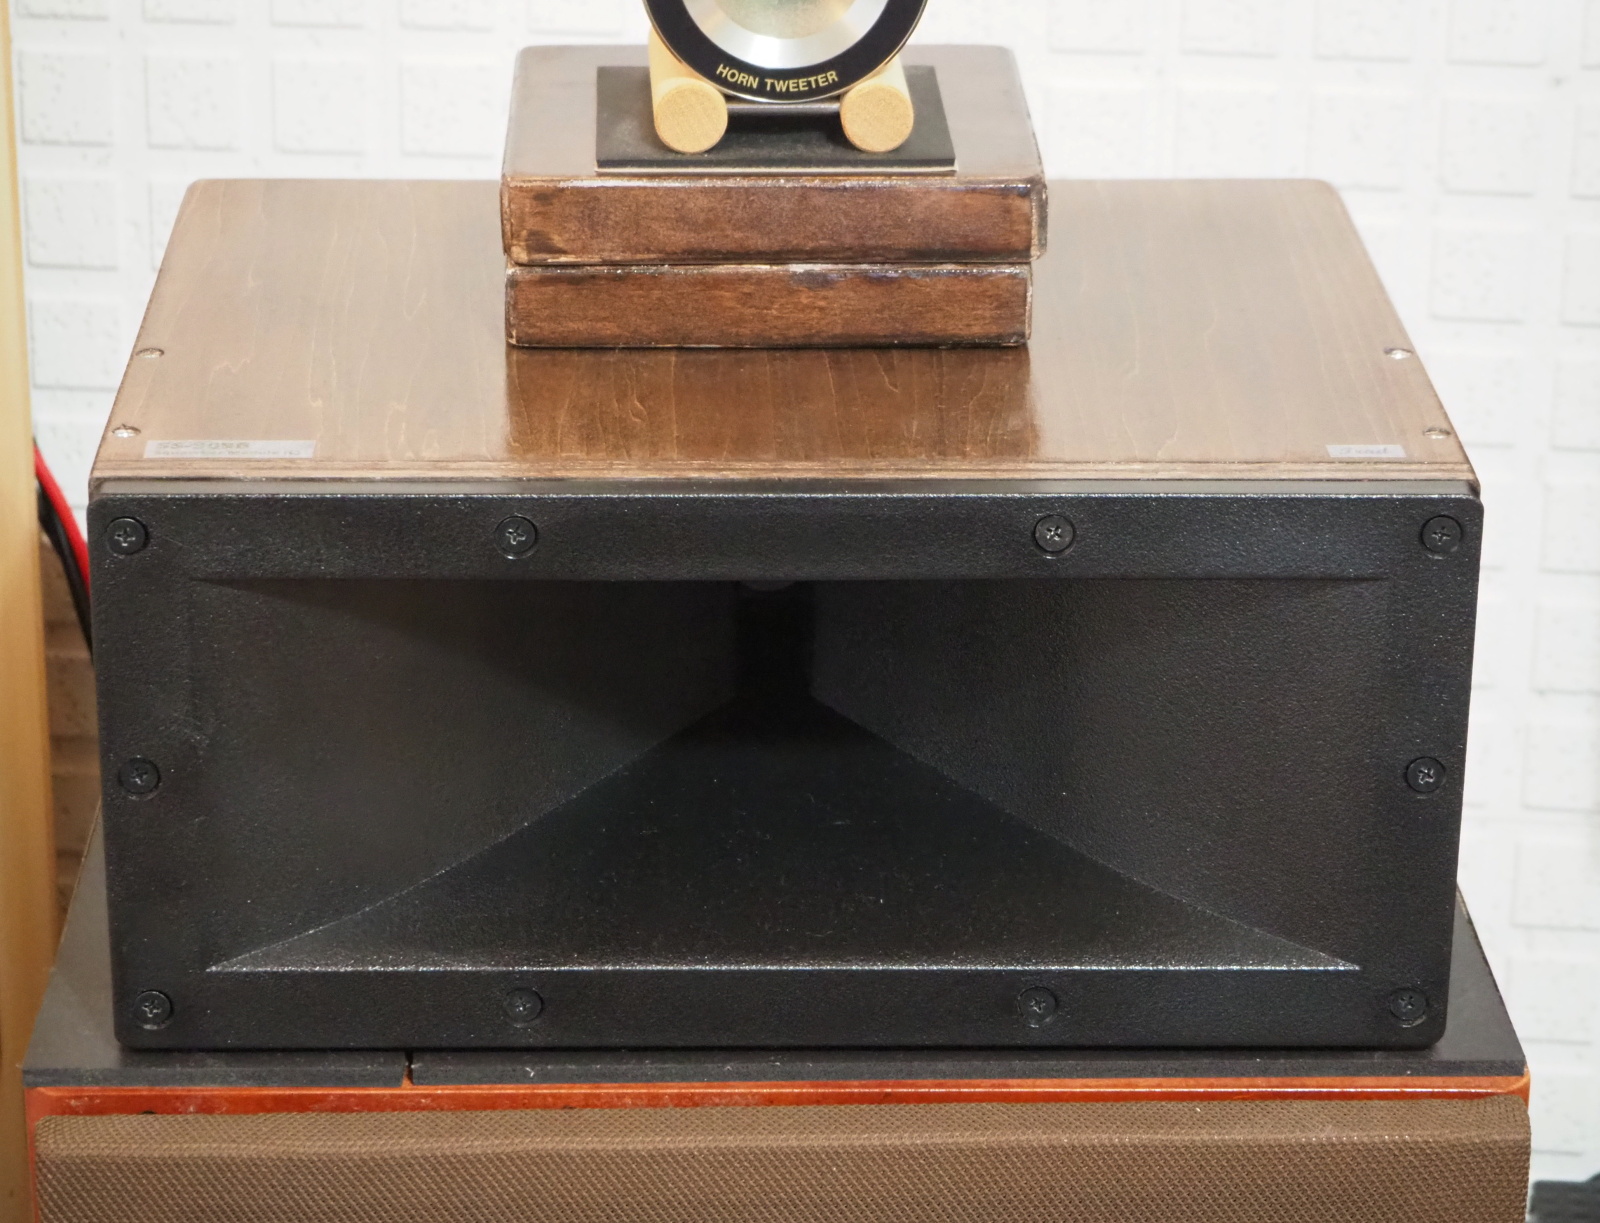 |
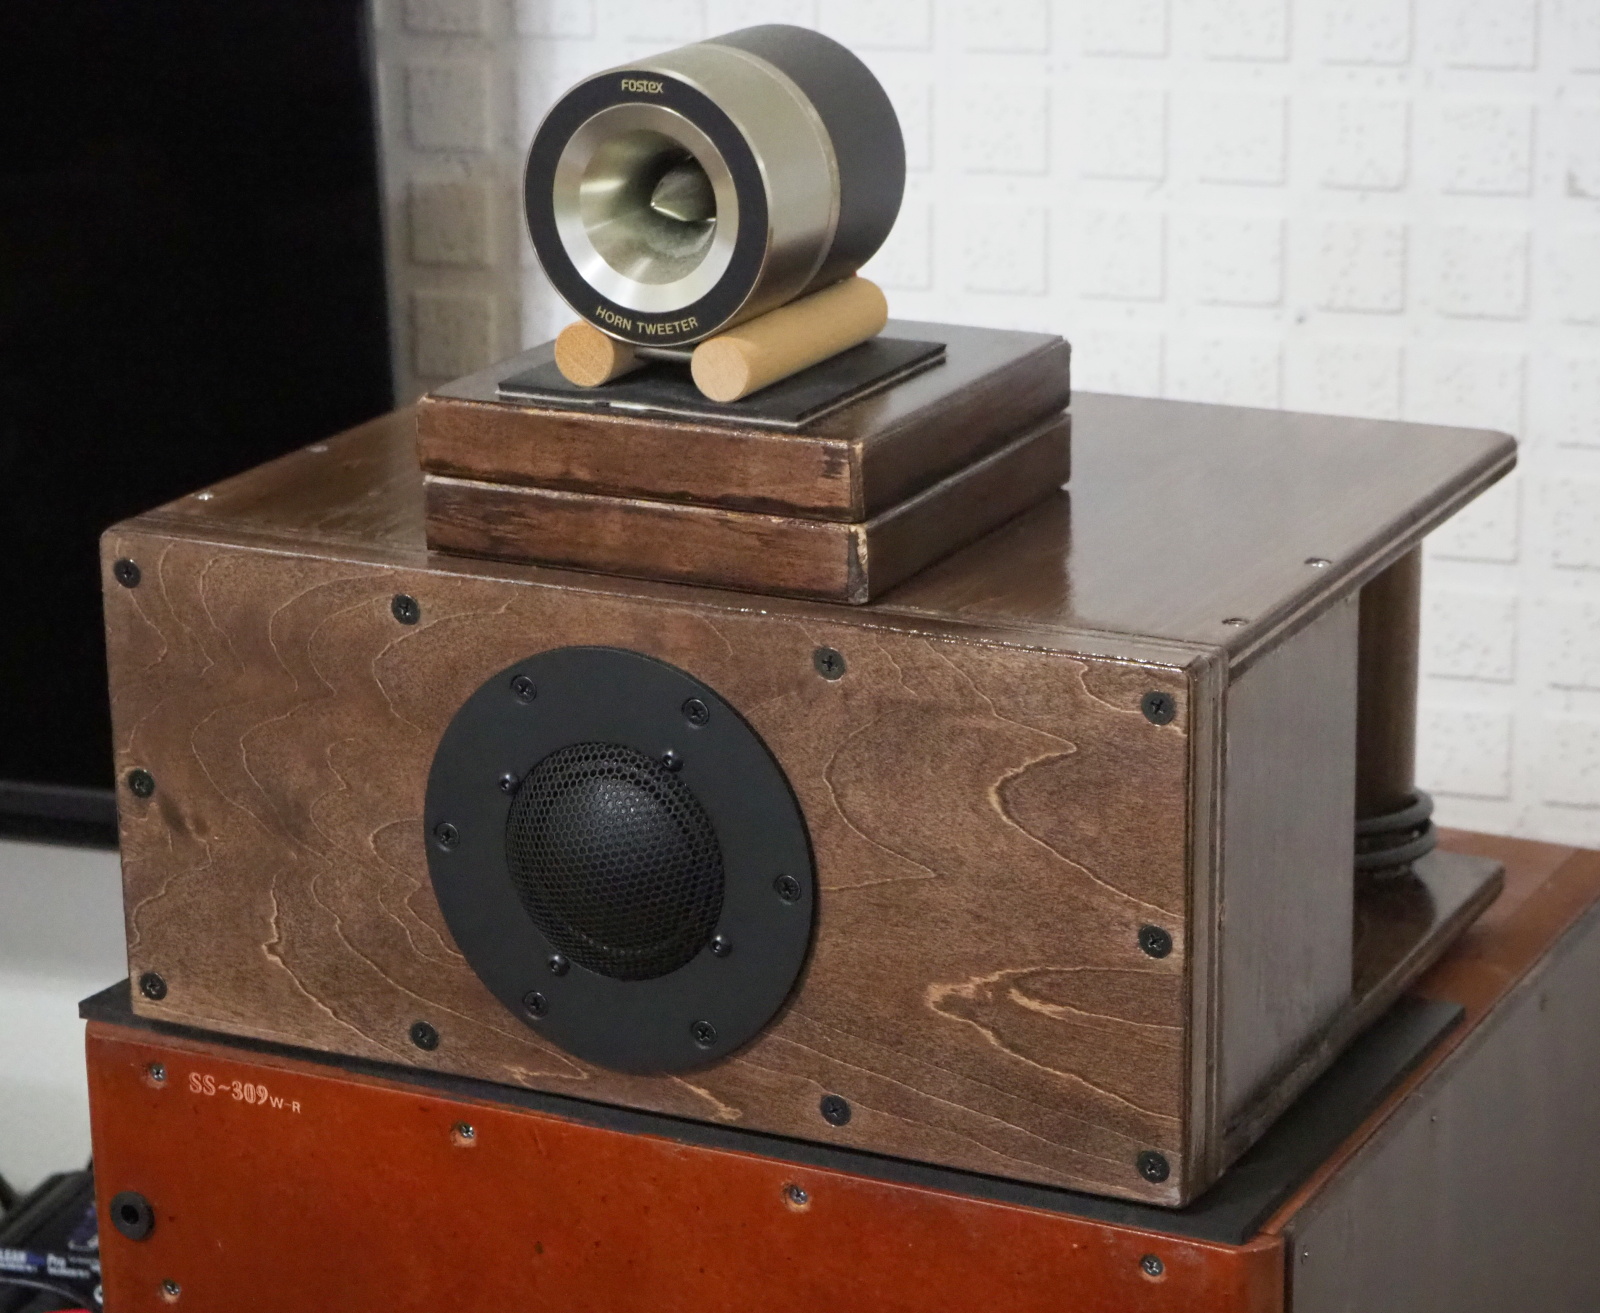 |
| Completed Squawker Module (Horn) The horn is fixed with M6 small flat head bolts. M5 is best fit, but I mistakingly drove the M6 insert nuts. So,I used the M6 bolts.The size of the head is the same as M5. |
Completed Squawker Module (Dome) Sq Baffle is fixed with the same M6 bolts. |
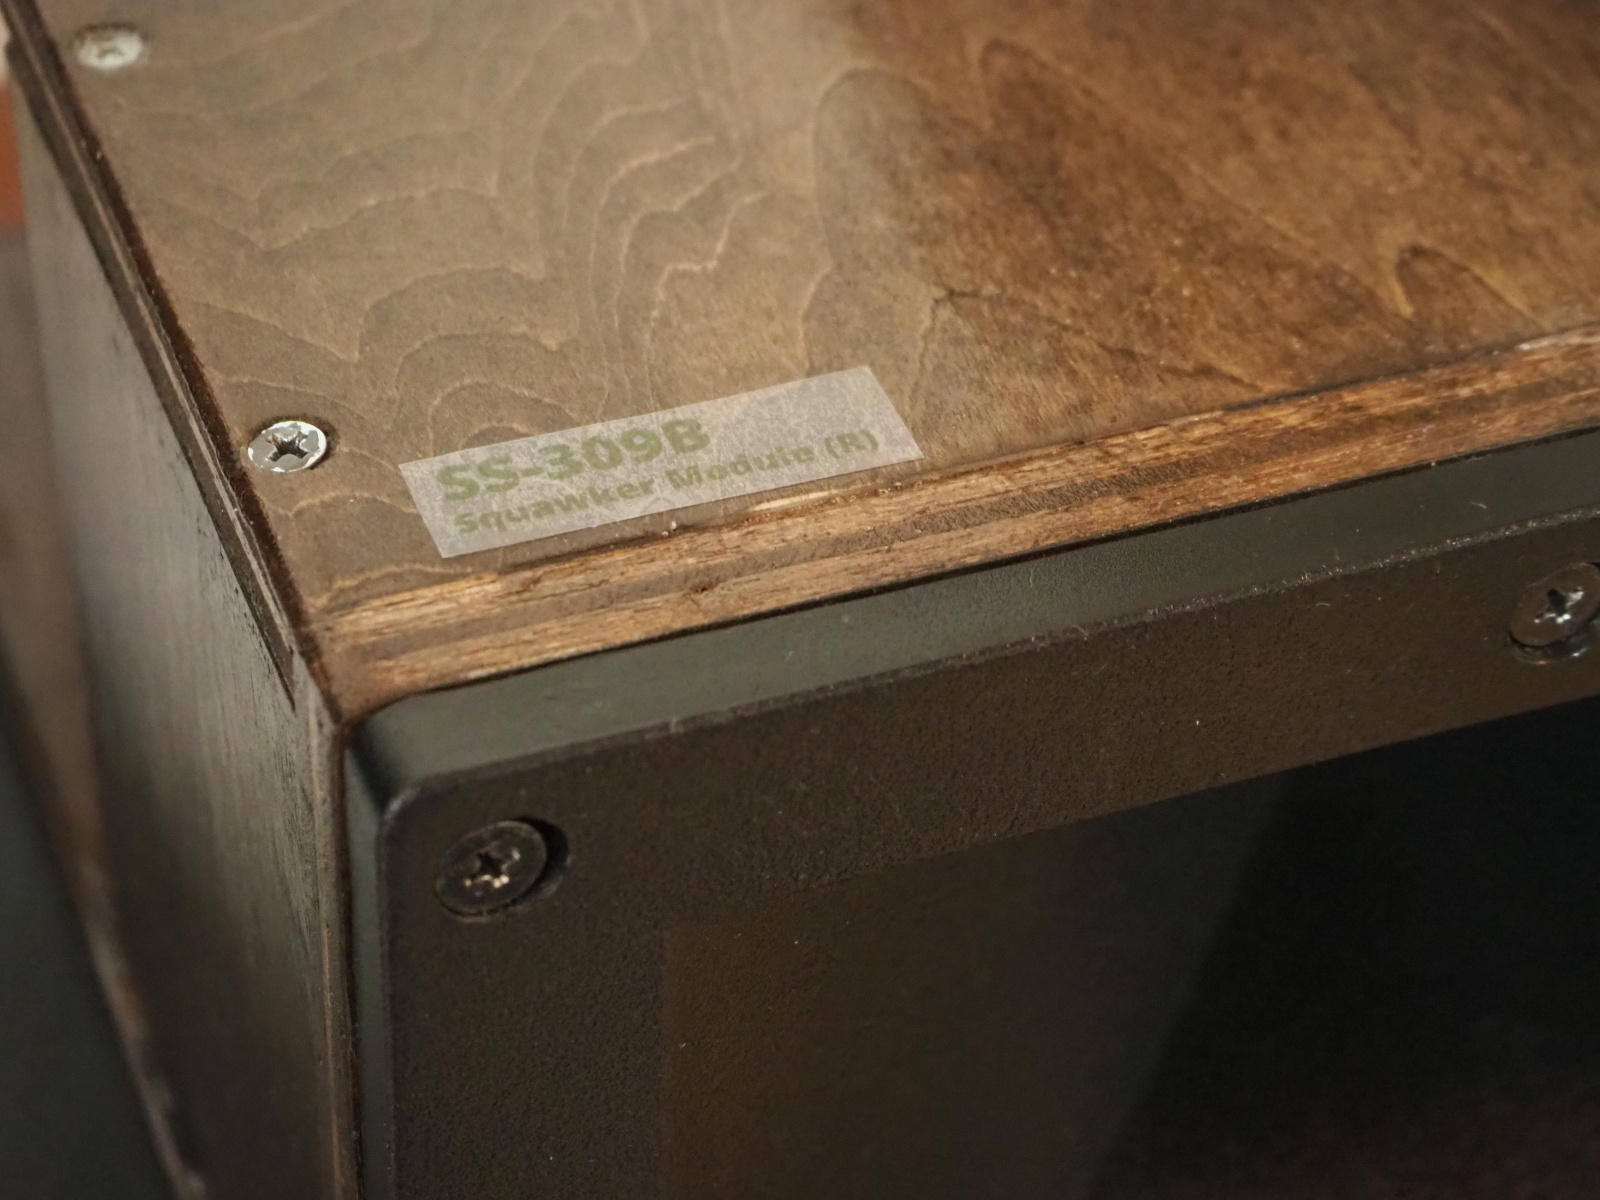 |
 |
| The sticker of Squawker Box (Top Panel) The color of teh substrate of the sticker is offically clear, but it really is semitransparent milky white. The color of the font is bright green. It isn't noticeable. It should be yellow or orange. |
The sticker of Squawker Box (Bottom Panel) To prevent a stress from applying to the soldered joint, the cable is fixed by the cable holder. |
Measurements
Let's compare ED3402 + H4401 with RS52FN-8 in the measurement data.
First, the frequency responses. The data of ED3402 + H4401 are shown in the left column, and RS52FN-8 in the right.
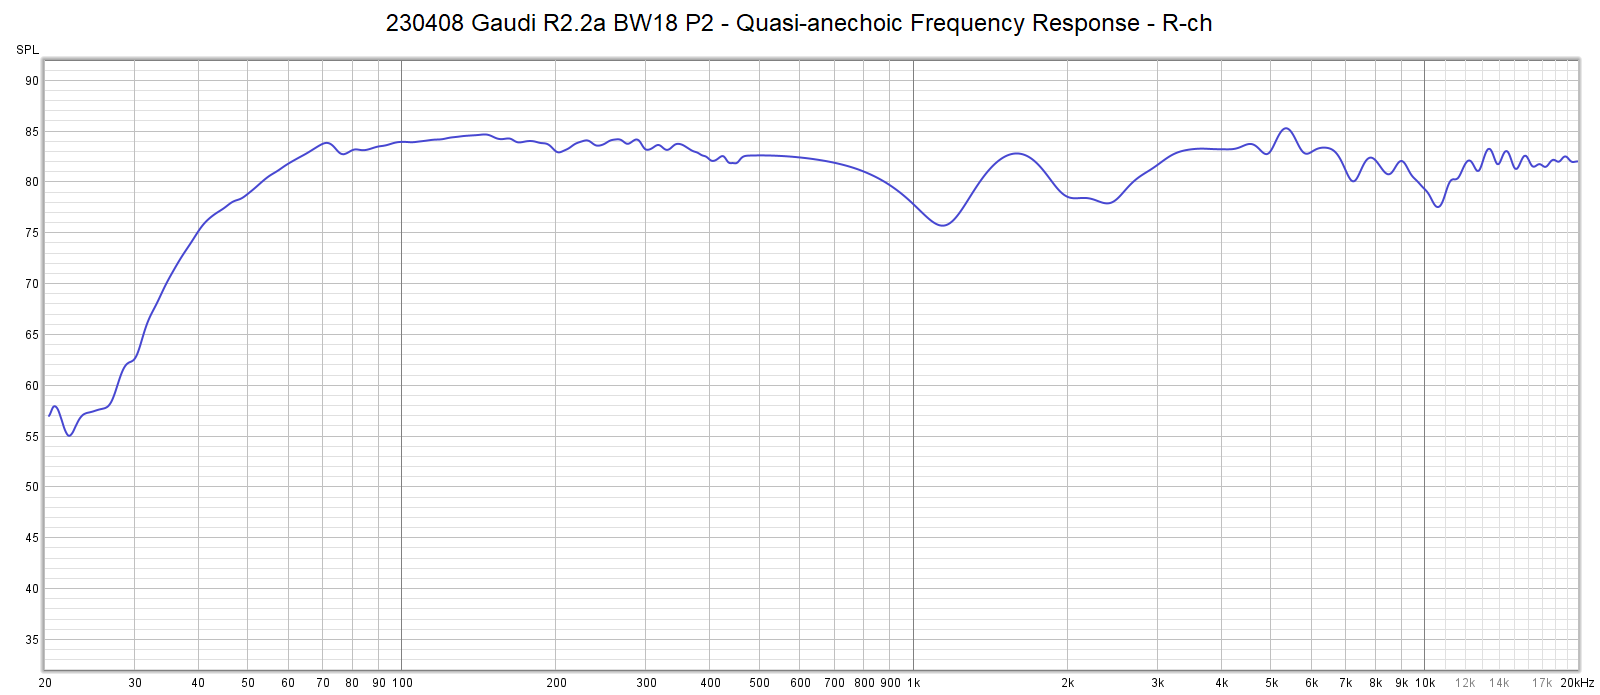 |
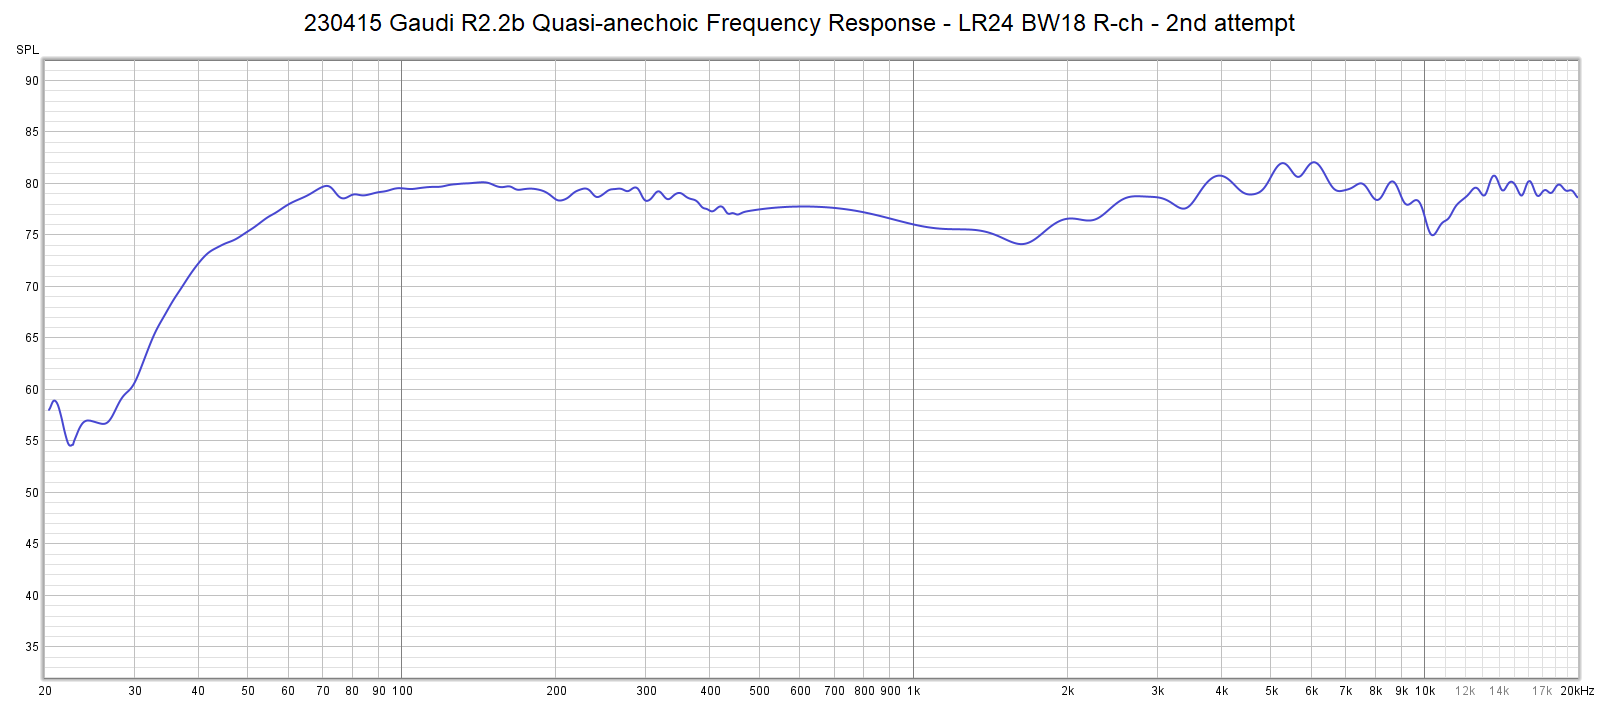 |
| ED3402+H4401 - Total The result of quasi-anechoic measurement of the speaker installed in Gaudi Rev.2.2a. |
RS52FN-8 - Total The result of quasi-anechoic measurement of the speaker installed in Gaudi Rev.2.2b. |
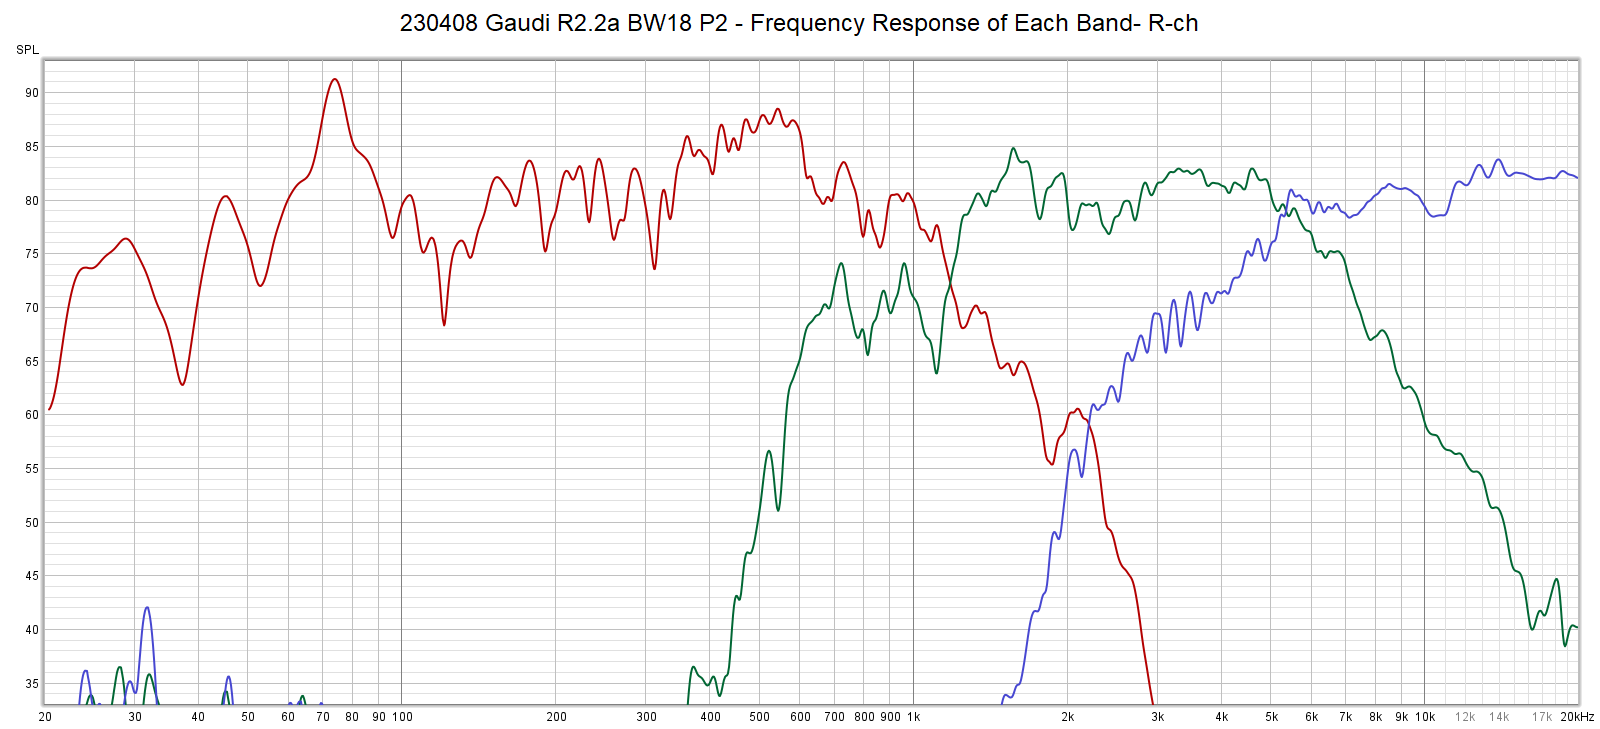 |
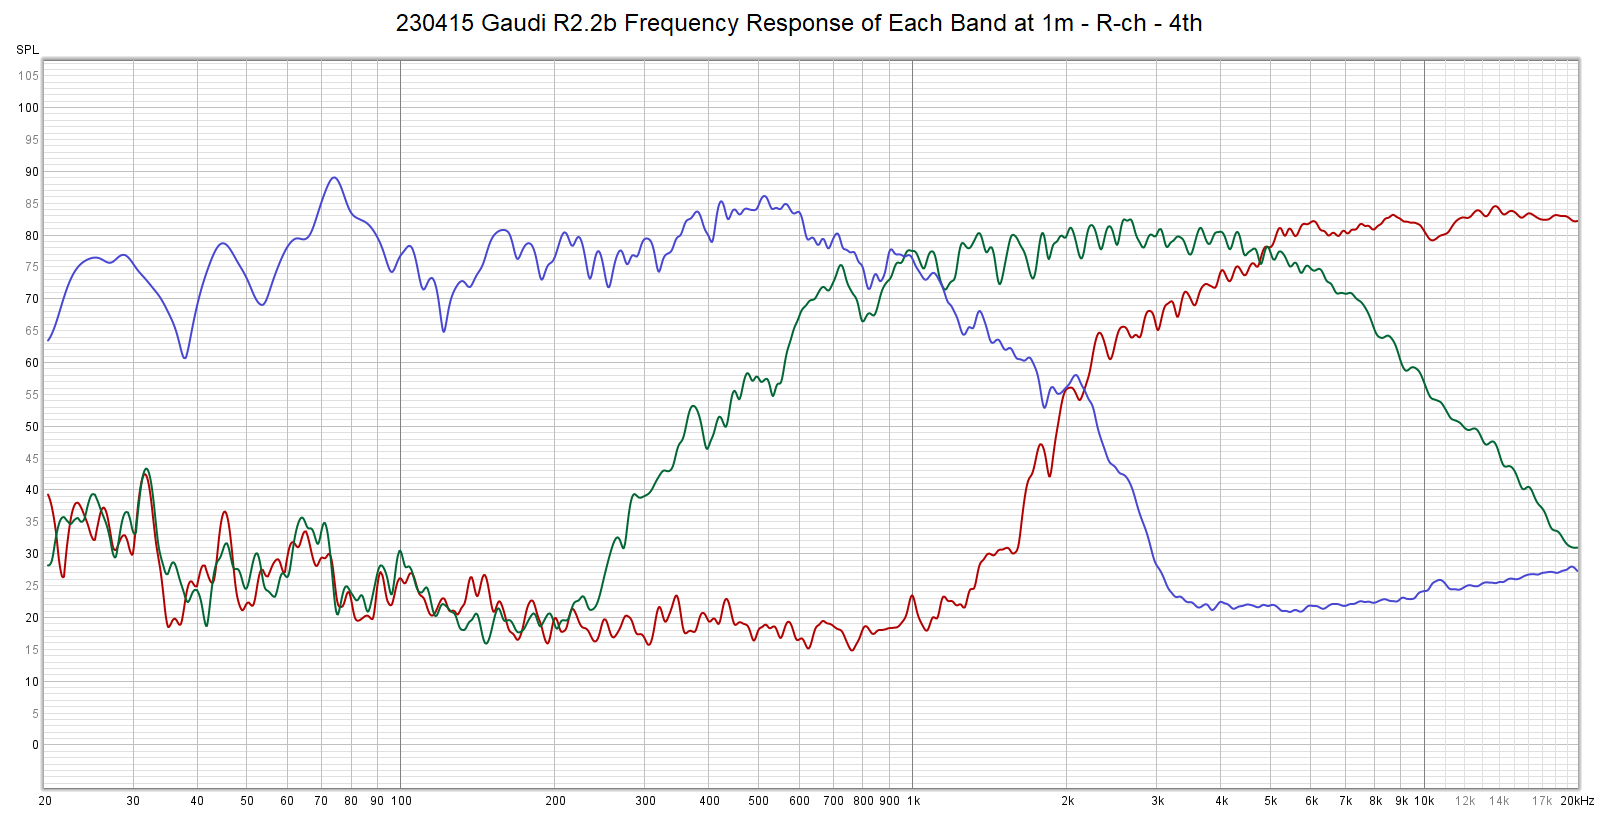 |
| ED3402+H4401 - Each band The green curve represents the data of midrange. It includes reflections in the room. |
RS52FN-8 - Each band The green curve represents the data of midrange. It includes reflections in the room. |
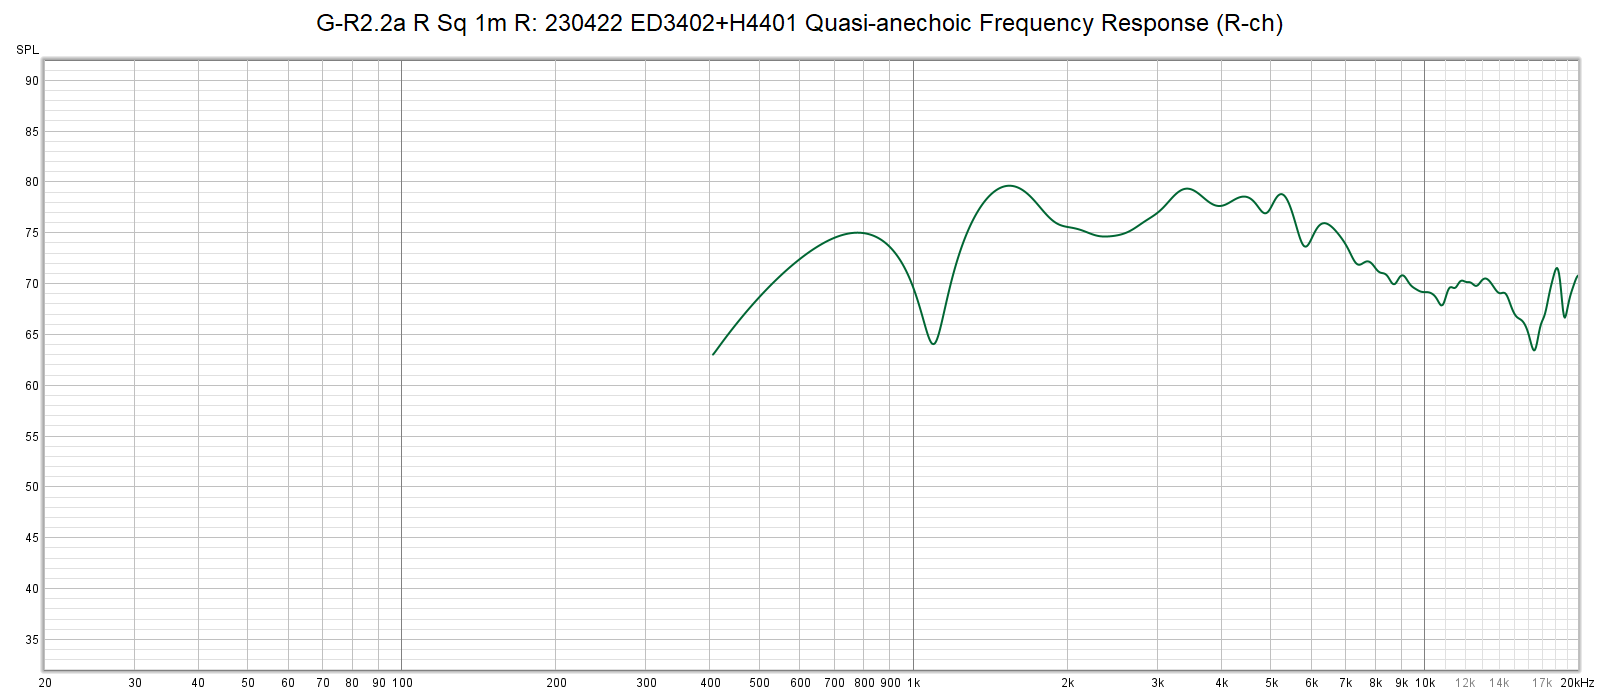 |
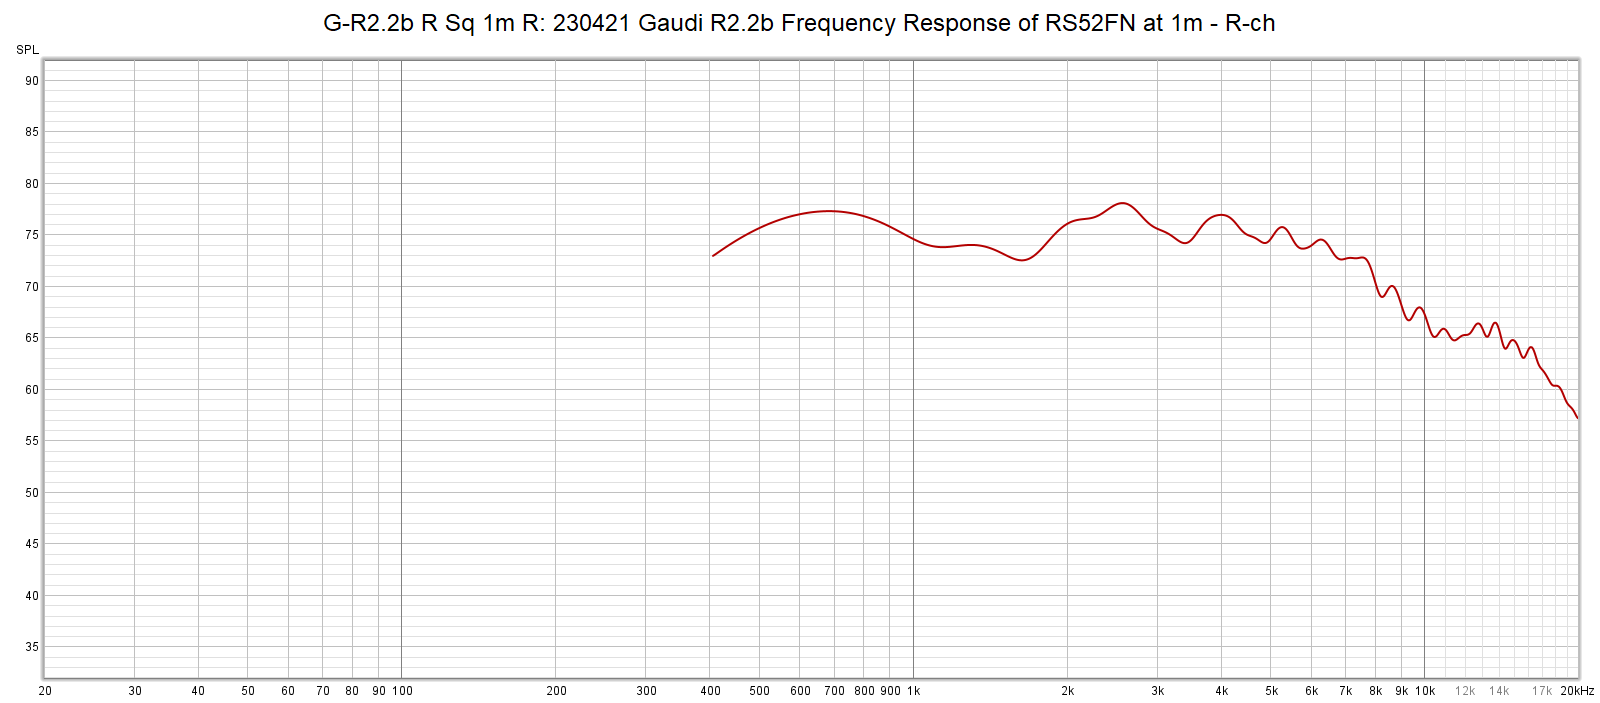 |
| ED3402+H4401 - Squawker only The filters in the crossover network are all off. Sine wave sweeps in the range 400Hz-20kHz. The reflections are eliminated. |
RS52FN-8 - Squawker only The filters in the crossover network are all off. Sine wave sweeps in the range 400Hz-20kHz. The reflections are eliminated. |
As for frequency response, the dome squawker, RS52FN-8 is better than the
horn squawker , ED3402 + H4401.
The hoen squawker has a deep dip at 1.1kHz. Other than the dip, the lower
end starts to roll off below 1.3kHz.
This fact implies, for ED3402 + H4401, fc1should be 1.2kHz or higher.
The figure below shows the frequency responses for the three combinations:
ED3402 only, ED3402 + H400, and ED3402 + H4401.
The driver itself doesn't cause the dip. H400 causes a dip, too, but it's
not as deep as H4401.
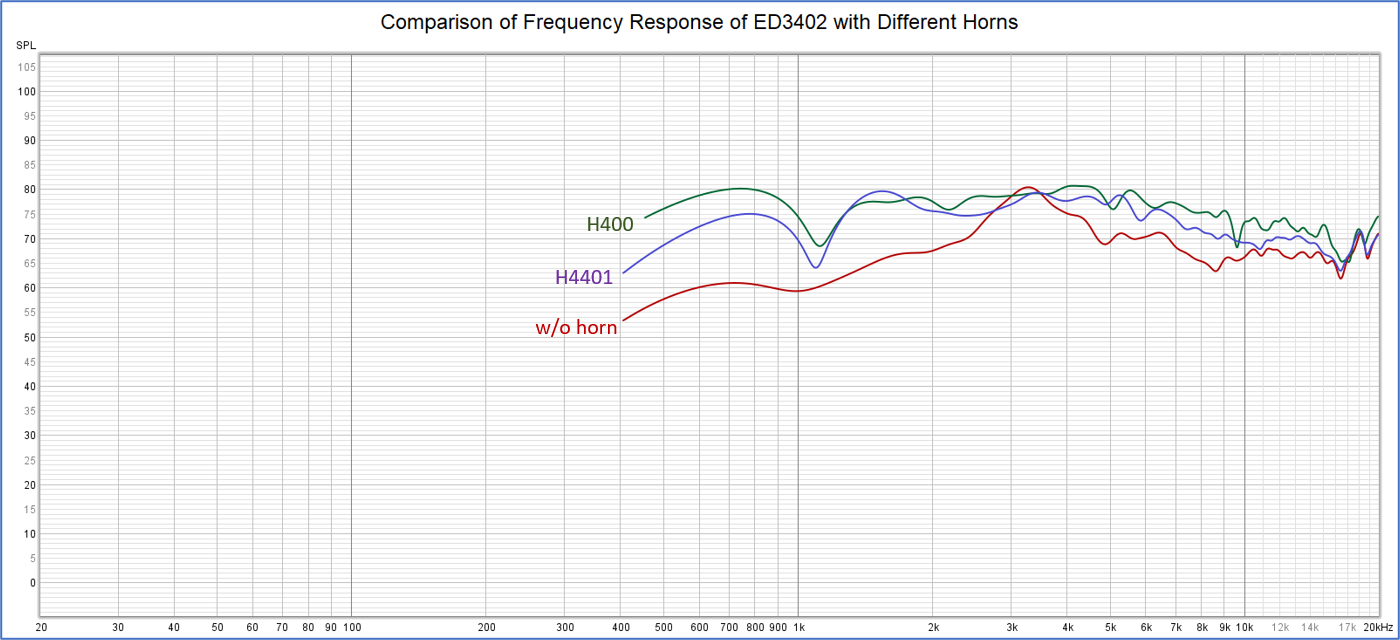
To measure the transient response, one-period sine wave is used. All the filters in the crossover network are off so that unfiltered signals are fed to the squawker.
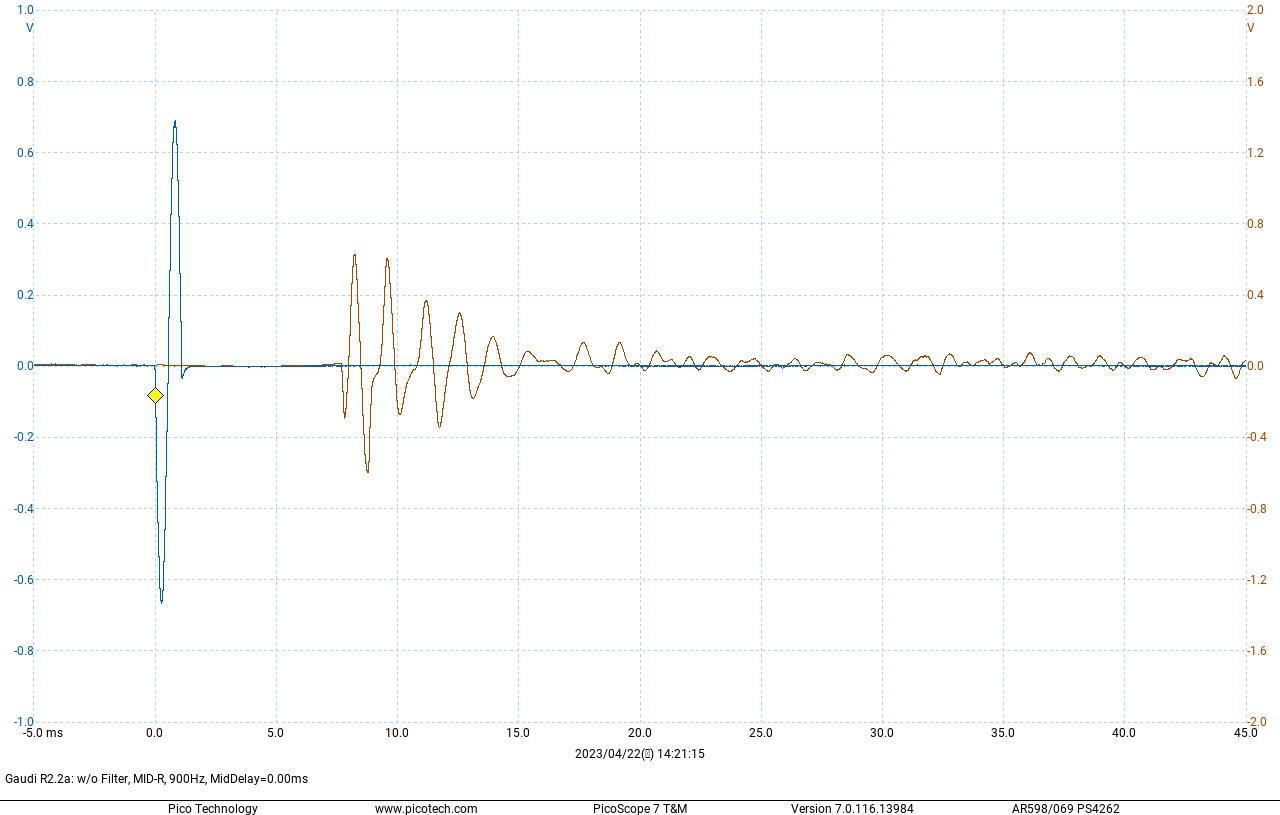 |
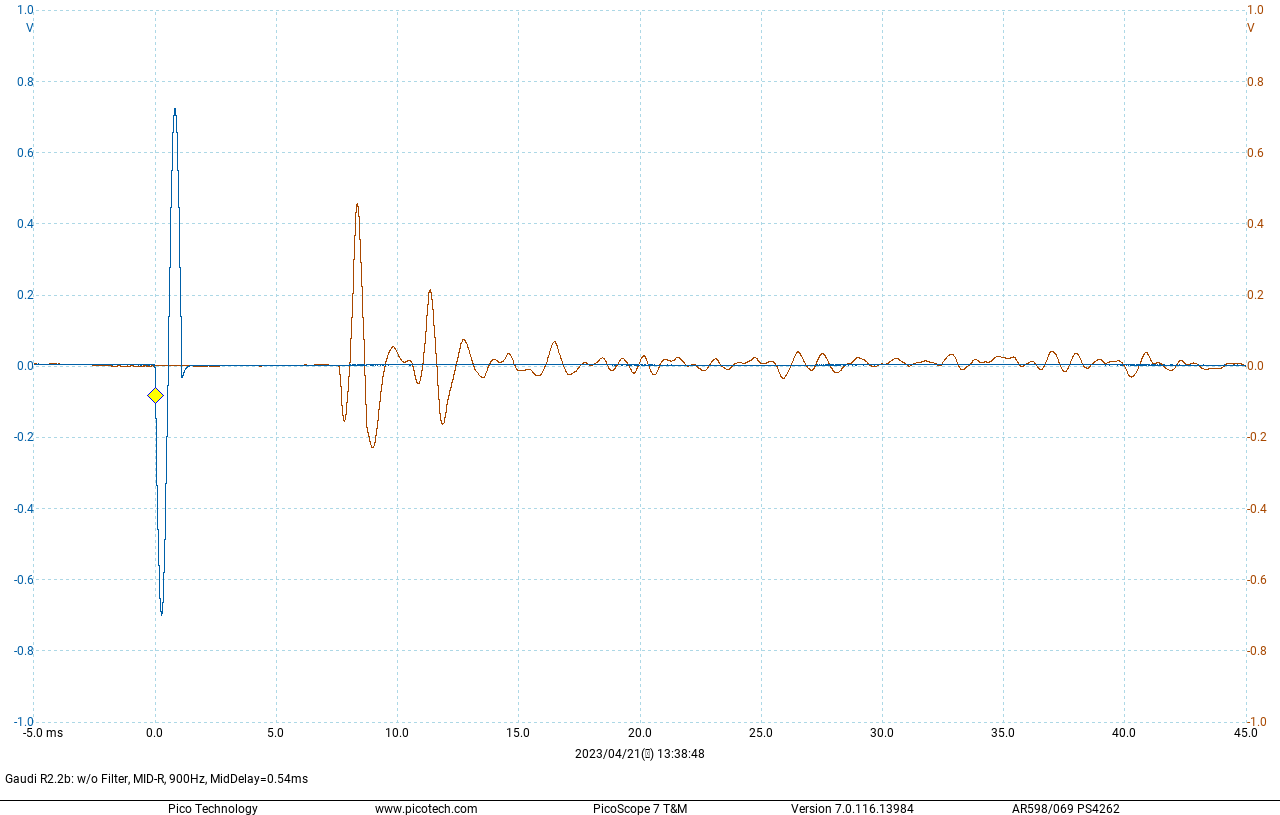 |
| ED3402+H4401 - 900Hz The blue curve represents the input (PRE OUT), and the red curve represents the output (on-axis sound pressure at 1m). This includes the reflection from the floor (delayed by about 3msec from the direct sound). |
RS52FN-8 - 900Hz The blue curve represents the input (PRE OUT), and the red curve represents the output (on-axis sound pressure at 1m). This includes the reflection from the floor (delayed by about 3msec from the direct sound). |
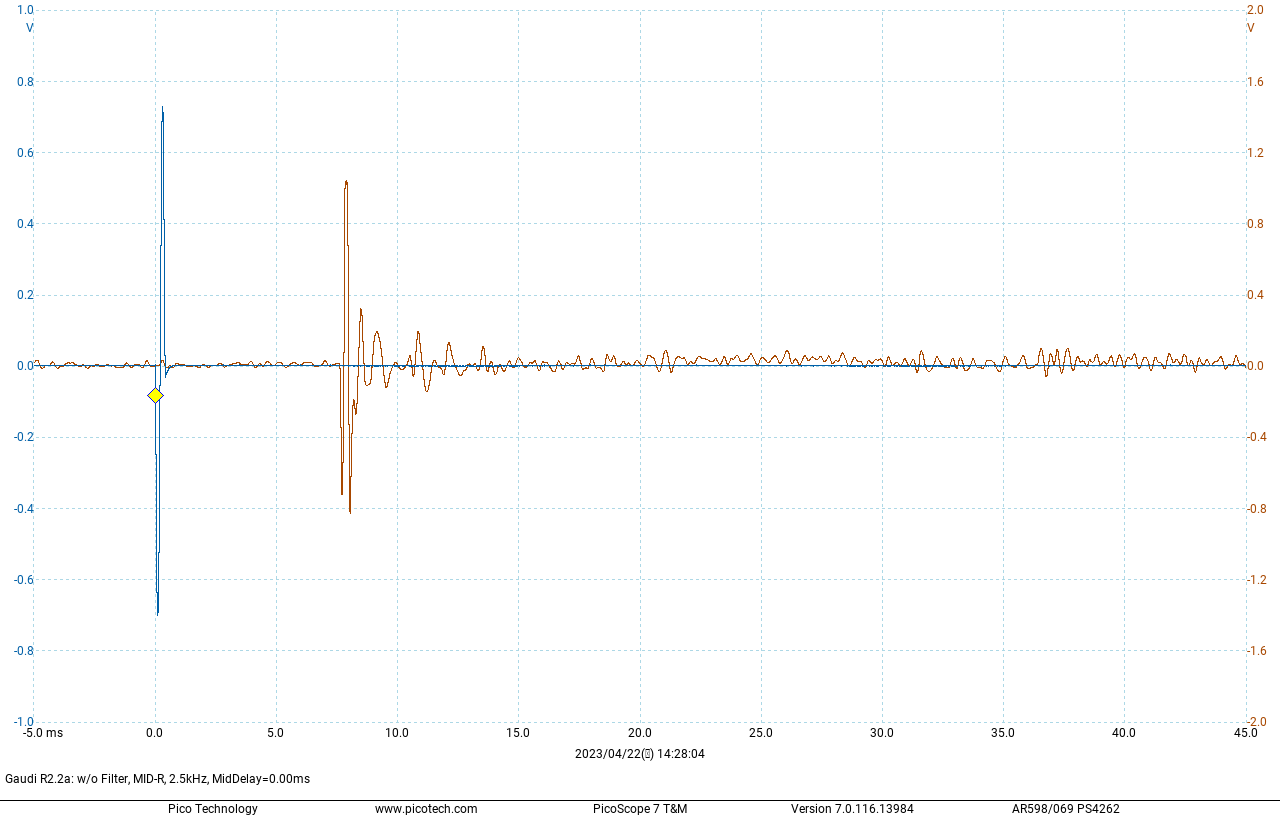 |
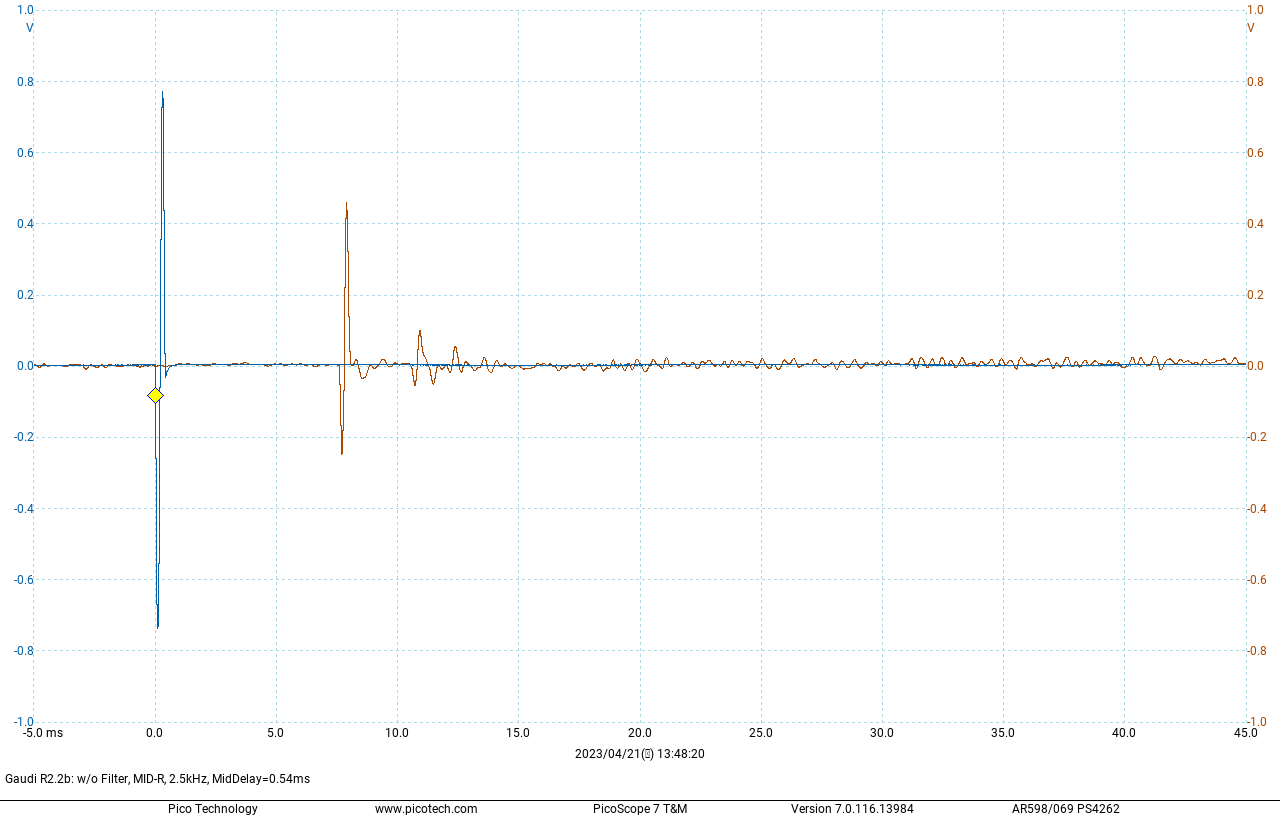 |
| ED3402+H4401 - 2.5kHz The blue curve represents the input (PRE OUT), and the red curve represents the output (on-axis sound pressure at 1m). This includes the reflection from the floor (delayed by about 3msec from the direct sound). |
RS52FN-8 - 2.5kHz The blue curve represents the input (PRE OUT), and the red curve represents the output (on-axis sound pressure at 1m). This includes the reflection from the floor (delayed by about 3msec from the direct sound). |
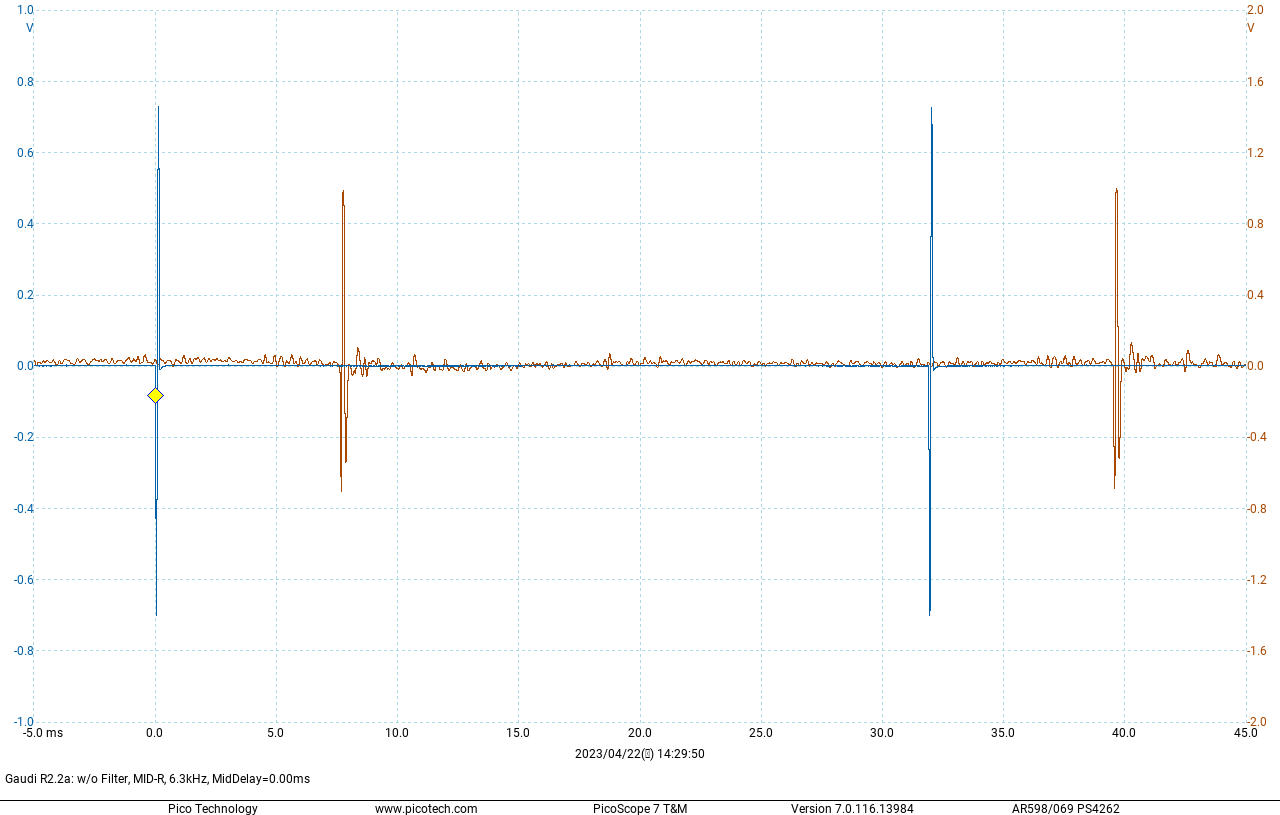 |
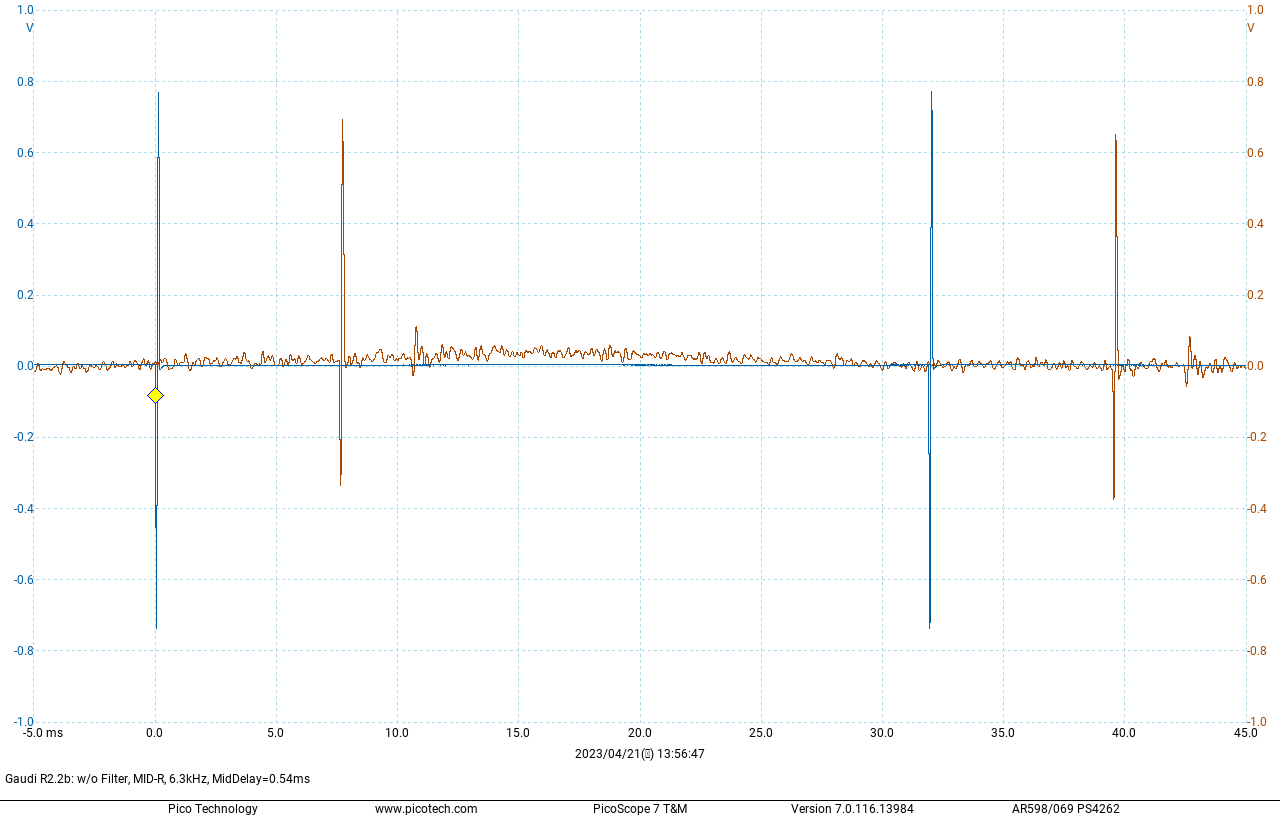 |
| ED3402+H4401 - 6.3kHz The blue curve represents the input (PRE OUT), and the red curve represents the output (on-axis sound pressure at 1m). This includes the reflection from the floor (delayed by about 3msec from the direct sound). |
RS52FN-8 - 6.3kHz The blue curve represents the input (PRE OUT), and the red curve represents the output (on-axis sound pressure at 1m). This includes the reflection from the floor (delayed by about 3msec from the direct sound). |
RS52FN-8, dome type, is superior to ED2402+H4401, horn type, because the former has shorter ringing.
The measurements tell that the dome squawker excels the horn in both performance in frequency domain
(frequency response) and performance in time domain (transient response).
I didn't expect this result at all, because I have believing the horn is
superior to direct radiators (cone type, dome type) since 1974, when I
planned Gaudi. I misunderstood for nearly half a century.
One more thing, I compared the horn with the dome in directivity.
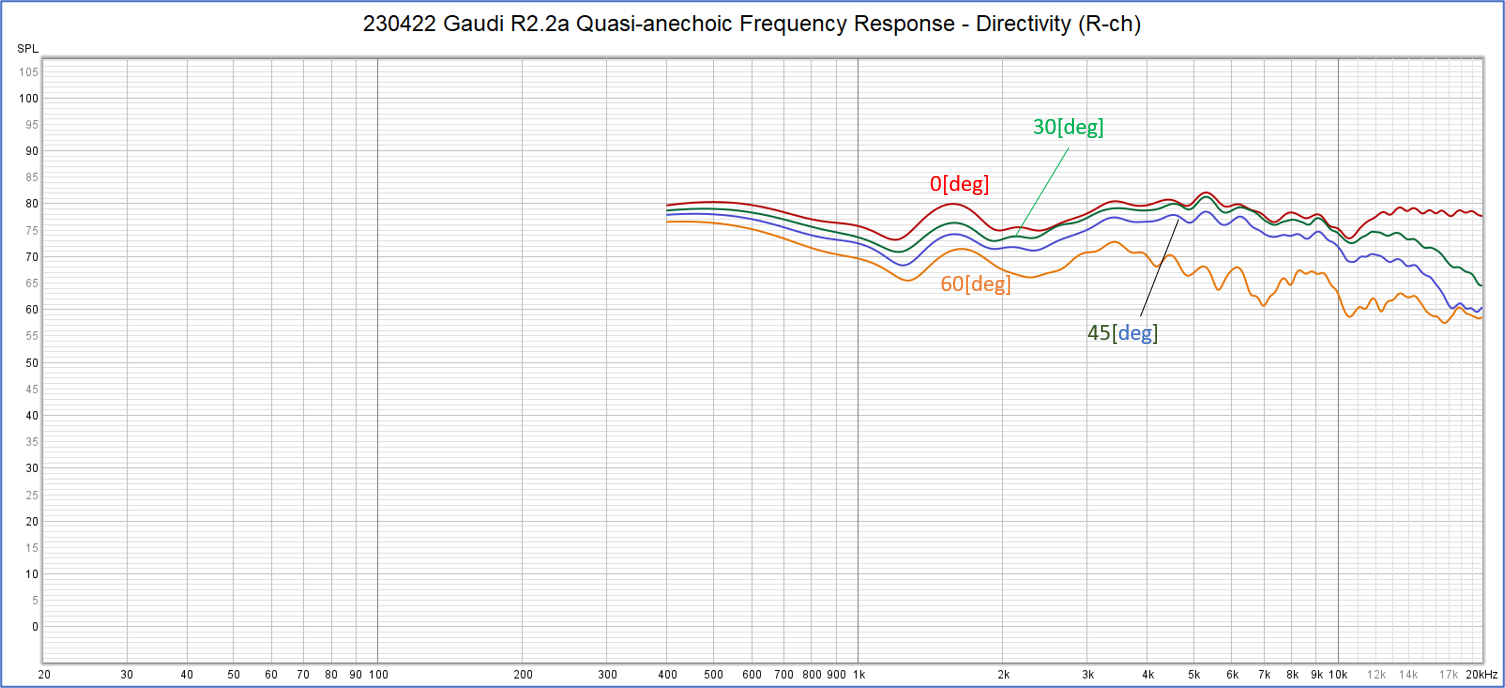 |
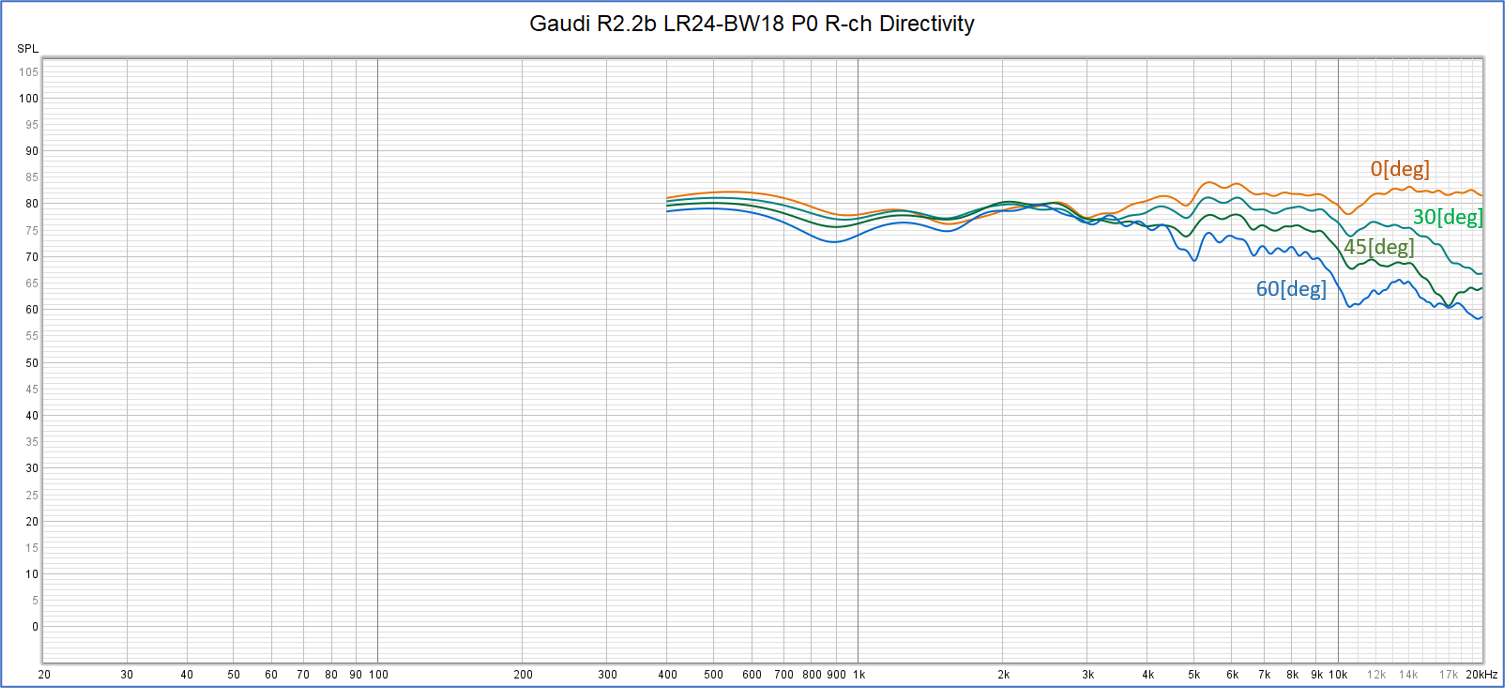 |
| ED3402+H4401 - Directivity The angles are 0, 30, 45,and 60 degrees. The distance is 1m. Reflections are eliminated. The SPL is almost the same till 45 degrees. It significantly drops at 60 degrees. |
RS52FN-8 - Directivity The angles are 0, 30, 45,and 60 degrees. The distance is 1m. Reflections are eliminated. The directivity is perfect below 3.4kHz. At the higher frequencies, as the angle increases, the SPL declines. |
Again, the result is not what I expected. When the angle is 45 degrees or narrower , the horn has the better directivity
than the dome.
The differences of SPLs between 0 and 45 degrees at 4kHz, 5kHz and 6kHz
are:
Horn (ED3402+H4401): -2.9dB, -3.5dB -2.8dB
Dome (RS52FN-8): -4.7dB, -5.5dB, -5.6dB
Listening trials
Other than the new squawker module, I have two old squawker modules. Now
I have four options.
I made listening trials of all the four options ((a)~(d)) shown in the
table below:
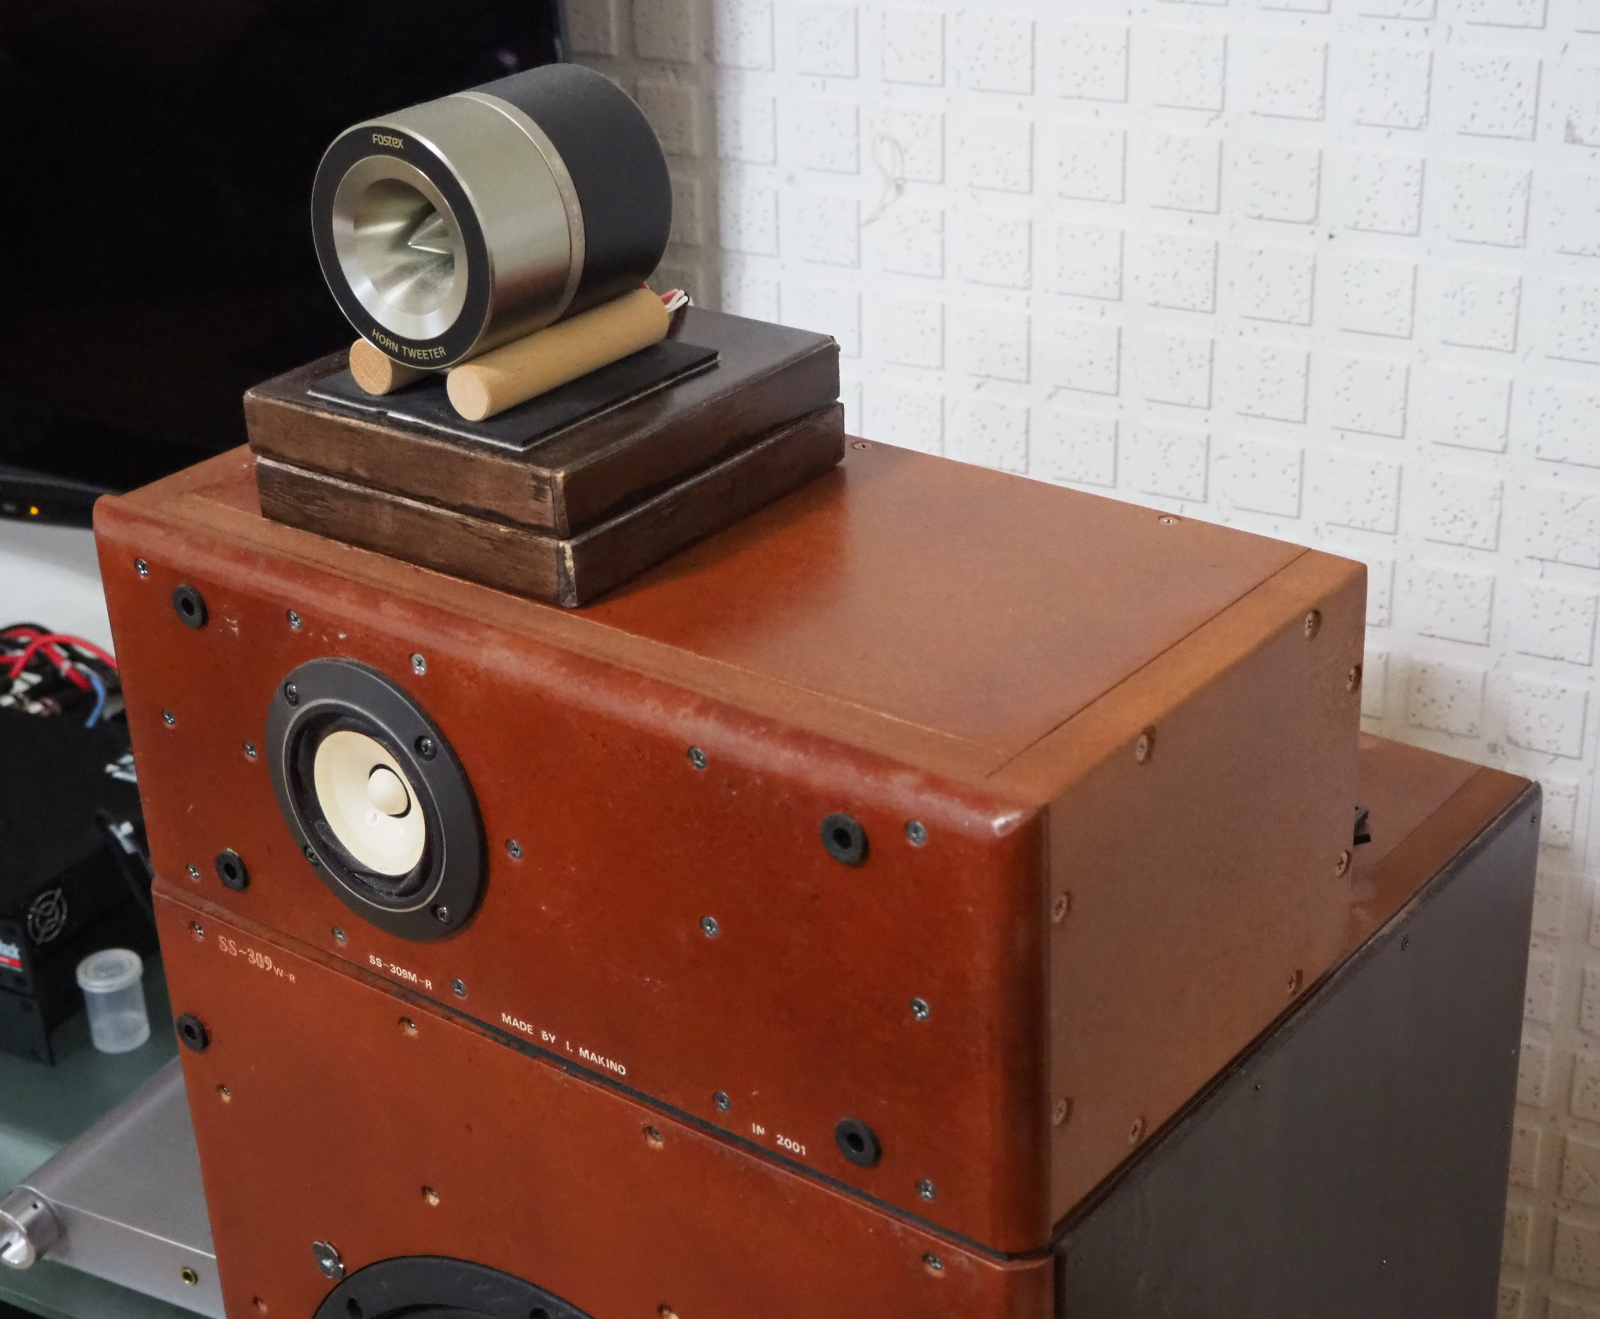 |
 |
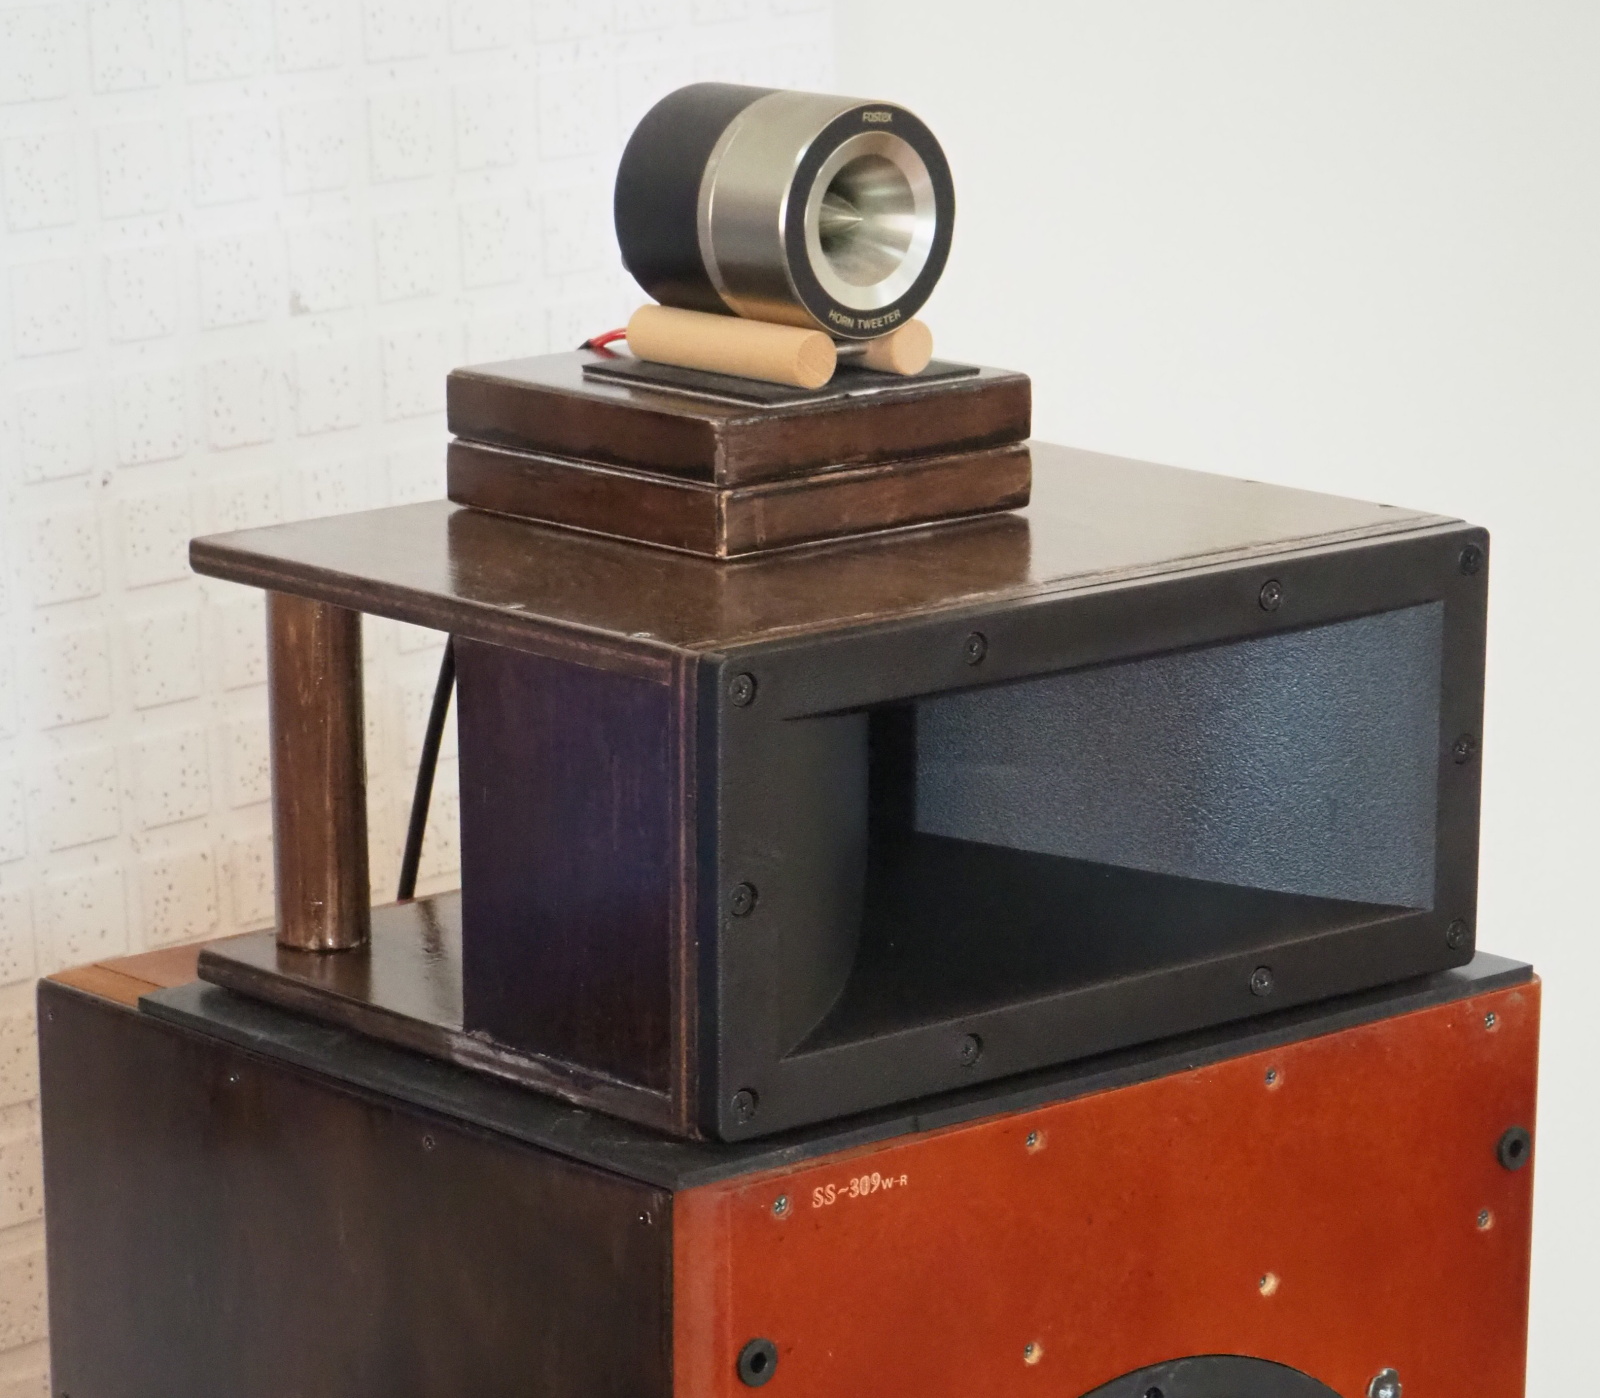 |
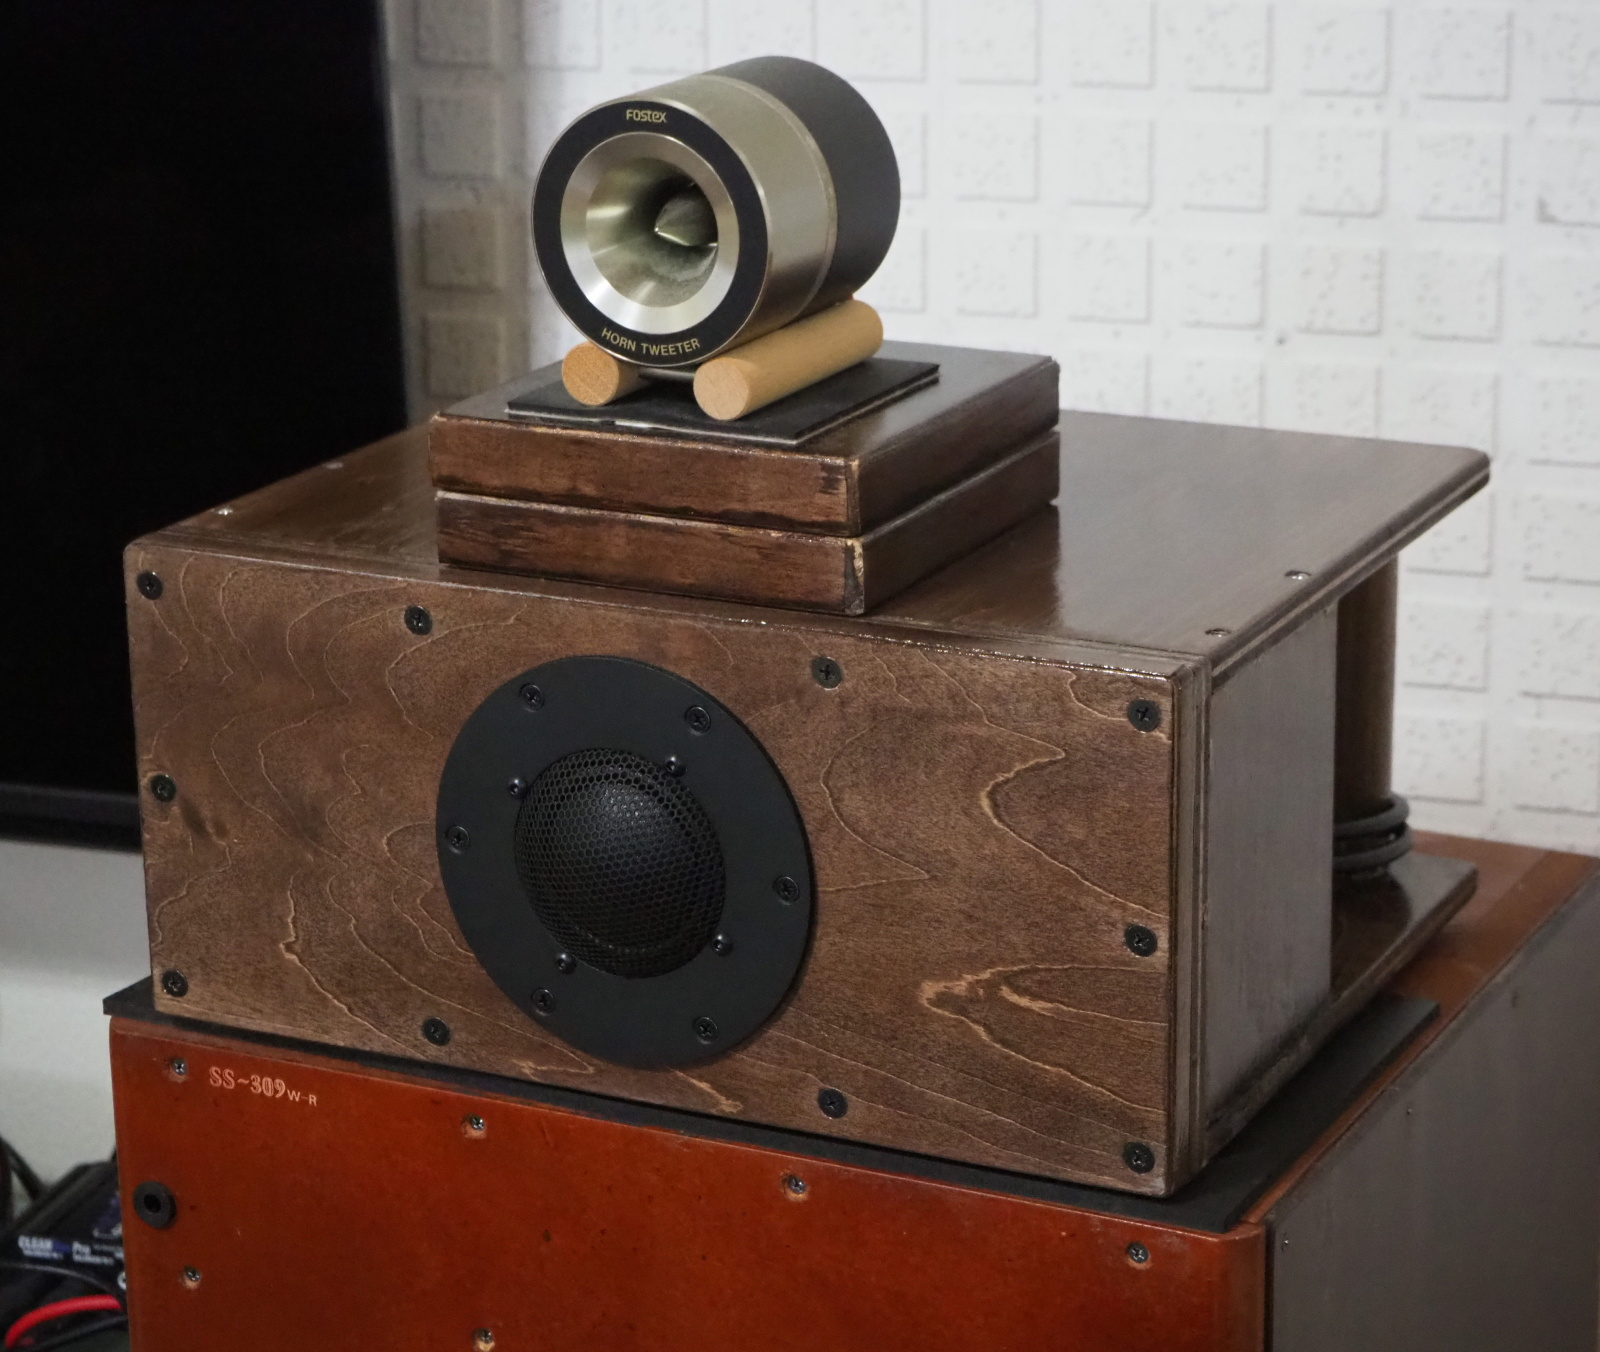 |
| (a) Fostex 6N-FE88ES |
(b) Classic Pro ED3402 + Fostex H400 |
(c) Classic Pro ED3402 + H4401 |
(d) Dayton Audio RS52FN-8 |
| Squawker Module of SS-309. The LS unit is a full-range driver. | Squawker Module of SS-309B on the early stage | Squawker Module of SS-309B. H400 is replaced by H4401 | Reference squawker |
At the first trial, I ranked them in this order: (c) > (a) > (b) > (d).
I was surprisingly impressed by (a). I replaced it with D1405 + H400 in
2012 (Rev.A). At that time, I thought SQ (sound quality) was apparently
improved. I firmly believed that horn speakers were definitely superior
to direct radiators. Besides, D1405 + H400 looked classy and so expensive.
The psycological bias made me illusioned. In fact, (a) was better than
D1405 + H400 in SQ.
I continued listening trials for further four months. During the period,
no need to say, I conducted fine tuning for each squawker.
My conclusion is as follows:
(c) > (d) > (b) > (a)
I rated them as above, but all the squawkers have been improved in SQ due to the fine tuning, and differences are so small.
(a) It is unexpectedly good! I have to reevaluate the system where a full-range driver is used as a squawker. If the driver is an up-to-date one, the speaker system may be better than SS-309B.
(b) Vocals sound good with this squawker. But transparency and resolution are not so high. The measumrents indicate it has long ringing after the input of impulsive waveforms. This ringing may degrades SQ.
(c) The resolution is high. I think this squawker is the best in SQ among the four. The sound of the piano is sounds like the piano unlike SS-309A . The unrealistic piano sound was a big problem in Rev.A. Finally, the problem has been solved. However, the frequency response is undulated compared to (b). For some music sources, this squawker is less good than (b), especially vocals. I feel a faint smell of the horn.
(d) I thought it was a cheap squawker at first, though, SQ has been much improved by the fine tuning. I am convinced that this squawker has the best characteritics in both frequency response and transient response. It reproduces dynamic sound so like American loudspeaker. But it makes me tired a bit, bacause the acoustic energy is inclined to high treble. I didn't consider baffle step when I designed Squawker Baffle. The better designed baffle may improve SQ of this squawker.
Rev. B (addition): Tuning of Woofer Module (May 2023)
Since Gaudi Rev.2.12, I've been wanting higher bass response. I decided to improve Woofer Module in addition to Squawker Module.
- No.1: Adjustment of the speaker position
- Moving the speakers backwards and forwards to find the best position. It is predicted that the closer the speaker to the wall behind, the stronger the bass response.
- No.2: Adjustment of the bass-reflex duct
- The Helmhorts frequency of the duct is fb = 28Hz so far. It is confirmed by measurement. Even if such deep bass is boosted, the listener doesn't feel good bass resoonse. Try higher fb. In addition, try closed-box.
- No.3: Adjustment of the acoustical absorber
- I lined Woofer Box with the acoustical absorber only by rule of thumb, when I built SS-309. I haven't adjusted it since then. Adjust it to improve bass response.
Speaker position
First, let SS-309B close to the wall behind the speaker. Let's denote this
position by P0. At this position , the distance between the back of Woofer
Box and the wall is d = 115mm. If SS-309B is closer to the wall than P0,
the duct is shut by the acoustic panel that is placed between SS-309B and
the wall. P1 is 25mm forwarder than P0. P2 is 25mm forwarder, and so on.
The furthest position is P15 (d = 490mm). See the figure below.
Frequency response is measured at each position.
During the measurement, only LOW-R is on. Sine wave sweeps 20Hz-20kHz.
The mic is positioned at the listening position specified in the system
design. Reflections are not eliminated.
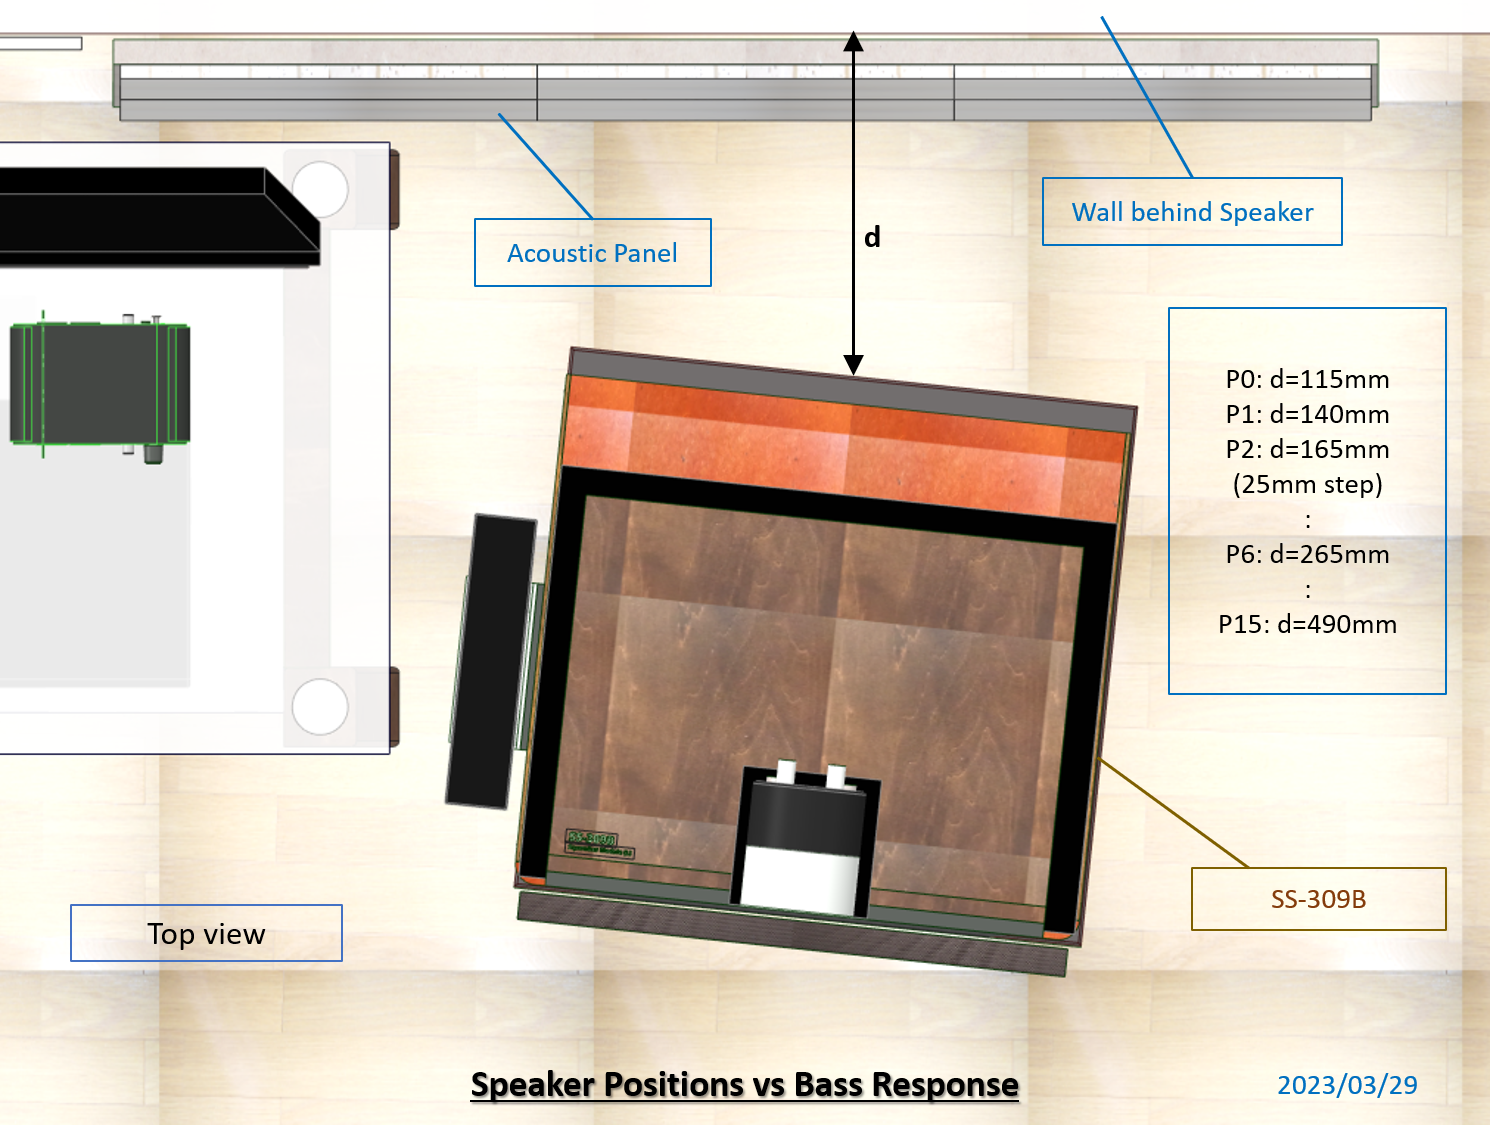
Before making the measurement, I checked out how bass response changed according to the positions of the speaker, by replaying the test record (2xHD, Audiophile Speaker-Setup) and listened to it carefully. But I didn't sense any difference by moving the speaker by 2.5cm. Even when I compared P0 and P15, the difference was very small.
The measured data shows small differences too.
Comparing P0 and P15, the difference is small (see the figure below). The
most significant difference occurs in the band of 100Hz~200Hz. The curves
are almost the same below 100Hz. This is not what I had expected.
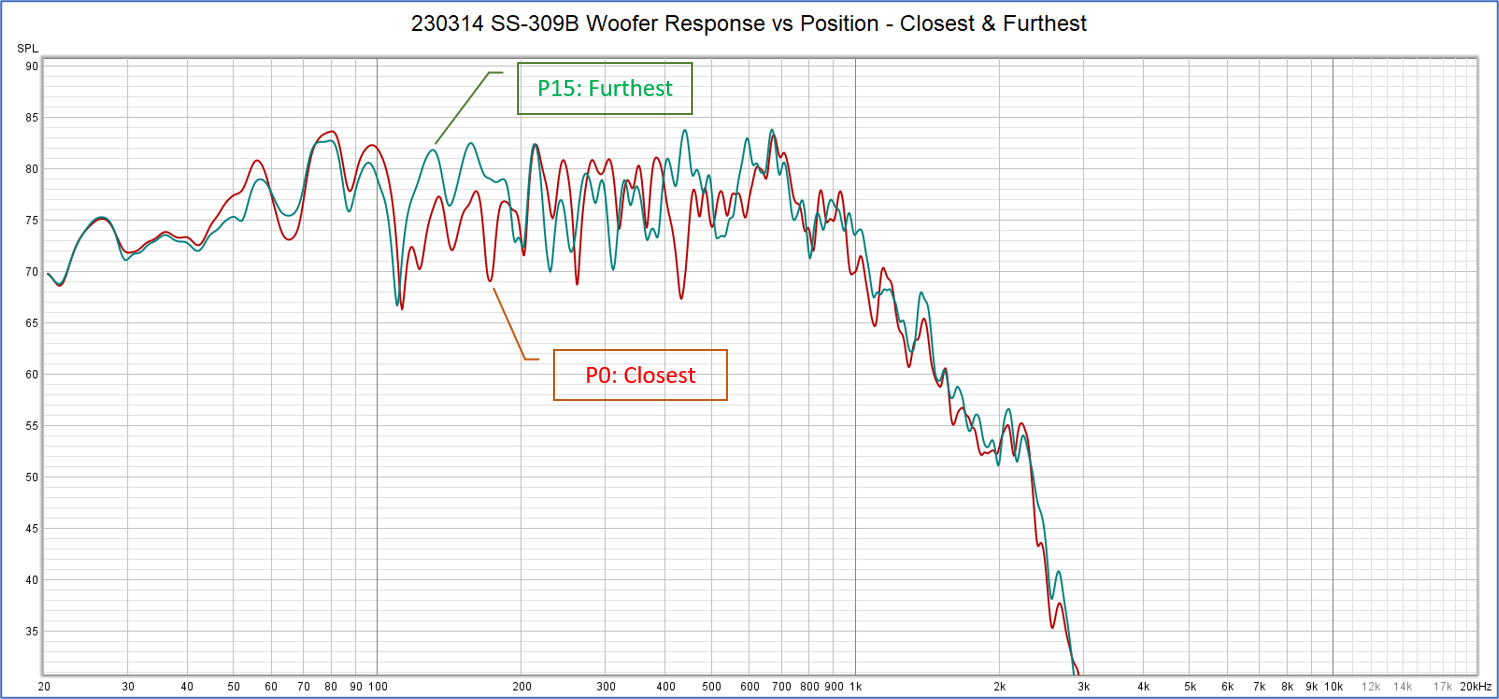
At P0, the response drops in the band between 100Hz and 200Hz. No such drop at P15.
P6 is the speaker position in the system design. There is no big difference between P0 and P6 (see the figure below).
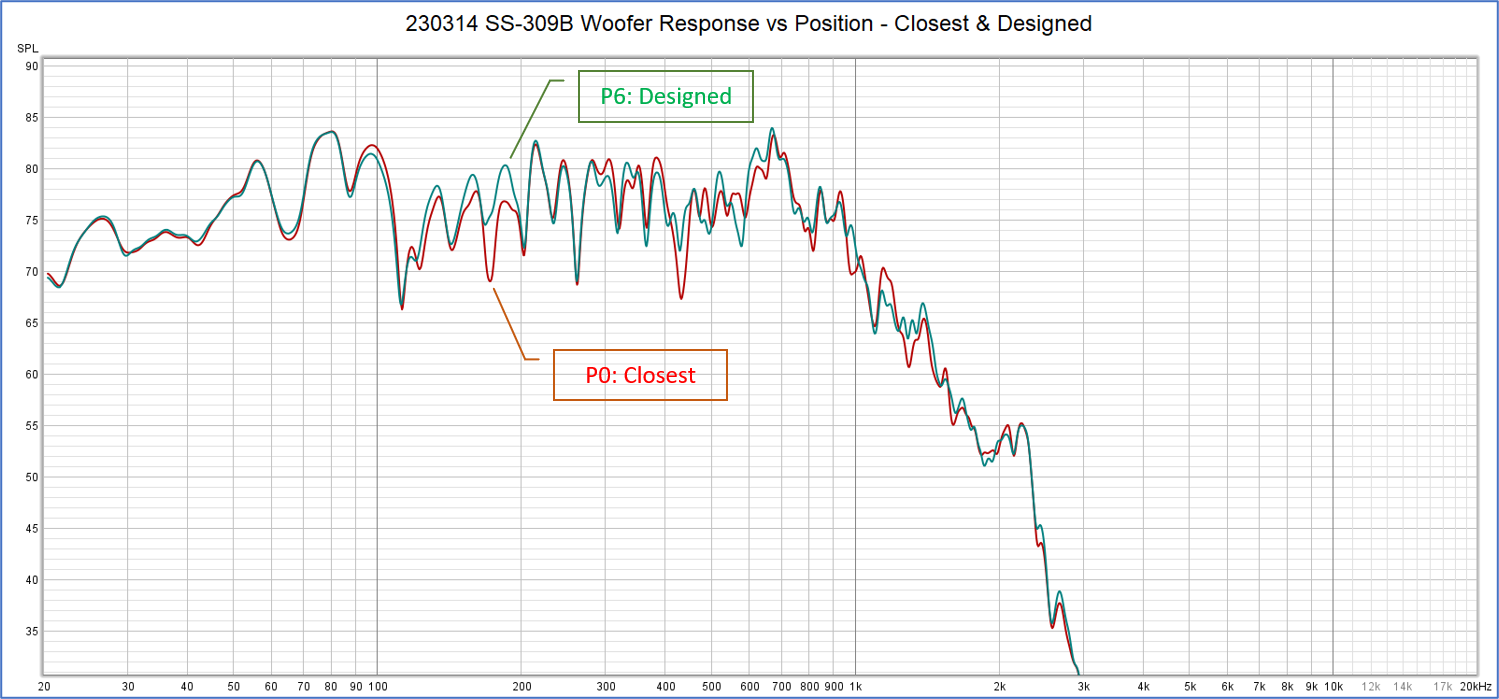
P12 seems to be the best position. Its response is neary the same as P15.
P15 is too far from the wall, and the speaker is in the way. At P12, the
speaker is out of the way by a nose.
However, SQ is not so good. I hear something like airy artifact.
I determined the speaker should be placed at P6 as it has been in the past.
Bass-reflex duct
The first try is stuffing the duct of Woofer Box with urethane mat. Now Woofer Box is a closed-box type.
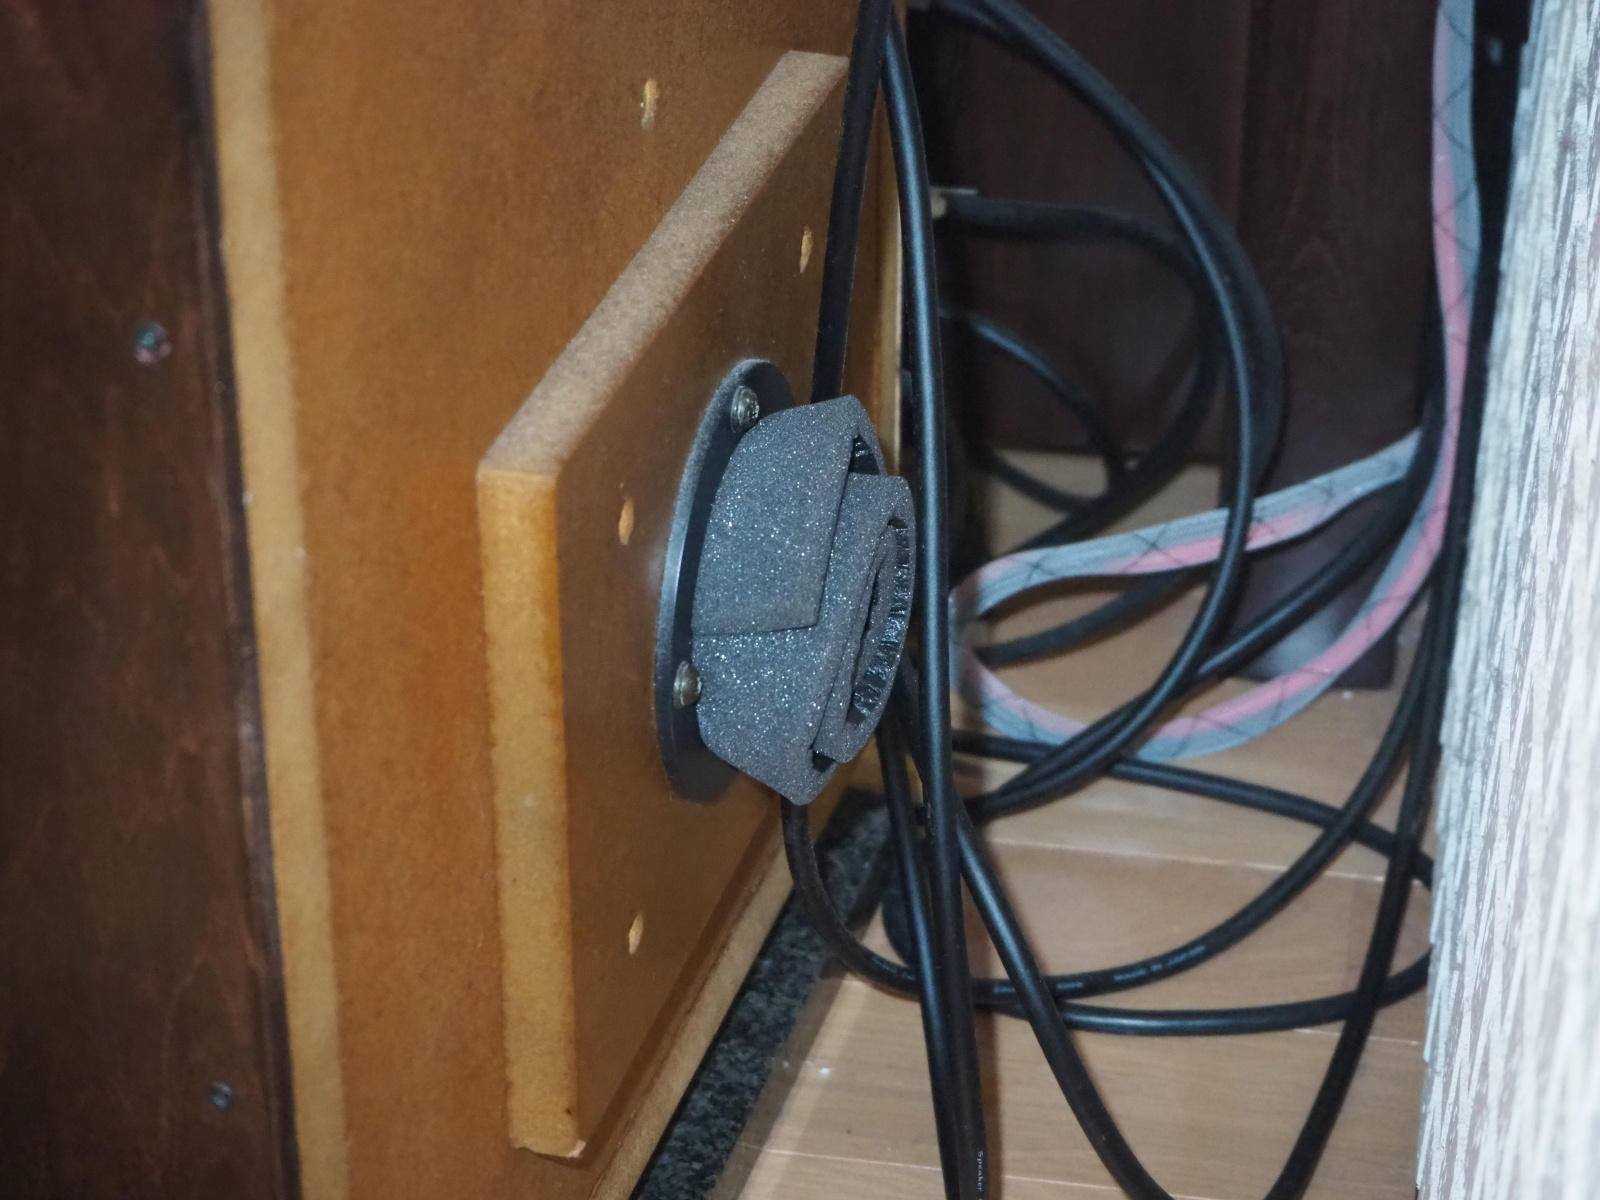 |
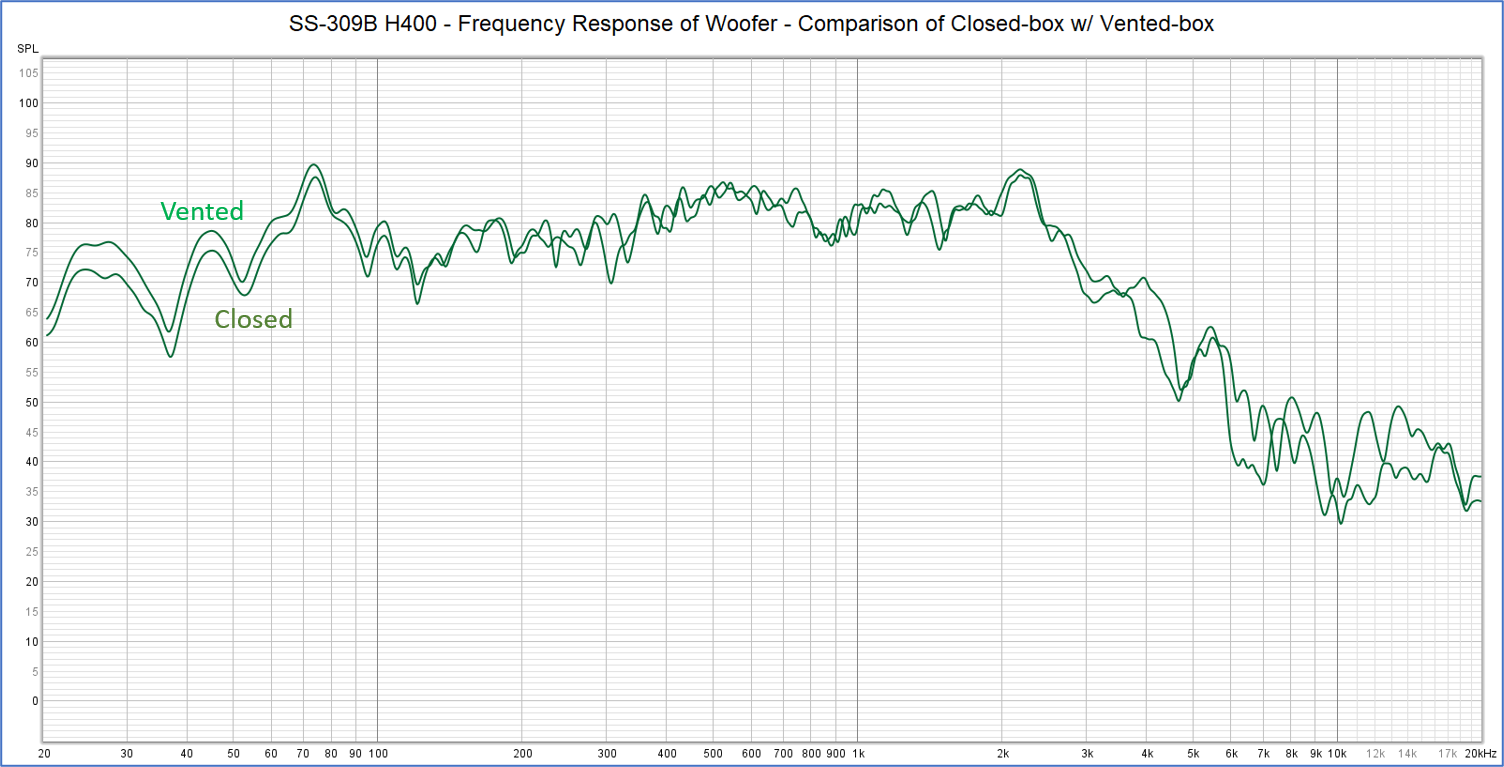 |
| Closed-box The duct is stuffed with urethane mat |
Comparison in frequency response - closed-box vs vented-box (fb=28Hz) All the filtres in the network are inactive. Only LOW-R is on. The mic position is 1m away from the woofer. Reflections are included. |
The closed-box has lower SPLs than the vented-box by -4dB at 30Hz and -3dB
at 60Hz.
This poor bass response is audible. I'd like a bit louder bass. On the
other hand, this tight bass makes the sound of the jazz bass more attractive.
Besides, the sounds of the woodwinds sound good with the closed-box. The
harmony of an ensemble of woodwinds became beautiful, which used to be
not so good (Wiener Blockfloeteensemble, Musik de Renaissance, Tudor X7703).
The rear duct of SS-309 is aimed to reduce distortions in midrange. However,
I realized the rear duct doesn't have such an effect.
The sound in midrange that leaks from the duct is in opposite phase to
the sound from the LS unit. If the duct is installed in the front baffle,
the sounds counteract each other (the sound from the LS unit is much more
intense, so the SPL reduces little). For the rear duct, both the sounds
are not in exact opposite phase because the sound from the rear duct takes
longer path to the front. I think this causes distortion.
I stopped the duct tuning. I decided to employ the closed-box type.
Acoustical absorber
I added large volume of acoustical absorber into Woofer Box, and made measurement.
The additional absorber is 55mm-thick rock wool.
55 x 300 x 400 ==> bottom and back
55 x 300 x 760 ==> top and upper back
55 x 125 x 680 ==> one side
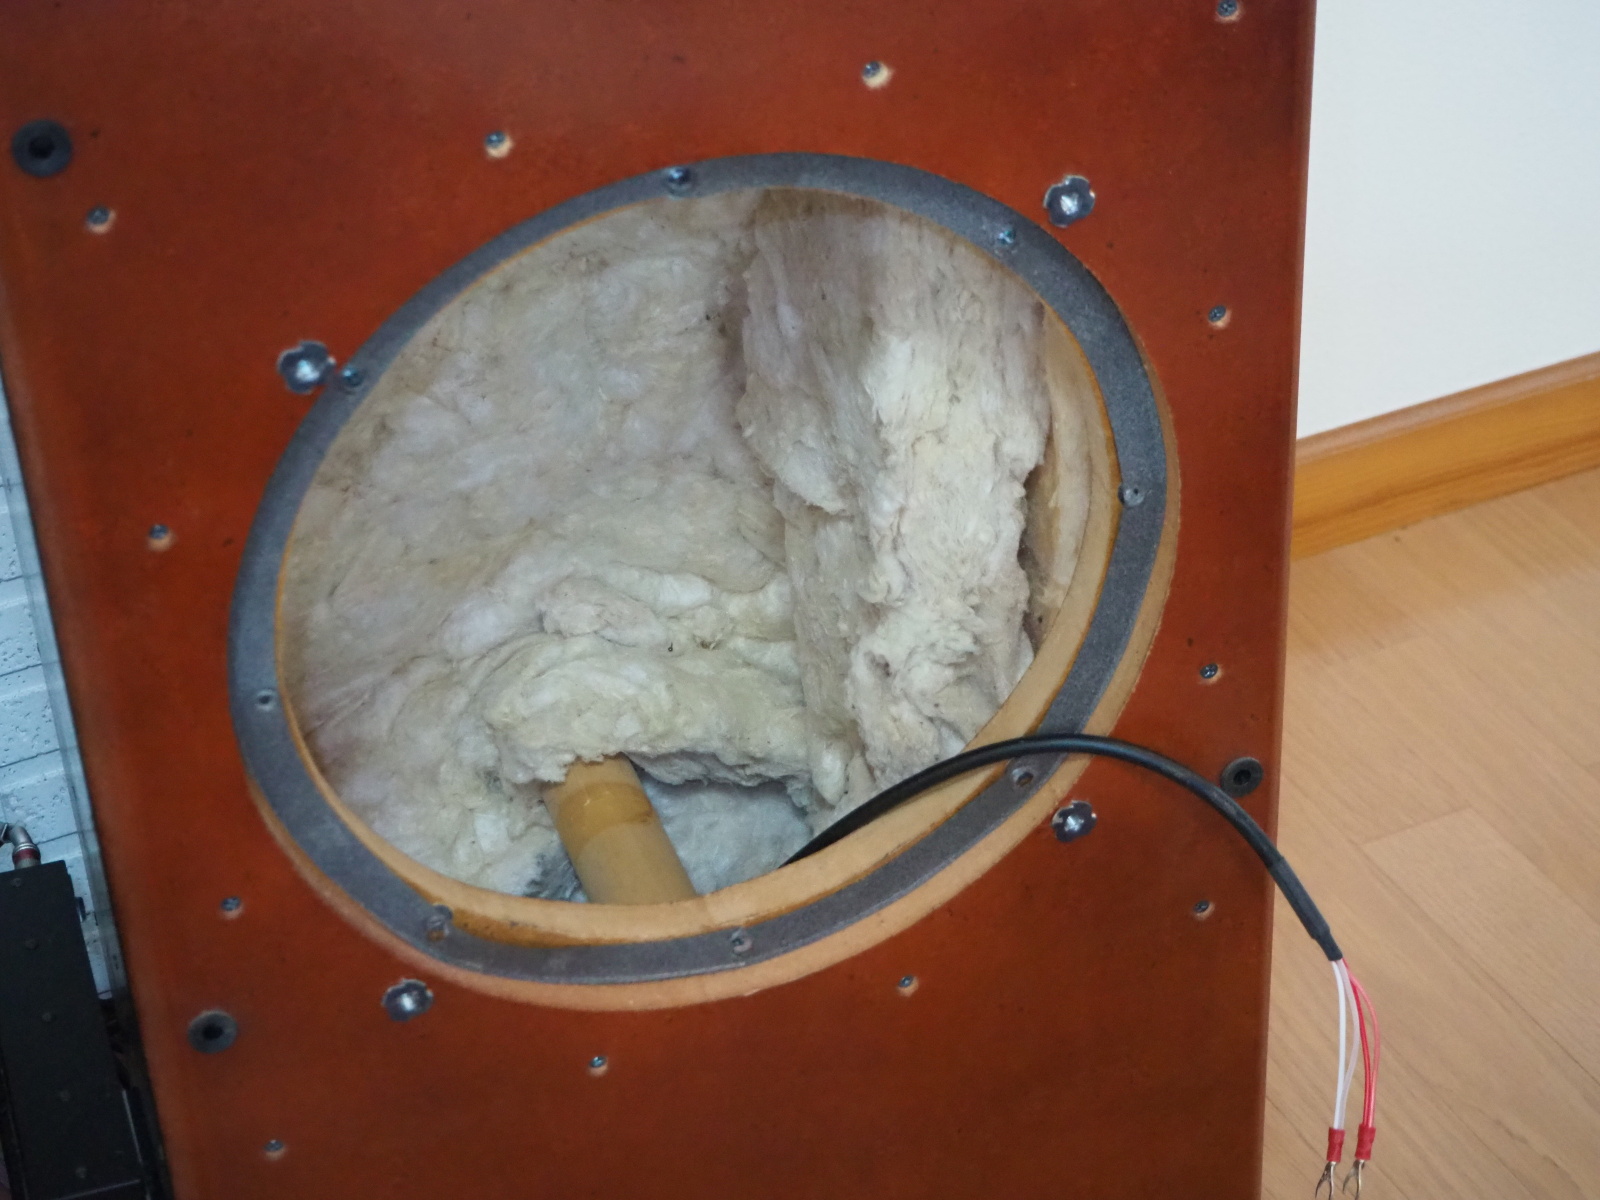 |
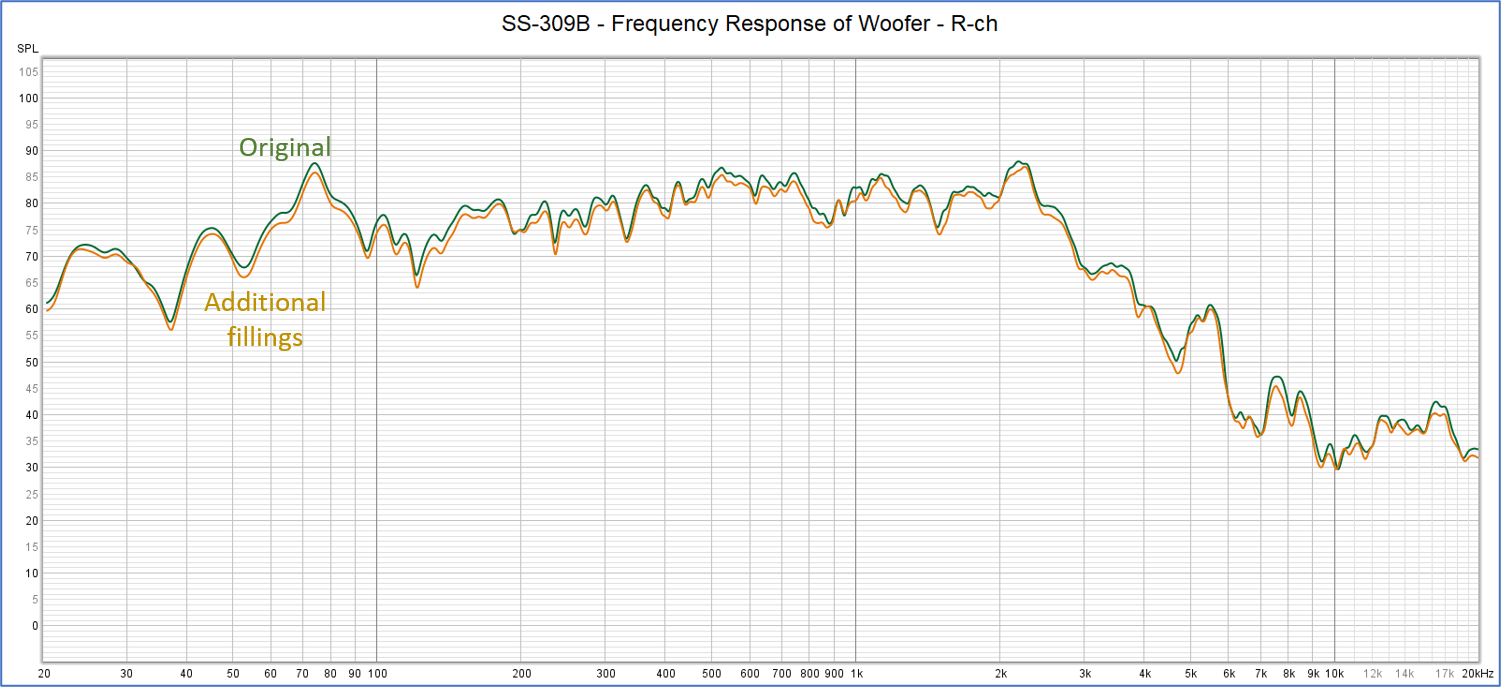 |
| Additional fillings 55mm-thick rock wool was added. |
Comparison in frequency response Comparison of before and after. All the filters in the crossover newtwork are off. Only the output LOW-R is on. The mic position is 1m away from the woofer. Reflections are included. |
I'd expected the flatter frequency response with the additional acoustical
absorber, but this didn't live up to my expectation. The difference is
so small in the measurement. And it isn't audible, either.
I found that the additional fillings canceled out the bass-reflex effect
even when the duct was open.
Finally, I removed the additional fillings to resume Woofer Box in the original state.
I can make Woofer Box closed/vented easily anytime by stuffing the duct
with the urethane mat or removing it.
PEQ
The bass response is rolled off at 60Hz. I tried boosting low bass by using
PEQ (Parametric Equalizer).
This surely boosted deep bass, though, the sounds of the strings, especially
the violin, were distorted for some reason. It's hard to believe that treble
is distorted by boosting bass, but this distortion is clearly audible.
I've experienced before that the PEQ of MID impaired SQ. The PEQ of LOW doesn't work either.
I've decided not to use PEQ.
Summing up Rev.B
As always, I spent three times more time and labor than my first estimation.
Unexpectedly, I have realized some of my beliefs were only preconceived
assumptions.
See the list below:
- Assumption 1: Horn-loaded speaker has lower distortion than direct radiator
- I can tell from experience in this project that the dome squawker excels the horn squawker in both frequency response and transient response.
- Assumption 2: Horn type is excellent in transient response
- I had had a strong belief that the horn speaker is better than the dome/cone types especially in transient response. I believed so because an ultra light vibration system is driven by a powerful magnetic circuit. Now I know this belief is wrong.
- Assumption 3: Horn's uneven frequency response can be compensated by an equalizer
- I flattened out the frequency response by using PEQ, but SQ got worse adversely.
- Assumption 4: Horn speaker is suitable for multi-amplifier system
- The frequency range of horn speakers tend to be narrow and their sensitivities are so high. It's hard to make full use of them. But I originally thought their shortcomings could be covered in a multi-amplified system. In fact, it became clear that their shortcomings are well perceived in the multi-amplified system. Now I believe horn speakers should be used in mono-amp system. For example, the combination of D1405, H400 and T925A should be used with the passive crossover network recommended by Fostex. I think they are suitable for the listeners who prefer retrospective sounds to modern high-resolution sounds.
- Assumption 5: Narrow directivity of the horn speaker leads to high sound quality
- With narrow directivity, the acoustic wave emitted by the LS unit doesn't spread and reaches the listening position with little loss. The quantity of the first reflection is relatively low. I thought this characteristic could improve SQ. However, it is somewhat unnatural trebles don't spread while lows do. In a PA system, sounds must be far-reaching and horn speakers are suitable for this application. But for home systems, wide directivity may be preferable. Actually, most of commercial loudspeakers are designed to have wide directivity.
- Assumption 6: Good bass response can be easily realized with large-sized woofer
- A large-sized woofer is necessary to reproduce super lows (below 35Hz). But only few music sources contain super lows. It's more important to reproduce lows above 35Hz. I employed the 30cm (12") woofer on the assumption that "the greater embraces the less." However, the volume of bass is less than what I expected. Now I think that 20cm (8") woofers are better than the 30cm woofer in reproduction of the sounds of the bass and the bass drum.
- Assumption 7: Vented box excels closed box
- I've been believing for long time that the vented box (bass reflex) is better than closed box, because my favorite commacial loudspeakers are all vented-box type. Now I don't believe that. Fujitsu Ten appeals that closed-box type is better than vented-box in performance in time domain. Recently, I, too, regard the performance in time domain. I quit sticking to vented box.
- Assumption 8: Read duct reduces distortion
- I've been long believing that the read duct produces less distortion than the front duct. This belief may be long as well. The sound wave leaked from the rear duct pass through the longer way to the listening position than the sound emitted from the LS unit. This causes a time delay, and the phase difference between them isn't exactly 180 degrees. I think this causes a distortion. In addition to that, the SPL of the sound leaked from the rear duct varies as fequency changes. This may be another cause of the distortion.
Position of the Tweeter
In this improvement (Rev.B), any improvement concerning tweeter wasn't
included. But I had to consider it to achieve high SQ I wanted.
I evaluated how the position of tweeter affects SQ.
I made measurement and trial listening for the three positions, P0-P2,
shown in the table below.
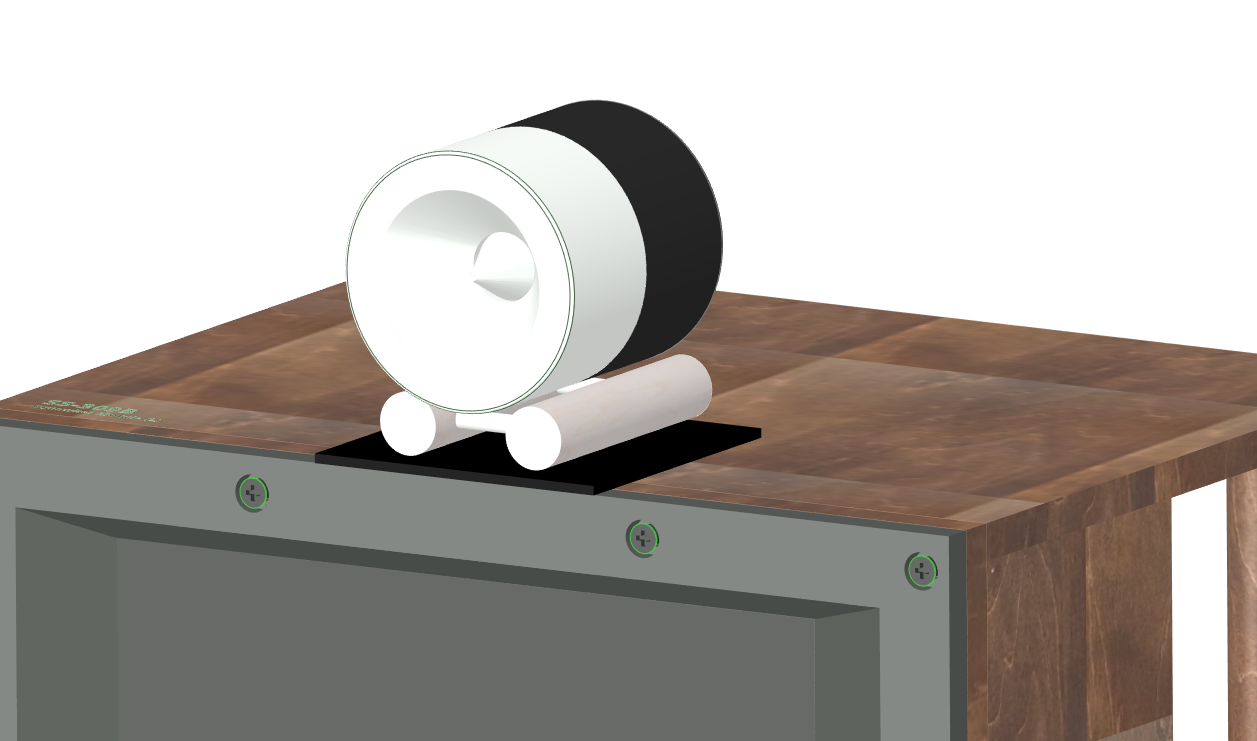 |
 |
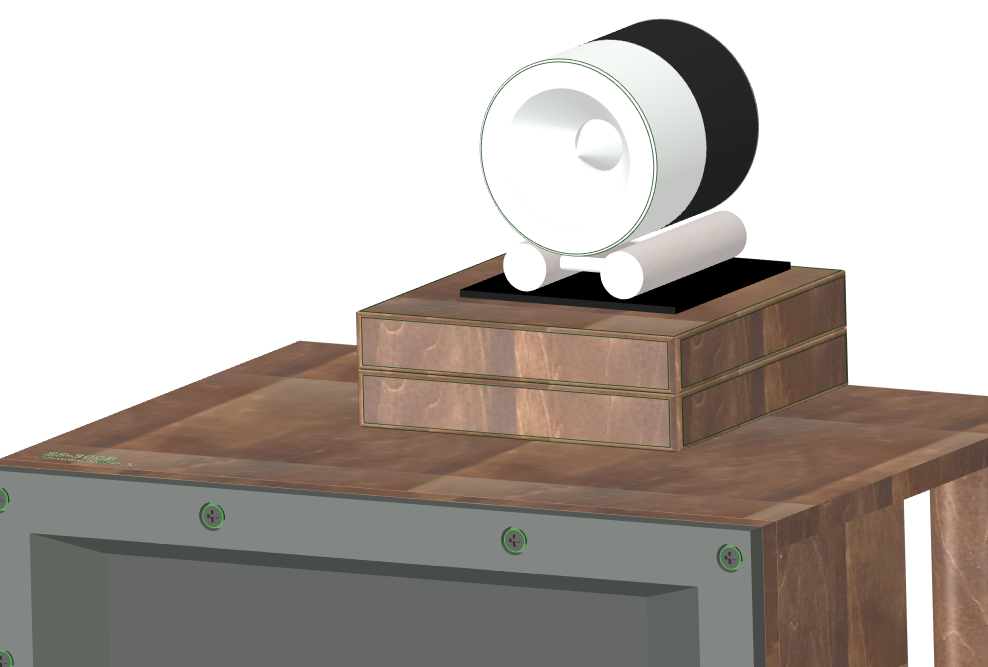 |
| P0 (Position #0) Seemingly most adequate position |
P1 (Position #1) Tweeter is lifted by spacers. It's aimed to reduce distortion caused by diffraction. |
P2 (Position #2) Tweeter is aligned with the squawker driver. Time alignment is achieved w/o using the delay feature of the crossover network. |
The figure below shows the frequency response. It's the result of quasi-anechoic measurement.
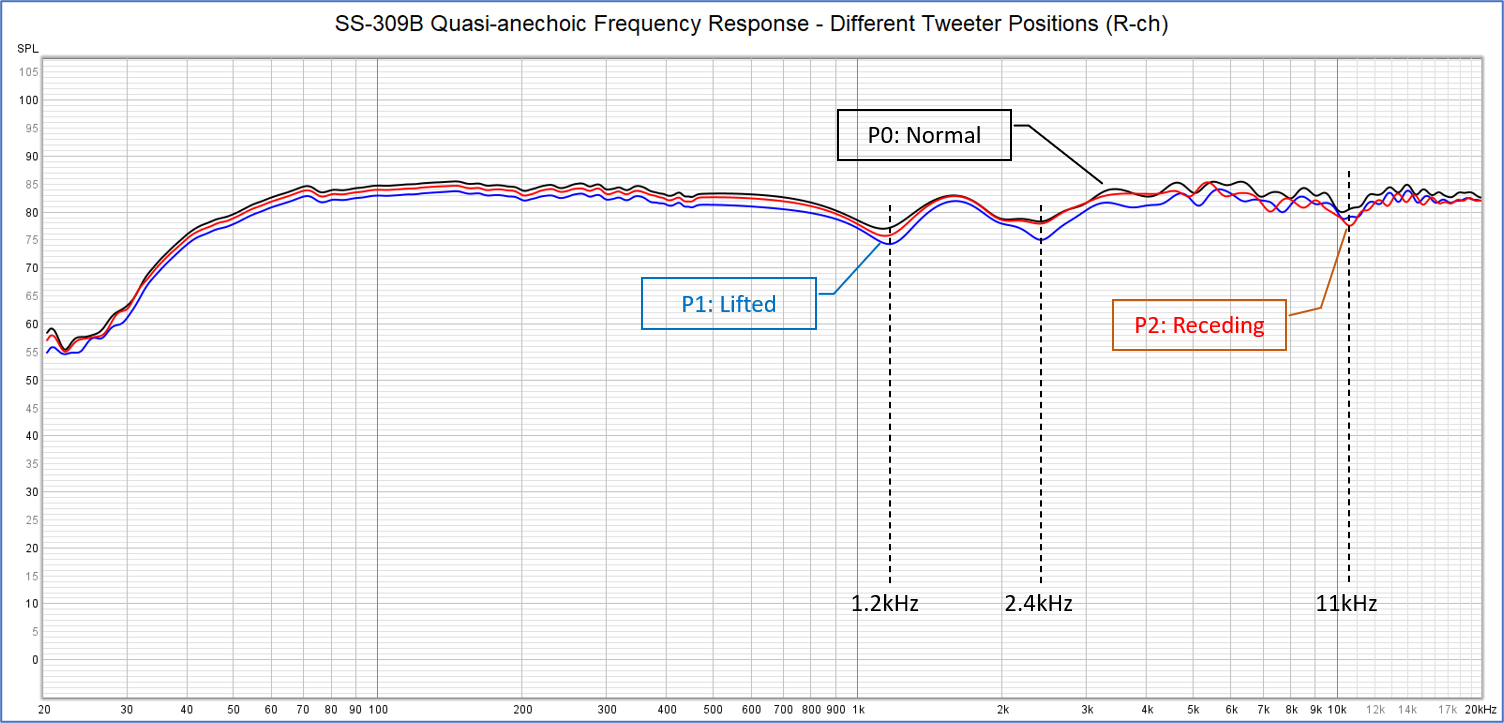
There isn't a big difference.
To stretch a point, for P1, the dip at 1.2kHz is a bit deeper than the
other positions, and the dip can be seen at 2.4kHz though there is no dip
for the other positions. The SPLs of both dips are lower than P0 by 3dB.
For P2, the dip at 11kHz is a bit deeper than the other positions.
At either poistions, the curves ripple above 5kHz. I suppose it is caused
by diffraction at the edges of the squawker module.
Now I think it is questionable to place tweeter on the enclosure. This
method is so easy to install tweeter, but some distortion is inevitable.
I think tweeter should be mounted on a baffle like other LS units. Or,
the shapes of enclosure and tweeter itself must be elaborately designed
to avoid diffraction like B & W.
At trial listenings, I perceived little difference between them.
I thought P2 is slightly preferable to the others. It sounded soft. It
was suitable for vocals, especially.
My decision is P2.
P2 isn't obviously better than the others in both the measurements and
perceived sound quality, but there is a strong reason to choose it. With
P2, time alignment can be tuned without the time delay feature of the digital
crossover network. An analog crossover network, which doesn't have HIGH
delay in it, can be used, if the tweeter position is P2. This point is
very attractive to me.
Final setting
The final spec of SS-309B is shown in the table below:
| LS units | Tweeter: Fostex T925A Squawker: Classic Pro ED3402 (driver) + Classic Pro H4401 (horn) Woofer: Fostex FW305 |
| Enclosure | Tweeter: Stand that came with T925A + Wood Spacer (DIYed) Squawker: Squawker Box (DIYed) Woofer: 80L, closed-box type (DIYed) |
| Crossover frequencies | fc1=900Hz, fc2=6.3kHz (see the page on Gaudi Rev.2.2 for the filter settings) |
| Time alignment | Tweeter - Squawker: adjusting the position of tweeter Squawker - Woofer: LOW delay of the crossover network is used (see the page on Gaudi Rev.2.2 for details) |
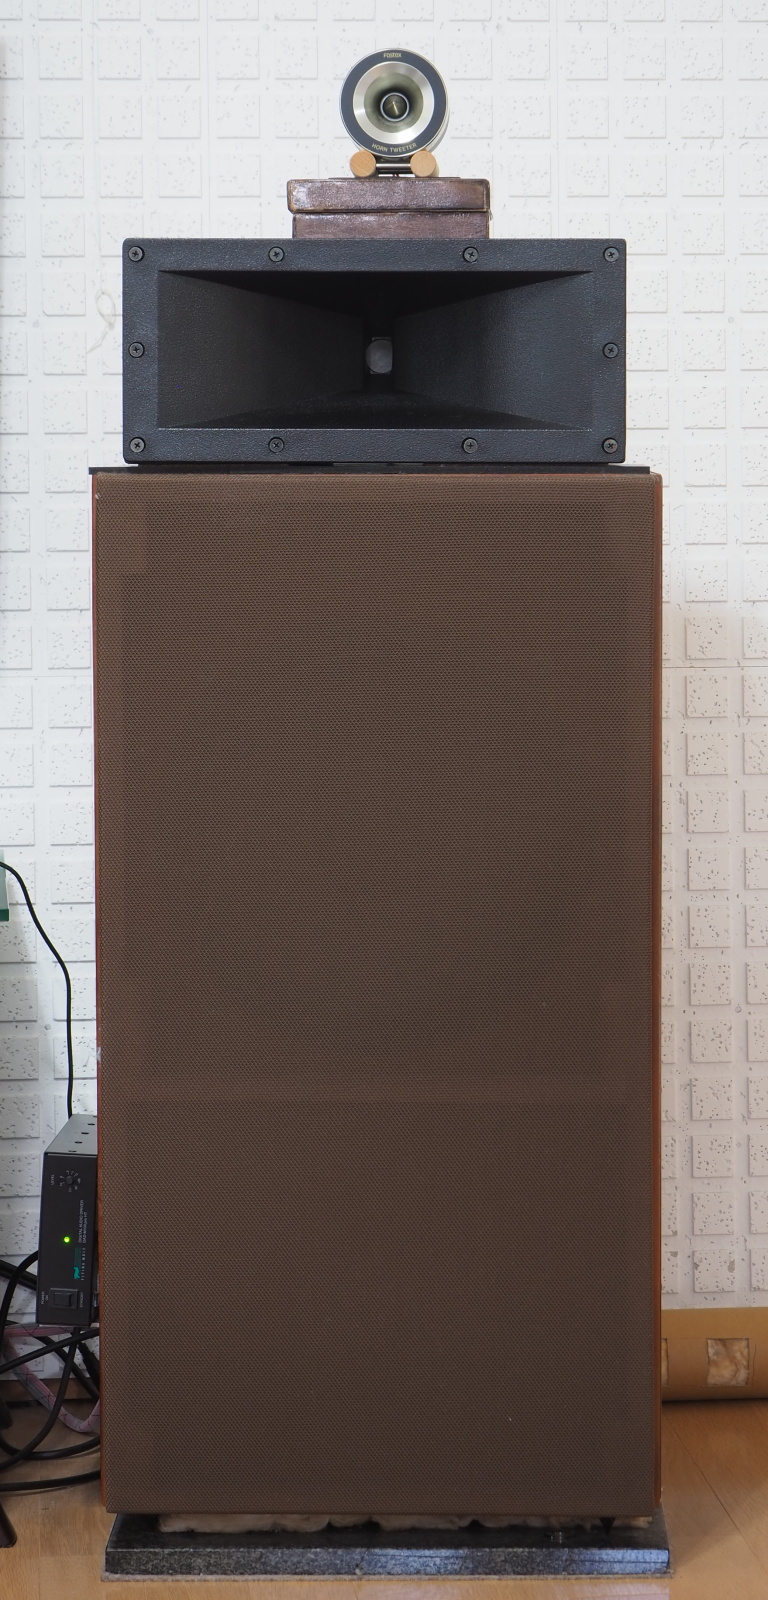 |
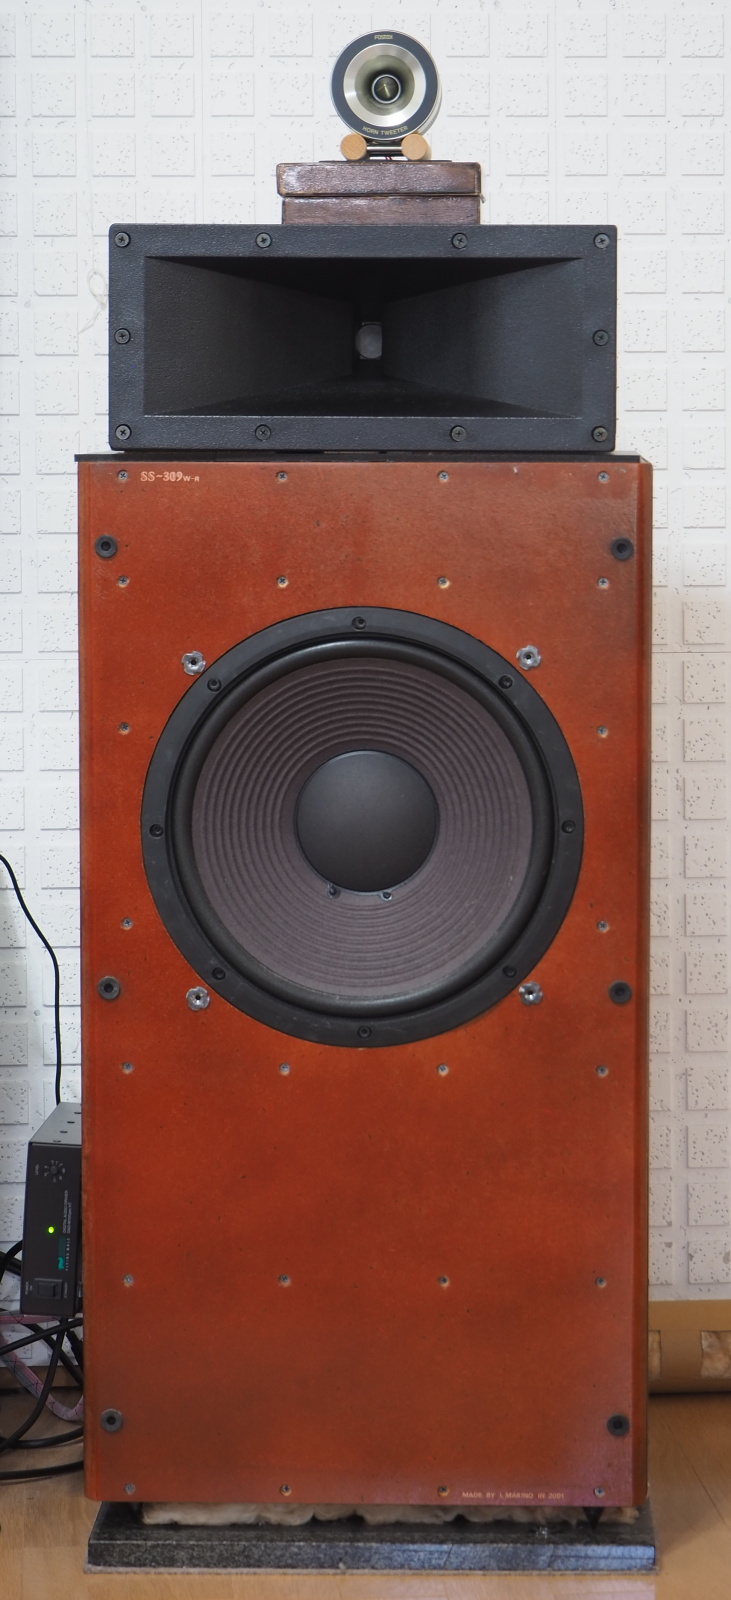 |
| SS-309B completed With grille |
SS-309B completed Without grille |
Self-evaluation
Sound quality: C+
It took me more than one year to improve SS-309A to be Rev.B. It took me
a lot of labor too, but SQ has been improved only a little. It's natural
because Rev.A already had high SQ, and it's hard to improve it further.
One of my complaints about Rev.A was that the sounds of the piano didn't
sound like a real piano. This problem has been solved by improving the
squawker.
The sounds of woodwinds like the flute and the recorder became more realistic.
I am so pleased that the harmony of woodwinds became so beautiful. This
improvement is brought about by the closed duct of Woofer Box. The bass
response is a little less powerful than the vented box, though, mid and
treble have got clearer. I thought it was squawker that made clear mid
and treble less clear. In fact, woofer was the 'true calprit'.
There still are some problems. Especially, Woofer Module has many shortcomings
to be improved.
Appearance: C+
I challenged painting with a brush for the first time in ages, though I
am not good at it. I wanted to paint Squawker Box the same color as H400,
but the color became darker than I wanted. The color doesn't go with the
interior of the room.
The sub-baffle of Woofer Box should have been re-painted, but I didn't
have enough strength left to do that.
The looks of SS-309B isn't neat, since the color of the front of Woofer
Box is different from the other parts.
User-friendliness: A
I quit sticking to soldering, and employed the spade terminals. Now it's
easy to connect/disconnect the speaker cables.
Playback
I have been a Hi-Fi addict more than half century, but this project made
me realize how little knowledge I had. Through this project, I learned
much. What I learned is the most precious achievement of this project,
I think.
But there still are a lot of things I have to learn, in order to improve
my skills in designing loudspeakers.