SS-312 Study
2011/04/03 created
2023/01/28 updated
Single-unit Speaker System
From easy-listening to music appreciation -- high-performance compact loudspeaker!

| Features | Loudspeaker unit: Fostex 6N-FE103 (replaced by FF105WK at Rev.A) (10cm
full-range) Enclosure: Bass reflex (rear duct) |
|---|---|
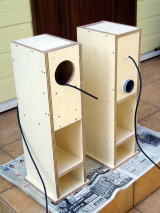
| Outline Specifications | Frequency response: 85Hz-20kHz, Sensitivity: 90dB/W (@1m) (original). Frequency response: 40Hz-25kHz, Sensitivity: 88dB/W (@1m) (Rev.A). Dimensions: 164(W) x 630(H) x 216(D) mm, Weight: 5.6kg (including the cable) |
| Cost | Original: approx. 15,000 JPY Rev.A: 18,848 JPY |
| History | Built in April, 2006. Revised in April 2020 (Rev.A). Being used in Kinglet. |
Concept
This loudspeaker is supposed to be used in a subsystem in the study room. Its purpose is easy listening; playing easy-listening music at relatively low volume.
I designed and built this loudspeaker while I took a long leave for my
health problem. Building it was a kind of rehabilitation for me. I didn't
like to design and build a high-grade speaker, but a simple one for my
rehab.
I planned to build single-unit compact speakers.
I happened to have a pair of Fostex 6N-FE103, which I had bought for the
squawker of SS-307. I wasn't satisfied with it, and left it unused for
a long while.
I expected it was good as a full-range unit, though not good as a squawker.
I decided to use 6N-FE103.
It was troublesome to build speaker stands for these loudspeakers. I decided to integrate the stand and the speaker enclosure.
Nickname and Theme Music
SS-312 hadn't had a nickname. But I wanted a good name for it when I improved it (Rev.A) and achieved high sound quality that exceeded my expectation.
The nickname is "Study". It's because SS-312 is used in my study
room.
A simple speaker system like SS-312 is very useful in experiments and researches.
In this concept, the name "Study" befits SS-312, I think.
I chose Haydn's 101th symphony for the theme music.
I used to hear the music when I was a student preparing for collage entrance
exams. It was the theme music of some educational radio program. I listened
to the program every evening.
Even today, it still motivates me.
--- Haydn Symphony No.101, 2nd mov. (Haydn101-2.mp3) ---
This nickname is not included in the lettering of the enclosures, since I came up with it after the revision work was completed.
Specifications
This is a compact speaker system using 10cm full-range loudspeaker unit
(LS unit).
In many cases, it's rather difficult to find a good position for compact
loudspeakers in the room than their appearance might suggest. So as to
solve the problem, I came up with an idea of combining a stand with the
enclosure. The stand part can accomodate CDs and/or DVDs.
AS for bass response, the target of the -6dB cutoff is 90Hz or lower. This spec is satisfactory for easy listening.
The enclosure is bass-reflex type (vented box). The design is based on
the Fostex's recommended enclosure. The difference is the duct. The duct
is mounted in the back baffle to improve the looks and minimize distortion.
| LS unit | Fostex 6N-FE103 (Replaced with Fostex FF105WK at Rev.A) |
| Inside dimension | 134(W) x 270(H) x 171(D) mm (same as recommended enclosure) |
| Enclosure type | Bass reflex (rear duct) |
| Major materials | 15mm sino lauan plywood board |
| Outside dimension | 164(W) x 630(H) x 216(D) mm. Weight: 5.6kg |
| Finish | Matt clear spray vanish (Changed to off cream paint at Rev.A) |
| Speaker cable | Coaxial cable (NEGLEX 2510) 1.8m, soldered to LS unit (Replaced with Canare 4S6G at Rev.A) |
Design
New technologies, Major Parts/Materials
The design of SS-312 is simple. Any new technology is not adopted.
- Loudspeaker unit
- As mentioned above, I used Fostex 6N-FE103 (10cm full-range driver) that
used to be used in NOBODY SS-307.
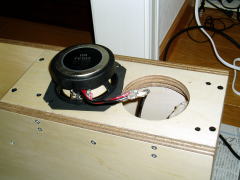
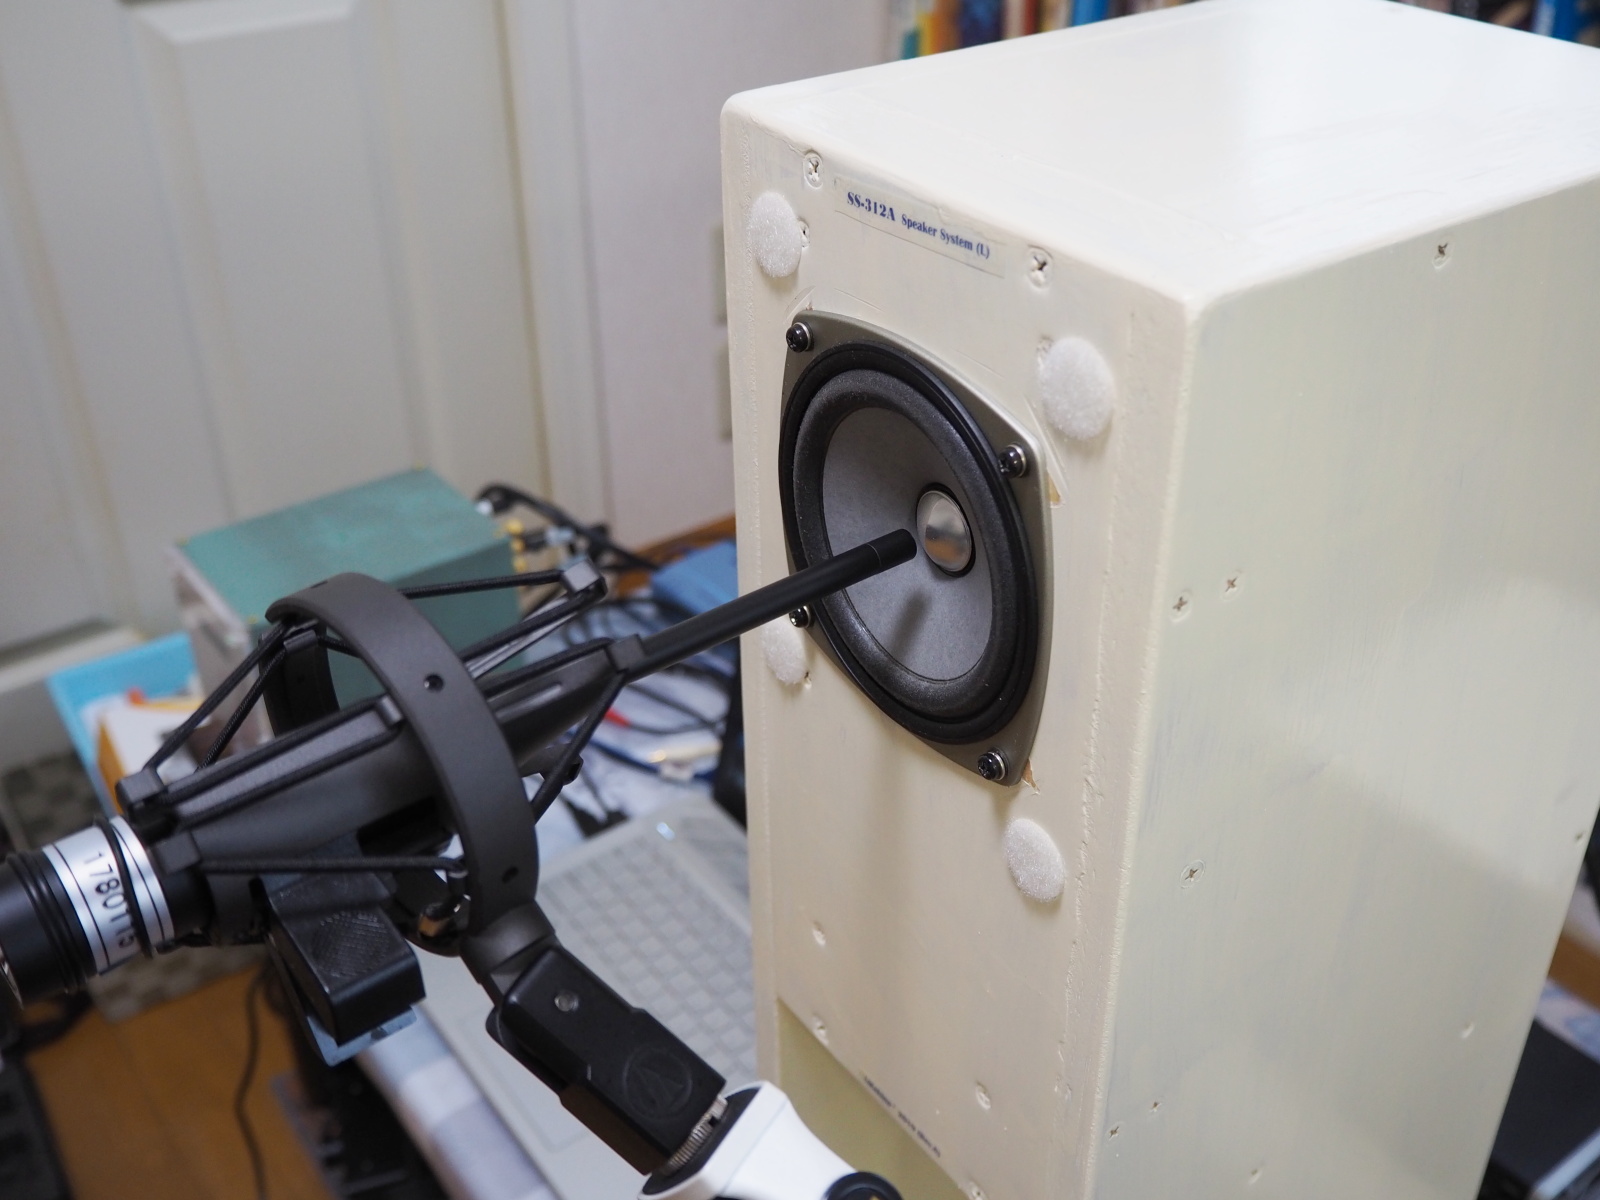
This loudspeaker unit (LS unit) was a limited version of FE103. The specifications are as follows:Type 10cm single-cone, full-range LS unit Impedance 8 ohm Resonance frequency (f0) 90Hz Frequency range f0 - 20kHz Sensitivity 90dB/W (at 1m) Rated input 15W (mus.) m0 2.2g Q0 0.28 Equivalent diaphragm radius (a) 4cm Magnet weight 193g Net weight 0.64kg Recommended enclosure Bass-reflex Inner volume 6L Baffle hole diameter 93mm -
- Speaker cable
- I used coaxial cable, NEGLEX 2510, which I bought for SS-309 and still
had unused portion.
NEGLEX 2510 was recommended by an audio magazine (I thought it was MJ). The article said it was good for speaker cable, though it was coaxial. That's because I selected it.
Enclosure Design
The enclosure's dimension and inner volume are almost the same as the recommended enclosure. The difference is the dimension of the bass-reflex duct and its position. It is mounted in the back baffle just like SS-309 (rear duct).
The joints are not processed in particular. The boards are simply glued
by wood bond. Though wood screws are also used, they are only a supplementary
means. The purpose of the wood screw is to keep holding the joints till
the bond has dried.
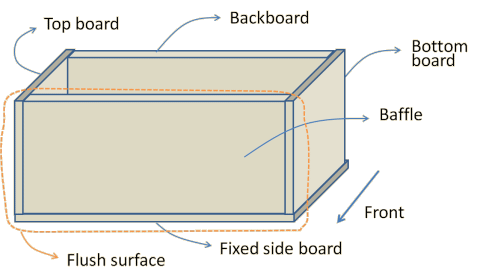
One of the side boards is not glued, and fixed with wood screws only. For
most speaker enclosures, the backboard is detachable, though, the side
board is detachable for SS-312.
This construction is just the same as SS-309 so that I can assemble the
enclosures in the familiar process.
I made use of a PVC tube for water pipe as the bass-reflex duct by cutting it into the desirable length.
The front baffle is made of two boards one on top of another so that it can hold the driver firmly.
The bass-reflex duct is designed so that the port resonance frequency (fb) becomes the same as the recommended enclosure.
First, I calculated fb of the recommended enclosure and it was 87Hz. The dimension of its duct
was 50mm(D) x 88mm(L). The PVC tube's internal diameter (D) was 56mm. Then,
I calculated the length (L) that made fb=87Hz, and it was 115mm.
The enclosure is so small that I omitted bracing.
All the parts for the enclosures except the ducts are cut out from one standard 15x1820x910mm lauan plywood board.
[Dimensional drawing and cutting plan (SS-312Drawing.pdf)]

As for sound absorbing material, I used Nihon Muki Micron Wool again as in the SS-309 project. The quantity was small.
The building procedure is the same as SS-309. I intended to maximize assembly accuracy by employing
the familiar process:
(1) Put one side board (hereinafter referred to as the fixed side board)
on a level workbench. (2) Assemble the parts except the other side board
(hereinafter referred to as the detachable side board) on it using wood
bond. (3) Slide each part to make the baffle side flush. Since the parts
are not mortised, they can be slid a bit while the bond is wet. (4) Make
flush the top board side. (5) Screw all the parts with each other.
The kerfs that joint the detachable side board are made flush with a power
sander, and insulating tape is affixed on the kerfs to retain the box air-tight.
As for the finish, I chose the way that doesn't take much labor and time.
The lauan plywood had beautiful grain. I decided to spray it with colored
varnish after sanding the surface of the enclosure a little.
The grille is a genuine part of Fostex (I've forgotten the model number).
It is fixed together with the LS unit.
The cable was soldered directly to the terminal of the LS unit. If the cable should
be replaced afterwards, it would take much labor. But it was not so likely
for SS-312. And, by omitting terminals, the cost can be reduced. So I chose
this method.
Building
Woodwork
I bought the plywood board and had it cut at the do-it-yourself store nearby
where I did the same thing in the SS-309 project.
The guaranteed maximum error was 1mm, but I didn't find any error (maybe
0.1mm or so).
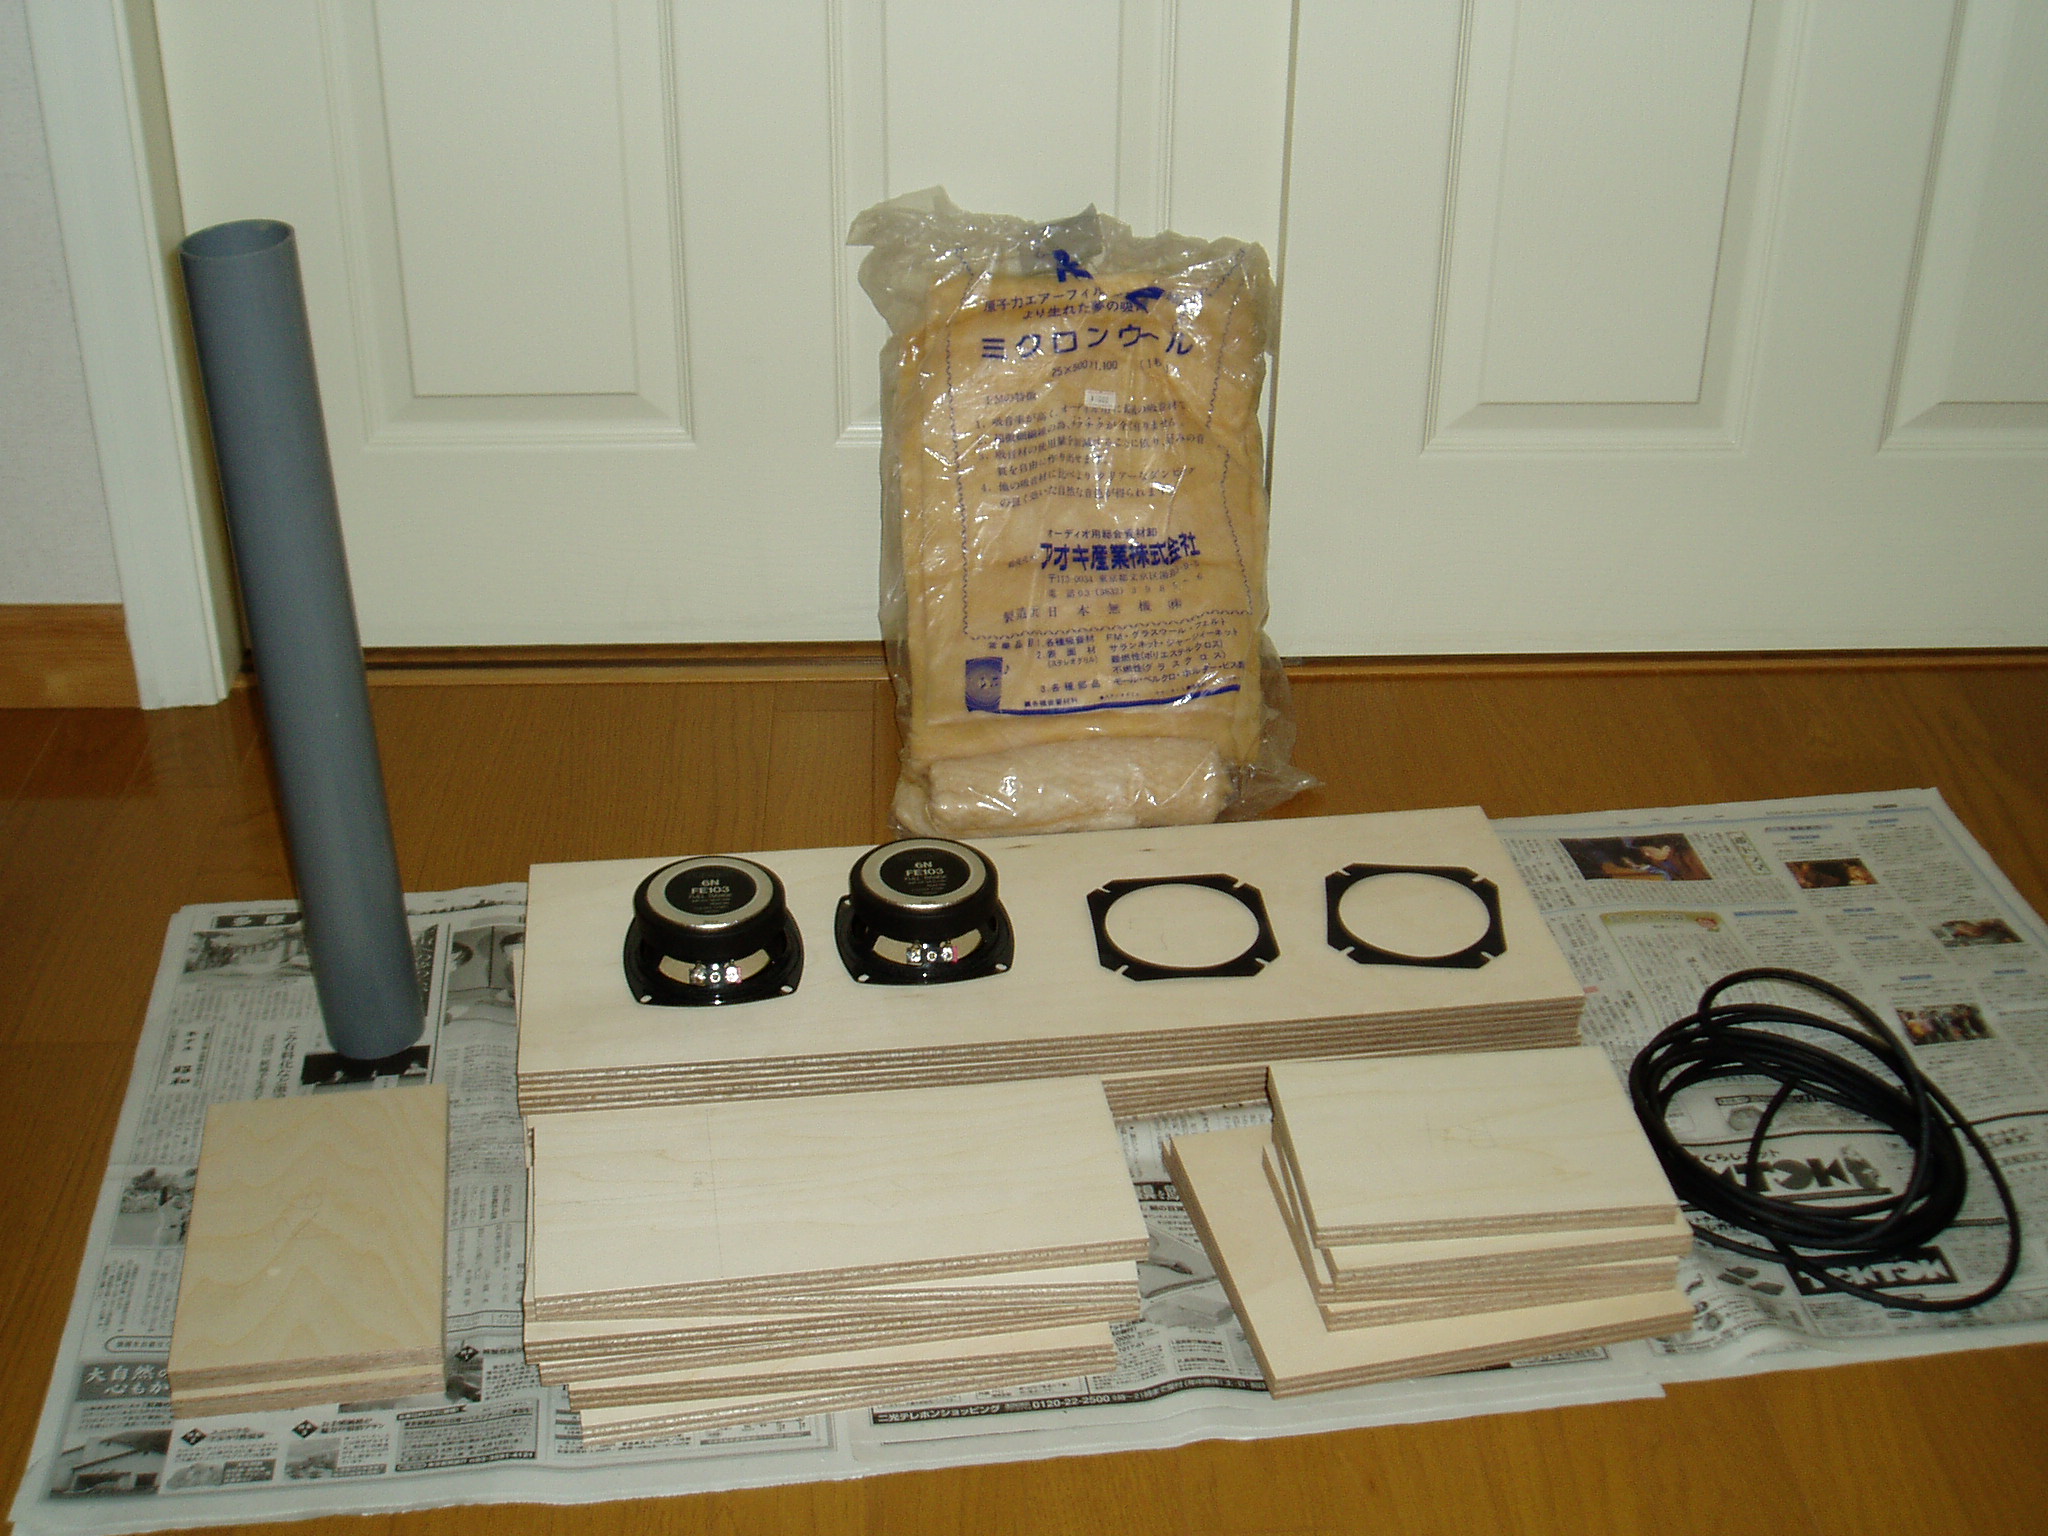
I bored the cutouts for the LS units and the ducts by myself.
I also cut the PVC tube into pieces by myself to make the ducts.
Assembly
I assembled the enclosures in the procedure I had planned.

Before assembling the enclosures, I fixed the bass-reflex ducts in the back baffle with bond. The ducts stuck out a little so that the length of the duct could be adjusted later by cutting or extending the pipe. And, the length of the duct is longer than the recommended one (recommended: 88mm, this duct: 115mm) because the diameter of the PVC pipe is bigger than the recommended one. If the entire duct is placed inside the enclosure, the edge of the duct is too close to the front baffle.

First, the fixed side board is put horizontally. Then the front baffle, back baffle, and top and bottom boards are placed vertically on it, and the parts were glued each other with
wood bond. The bond was applied so plenty that it would fill (a) gap(s)
if it/they would occur at (a) joint(s). The bond I used was a commonly-used
type, not a quick-drying type.
While the bond is still wet, each part is adjusted in position to make
the front and top surfaces flush.
After the positions of all parts are fixed, screw holes are drilled in
the kerfs by inserting the bit of a power drill into the screw holes that
was bored beforehand. This work needs an extra care not to move the parts.
Each wood screw is not tightened at once. First, all the screws are screwed
halfway. Then, in order to keep the joints from sliding, one screw is tightened
a little with a screwdriver (not a power screwdriver), then another is
tightened in the same way, and so on, till all the joints are secured.
Finally, all the screws are tightened firmly with a power screwdriver.
The above process must be done quickly before the bond has dried. When the work was done, a lot of bond leaks out of the joints. It maybe left untouched till the start of the finish process.
When the bond becomes adhesive, the boxes are turned over with care to prevent the fixed side boards from being misaligned. Then the fixed side boards are screwed to the boxes. Now the boxes are rigid.
At this point, the cables sre inserted through the cable holes, and sound absorbing material is attached inside the boxes. I decided the amount of the sound absorbing material by intuition.
The adhesive tape is affixed on the kerfs and small holes are cut out at
the positions of the screw holes. Then, the detachable side boards are screwed. The boxes have all six walls at last.
Finish
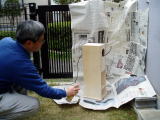
Before painting, I sanded the enclosures a little with an circular abrasive paper attached to a power drill.
As for painting, I sprayed clear varnish on the surfaces of the enclosures. I did it without any particular techniques. I did it in my yard when the weather was fine.
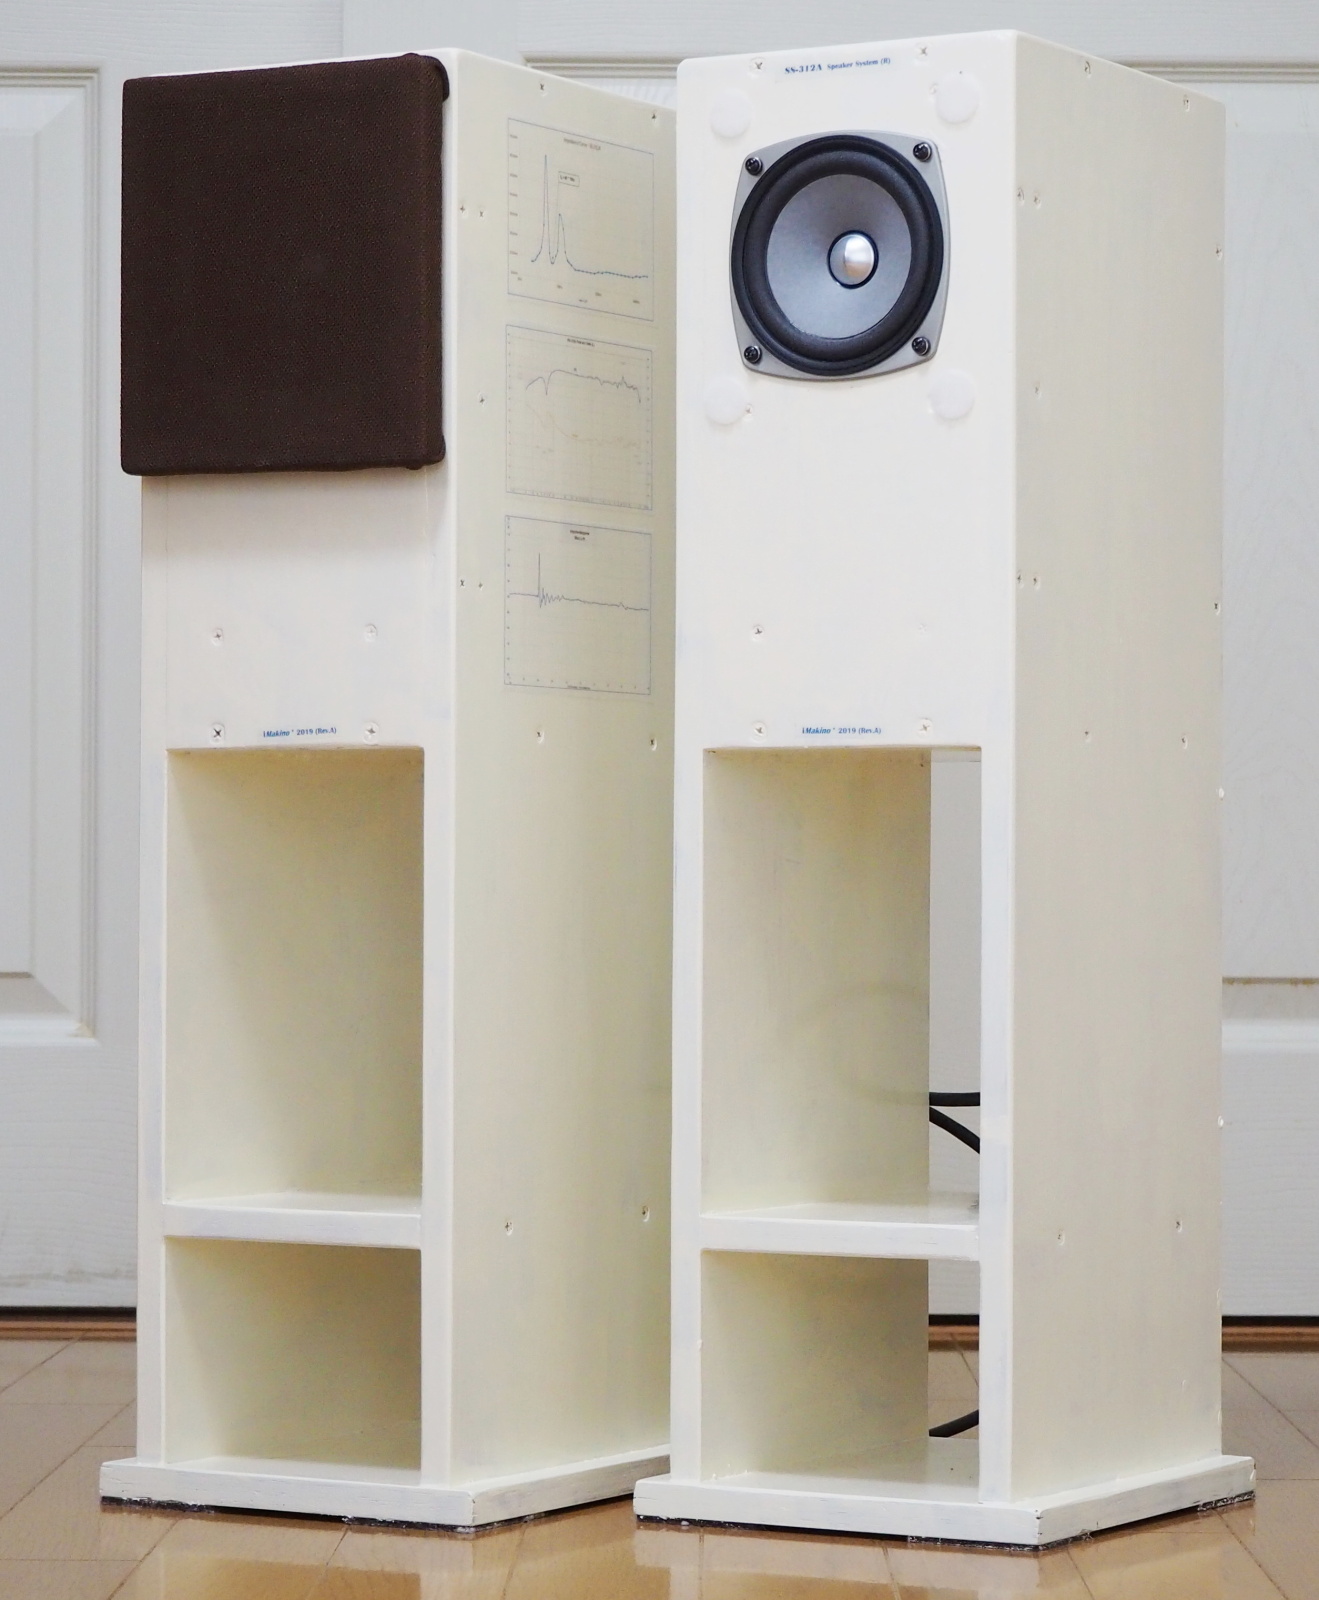
I affixed instant letterings on the back baffles to read my brand 'NOBODY' and the model number 'SS-312'.
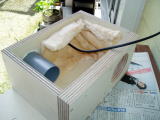
Mouting LS Units
After the varnish was completely dry, I fixed the LS units.
Before fixing the LS units, I soldered the cables to them. The cables were so thick that the LS units couldn't be fit to the cutout in the baffle if they were soldered directly to the driver. I extended the cable with thinner OFC wires.
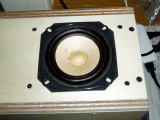
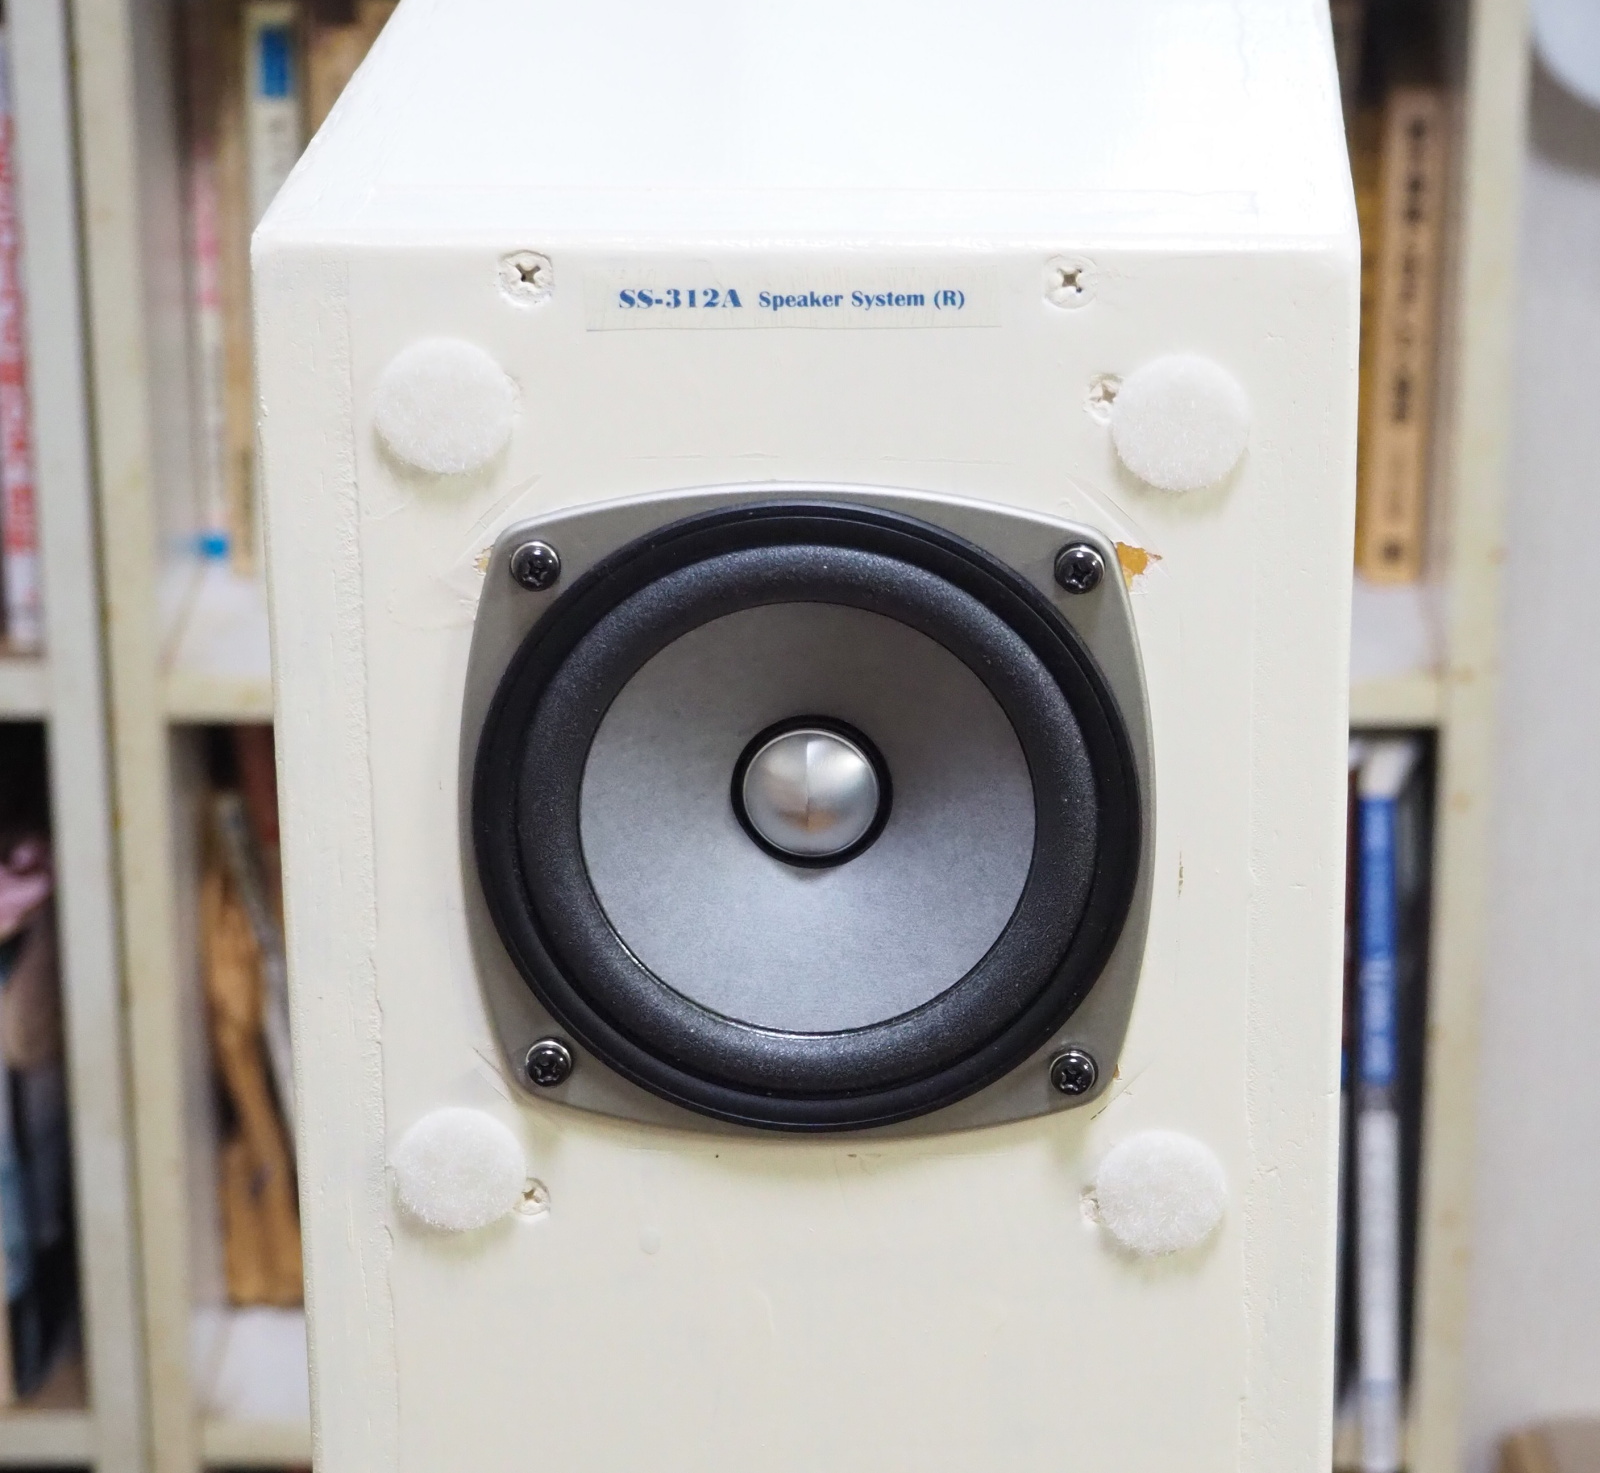
The wood screws used for mounting the LS units were the accessary of the LS units. I screwed the Fostex's genuine grilles with the LS units.
 |
 |
 |
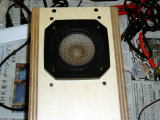 |
| Cable soldered | 6N-FE103 fitted to baffle | Screwed w/ grille | Completed |
Installation and Adjustment
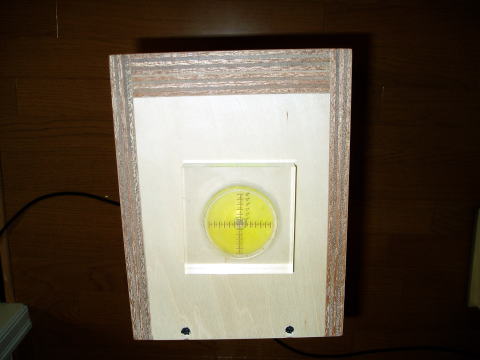
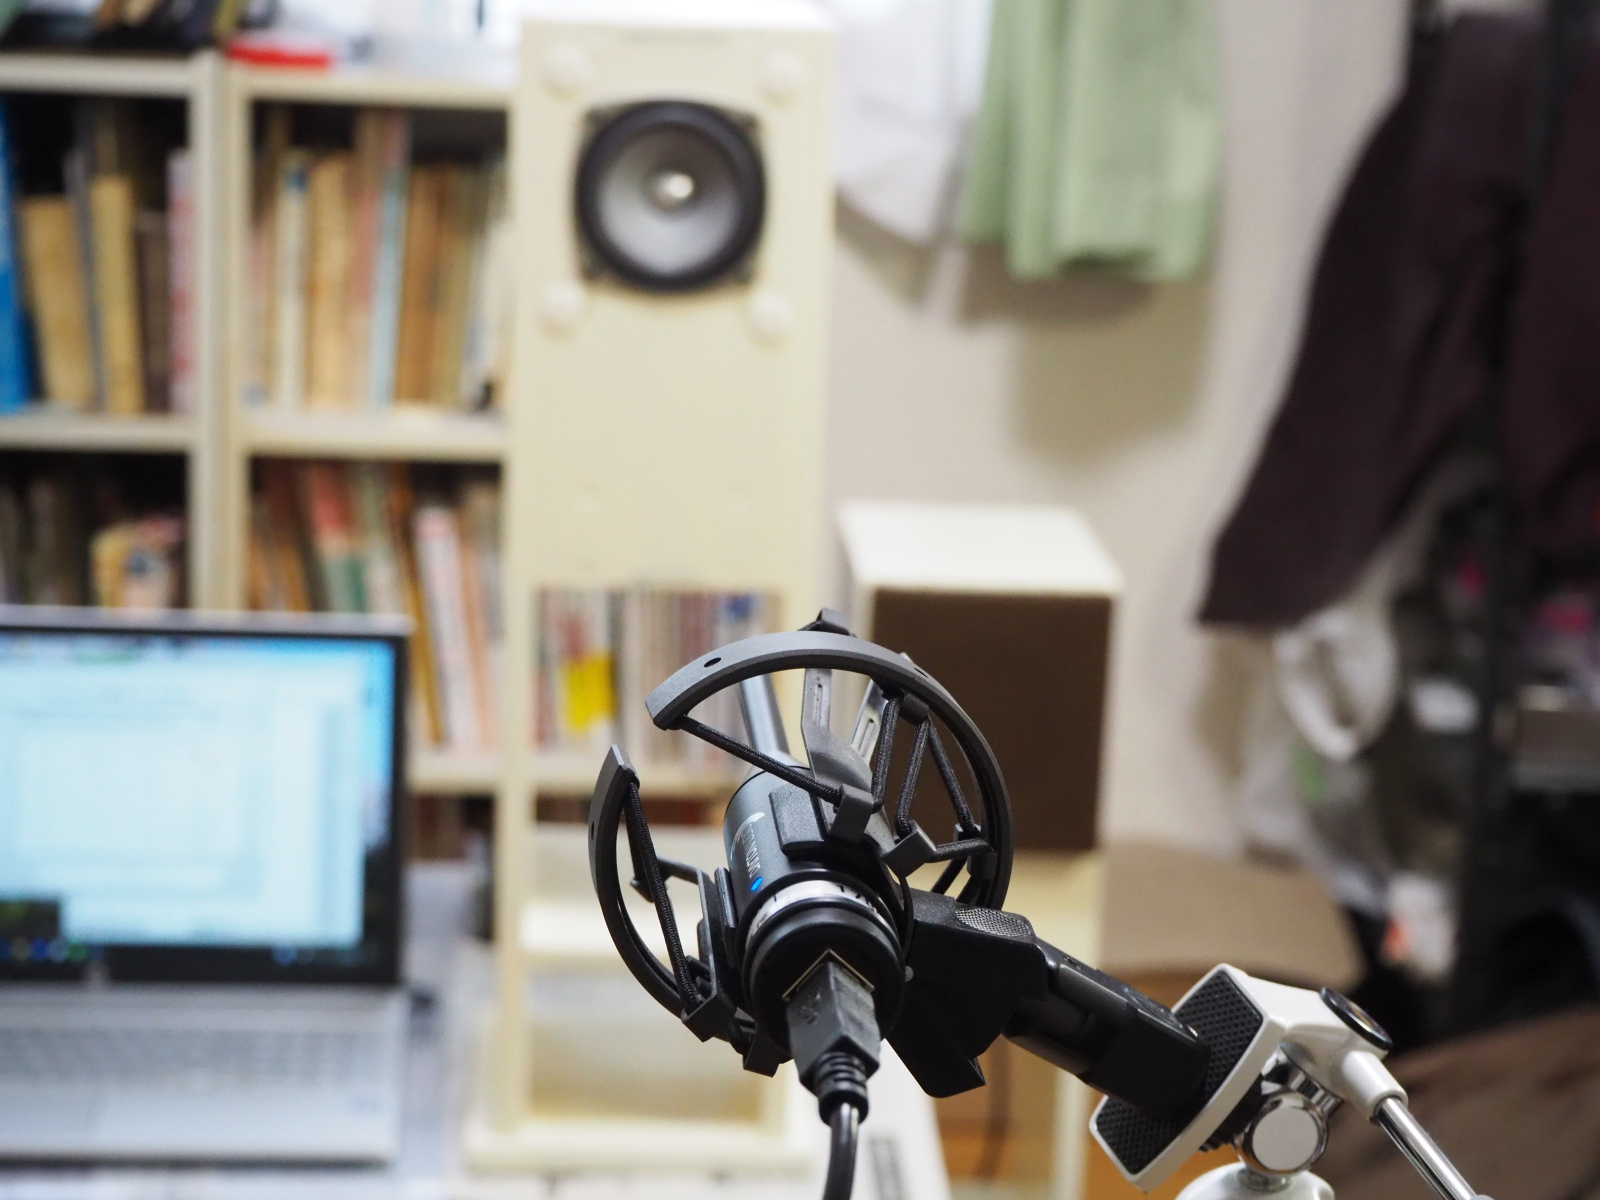
SS-312 was installed in my second system in my study room as planned. Though my friend's amplifier was used in this photo, it was a temporary configuration and MA-205 is used normally (I was checking the amplifier upon request of the friend). And, a small laptop PC is used as a DVD player in this photo, though, a portable CD player (Kenwood DPC-X517) and an IC recorder (TASCAM DR-1) are used as music source regularly (DPC-X517 was discarded October 2011).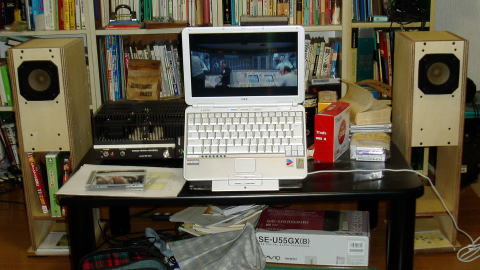
After the installation, I didn't do anything about measurement and tuning.
I played music for many hours every day to break in the new loudspeakers
since the installation. The sound quality was getting improved day by day,
and reached the satisfactory level. SS-312 offered better bass than I had
expected, and its sound was heard well-balanced.
I judged that tuning was not necessary and declared its completion. In
fact, I was already tired and didn't feel like doing any more.
No tuning and no improvement was against the design policy of NOBODY. I wondered if I should give NOBODY-brand to SS-312, but I did so because of the special situation that I built it in my long sick leave as my rehab.
My Own Review
Looks
I skipped wood filling and sprayed varnish soon. I was disappointed that
beautiful grain woody texture didn't appear.
I haven't learned painting techniques enough. I am going to learn it before
next opportunity.
Process & Assembly Accuracy
The accuracy of SS-312 enclosure was improved than SS-309 thanks to the
same construction and assembly method. They were familiar with me, and
I built the enclosures with ease.
The worker of the DIY shop who cut the plywood board was the same man who
did it for SS-309.
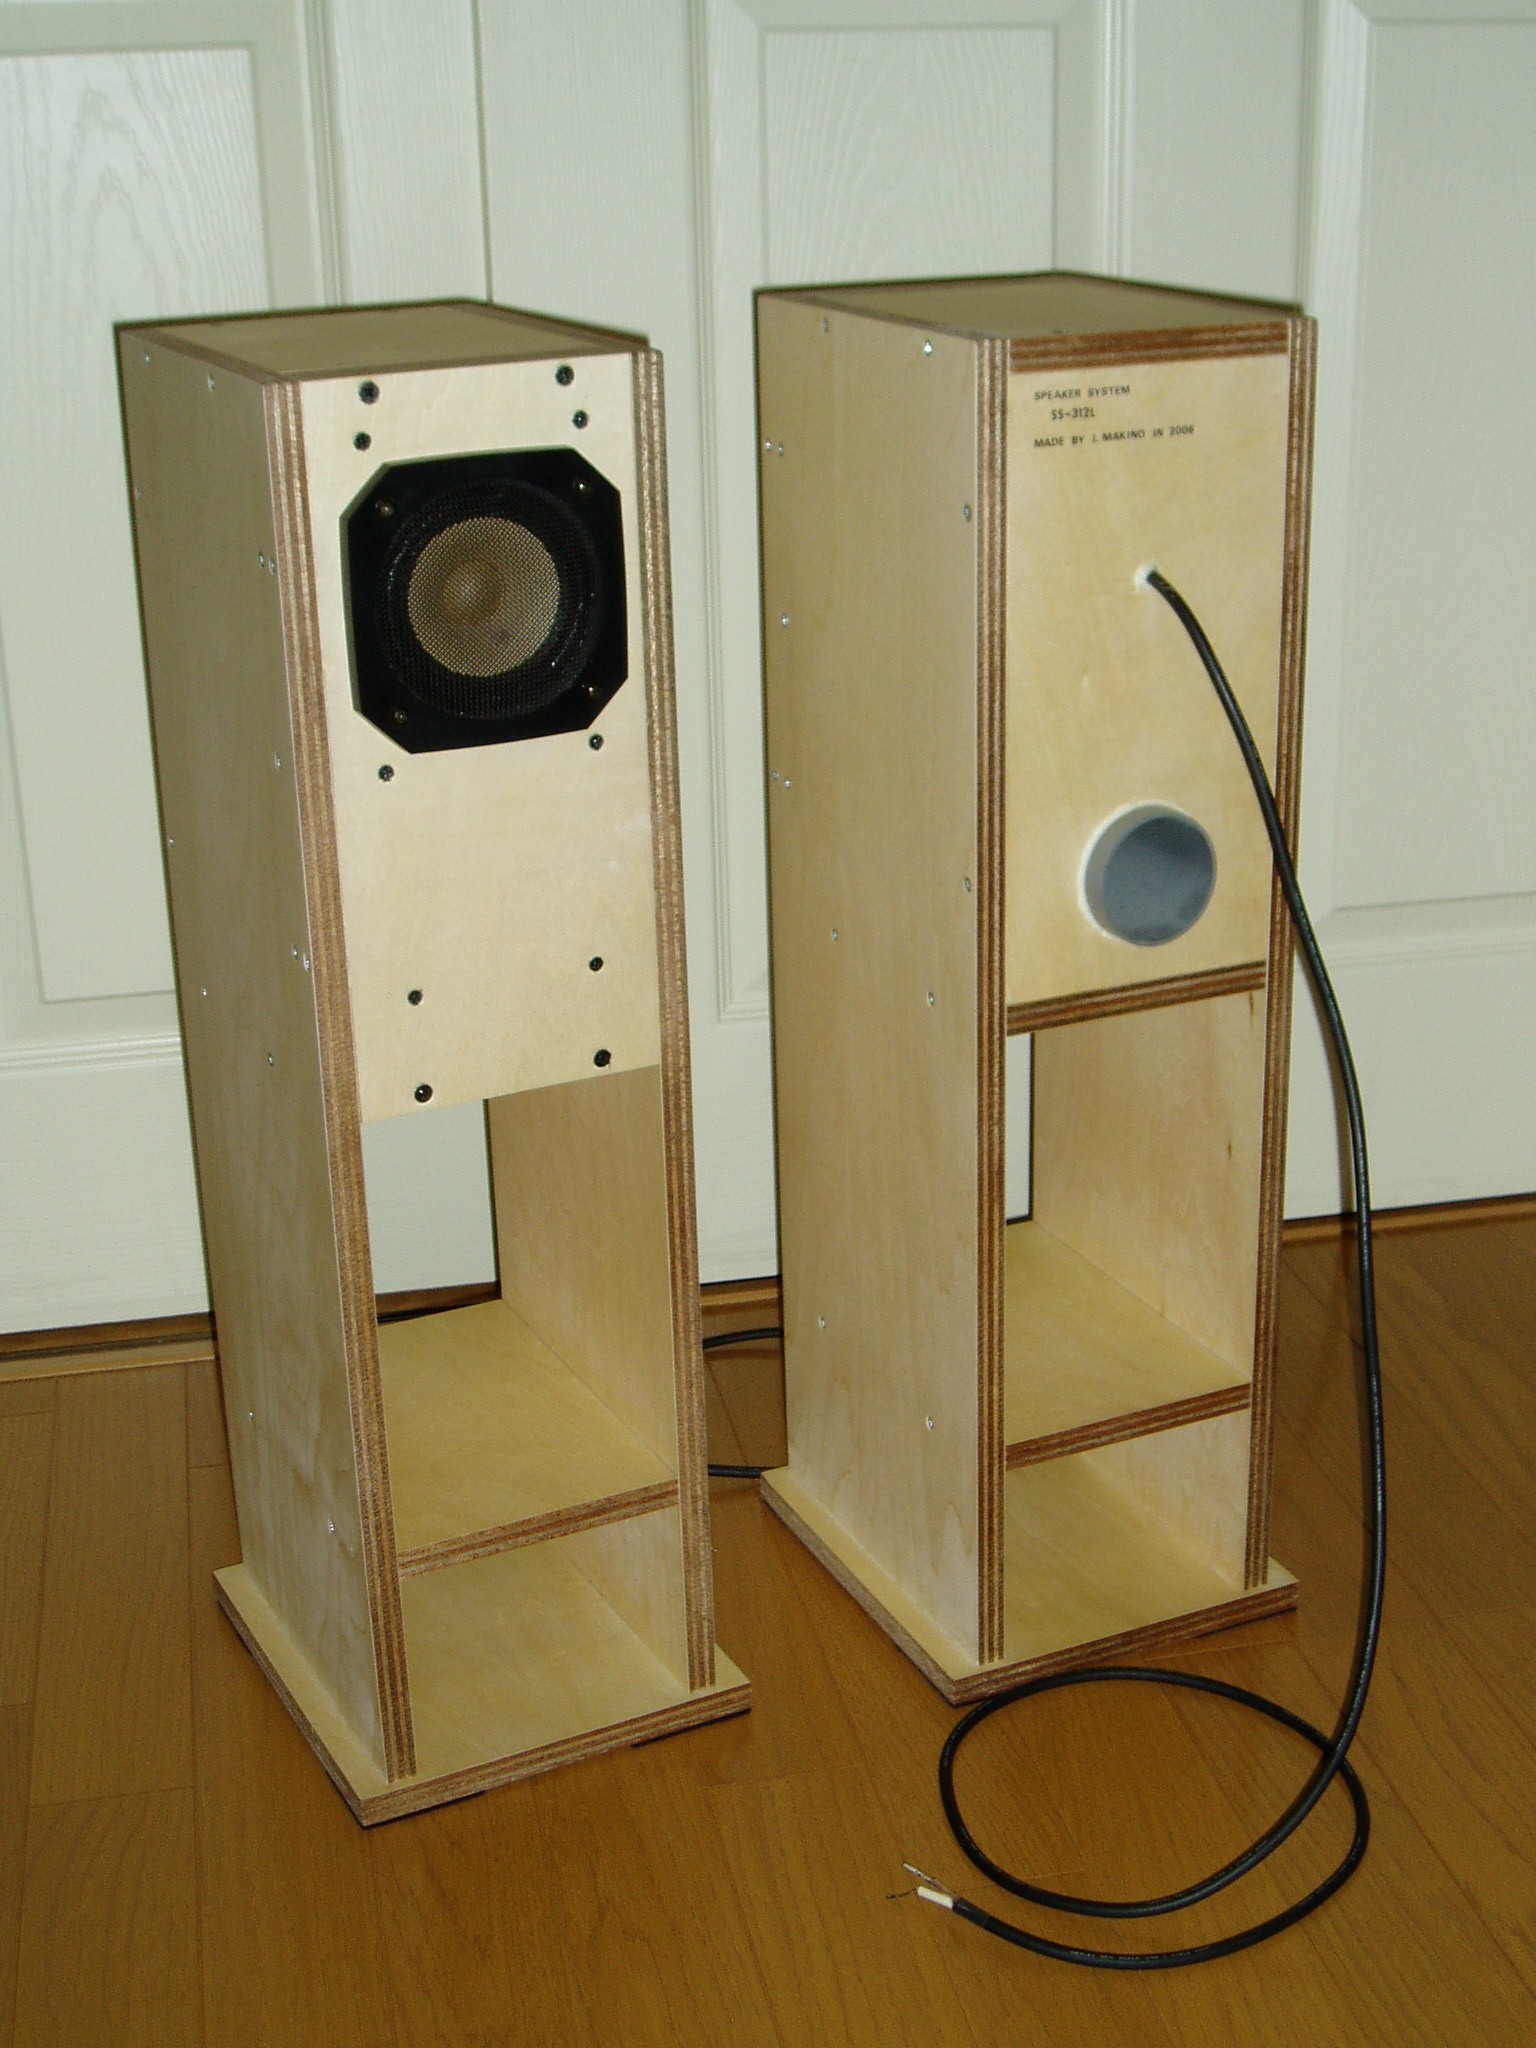
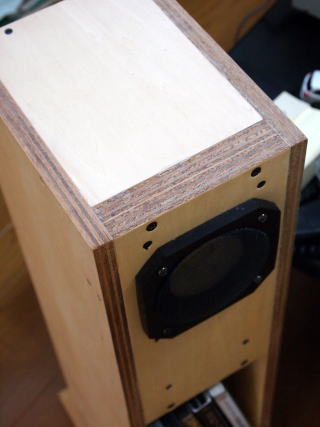
As the left photo shows, the enclosure was assembled so exactly that even
a hair cannot go in between the boards.
As the right photo shows, the enclosures stood to a level when they were
installed.
Sound Quality
As described above, deep bass doesn't come from SS-312, though, its sound
is well-balanced and comfortable. It's suitable for background music in
the study room.
The combination of SS-312 and MA-205, which offers mild, soft tone, is
best fit for healing music.
User-friendliness
SS-312 is compact and floor-standing type. It's easy to install it. I think
the book-shelf type is rather difficult to install.
SS-312's lower body functions both as a stand and a CD/DVD rack. It is
more convenient than I expected.
I think SS-312 is a user-friendly speaker.
Summing Up
I think I've got the intended results. SS-312 is a good speaker system
to enjoy background music at my leisure time.
Its construction is simple, and no special technique is needed to build
it. It's recommendable for easy-going DIY audio.
Improvement (Rev.A)
Purpose
I thought the sound quality (SQ) of SS-312 was reasonably good when I built it. But, soon I became dissatisfied. The worst thing was bass response. Both extension and strength were not satisfactory. When the volume was low, bass response got worse. So, I didn't use SS-312 even for background music.
When I tried to use SS-312 for checking MA-215 Arabesque, which I built
in 2015, bass response was bad, and the total SQ was not good at all.
The surround of 6N-FE103 had deteriorated. The air in the enclosure leaked
through it. So, bass-reflex didn't work.
I don't like repairing. I decided to upgrade SS-312 by replacing 6N-FE103 with the better loudspeaker unit (LS unit). Especially, I wanted to improve bass response in both quality and quantity.
I selected Fostex FF105WK for the reason I describe later.
In addition, I set the following goals:
- (1) Tuning based on measurements
- I feel remorseful even today for giving NOBODY brand to this speaker system despite that I didn't make measurement and tuning when I built it in 2006. I decide to make fine tuning based on measurements this time in order to draw out the best performance of FF105WK. I will implement my own measurement methods "Tonochi Methods", which I revised in June 2019, for the first time. It's one more purpose to confirm effectiveness of Tonochi Methods.
- (2) Looks matching the interior of the room (study room)
- The interior of my study room is bright-colored; the walls and ceiling are white, the floor is bright wooden flooring, the windowsills are made of bright wooden materials, the curtains are light green. SS-312A should be bright-colored too. White or cream is good.
- (3) Better maintenablity
- It should be easier to connect/disconnect the speaker cable to/from the amplifier, and to mount/dismount the LS unit on/off the baffle.
Key Parts
- LS unit
- As mentioned above, I selected Fosxtex FF105WK.
At first, I looked for LS units other than Fostex, but the dimension of the frame is unique. It's not compatible with other manifacturers' profucts. Sub-baffle is necessary to mount them on SS-312. It is troublesome to make sub-baffles, and the sub-baffle may affect the looks of the loudspeaker adversely. I concluded Fostex is the best.
I visited Fostex's website and found the FF series, which I didn't know until then. It matches bass-reflex (vented-box). On the other hand, the FE series, which I have been using almost half century, matches back-load horn. I realized the FF was better selection for SS-312.By the way, FF105WK is a mechanical 2-way LS unit, though I didn't know it until I received it.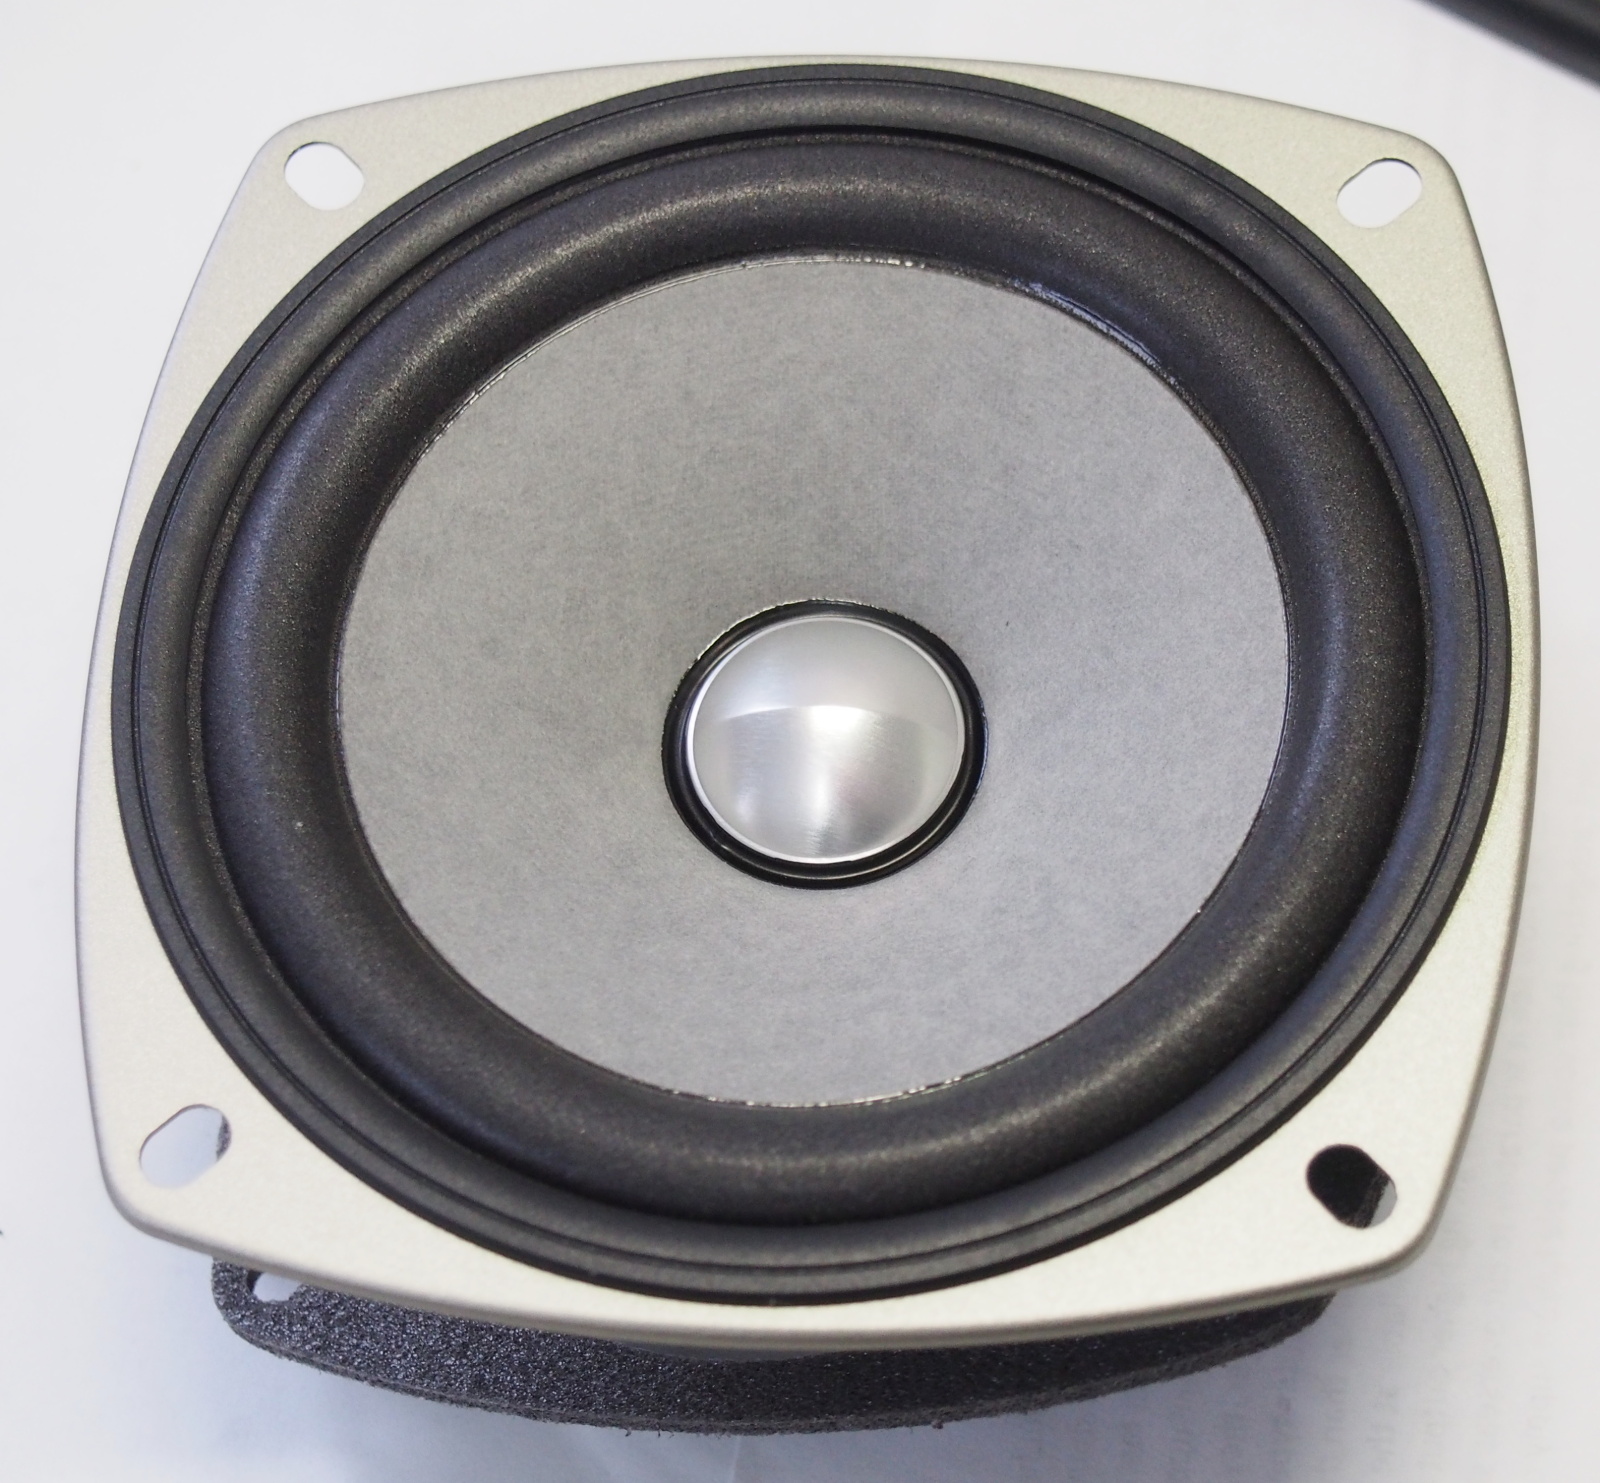
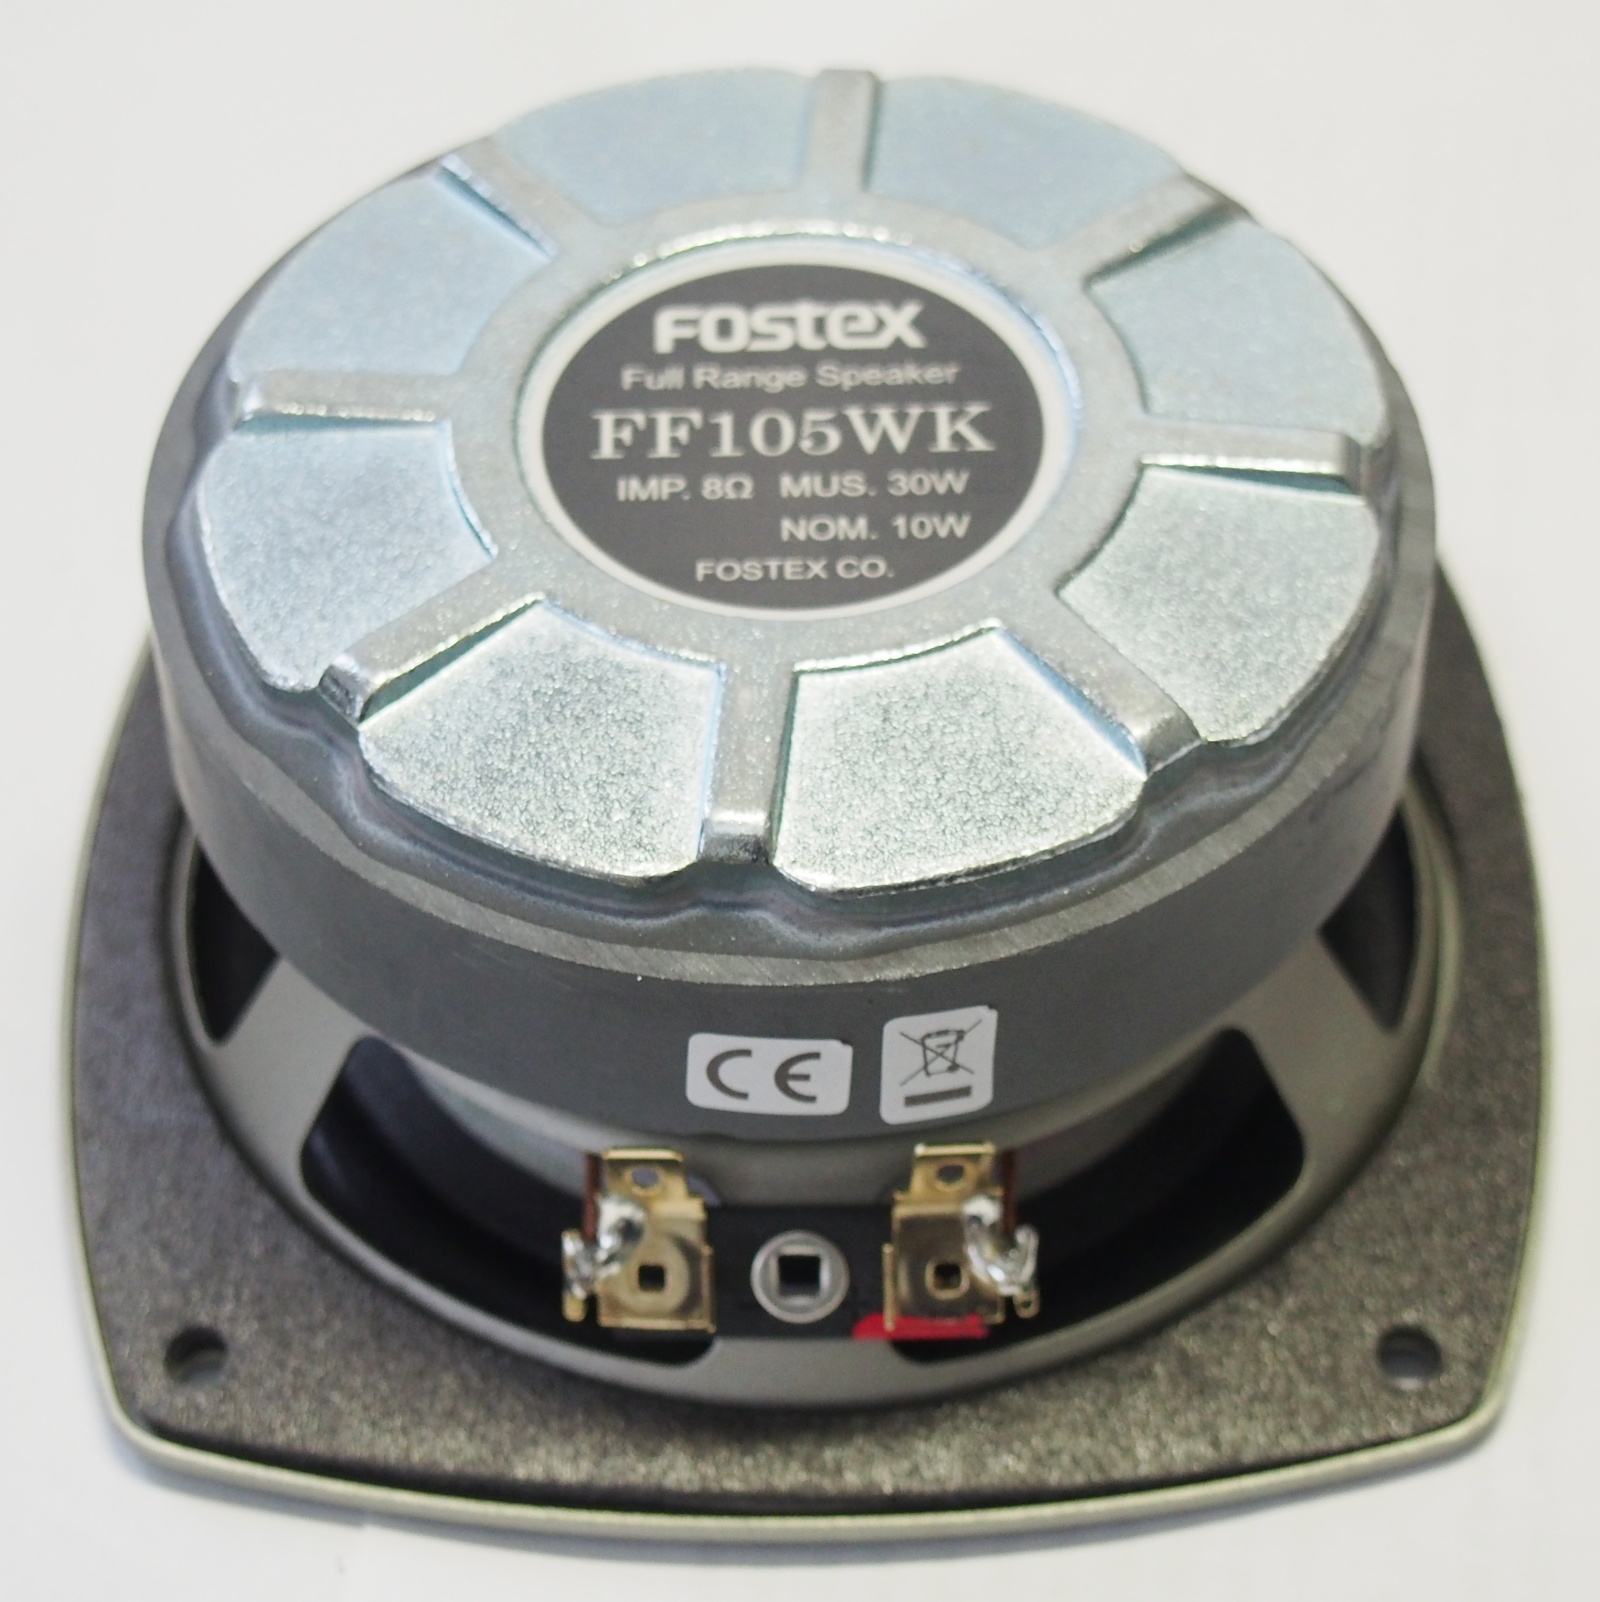
Type 10cm mechanical 2-way full-range LS unit Impedance 8 ohm Lowest resonance frequency (f0) 75Hz Frequency range f0 - 25kHz Sensitivity 88dB/W (at 1m) Rated input 30W (mus.) m0 3.4g Q0 0.41 Equivalent diaphragm radius (a) 4.0cm Magnet weight 340g Net weight 0.8kg Recommended enclosure Bass-reflex Inner volume 6L Baffle hole diameter 93mm - Speaker cable
- Now I know a coaxial cable is not good for speaker cable. I employed another
type of cable.
A reader of mine gave me a good information on speaker cable. He recommened Canare 4S6. I chose its derivative product, 4S6G. He said 4S6 is a standard cable in professional audio. It consists of quad core wires and PE (polyethylene) insulator. It looks reliable, but costs only 70 yen per meter. The core wire material of 4S6G is OFC. 4S6G costs 120 yen (as of March 2019). Still reasonable. I selected it without hesitation.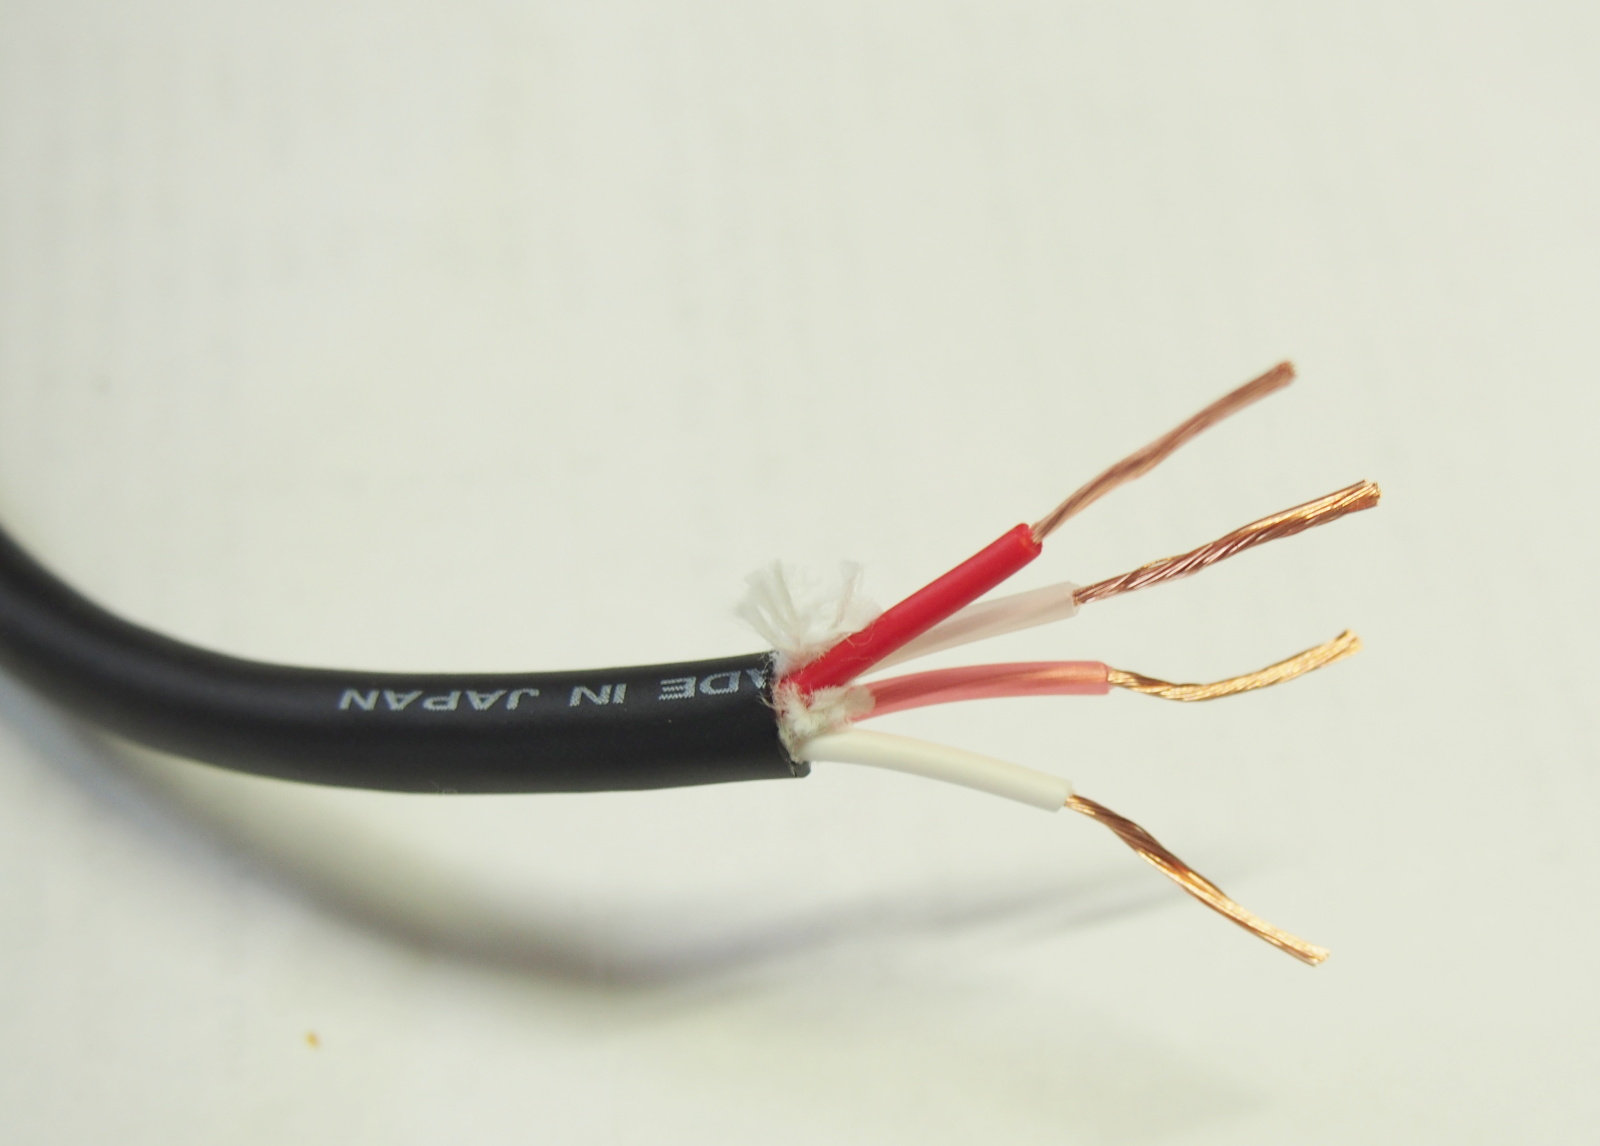
- Insert nut
- A while ago, I read a book on loudspeaker technologies (ref#8) for the first time in ages, which I used to read as a good reference
for loudspeaker design. I re-discovered an article in the book which says
that wood screws are not used to mount LS units. It's because wooden female
threads aren't solid enough to fix the LS units tightly. I should have
known it since 40 years ago, but I forgot it at all. It may be too late,
but I decided to use M4 screws and insert nuts.
Moreover, the speaker cable of SS-312 is directly connected to the LS unit. When the speaker cable is replaced, the LS unit must be removed off the baffle. And, when sound absorber is added or reduced, the LS unit must be removed too. Each time these maintenance job is done, wooded female threads are worn. This trouble can be prevented by using the insert nuts.
I chose M4 insert nut whose length is 10mm, Murakoshi k-e410.

Implementation
- (1) Sanding
- The surfaces of the enclosures were sanded.

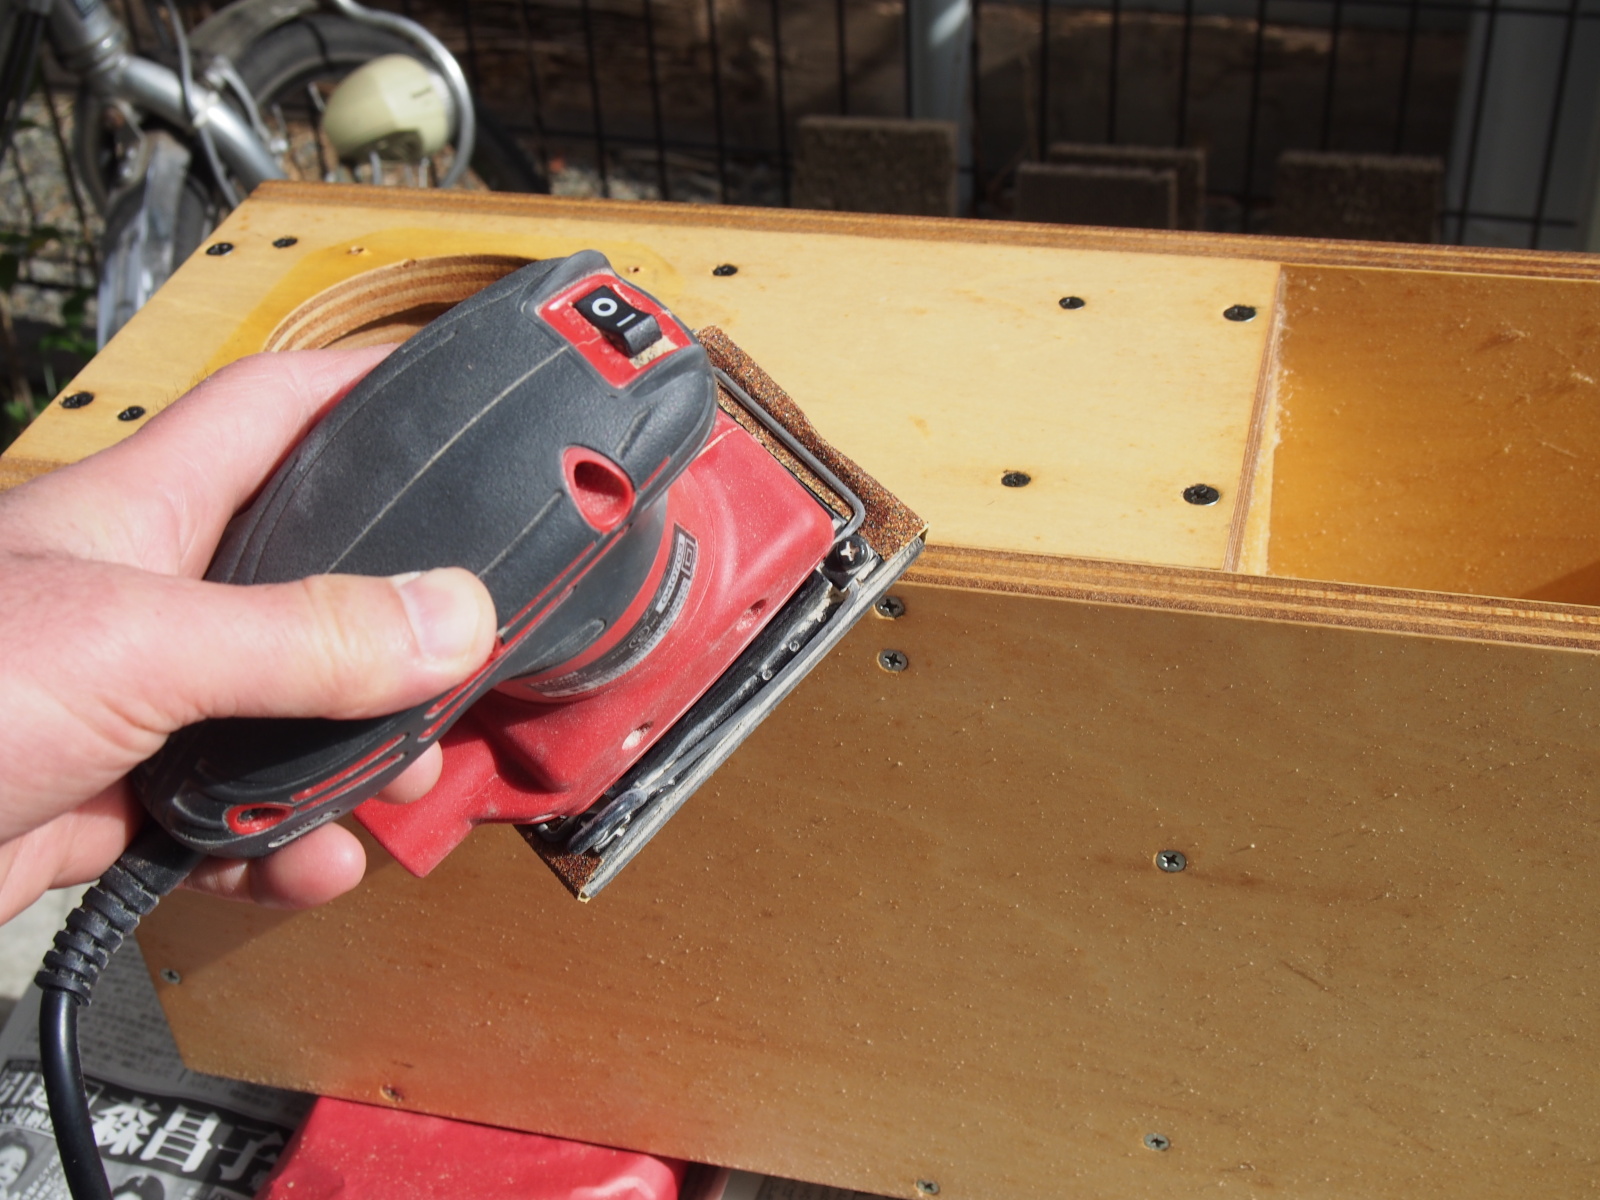 The edges were rounded.
I used to feel pain when I walked around in the study and hit the enclosures by my thighs, because the hight of this enclosures is the same as that of my thigh and the edges were so sharp. - (2) Insert insert nuts
- First, the screw holes were broadened with a power drill to the diameter
to fit the insert nuts.
The cable holes were also broadened to the diameter slightly larger than that of 4S6G (hole: 6.5mm, 4S6G: 6.4mm).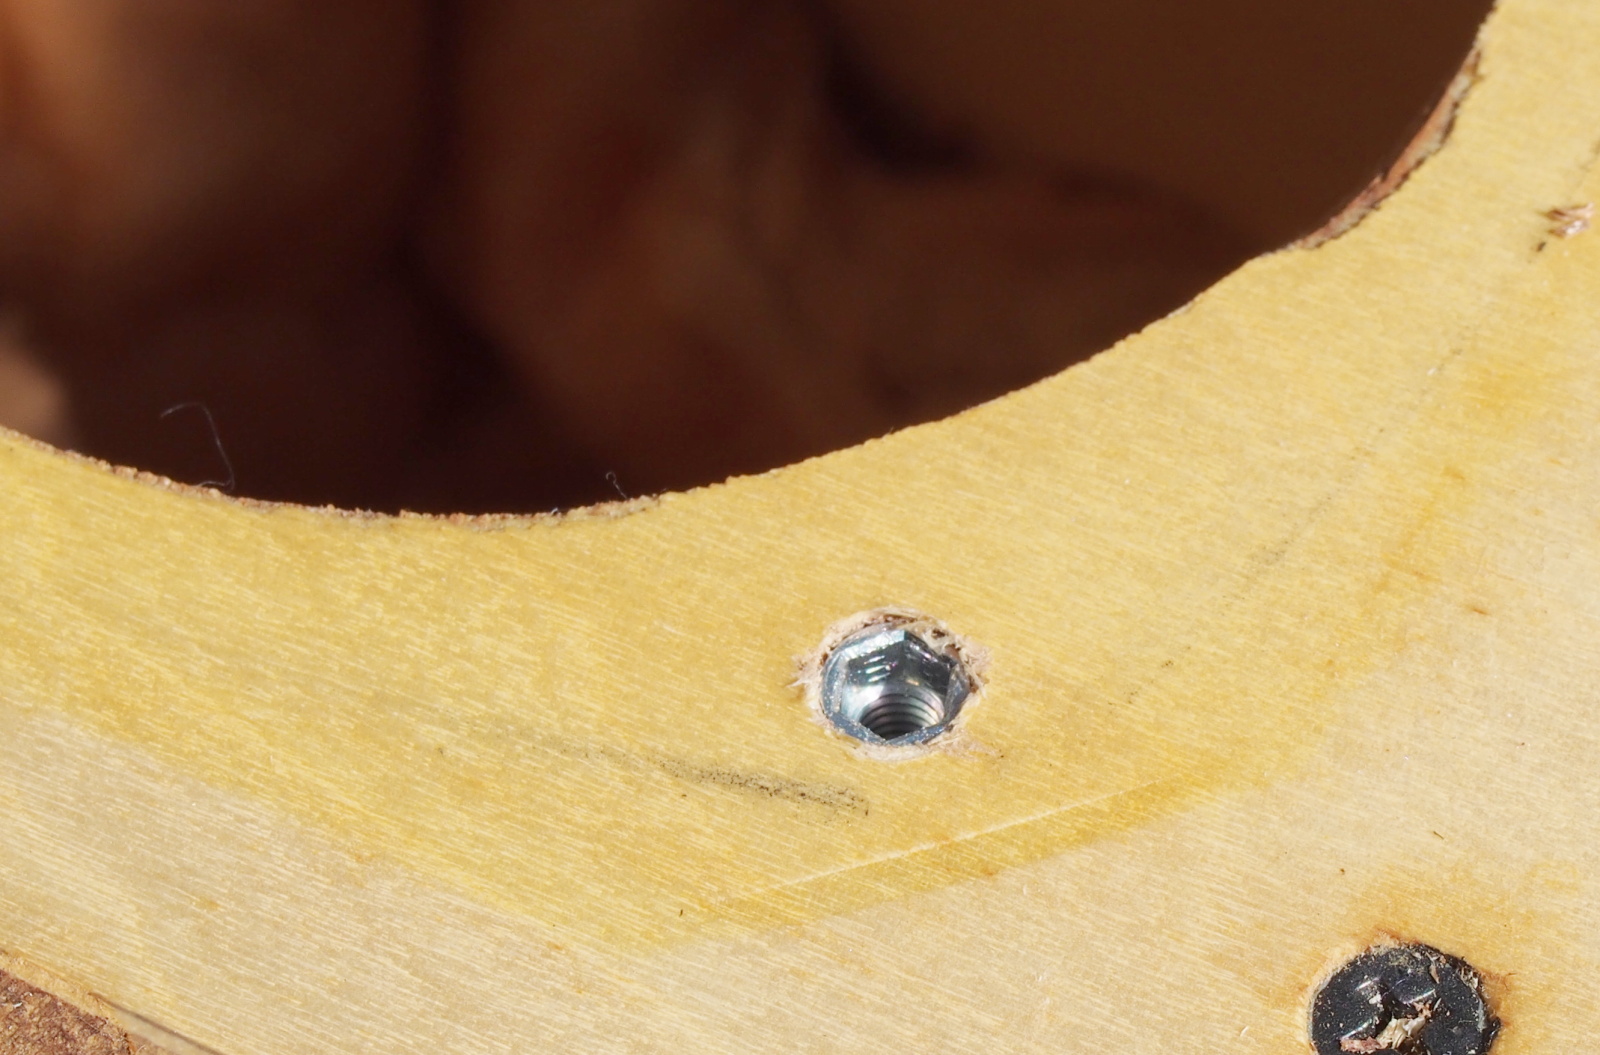
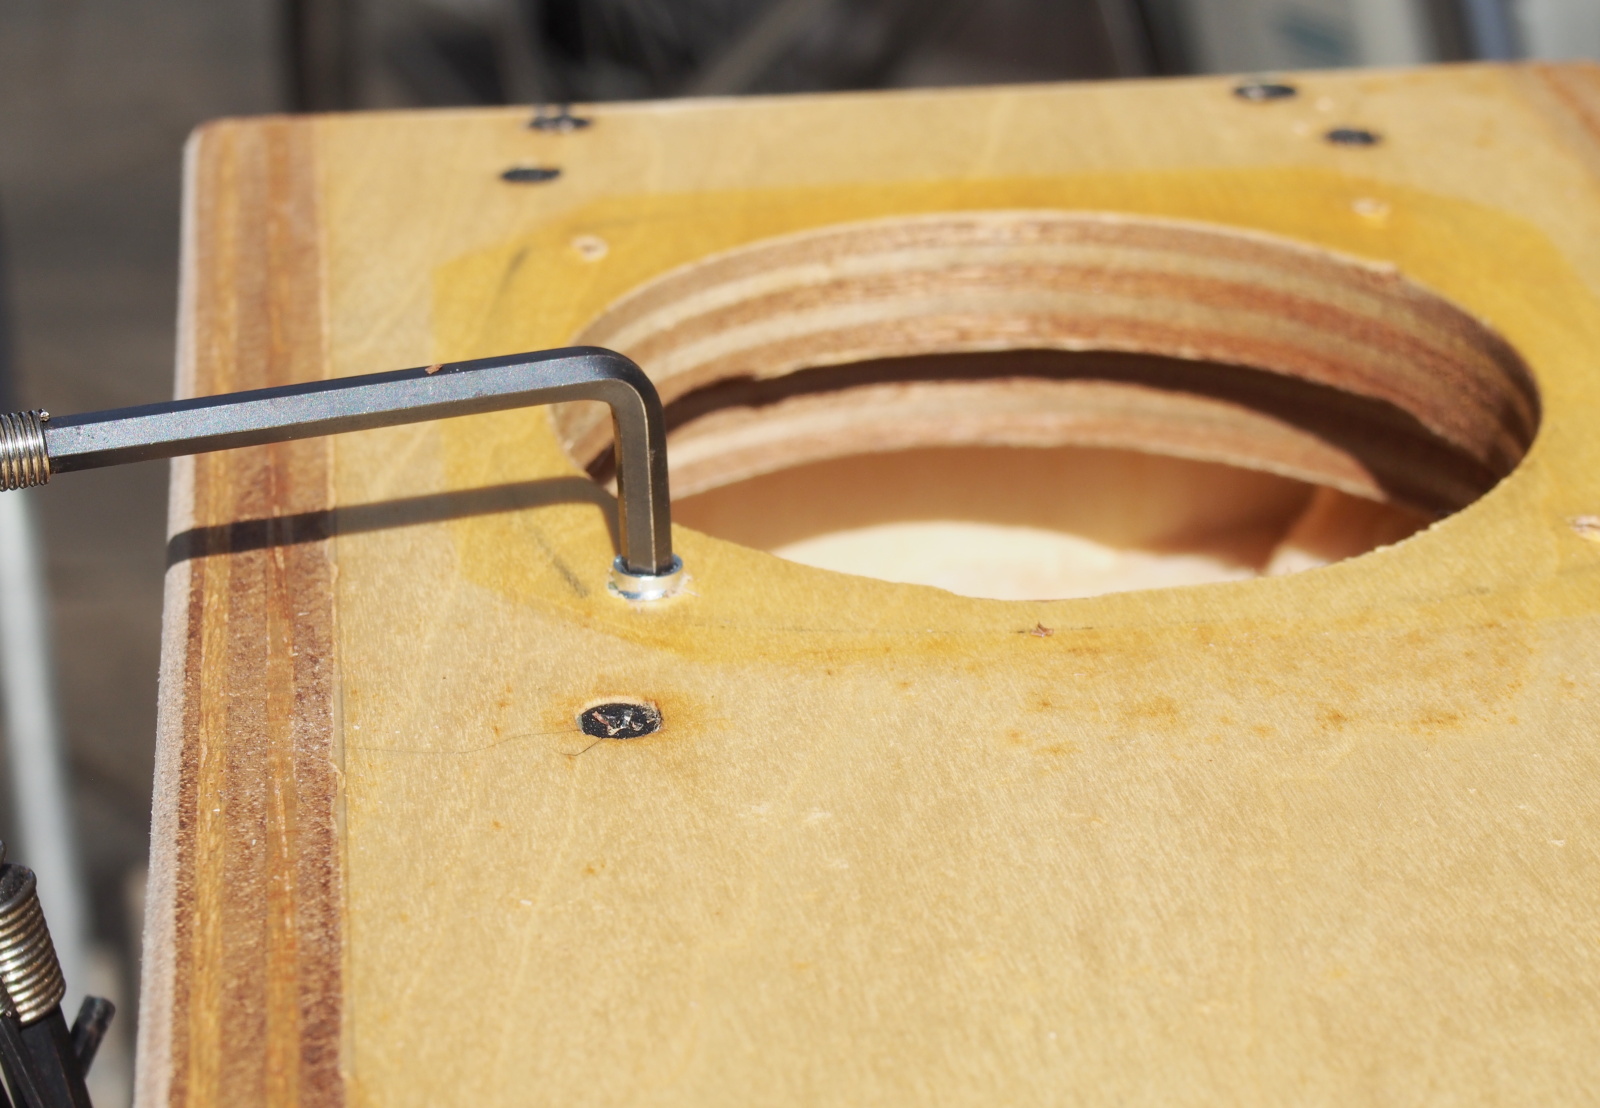 Next, the insert nuts were driven into the baffles. The k-e410 is the type
of insert nut which is burried in wood. So, it must be driven till the
upper end of it reaches below the surface of the baffle.
Next, the insert nuts were driven into the baffles. The k-e410 is the type
of insert nut which is burried in wood. So, it must be driven till the
upper end of it reaches below the surface of the baffle.
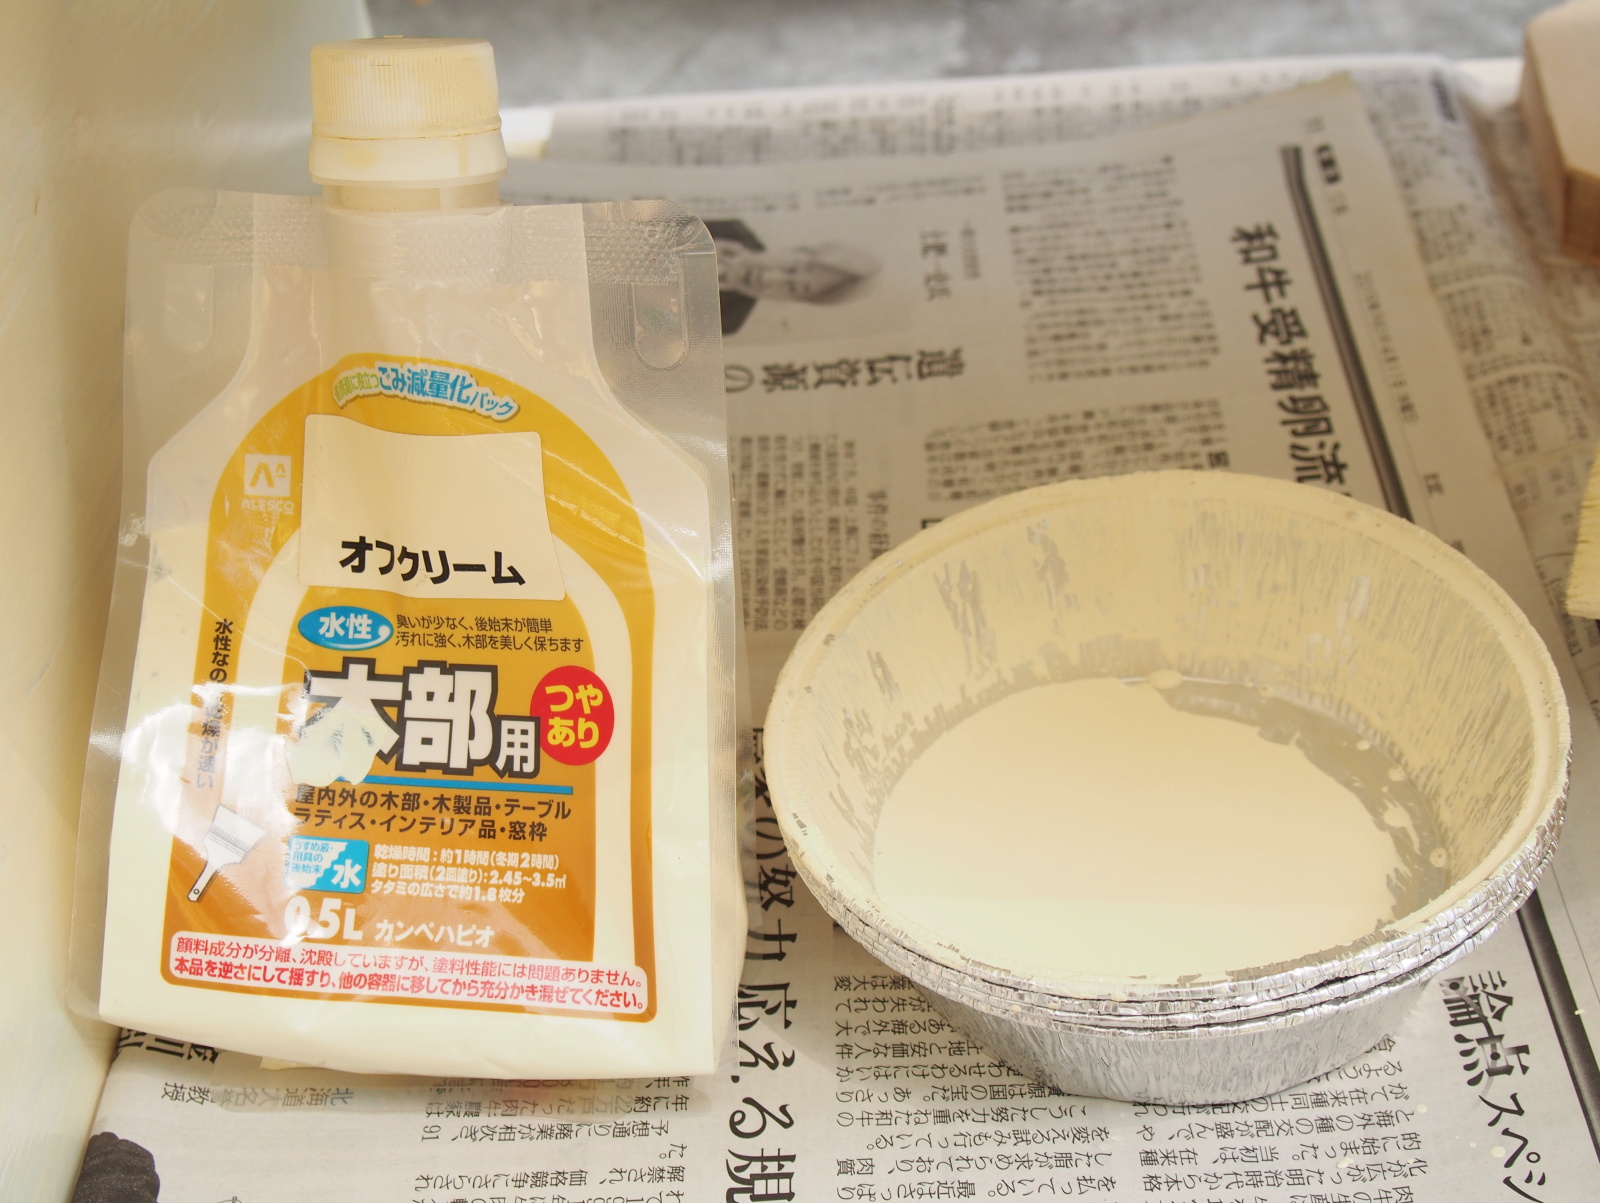
- (3) Recoating
- I used water paint manufactured by Kanpe Hapio. The color is "off
cream". This paint is easy to use even for beginners.
It was remains. I had used it for my home-built outdoor rack. Half the bottle remained.
I used brushes for water paint.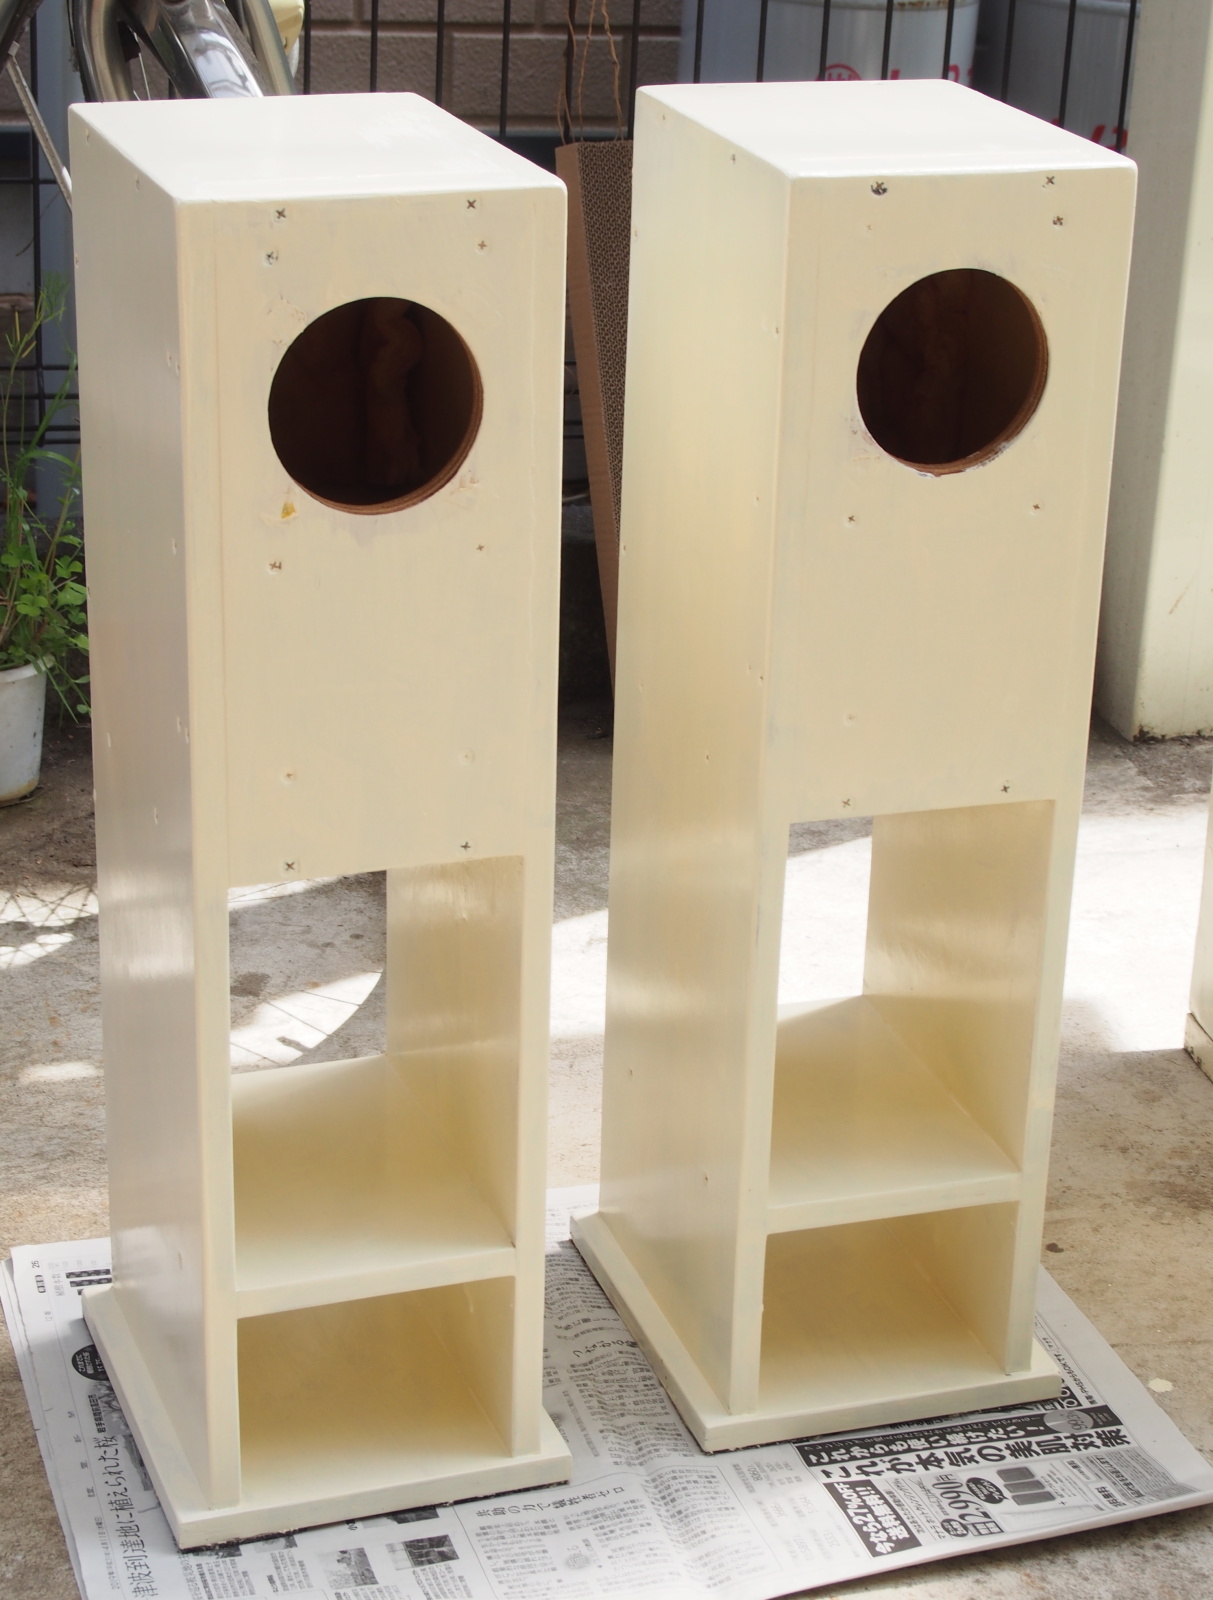
 One day after I painted the enclosures, I painted one more time after I
sanded them with #400 sandpaper and my power sander.
One day after I painted the enclosures, I painted one more time after I
sanded them with #400 sandpaper and my power sander.
The coating was still uneven, so I wondered if I should paint once more. I didn't, because I liked that unevenness, which gives off hand-made atmosphere.
After the coating was perfectly dried, I polished the surfaces with polishing agent for white cars, and affixed stickers of logotype. I used Sanwa Supply JP-TA08CL, A4-sized transparent sticker. - (4) Mounting LS units
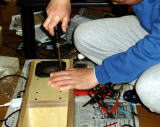
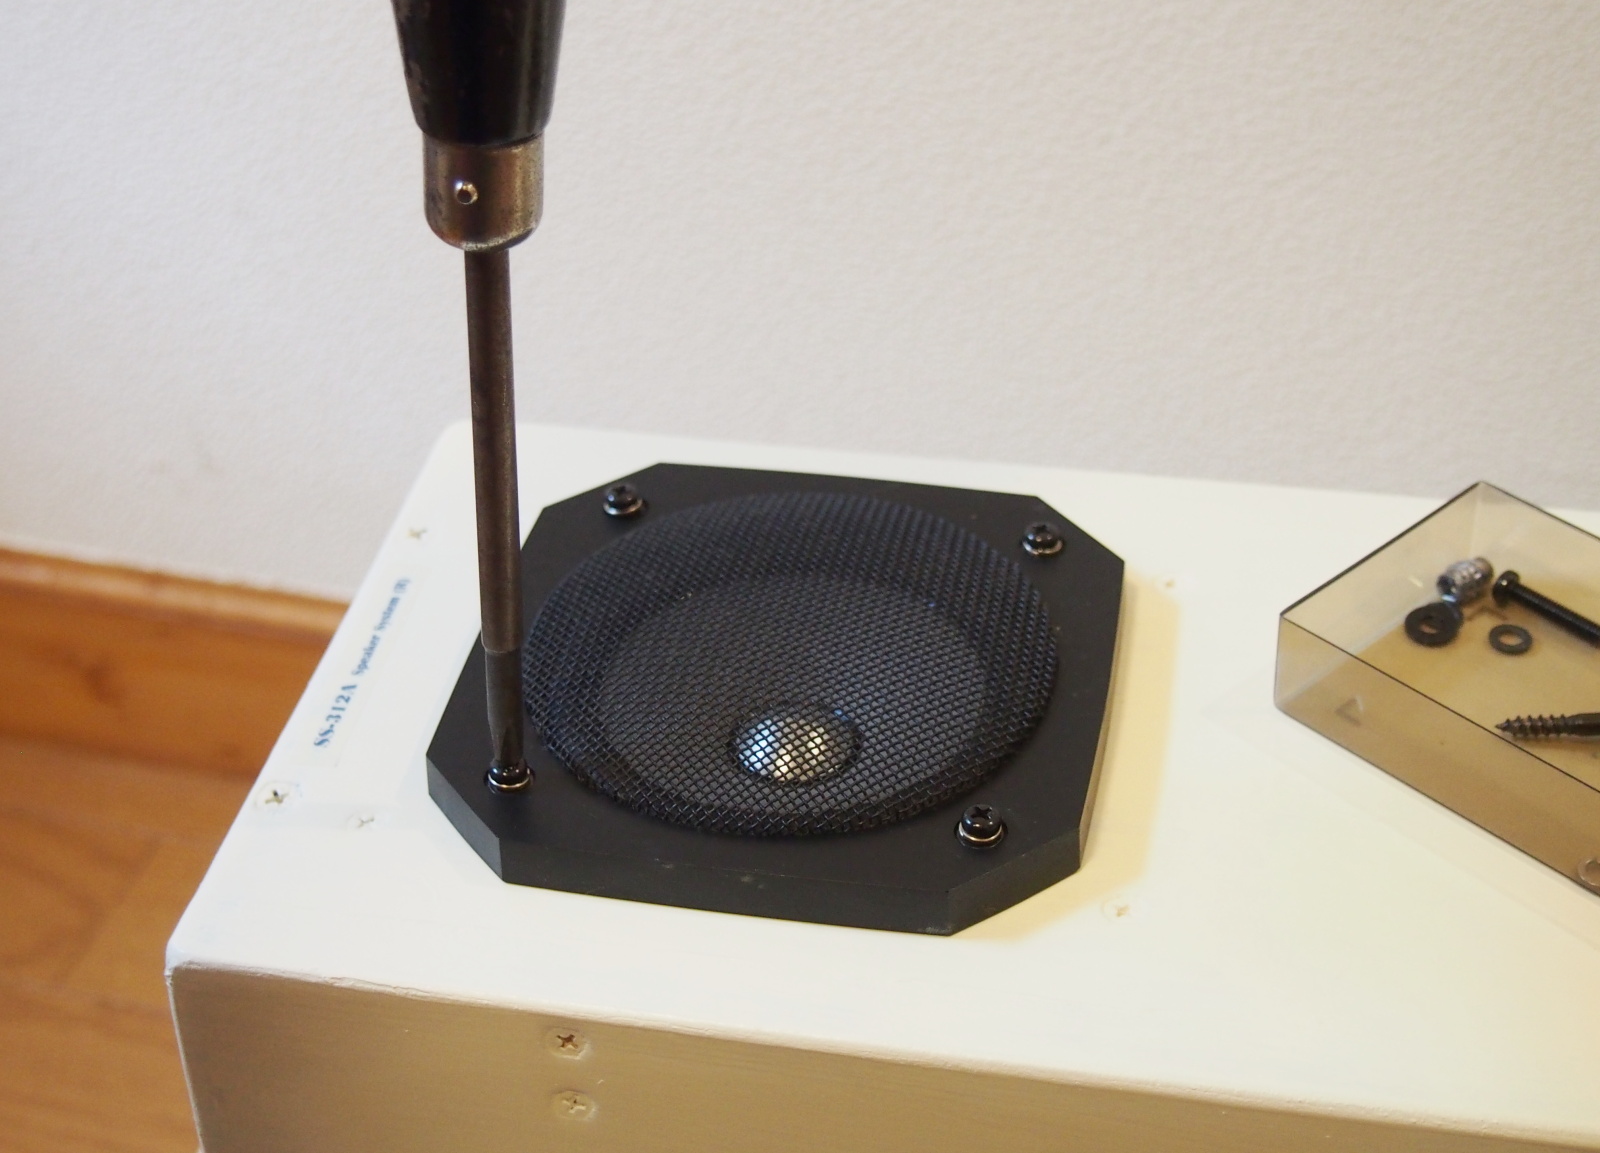
- First, the speaker cables were soldered to the terminals of the LS units.
Needless to say, it was done in "Tonochi Method" The solder was a silver solder with copper in it.
Secondly, the speaker cables were put through the cable holes.
Thirdly, the LS units were fixed together with the grilles on the baffles. The screws were M4 dome head screw. The length was 20mm (Yahata Neji #1112). The flat washers that had been used before Rev.A (probably, they were an accessary of 6N-FE103) and spring washers were also used to prevent loosening.
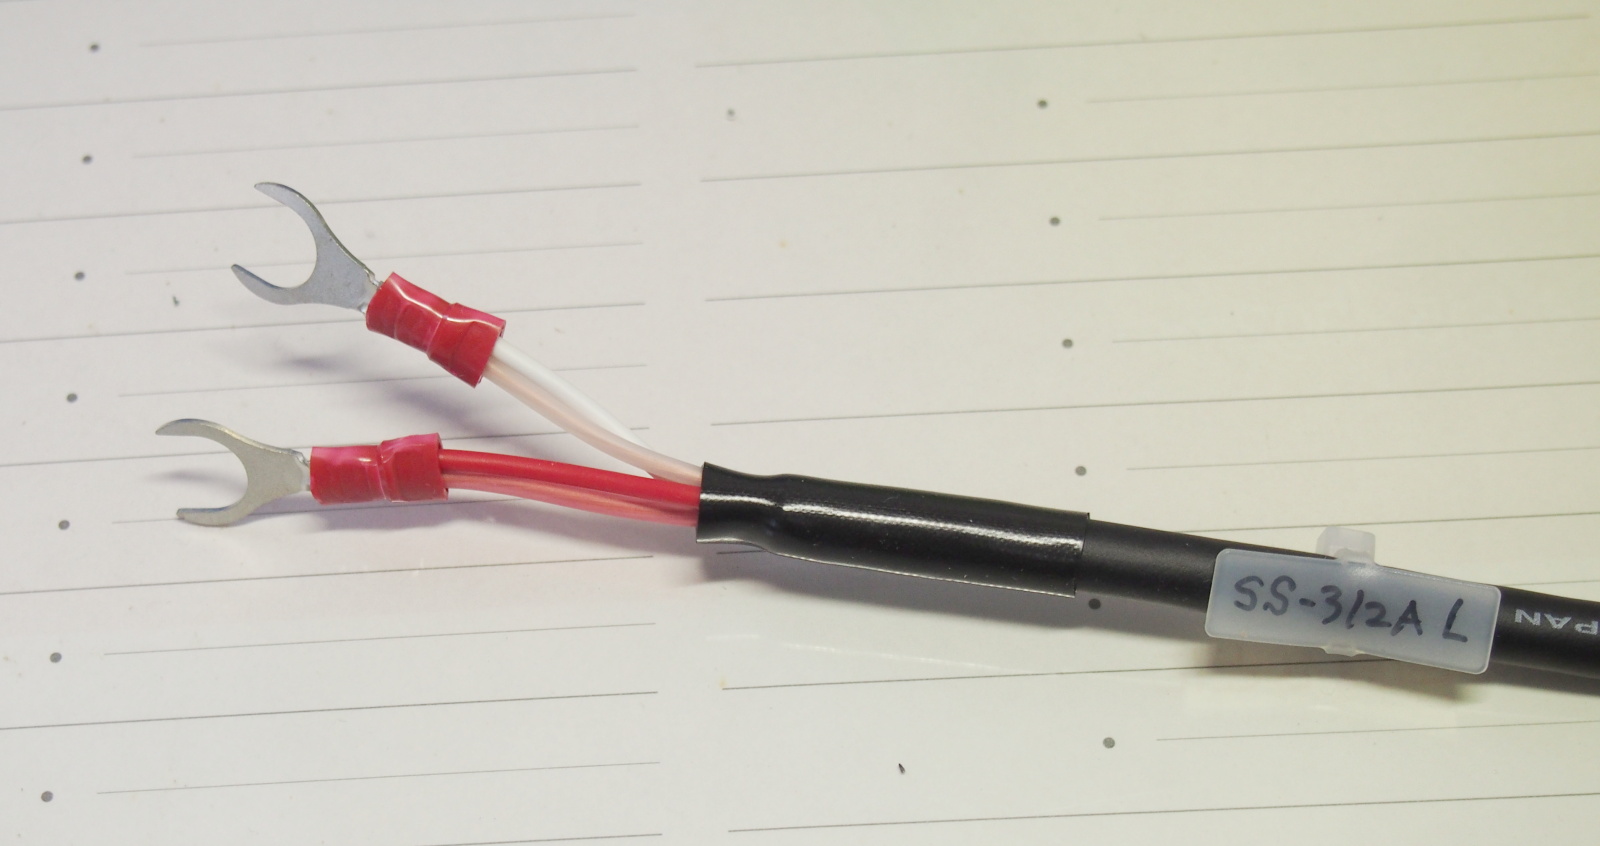
Lastly, spade lug terminals were crimped at the end of the speaker cables. The terminal wasn't special for audio, but a commonly-used, tin-plated copper terminal. It's RS Pro 613-9485; M8-sized, suitable for AWG22-16 wires. I used RS Pro crimp tool, 534-812.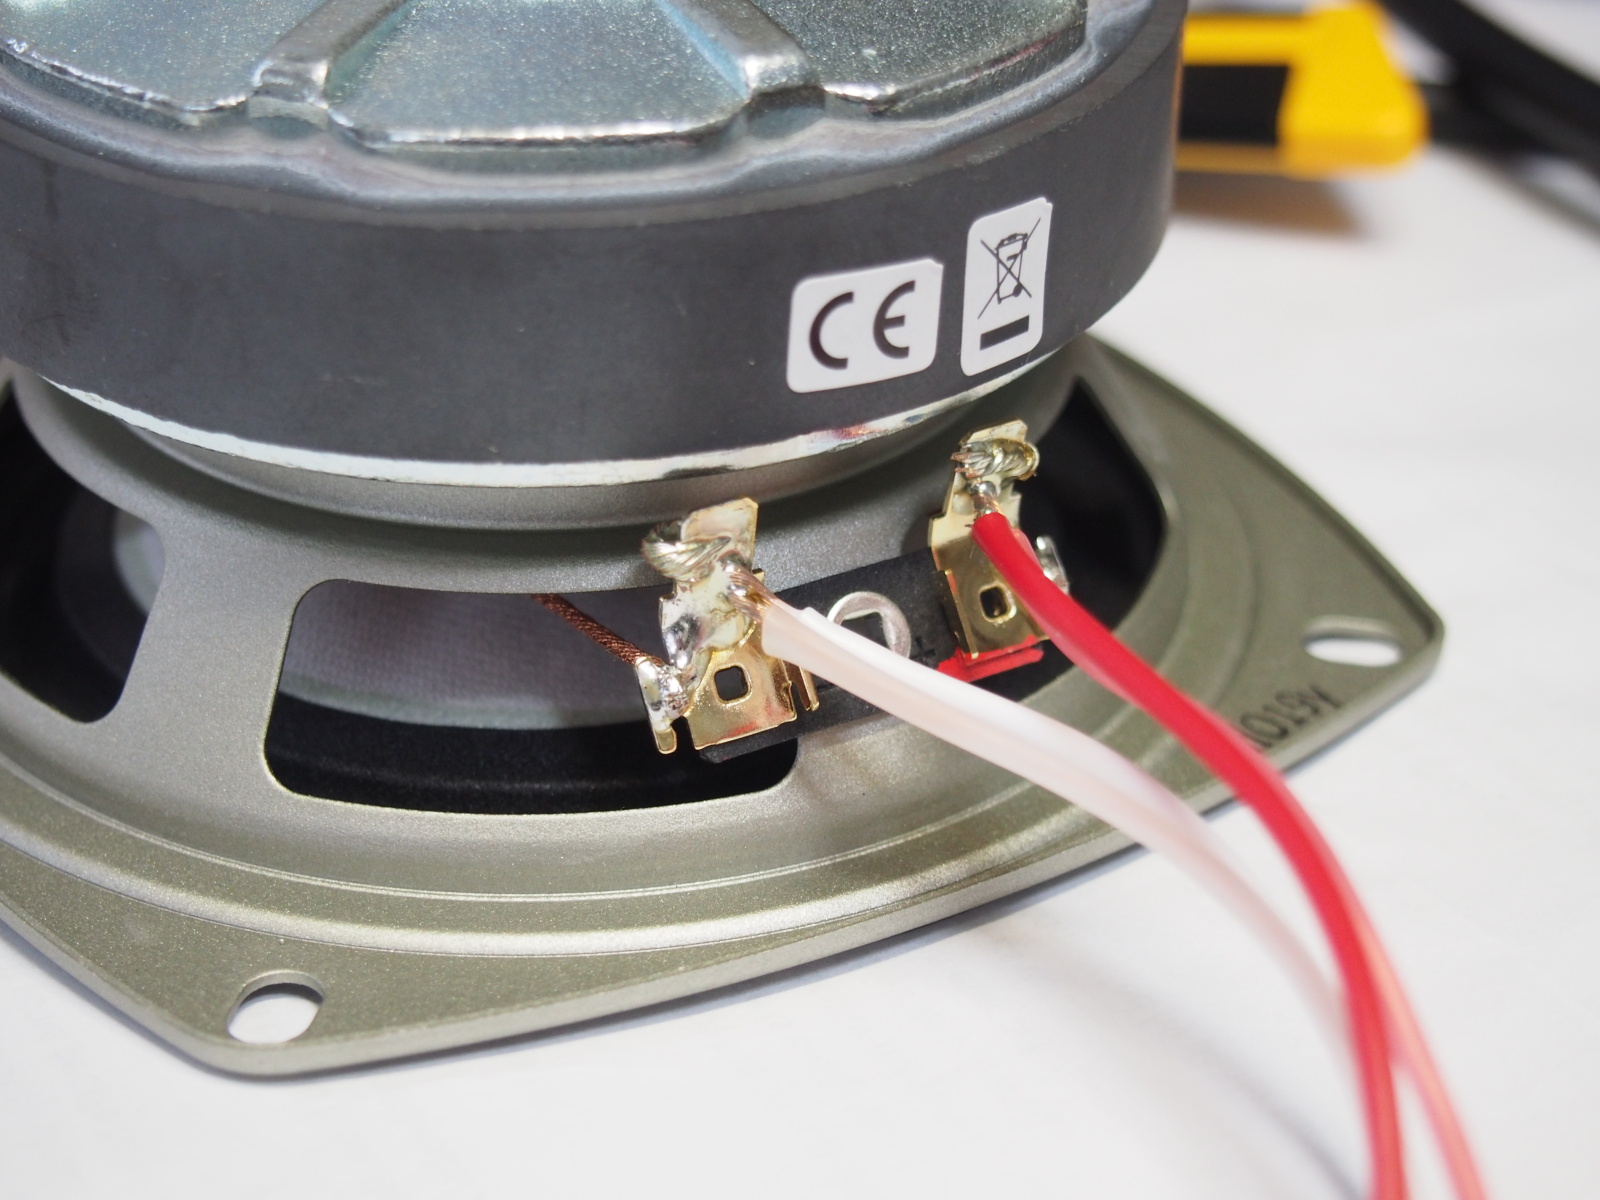
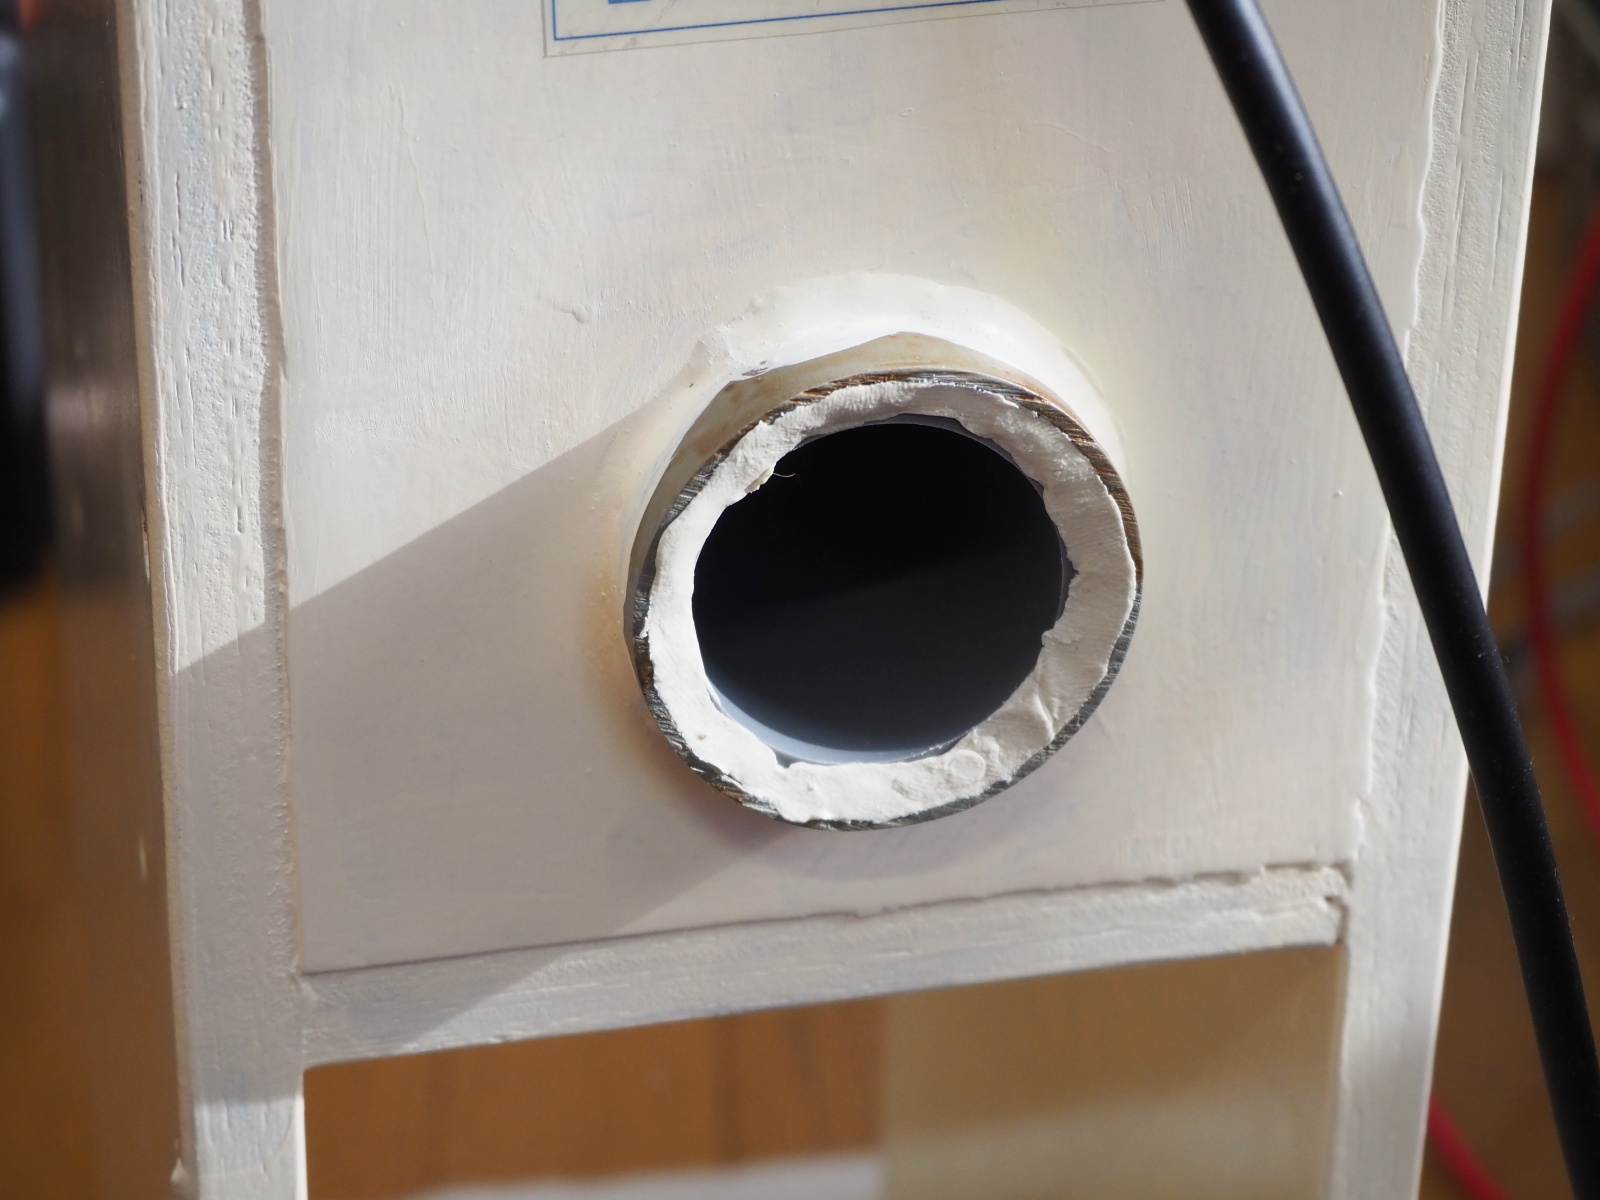
- (5) Tuning of bass-reflex
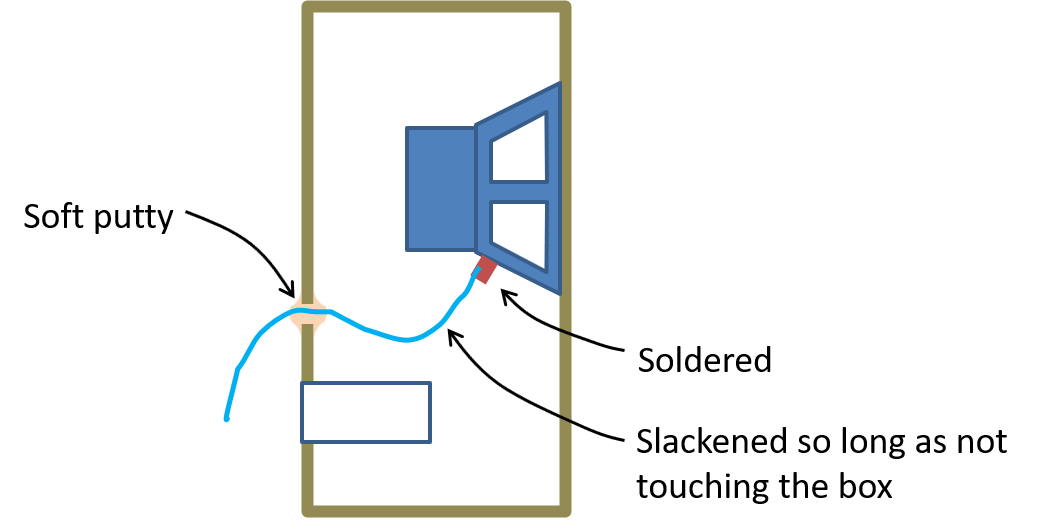
- I set the target of the duct resonance frequency (fb) to 72Hz, as said in the user manual of FF105WK.
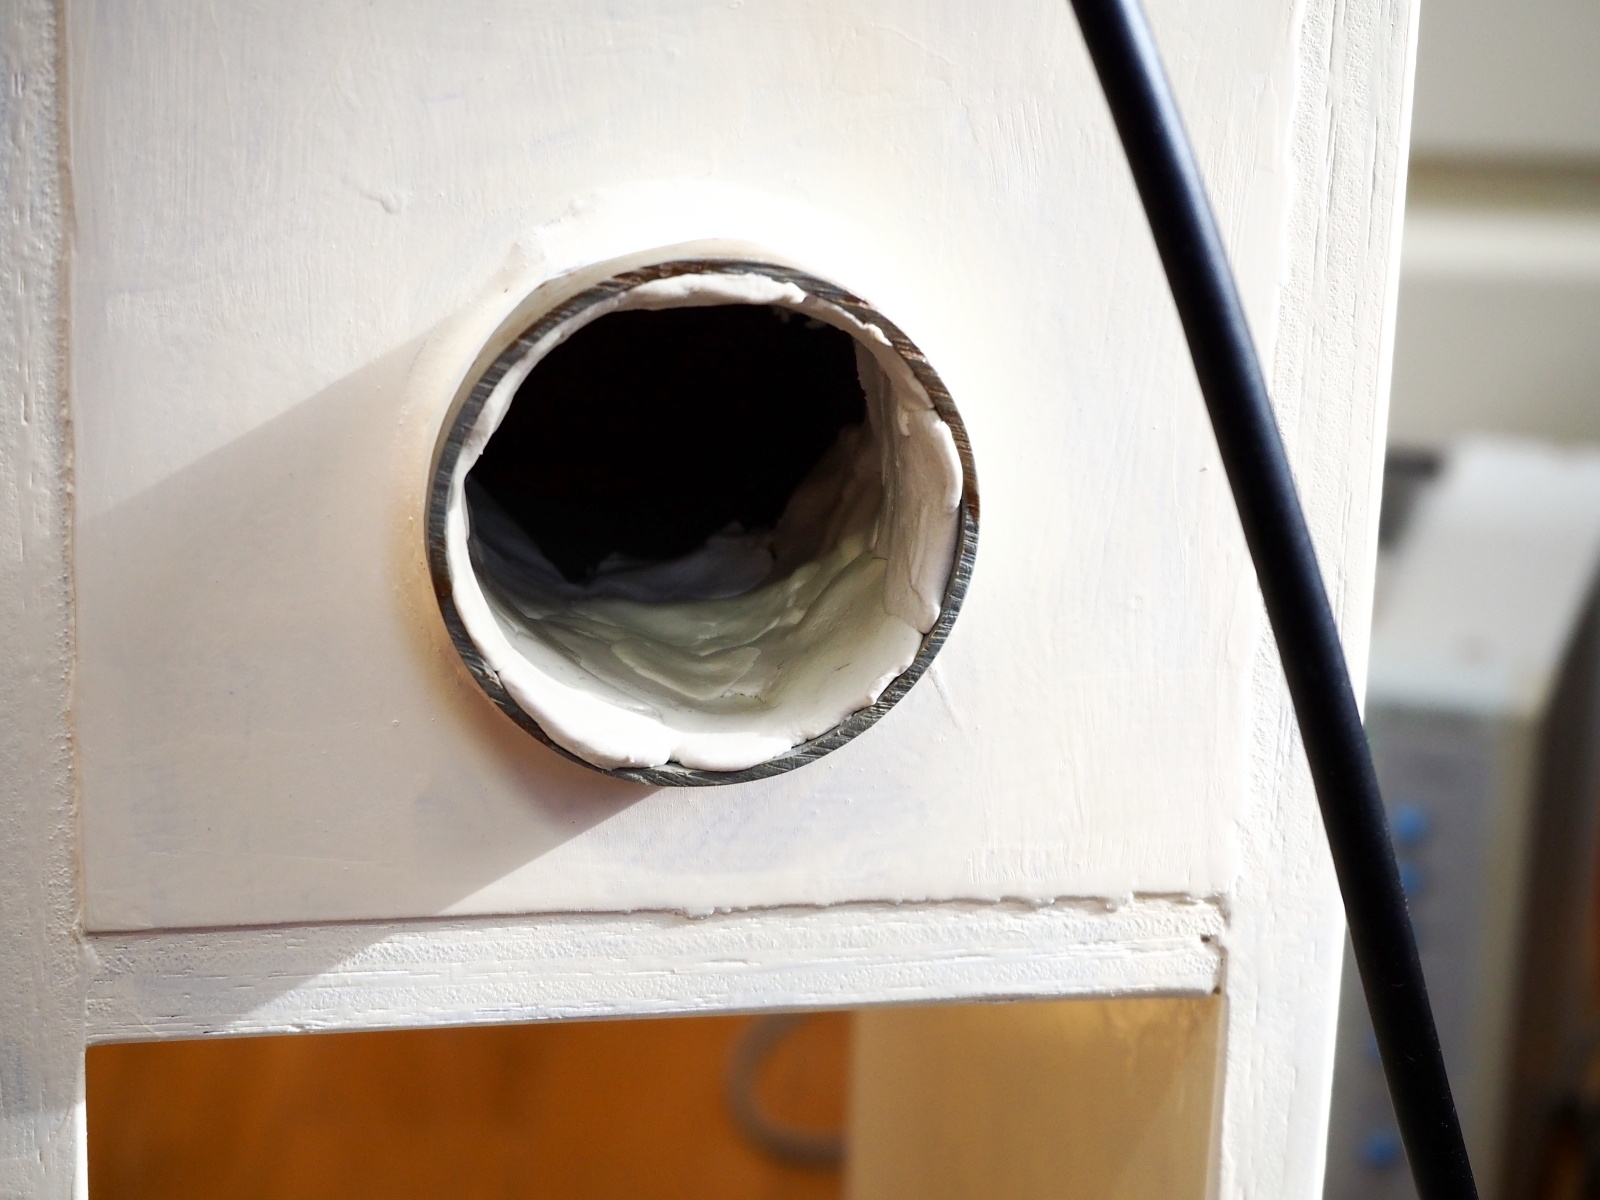
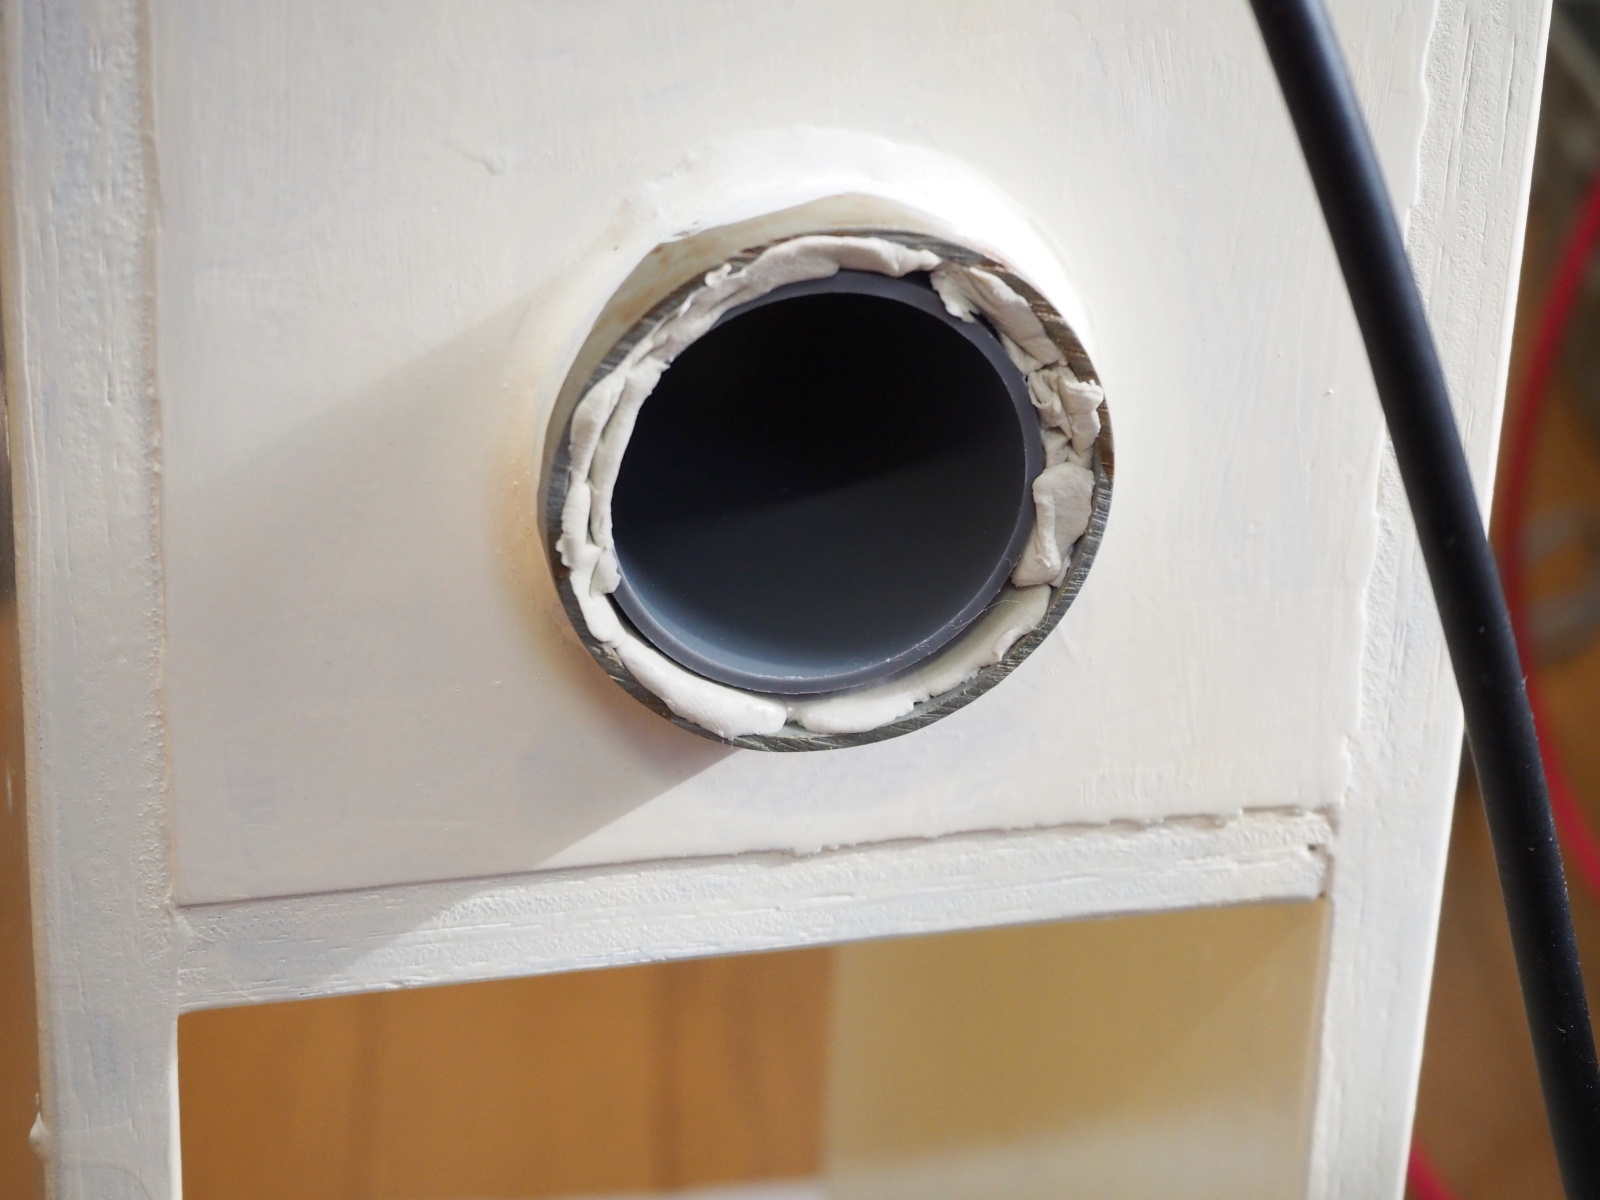
The dimension of the previous duct was 56(pi) x 115(L)mm. The calculated fb is 87Hz. The duct was made of VU50 PVC pipe.
The inner diameter of VU40 PVC pipe is 44mm. The 110mm long VU40 PVC makes the fb 72Hz, equal to the target. The target fb can be realized by inserting that smaller pipe into the previous duct and filling the gap with soft putty.
The real fb should be measured, because there may be an error. You can get the real fb from frequency response of the voice coil impedance or sound pressure level (SPL).
I made measurements before tuning the duct, because I hadn't made measurement when I built SS-312 in 2006, and I wanted to know if the real fb had been equal to the calculated one.
The details of the duct tuning is described in the section "Measurements & Tuning". See below.
Looks
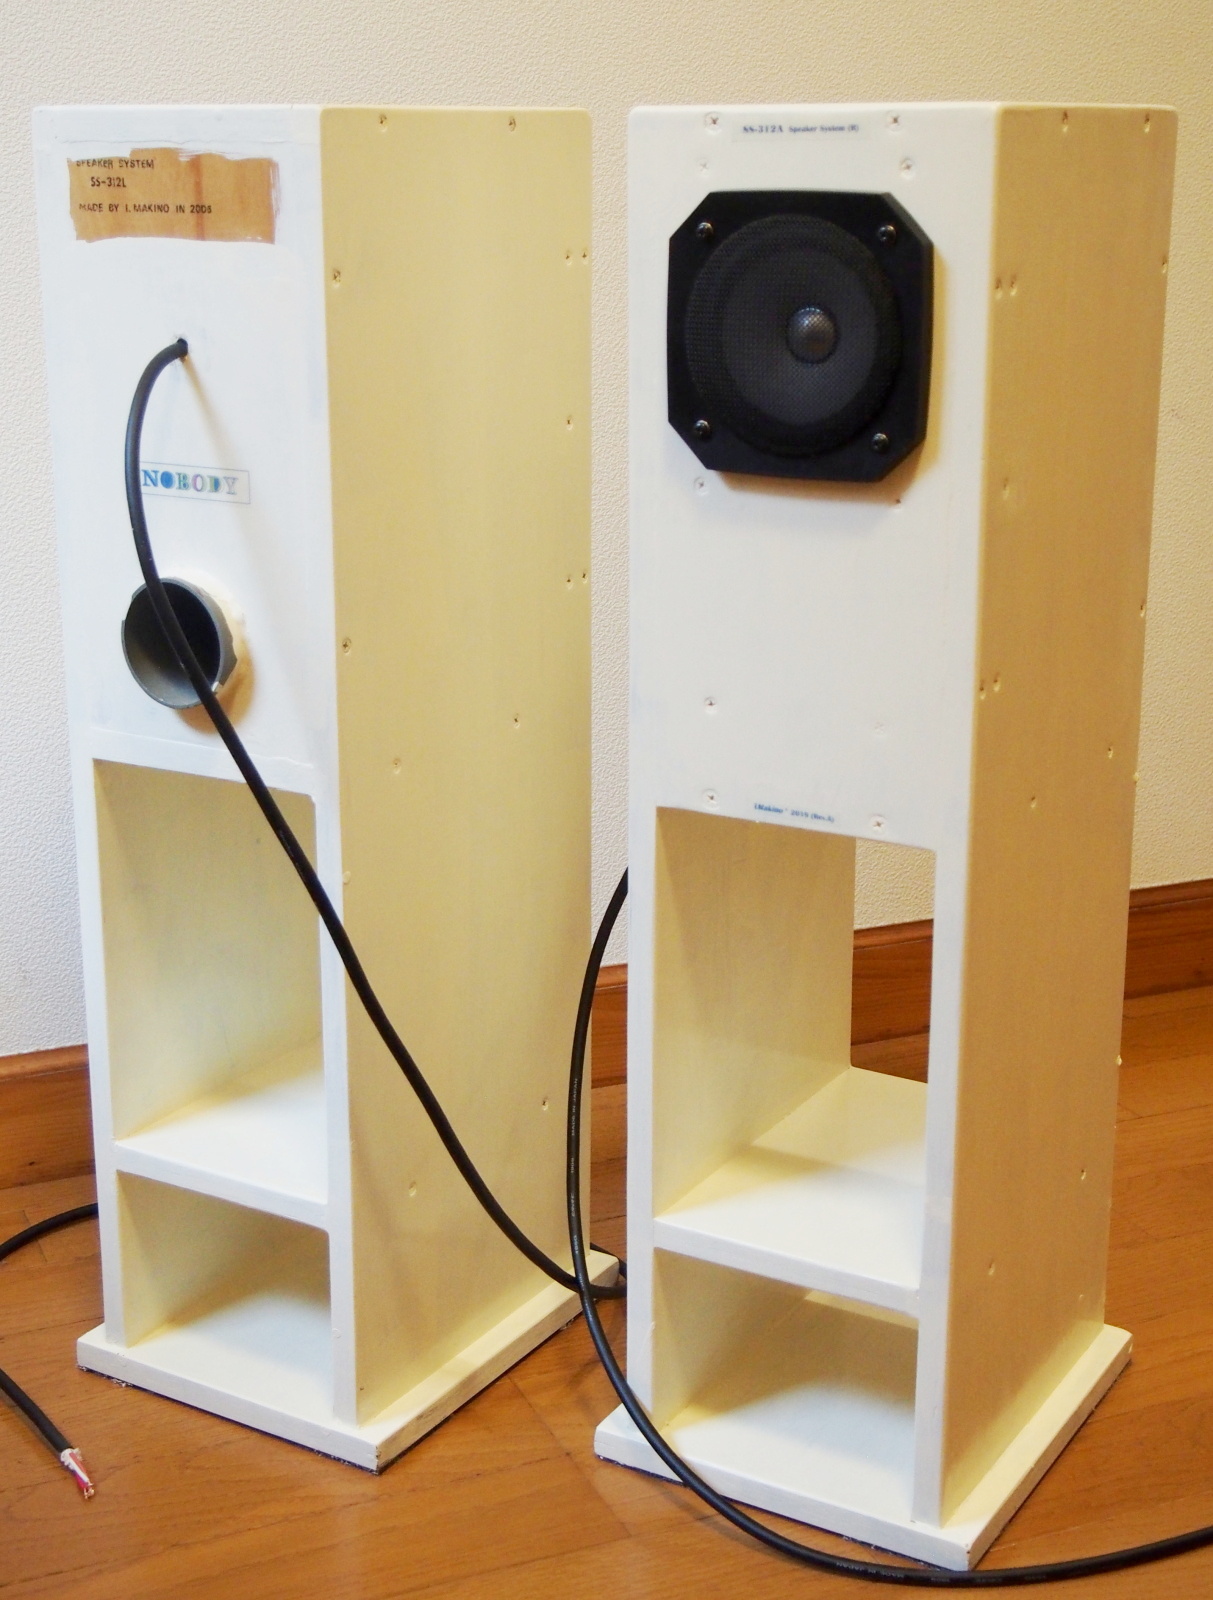
The looks of SS-312 turned to be as shown:
Measurements & Tuning
I applied my own method (Tonochi Methods) to measurements of loudspeaker for the first time.
Frequency response of SPL (sound pressure level) and phase was measured
in quasi-anechoic measurement method.
The distances between the LS unit and the microphone were 5mm in near-field
measurement, and 1m in far-field measurement. The merge frequency (fm)
was 1.4kHz.
The grilles were detached during the tuning.
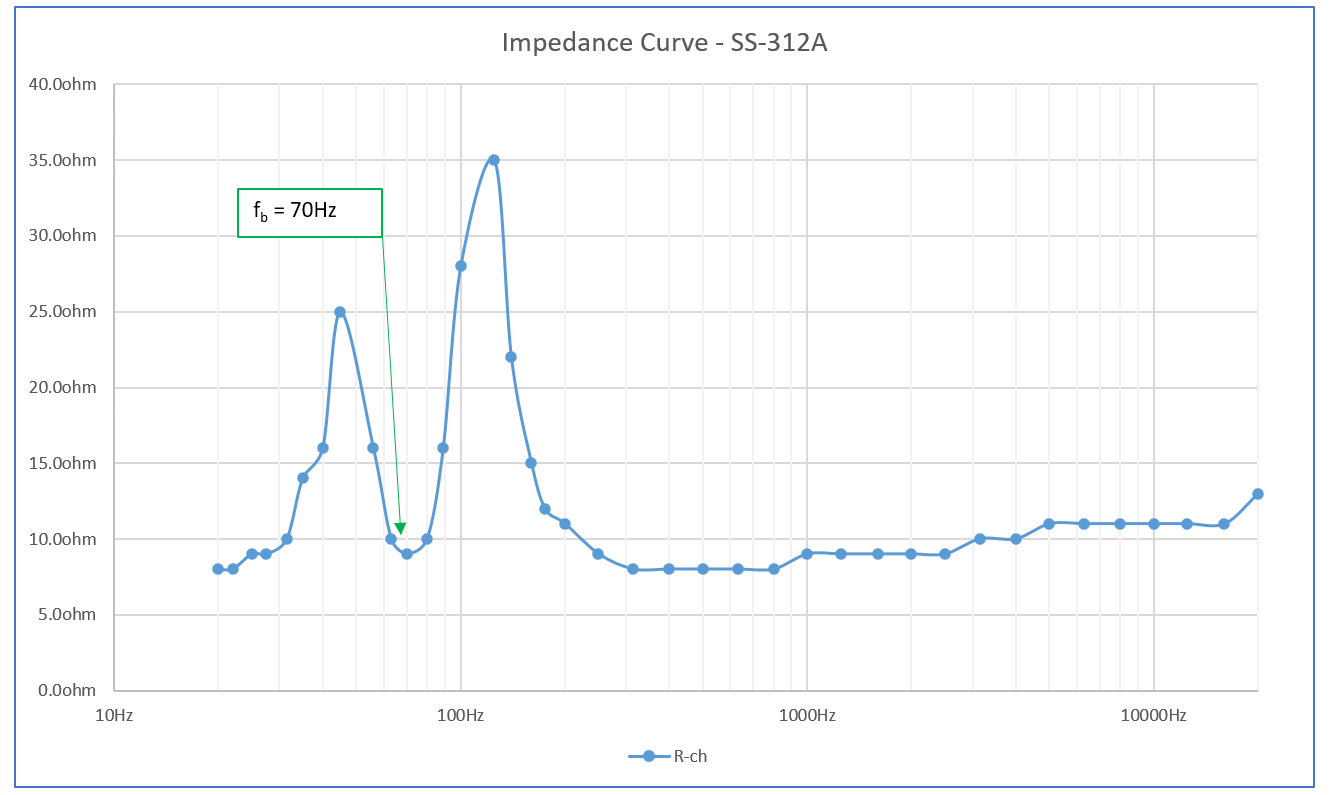
The two figures below show frequency response -- voice coil impedance (left)
and SPL (right) -- before tuning.
These are the measurements of the right unit of SS-312A. The left unit
had almost the same characteristics as the right, so the data for the left
unit are not shown here and hereafter.
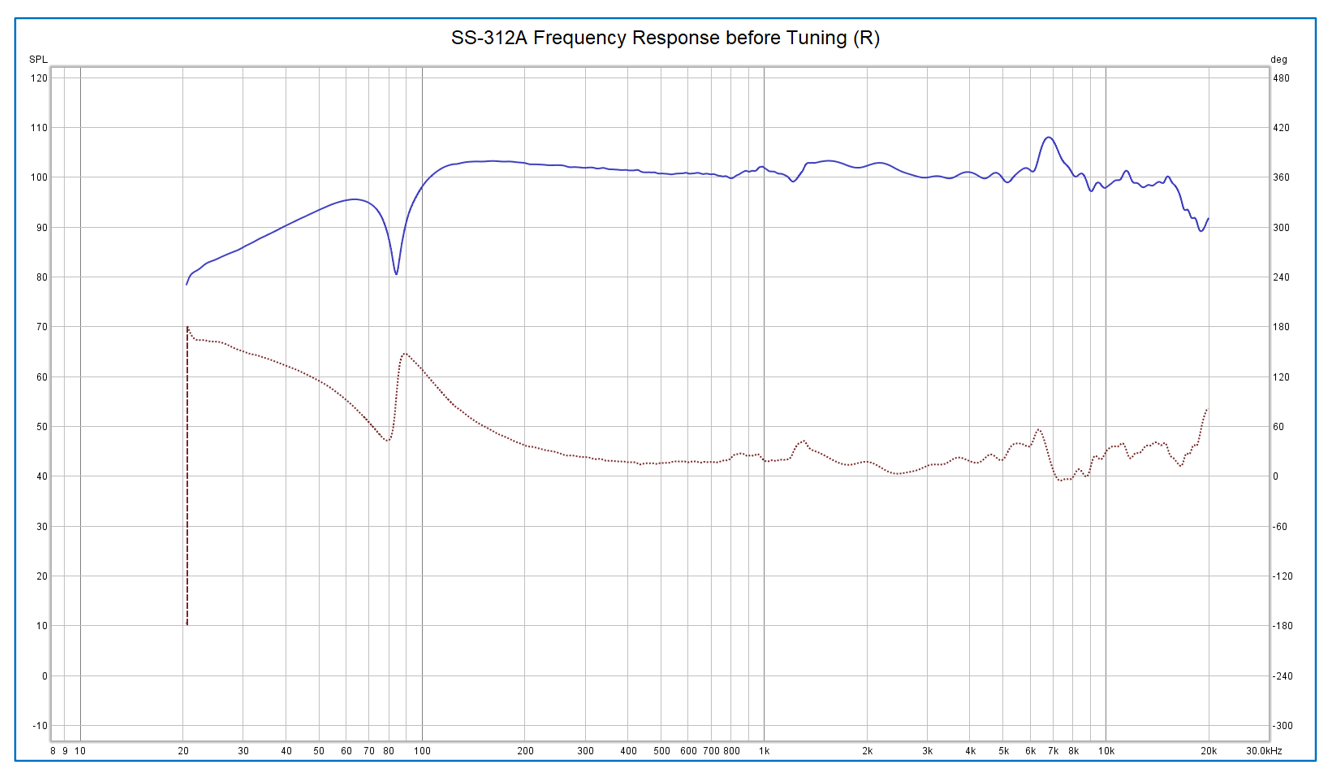

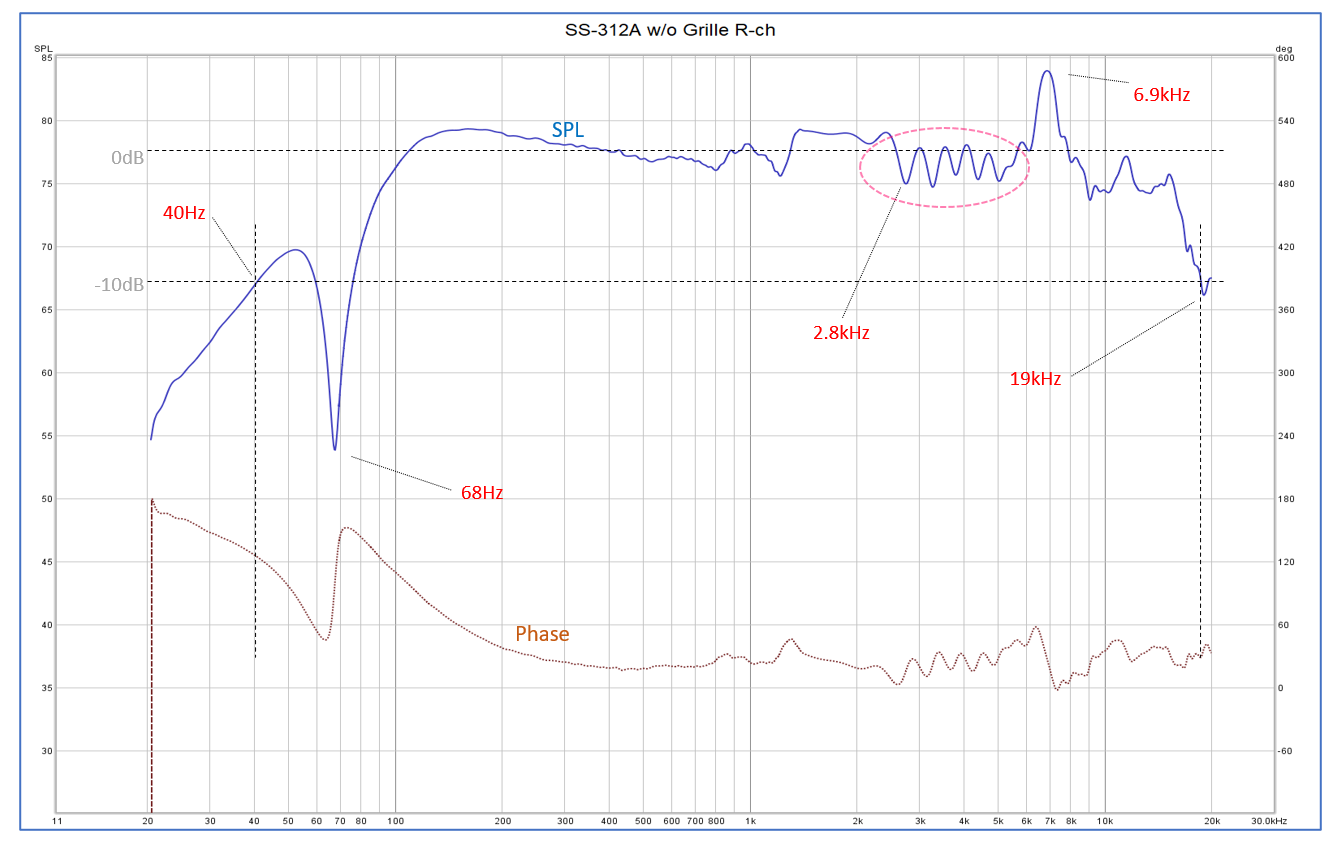
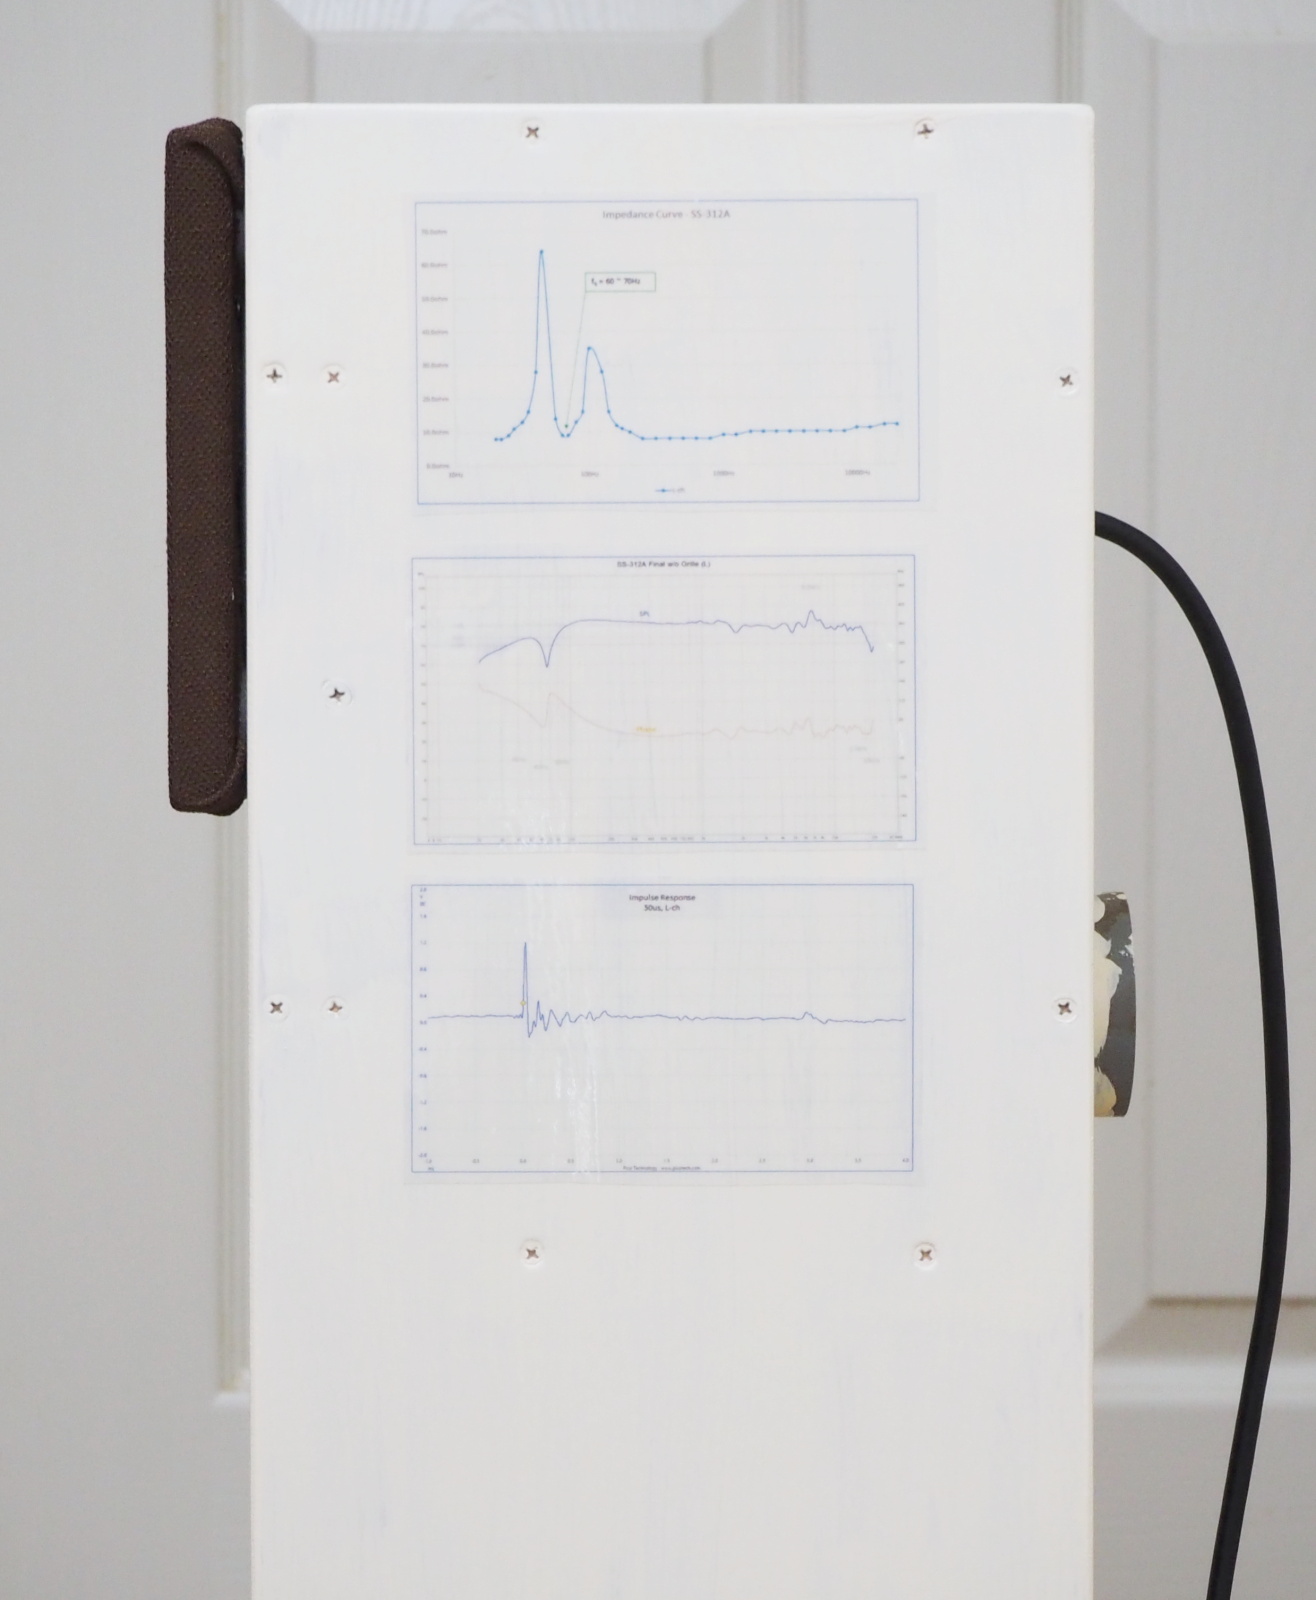
The real fb was just the same as the target (87Hz).
I was surprised that the SPL curve was very good. It's almost flat. Bass
was extended to 40Hz (-10dB cutoff). Excellent! I played my test record,
and it sounded so good. It seemed tuning wasn't necessary.
By the way, the dip around 80-90Hz is caused by the duct's resonance. I
suppose it's because the microphone is placed so near the diaphragm (only
5mm in this case) for the low range that it can catch the sonic wave from
the diaphragm only. At the listening position, this dip doesn't appear,
because the sonic wave comes out in phase from the duct at the resonance
frequency and the mic catches it.
The peak at 6.8kHz is caused by the LS unit itself. The same peak can be
seen on the catalogue of FF105WK. I suppose Fostex intentionally made this
peak in order to make the sound more vivid and lively.
 |
 |
| Near-field measurement | Far-field measurement |
I wondered if I could skip tuning when I saw this good result, but I got
over the temptation.
I modified the bass-reflex ducts and sound absorber.
I lowered fb by inserting the smaller pipe (VU40 PVC pipe) into the previous duct (VU50).
 |
 |
 |
| Duct lined with soft putty | New duct inserted | Finished |
Frequency responses of voice coil impedance and SPL were measured once again.
Fb became 68Hz, which was lower than the target. It's not a big issue. But the response
in high region wasn't flat (the vertical axis is zoomed up to clear up
the unevenness in the above figure).
It seems that this unevenness was not caused by the modification of the
duct. Probably, it's due to a mistake I made in the first measurement.
I wasn't used to the quasi-anechoic measurement. I merged the far-field
data to the near-field data. It is the wrong way. The near-field data must
be merged to the far-field data, and the curve became almost flat. I reflected
on it, and have decided to save raw data before the signal processing.
I gussed that the unevenness at 2.8kHz and higher was caused by standing
waves in the enclosure. The upper and the back walls were lined with sound
absorber, but the left and right walls were not. The distance between the
left and right walls is 134mm. The wave lenghth of 2.6kHz sine wave is
the same as this distance (lambda = (1/f[Hz]) x c[m/sec] = (1/2600[Hz])
x 345[m/sec] = 0.133[m]). So, I added sound absorber on the left and right walls to eliminate the standing waves.
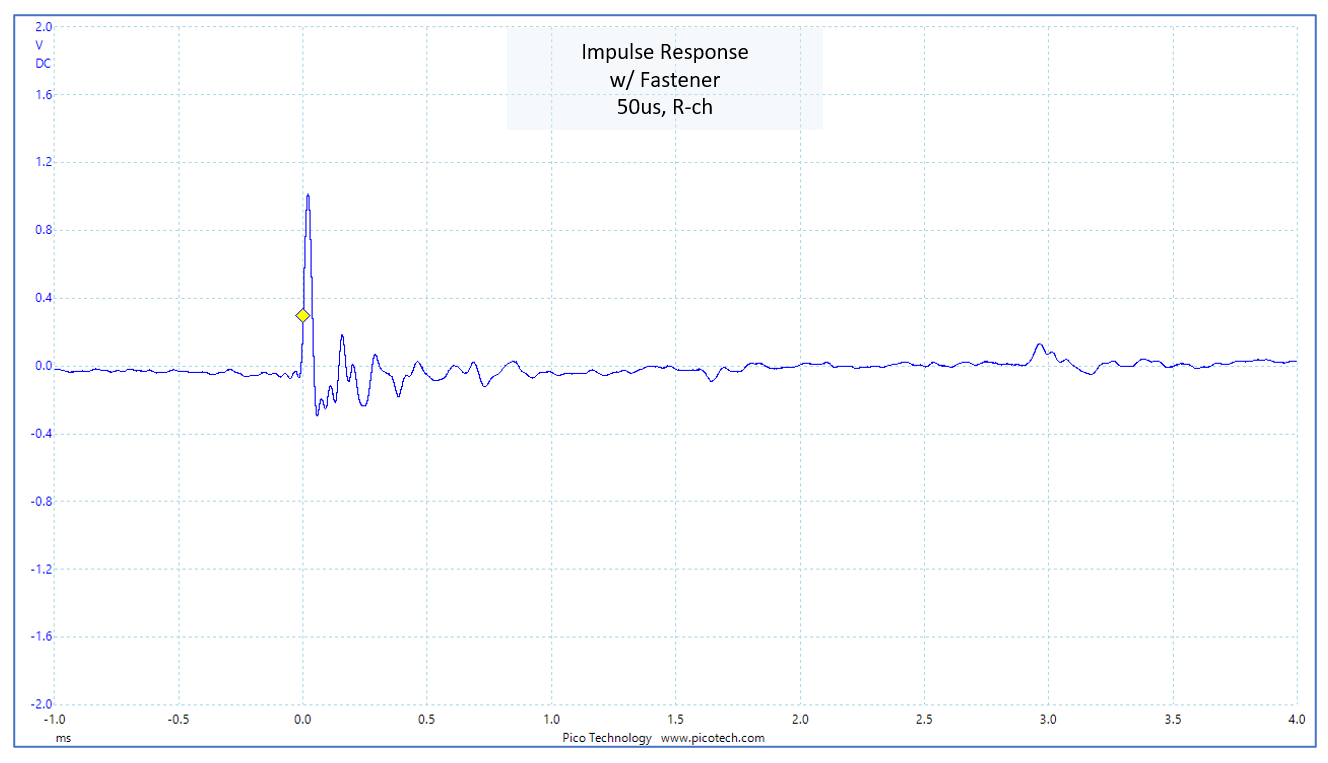
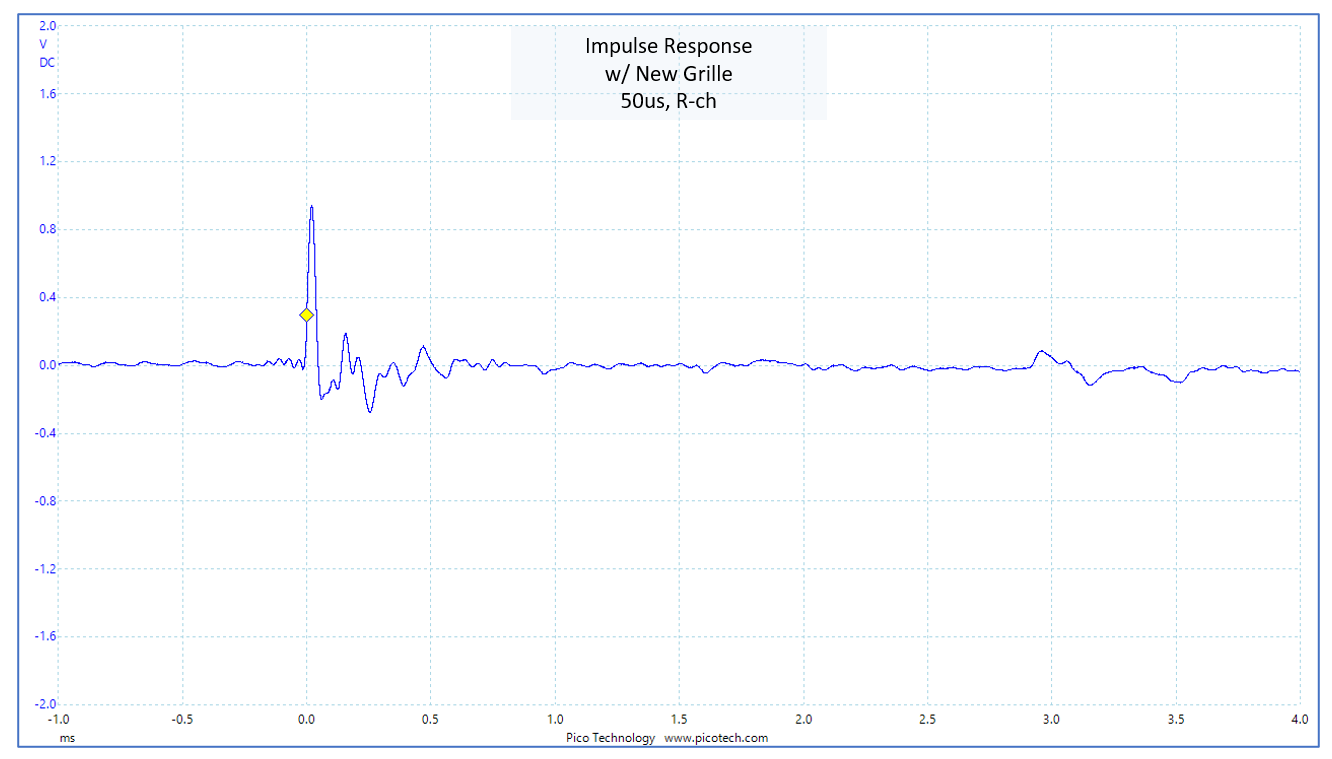
The measurements were made again. The lower right figure is impulse response measured with oscilloscope (not measured with REW). The test signal is impulse of 50us.
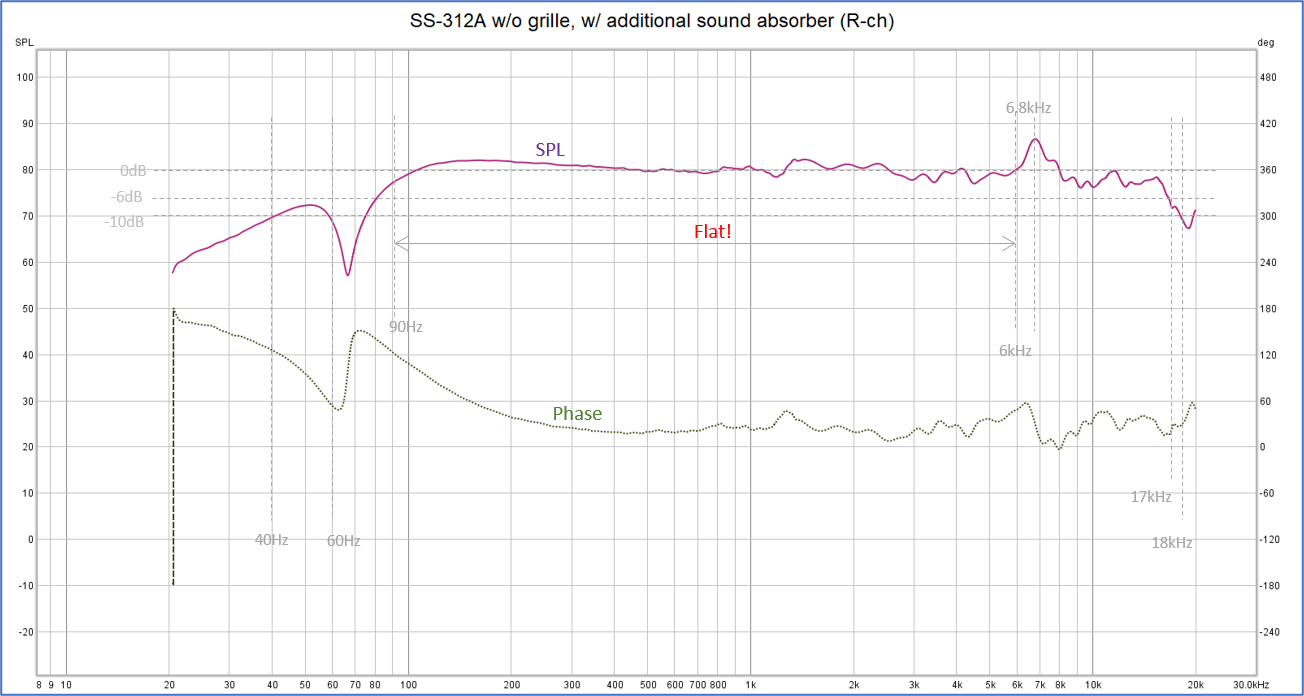
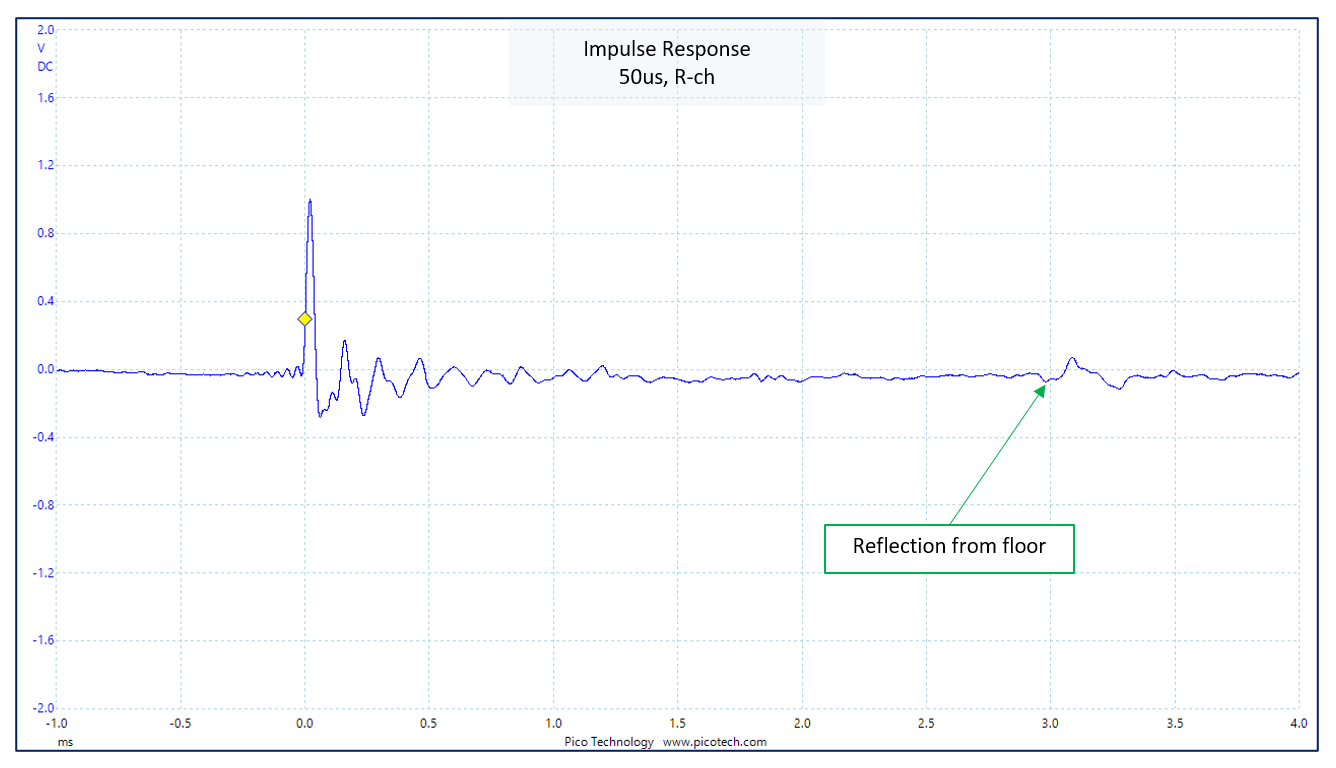
Wow! Perfect! The frequency response was flat from 90Hz to 6kHz. Ignoring
the peak at 6.8kHz, the flat response extended to 16kHz.
I played my test record, and SS-312A sounded so good. That's a pleasant
surprise.
I concluded the tuning. I attached the grilles, and made the final measurements.
The mic couldn't be placed close enough to the diaphragm, since the grille
blocks it. So, the error increased slightly in the near-field measurement.

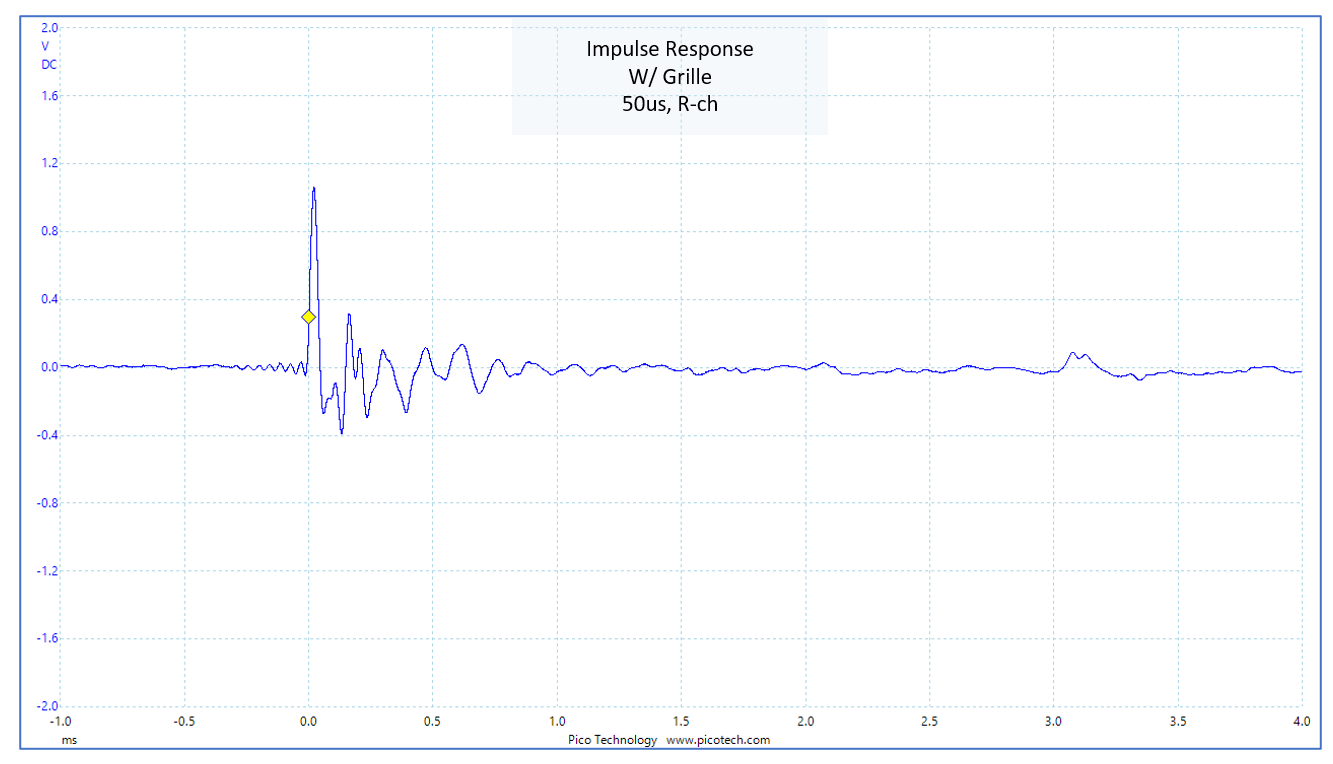
I was so disappointed. The grilles impaired the good performance. The frequency
response was uneven at frequencies between 1.2kHz and 5kHz. The waveform
in the impulse response was also distorted.
I had thought this Fostex grille was questionable, but I hadn't anticipate
the distortion would be that big. I think the frame of the grille, which
surrounds the LS unit, caused the distortion at high frequencies with so-called
cavity effect.
I felt the distortion too when I played my test record. Especially, sibilance
of vocal sounded harsh. In addition, localization turned to be a bit unstable.
SS-312A sounded so good without the grilles. I didn't feel like leaving
it as it was.
The Fostex grille can't be removed easily, since it is screwed together
with the LS unit. I decied to abandon the Fostex grille and make detachable
grilles myself.
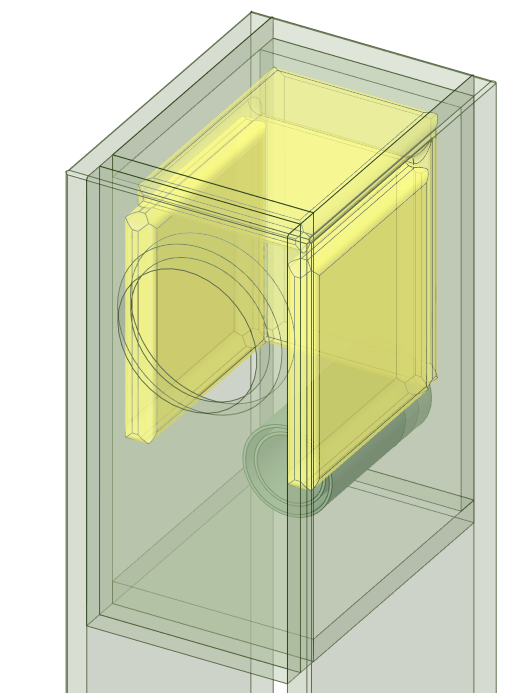
The following figures are the renderings and dimensional drawings of the
new grille:
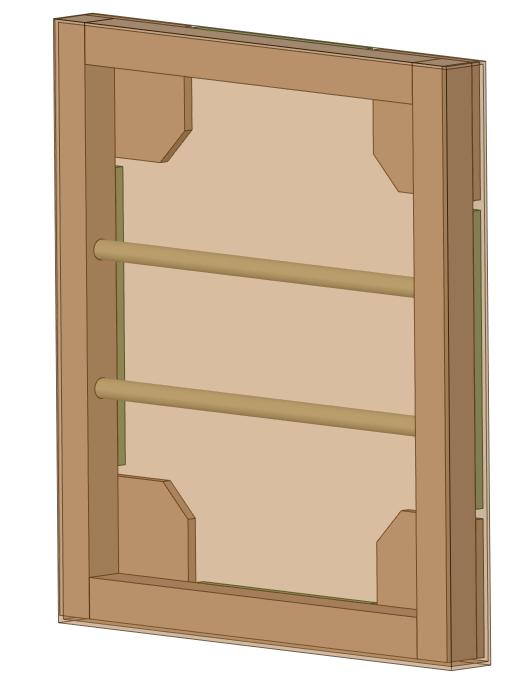 |
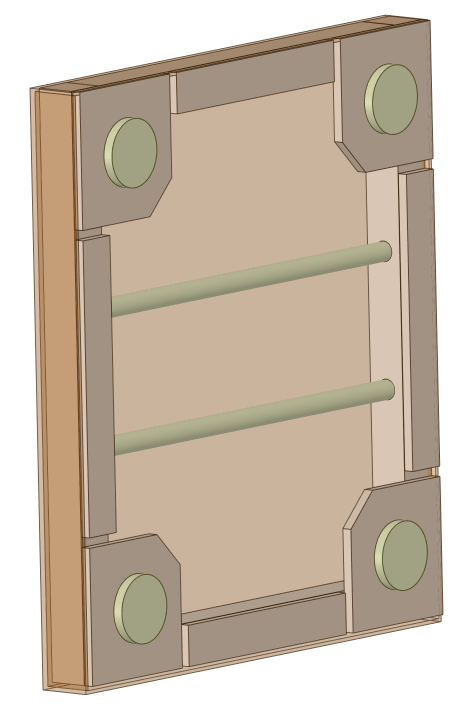 |
 |
 |
| Rendering (front) | Rendering (back) | Dimension (front) | Dimension (back) |
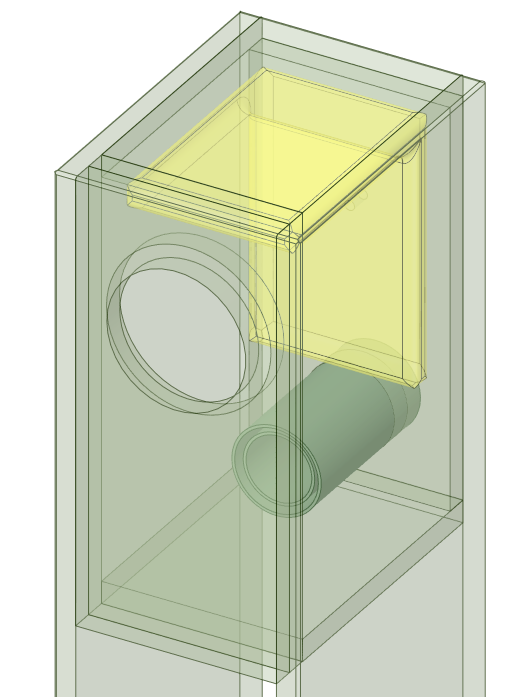
The net is the same one as in SS-309 (I kept the remains). The frame is made of 12mm square bar of Japanese cypress; the two guard bars are 6mm plastic round bar; the reinforcement is made of 3mm-thick lauan plywood board. The grille should be attached to the enclosure with grille holders, but it is necessary to bore holes in the baffles, and I was already tired. So, I decided to use Hook-and-Loop fasteners instead.
 |
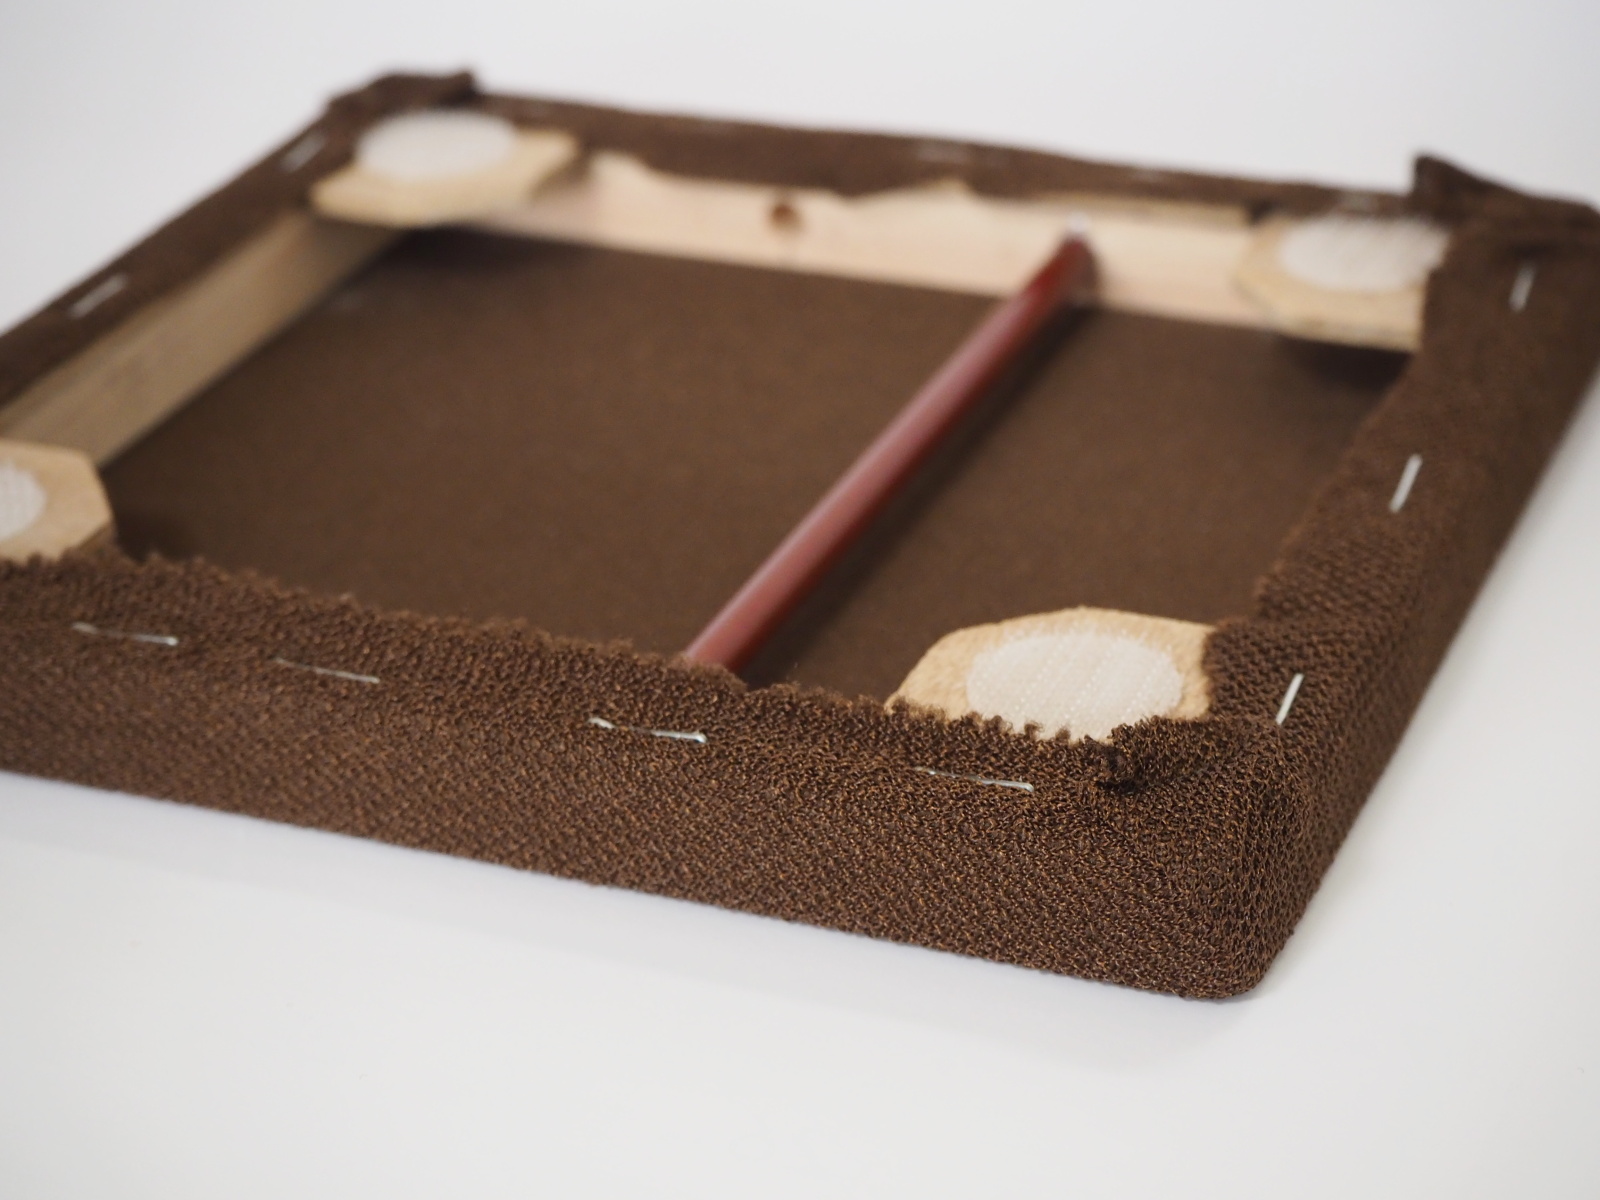 |
 |
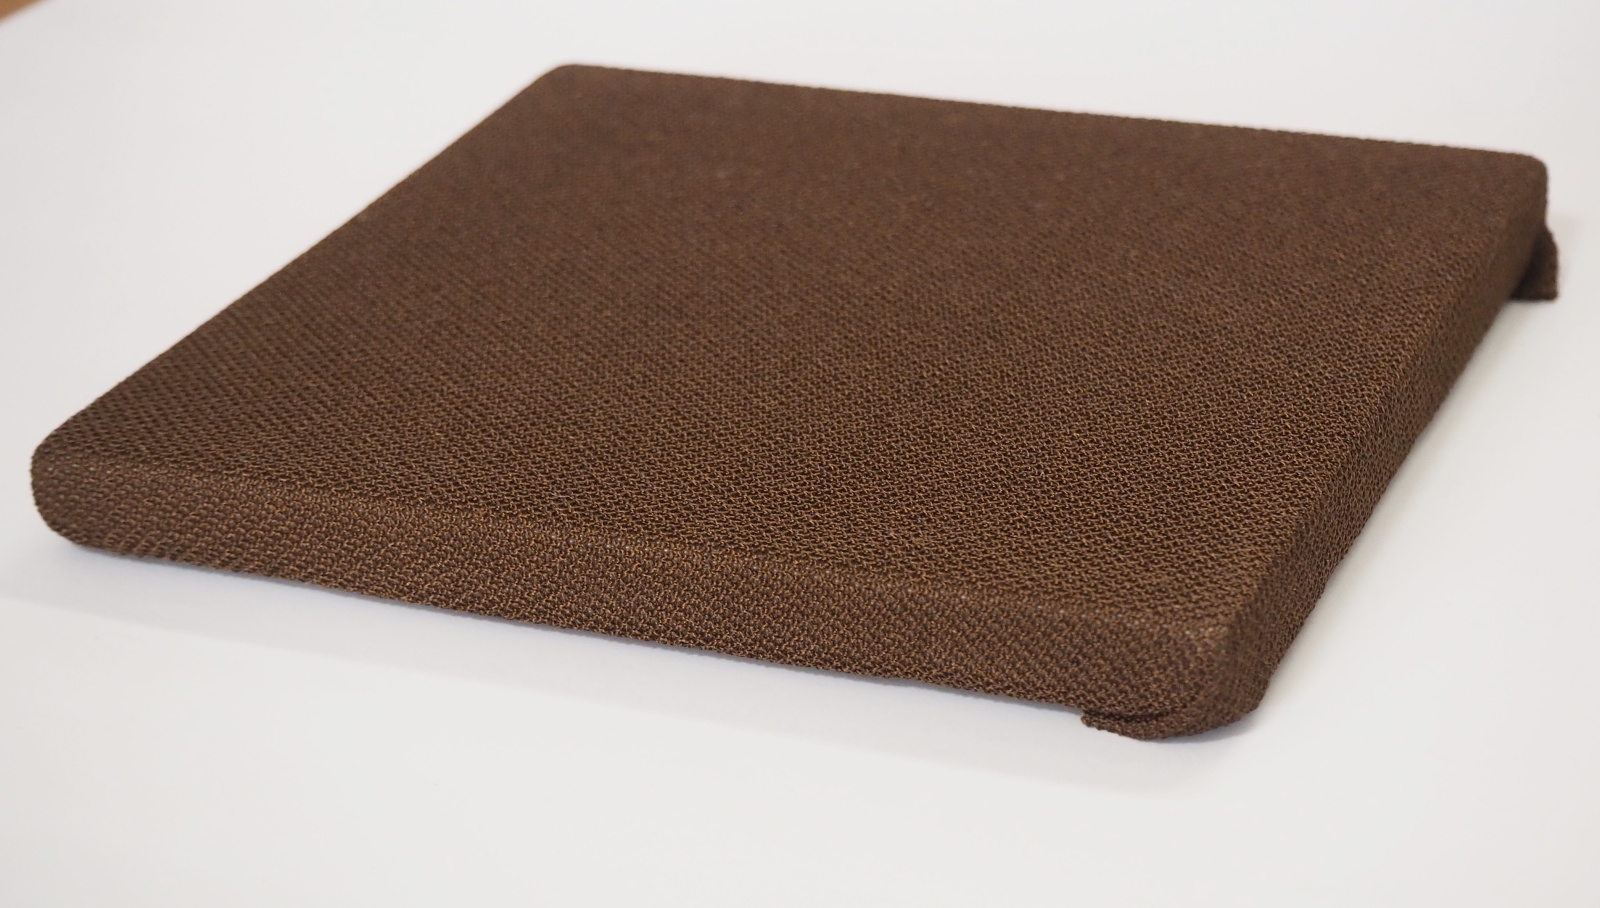
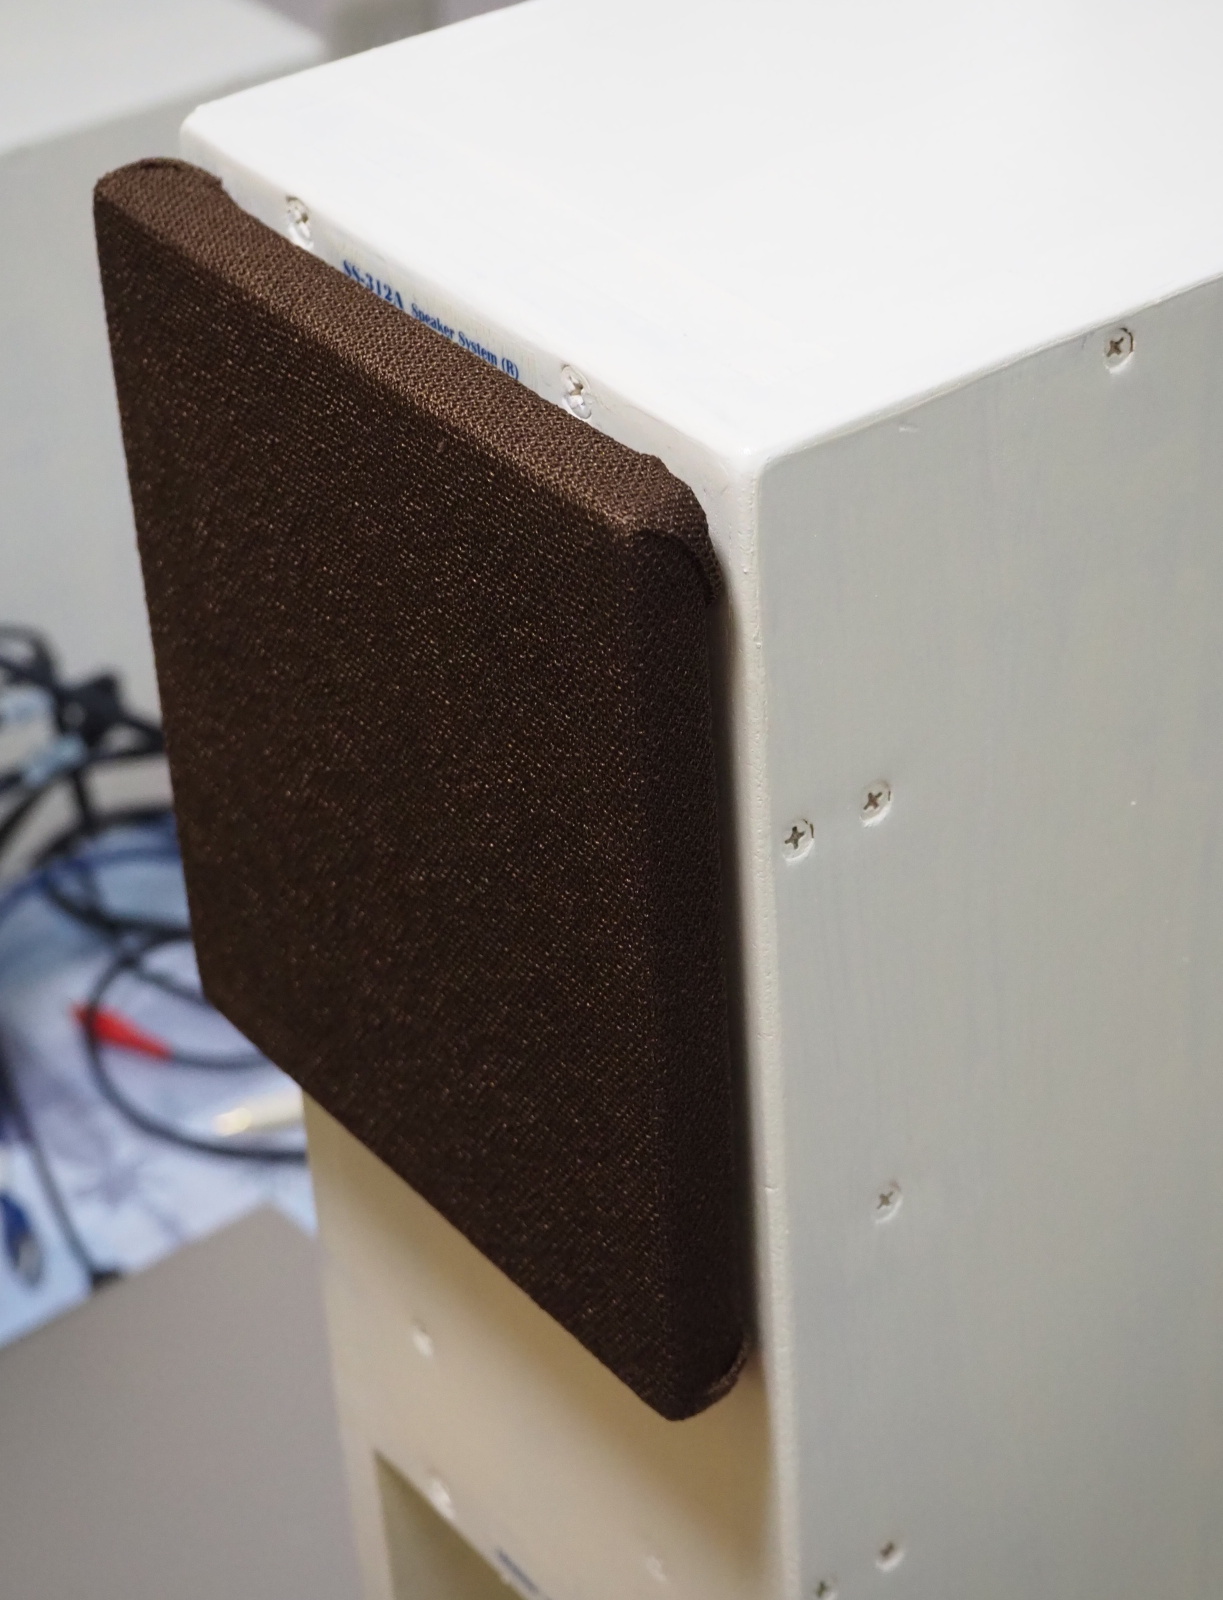 |
| Grille (front) | Grille (back) | Fasteners on baffle | Grille attached |
I fixed the net on the frame with a stapler. I placed an order of the plasctic
round bar on an e-commerce website, but I cancelled it because I received
an email that said they were unable to set the delivery date due the COVID-19
pandemic. I substituted it with bakelite round bar I bought for PA-210
Simplicity (I kept the remains). Unfortunately, the bar was so short that
I could get only one guard bar for each grille. Sometimes you should compromise.
I did all the works, design, purchase, woodwork and assembly, in one week.
I spent a couple of hours a day. It was a good job for me.
The problem was solved?? I made measurements one more time.
The following charts show characteristics with the grilles detached.

Damn! The phase shifted up and down in high treble. I didn't anticipate
that the fasteners affected so much. But I was wrong. I became painfully
aware that anything but the LS unit mustn't be attached on the baffle.
However, SQ didn't deteriorate so much. The focus of sound image became
slightly bad, but I didn't feel any airy artifact as in the case of Fostex
grille. SQ was good.
I concluded tuning. I didn't think the further tuning was necessary for
the loudspeakers of the subsystem.
Finally, I made measurements of SS-312A with the new grille attached.
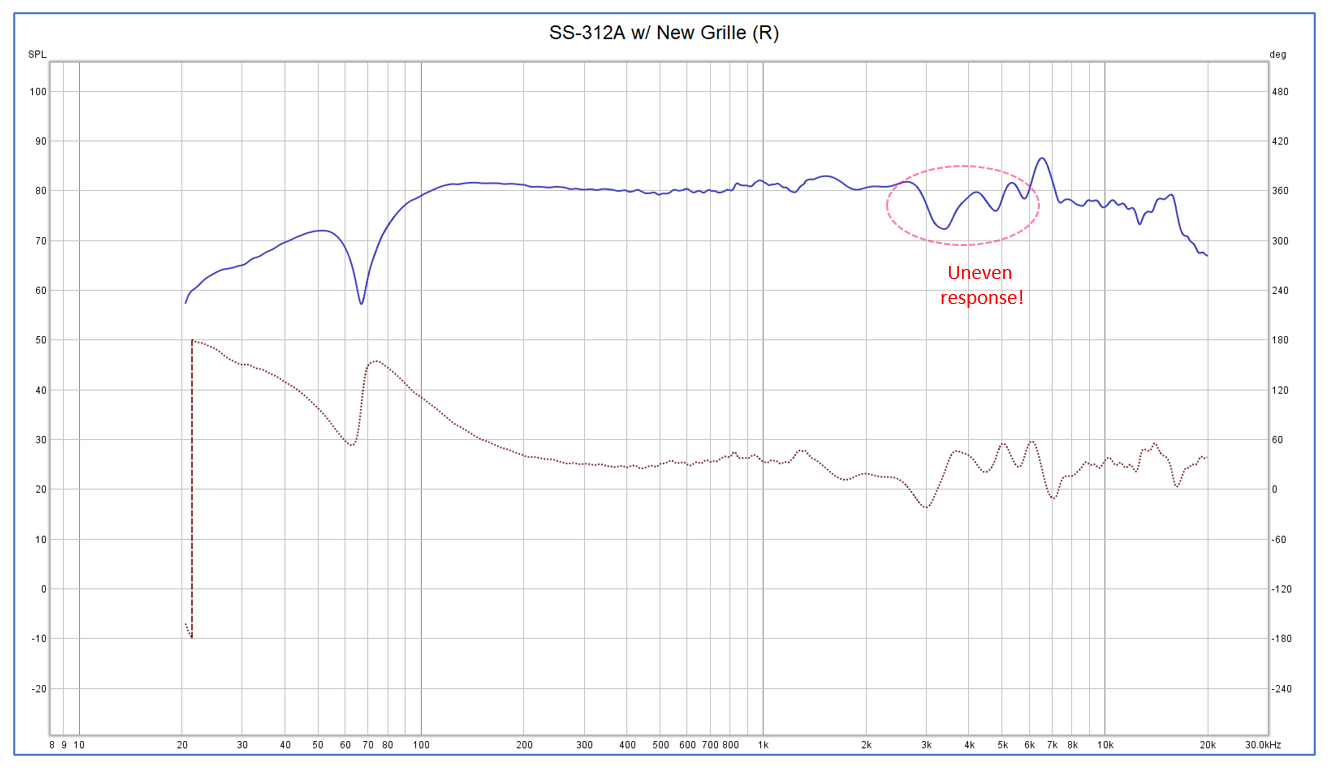
The dips were deeper than without the grille, though, the curve was similar.
The SQ wasn't different so much. It is lucky it wasn't worse. It is preferable
to attach the grilles when I listened to music. I don't feel like listening
to music when the LS units are uncovered. Some people don't care whether
the LS units are exposed or not. I prefer they are covered.
My Own Review
Looks
The looks has changed due to the new grilles.
The color of the grille (brown) fits with that of the enclosure (cream)
as they are similar colors. The net of the grille and the paint of the
enclosure are both remains of other projects, but they happen to be good
combination. I was lucky.
The uneven coating is rather attractive to my eyes (self-praise?). It's a taste of home-built equipment.
I affixed stickers on which the measurements are printed on the side of the enclosures. They are commemoration that I tuned loudspeakers based on measurements for the first time. They are good decoration.
I am rarely satisfied with looks of my home-built equipment,but I am this time.
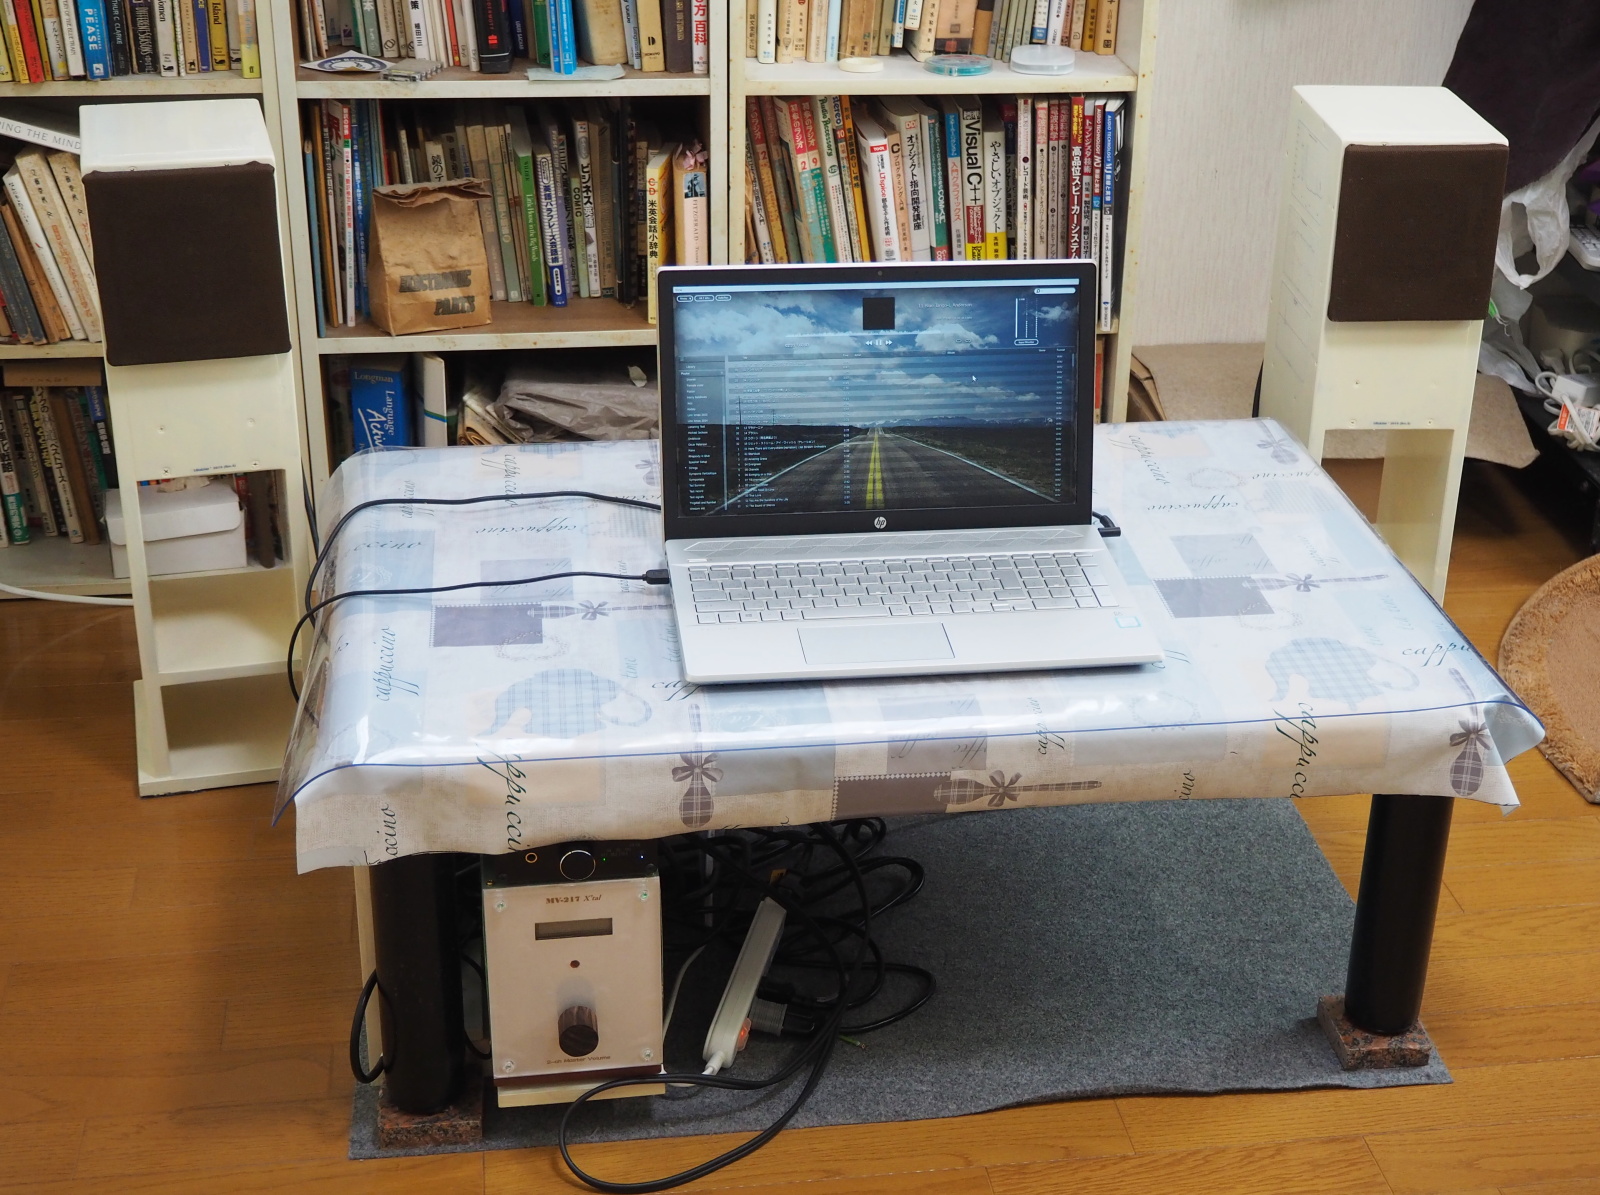
The last picture shows SS-312A in the subsystem Kinglet. The picture was taken before system-level tuning is done. The position of the loudspeakers is just tentative.
Sound Quality
The sound quality (SQ) of SS-312A is better than I had expected.
The most noteworthy thing is bass response. I was flabbergasted when I
heard the bass drum of Ondekoza with SS-312A for the first time. The frequency
of its resonant bass is 28Hz. Ordinary loudspeakers are unable to reproduce
it at all.
[2023/01/28 added] {The fundamental frequency of the bass drum is 56Hz, and 28Hz is its subharmonic.
Even if the subharmonic can't be reproduced, the strength of the bass drum
sound should be felt if 56Hz of the fundamental can be reproduced}
I used to be a regular customer of an audio shop. I listened to almost all the loudspeakers sold at the shop. I encountered no loudspeakers whose woofer was 20cm or smaller and could reproduce the sound of the Ondekoza's bass drum. The small woofers could reproduce only 'boom' sound that was produced at the moment the performer hit the drum. Some of them even failed to reproduce the boom sound and sounded like a toy drum. I remember I was dumbfounded loudspeakers like those were sold at an audio shop.
Needless to say that SS-312A is unable to reproduce the super low of 28Hz perfectly. But isn't it great that you can hear the super low though it isn't perfect?! I played other pieces of music that included deep bass, and I was satisfied with massive bass.
This excellent bass response has been acheived by a know-how that's special
in DIY audio.
The fb of SS-312A is 66 to 67Hz. It is a little lower than the target (72Hz).
I intentionally leave it as it is. In addition, I added sound absorber
a bit too much, so that the resonance of the duct is damped. These things
extend the low (-10dB cutoff frequency = 40Hz), and make the cutoff curve
gradual.
That characteristics is the result of the quasi-anechoic measurement. In
realty, bass is boosted by the floor and walls. The real cutoff may be
30Hz or so (sorry, I don't have the evidence because I haven't done system-level
tuning yet). This is why SS-312A can reproduce the super low of 28Hz (though
its SPL is 10dB lower than the original).
[2023/01/28 added] {The decrease at 28Hz turned to be -23dB. But the low is extened to 50Hz
without decrease, so the bass response is good enough}
This method,where the floor and walls are utilized to boost bass, was already
applied for the tuning of SS-309 and proved effective. It's a speical method
for DIYers, and not applicable for product design.
Designing and tuning audio devices to fit with the room acoustics is the
most advantegeous aspect in DIY audio. Witout complex mechanisms(like backloaded
horn) and/or circuits (like graphic equalizer), high SQ can be achieved
with simple components.
On the other hand, I am not so satisfied with SQ in treble region.
It's inevitable for full-range LS units that the treble is in the breakup
motion range and SPL and phase slightly differ between the left and right
channels at high frequencies. This phenomenon causes blur sound image and
unstable sound localization. Besides, the Hook-and-Loop fasteners affixed
on the baffles caused phase shifts and distortion in treble more than I
had anticipated.
Although the peak around 7kHz, which is the character of FF105WK, makes
the sound vivid and dynamic, it shifts phase and makes sound localization
a little unstable.
I began using a test record "2xHD Audiophile Speaker Set-Up (DSD5.6M)"
for checking stereo imaging (this record doesn't mean vinyl disc. It's
downloaded music files).
When I played the truck #2, I heard the sound of the trumpet from the left
which must be heard from the right. I was disappointed as Gaudi II doesn't
have this problem.
Note, however, that this test record was recorded richly echoic studios
and concert halls. It is challenging to reproduce its sound stage. Though
the sound of the trumpet should be located on the right, the left channel
includes considerable level of the signal of that instrument. It demands
very high quality audio system.
When I played records of jazz and pops that I am familiar with, the sound
localization was accurate and stable. I think SS-312A has enough quality
for music appreciation, though its quality isn't highest.
As a whole, I am satisfied with SQ of SS-312A. It is the first time in my half-century audio life to encounter a loudspeaker using a 10cm LS unit which can reproduce deep bass. I said I'm not satisfied with its treble, but that is so critical an evaluation. SQ of SS-312A is satisfactory for easy listening to music appreciation.
By the way, which improvement is the most effective?
Frankly speaking, I'm not so sure. You should implement a single improvement
and evaluate it to figure out how much it is effective. But I don't have
enough physical strength to do that. I have no option but implementing
multiple improvements at a time.
The following opition is based on surmise.
The most effective improvement is no doubt the replacement of the LS units.
I suppose the next one is the screws and insert nuts. Wood screws can't
be tightened strong enough. There remains a slight play between the LS
unit and the baffle, and that deteriorates SQ in high and super high regions.
I don't think the speaker cable and the spade terminal are so influential.
The Hook-and-Loop fasteners on the baffle is far more influential.
User-friendliness
User-friendliness is also improved.
The speaker cable used to be soldered to the output terminal of the power
amplifier. As you guess, it is so troublesome to connect/disconnect the
cable. The solderless terminal (M8 spade lug) is employed in Rev.A. It
made connection easy, and alleviated labor in tuning work. It makes me
feel that experiments and evaluation of power amplifiers are not tough
jobs.
The new speaker cable, Canare 4S6G is a bit thicker than NEGLEX 2510, but it's more flexible and easy to use.
Summing-up
SQ has been improved more than I had expected.
SS-312 used to be not so good even for easy listening, but now it is a
high quality speaker system that is suitable for music appreciation. SS-312A
is also useful for evaluation of power amplifiers. Its bass response is
so good even at low volume that it is a desireable loudspeaker for easy
listening too.
The looks turned to suit my taste. I feel good even when I just looked at it. The looks is the important factor for audio equipment, since it affects SQ so much. I'll continue to make effort to produce good-looking audio devices.
I conducted the tuning job based on acoustic measurements for the first
time in my life. I learned much through this experience.
At first, I was a bit perplexed, and hardly made progress. But now I am
used to it. I expect this method could be easier in the near future than
the tuning job using a test record and my ears, as I learn more about acoustic
measurement.
I hadn't made a BOM for SS-312. I made the BOM of SS-312A. I placed the
link below for your information.
[BOM]
Do Measurements Really Indicate Sound Quality?
This is very interesting discussion. I would like to create a document on this subject in the future. Here, I'd like to express my opinion based on the experience in tuning of SS-312A.
Some say stubbornly that measurements do not indicate sound quality (SQ).
I myself used to believe so.
However, I experienced that the measurements indicated SQ so well in this
Rev.A project. Of course, there may have existed psychological bias, because
I listened to SS-312A after I saw the measurements. There was a possibility
that preconception affected my judge.
To weaken the influence of preconception, I take much time for the listening
trial. I play recordings of various kinds of musical instruments. I play
not only the test record but my favorite records that I have listened to
countless times.
As a reslut, I have to say measurements are well related with SQ.
However, I raise an objection to give greater importance to numeical values.
They are too simple, and results of filtering plenty of important information.
For example, a numerical data of frequency response like '40Hz-25kHz' doesn't
indicate SQ. It's impossible to tell how good the SQ is. Another example
is THD (total harmonic distortion). How can you understand what kind of
distortion occurs from a numeric datum of THD=0.001%?
I recommend not to give importance to numerical values but charts.
One more thing. I recommend to make measurement in both frequency and time
domains. Measurement data should be multipronged. If you watch one aspect
only, you may overlook problems.
Waterfall chart indicates characeteristcs in both frequency and time domains
in one chart. You can get it by using REW at once. I'd like to use waterfall
charts in future projects.
The closest relation between measurement and SQ can be seen in stereo imaging.
Stereo imaging capability depends on how accurately both channels operate.
That is, the SPL and phase of the both loudspeakers are exactly the same
when a mono signal is reproduced. Particularly, it is important in treble
and super treble regions, where hormonics are contained. If the phase is
shifted in those bands, the sound image becomes unfocused and sound localization
becomes unstable. If the phase shifts to the same degree in both channels,
it doesn't cause a problem. But the phase shift of the loudspeaker isn't
as orderly as the amplifier, and phase difference occurs between the left
and right.
It's difficult to estimate tone from measurement data, but you can anticipate
unfocuse sound image and unstable localization.
I'll continued to study the relation between measurements and SQ.