AR-416 Air
2019/01/19 created
2019/01/19 updated
5-tier Wooden Audio Rack
| Features | All tiers fixed, vibration-proof by granite base plus spikes, vibration
suppression by combination of sino lumber core board and MDF board Omnidirectional air flow, airy-fairy looks |
|---|---|
| Outline Specifications | Dimensions: 548(W) x 1041(H) x 458(D) mm, Weight: 33.8kg (Main body: 19.3kg, Granite base: 14.5kg) |
| Cost | 40,258 JPY (including cost of leftover materials) |
| History | Completed in July, 2017. Being used in Gaudi II. |
Concept
This audio rack is supposed to be used in Gaudi II.
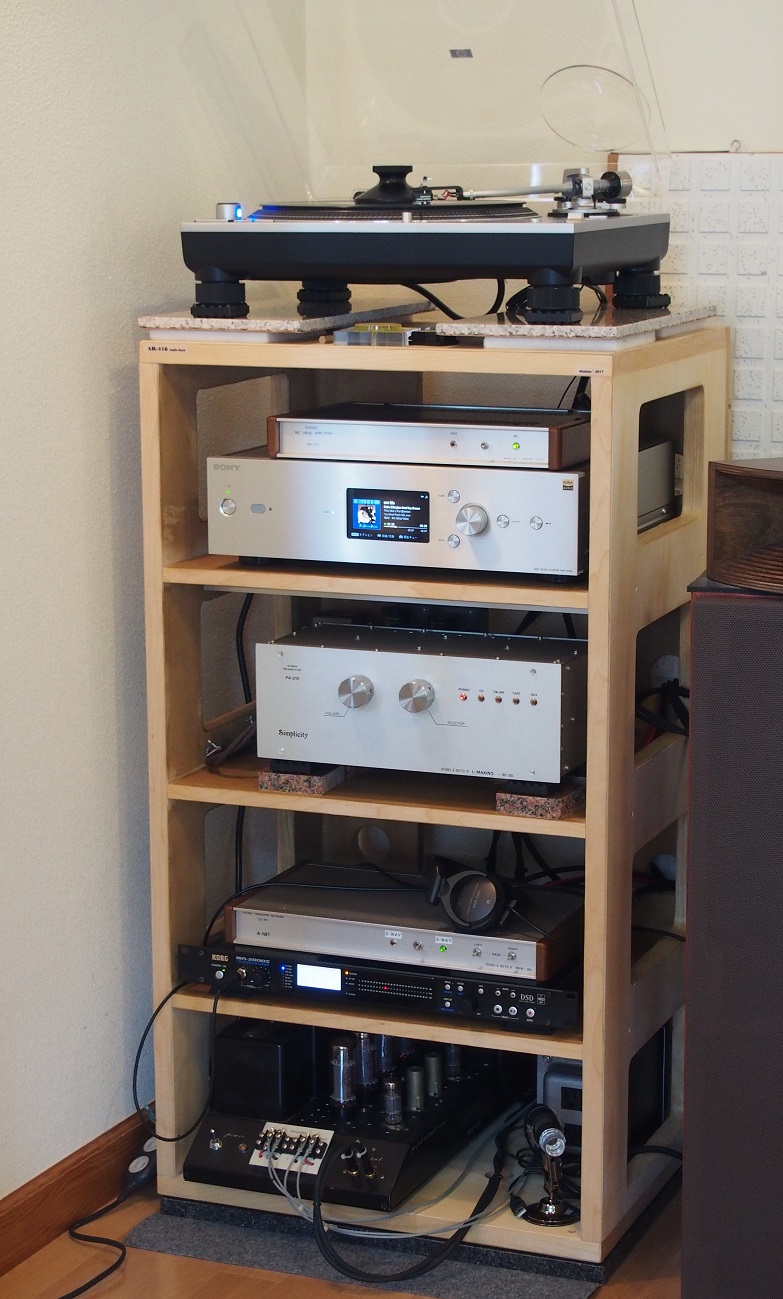
It houses analog disc player (ADP), digital audio player (DAP), preamplifier,
digital audio recorder (DAR).
Top priorities in design are as follows:
- (1) Thorough anit-vibration measures
- The main source of Gaudi II is the analog disc. So the most required performance of the audio rack where the ADP is installed is to prevent external vibration from being propagated to the ADP.
- (2) Looks matching the interior of the living room
- Gaudi II is installed in the lving room, and its interior is unified with bright color tones. The wallpaper is white, the ceiling and floor are light color wood close to white wood, the window frame is white wood, the curtain is light green, and so on. This rack should also be in a bright color with touch of plain wood.
- (3) Fine ventilation
- To keep the audio devices cool, air should flow through the rack in all directions; front/back, left/right, up/down.
Nickname and Theme Music
The nickname is Air. This just means "song". It is an English
word equivalent to "Aria" in Italian.
When I saw the model number "AR-416", I thought of the word "Air".
In addition, because AR-416 looks light for its weight, I thought air is
a good name for this rack.
To make sure, I looked it up in the dictionary, and found that this familiar
word has the meaning of "song". At the same time, the song titled
"Londonderry Air" came to my mind. I had been misunderstanding
for many years that this "air" means atmospheric air, but I leanred
it means "song".
I selected The Londonderry Air performed by The Scholars as the theme music
(CD, The Scholars, Folk Songs of British Iles, East World TOCE-3349).
--- The Londonderry Air ---
This nickname is not included in the lettering of the main body, becasue I came up with it when this rack was almost completed.
Specifications
The size of this rack is defind so that it can accommodate the standard-sized
commercial audio devices without difficulty.
In terms of strength, I want it to be able to withstand loads up to 200
kg, but since I don't have know-how to calculate and measure the strength,
I gave up strict evaluation.
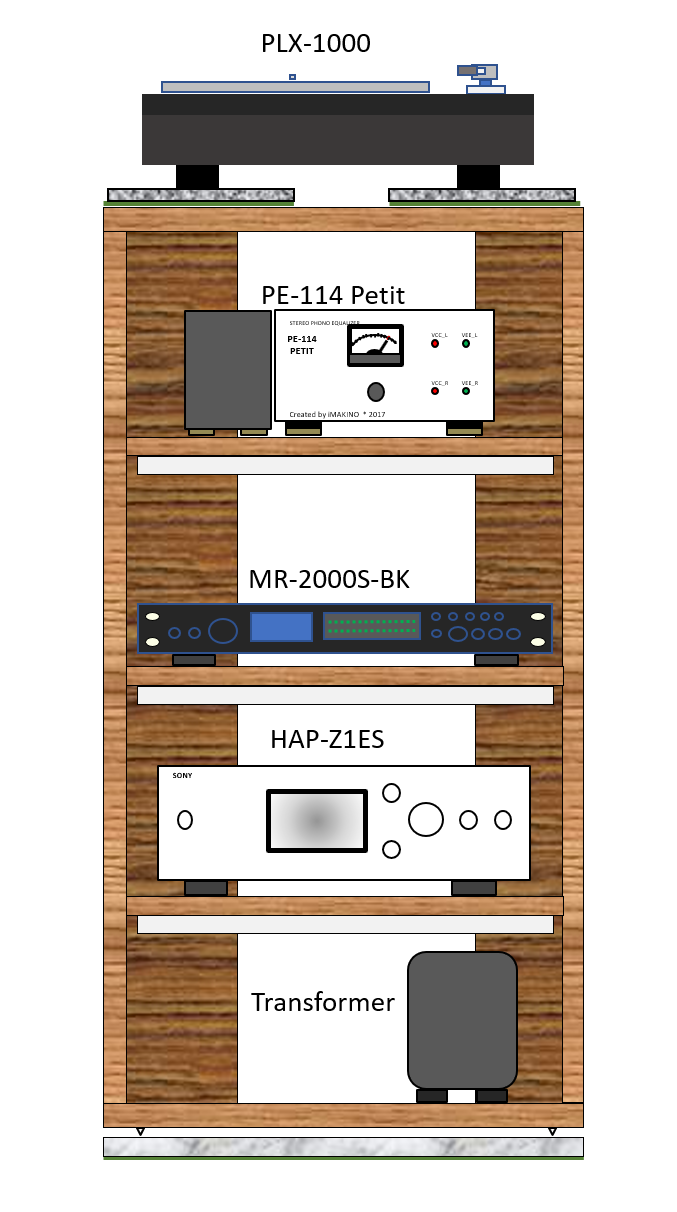
The ADP is to be placed on the top tier. The height of the top tier is
determined so that the ADP should be at the right position when I handle
it with standing posture.
| External dimensions |
548(W) x 1041(H) x 458(D) mm (including the granite base) 548(W) x 1000(H) x 458(D) mm (not including the granite base) |
| Inside dimension |
500(W) x *(H) x 440(D) mm *Height varies depending on the tier 1st tier (bottom): 208mm, 2nd and 3rd: 232mm, 4th: 226 mm |
| Weight | Main body: 19.3kg, Granite base: 14.5kg (Total: 33.8kg) |
| Major materials |
24mm sino lamber core board, 18mm MDF board 20mm granite board, 12mm granite board |
| Assembly method |
All the wooden parts are adhered to each other ... this rack is impossible to disassemble |
| Finish | Wood wax (applied one time) |
Design
New technologies, Major Parts/Materials
It's been a long time since my last woodwork, so I adopted various parts and materials I've never used before. The main ones are introduced below:
- Sino lumber core board
- I've used it for a bookshelf, but it's my first time to use it for audio.
The lumber core has a structure with thin plywoods stuck on both sides of laminated wood. Because the inside laminated wood is not very dense, the weight is light. But, thanks to the plywoods on both sides, it is characterized by high strength and less warpage.
The cut end is so unsightly that it's necessary to cover it by pasting sliced veneer on it. - Honey wood wax
 It is also new for me.
I used colored wood wax when I made a bookshelf with sino lumber core board. But I couldn't uniformly apply it, and the finish turned out to be uneven and unsightly. There seems to be compatibility between wood and wood wax.
This time, I chose a transparent wood wax. Even if it becomes uneven, the unevenness will be indistinctive. The board will be finished like a plain wood.
The wax is made of only natural materials, so it is okay if you touch or lick it. It must be applied only once (can't be overcoated). It has water repellency.
<Maker's website>- Sliced veneer (maple)
- When I made the bookshelf, I put cut surface tape on the cut ends of the
boards. But it didn't look neat. The cut surface tape is plastic tape on
which wood grain is printed. Its looks and touch are not natural, since
its's not true wood. Therefore, I decided to use sliced veneer.
I didn't know the sliced veneer well, since I was only an amateur at woodwork. I gathered information on the Internet and studied. In short, it is thinly carved natural wood with adhesive applied on one side. I learned that one using hot melt adhesive is easy to use.
I chose maple because its color is close to sino. I bought it online.
<Maker's website> - Allen screw (Socket set screw)
- It is commonly called imoneji in Japanese. Its English name is probably "Allen screw" or "socket
set screw". The tip of the screw is so sharp that it can be used as
a spike. However, though it is said to be sharp, the tip is actually cut
flat. In the case of M6 size, which I used, the tip is flattned and its
diameter is 1.5mm. This is because this screw's original purpose is to
fix the pulley to the shaft. This is rather favorable, because the tip
could crack the granite base if it was really sharp.
The Allen screws are inserted into the insert nuts that are inserted into the through-holes in the bottom shelf board. The Allen screws are adjusted so that their tips protrude by 4 to 5mm under the bottom shelf.
I selected M6, L25 stainless steel Allen screw.
<Maker's website> - Coarse thread screw
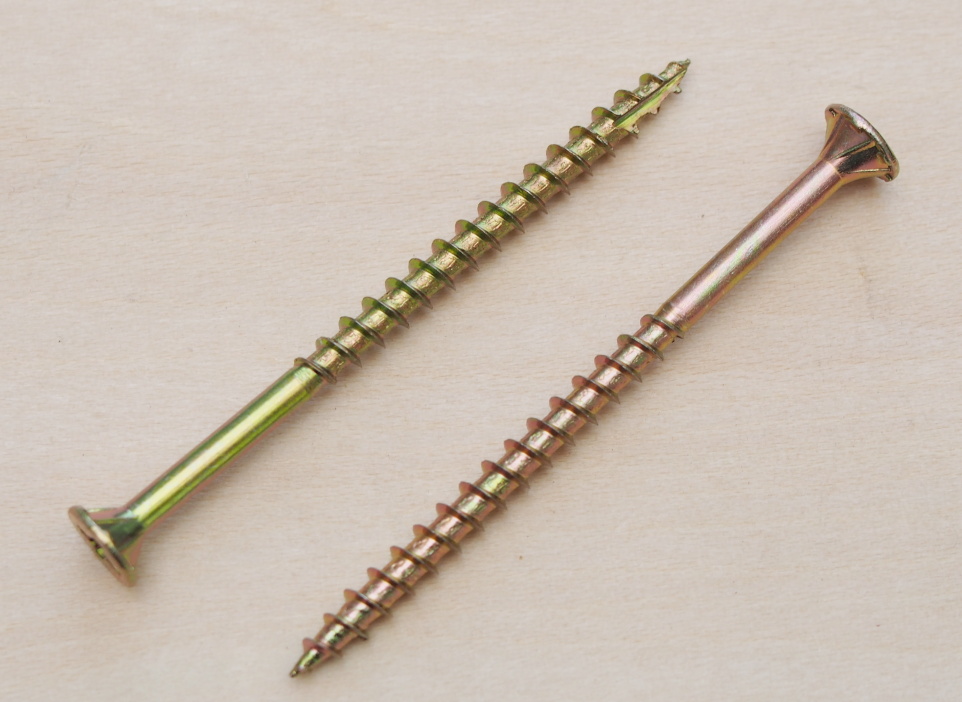 For many years, I knew only wood screws when it comes to screws used for
woodworking, since I'm not an expert. Recently, even at DIY shops, wood
screws are less available. Instead, screws called coarse thread have got
more available. I guess the name "coarse thread" is derived from
its wide-pitched thread. It is thinner than the wood screw, the thread
pitch is larger, and the tip is sharper. You can screw it into wood without
boring a pilot hole.
For many years, I knew only wood screws when it comes to screws used for
woodworking, since I'm not an expert. Recently, even at DIY shops, wood
screws are less available. Instead, screws called coarse thread have got
more available. I guess the name "coarse thread" is derived from
its wide-pitched thread. It is thinner than the wood screw, the thread
pitch is larger, and the tip is sharper. You can screw it into wood without
boring a pilot hole.
I decided to use the coarse thread, since it is easier to use than traditional wood screws obviously. (because the course thread is also a kind of wood screw, I'll call it a wood screw afterwards).
My selection is Moto Corporation's "Slim Vis" 3.3x40mm and 3.3x50mm.
Drawings
Each drawing contains data on certain pieces of furniture (named MiniRack).
I built them shortly before building AR-416. Please ignore those data.
The reasons for building the MiniRack are that I didn't want to waste the
leftover materials, and would like to familiarize myself with woodwork.
Since I am clumsy, when I start woodworking without training myself beforehand,
I'm likely to fail. So, I determine that I would build some furniture to
get accustomed to woodworking before building AR-416. I built two units
of MiniRack with the same design.
[Construction]
The granite base (BD10) is placed on the floor and the rack main body is
placed on it. The tip of the Allen screw protrudes to the bottom of the
body so that the bottom shelf of the main body (BD1) does not come into
direct contact with the granite base. The granite boards (BD11, BD11')
are put on the top shelf (BD5) of the main body. This is to reduce vibration
propagated to the ADP even a little.
In the drawing, the material is not clearly indicated, but the middle shelf
boards (BD2-4) and the back boards (BD8-9) are made of 18t MDF board. MDF
is denser and heavier than the sino lamber core board. By combining different
materials, vibration will be suppressed.
All wooden parts are glued with adhesive. Therefore, it can not be disassembled
after the assembly. By doing this, sufficient strength can be obtained
even with a combination of relatively thin boards.
The MDF board will warp under a constant heavy load. To prevent warping,
the reinforcements made of aluminum channel are attached on the lower side
of the MDF shelf boards (BD2-4).
For good ventilation, every wooden part has air vents, and the backboard
is divided into two narrow boards (BD8-9) to open the back. Large rectangular
holes are cut out in the side boards (BD6-7). These large cutouts are not
only for securing ventilation, but for easy access to the devices when
I connect the cables.
[Board Cut]
In the drawing, the numbers in the green circles indicate the order of
cutting the boards. To precisely align the lengths and widths of multiple
parts, the layout and the order of cutting have to be considered carefully
so that those parts are cut out in one action.
The direction of the wood grain need not be so much thought, because the
wood grain of the sino lumber is not sharp. For better appearance, I laid
out the side boards (BD6-7) so that the wood grain becomes vertical, and
the top board (BD5) so that the grain becomes horizontal from the front
view.
[Woodwork]
For the vent holes of the side boards (BD6-7), only marking out is made
in the part processing. The holes are actually cut out after the assembly
of the main body is done. This is because I don't have a workbench that
can hold a large board. Although this way brings a risk that the main body
might be scratched with a slight mistake during cuting out, I had no choice.
The guide holes for the screws are bored only in the outer boards. The
diameter of the hole is the same as the outside diameter of the screw (3.5mm).
In the drawing, "Overlap area" indicates the area where adhesive
is applied to. During the part processing, only marking out is made.
[Metalwork]
The reinforcements are only metal parts. They are cut ouf of a 2-meter
long aluminum channel. Screw holes are bored in them.
[BOM]
The cost has become 40,258 JPY, exceeding 40,000 mark. It is higher than
I expected. But it's not unusual. Each time I create a BOM and calculate
the cost precisely, I realize the cost is about twice the rough estimate.
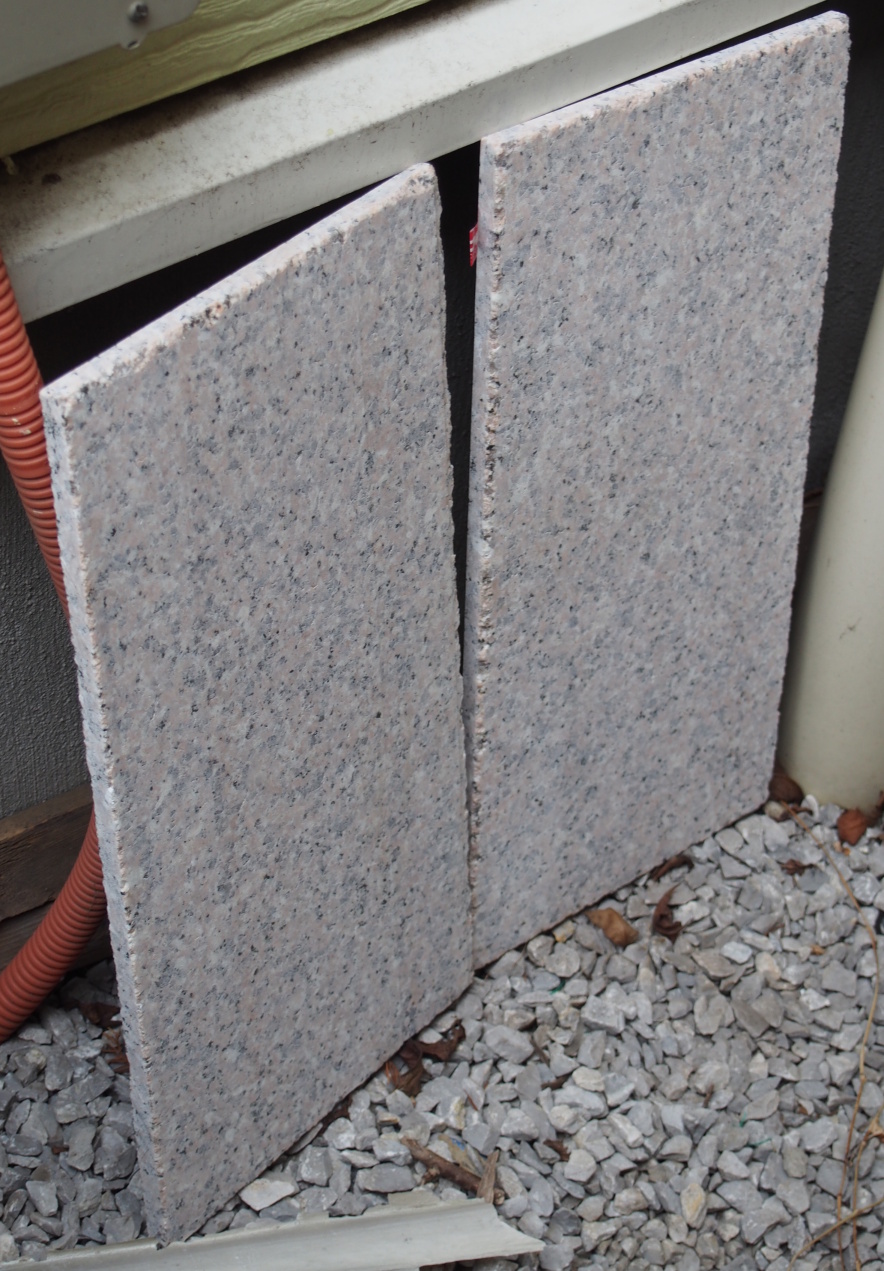
Particularly, the granite board for the base (BD10) was expensive. I bought
it from the same supplier from whom I purchased the granite for SS-309.
The charge was 8,424 yen, including the cost of cutting and chamfering.
On the other hand, the granite board to be placed on the top shelf (BD11,
BD11') cost only 650 yen. If you don't stick to the apperance, there are
also some around 400 yen. This is the difference between special order
items and standard items (12x400x400 mm). It is more economical if you
can make use of standard granite boards.
This cost includes the cost of MiniRack. The cost is about 33,000 yen without
that of MiniRack.
[Assembling Manual]
In this manual, the reinforcements (CH1-3) are supposed to be attached,
but this is temporary fixation. They are fixed after completing the finish.
[Finishing Manual]
This manual includes fixing of the Allen screws, but this work is done
at the time of installation.
The finishing work of MiniRack is omitted.
Building
Procurement
I bought most of the parts and consumable tools at a nearby DIY shop, and the other parts online.
I bought the sino lumber core boards and MDF boards at the DIY shop. They were all standard size (1820 x 910mm). And I had them cut at their workshop. I handed them my drawing and ordered them to cut the boards following the drawing. I got the wooden parts exactly as I designed. Although they said that the error is maximum 2mm, there is no visible error. In fact, the error was at most about 0.1mm. With this precision, I could assemble the rack without additional processing.


Woodwork
I carried out woodwork in the following order: marking out → drilling the screw guide holes → boring the vent holes → cutting the sliced veneer → cutting the carpet and cork sheet. I worked almost in accordance with the manual.
I marked out the wood boards with a metal scale and a pencil.
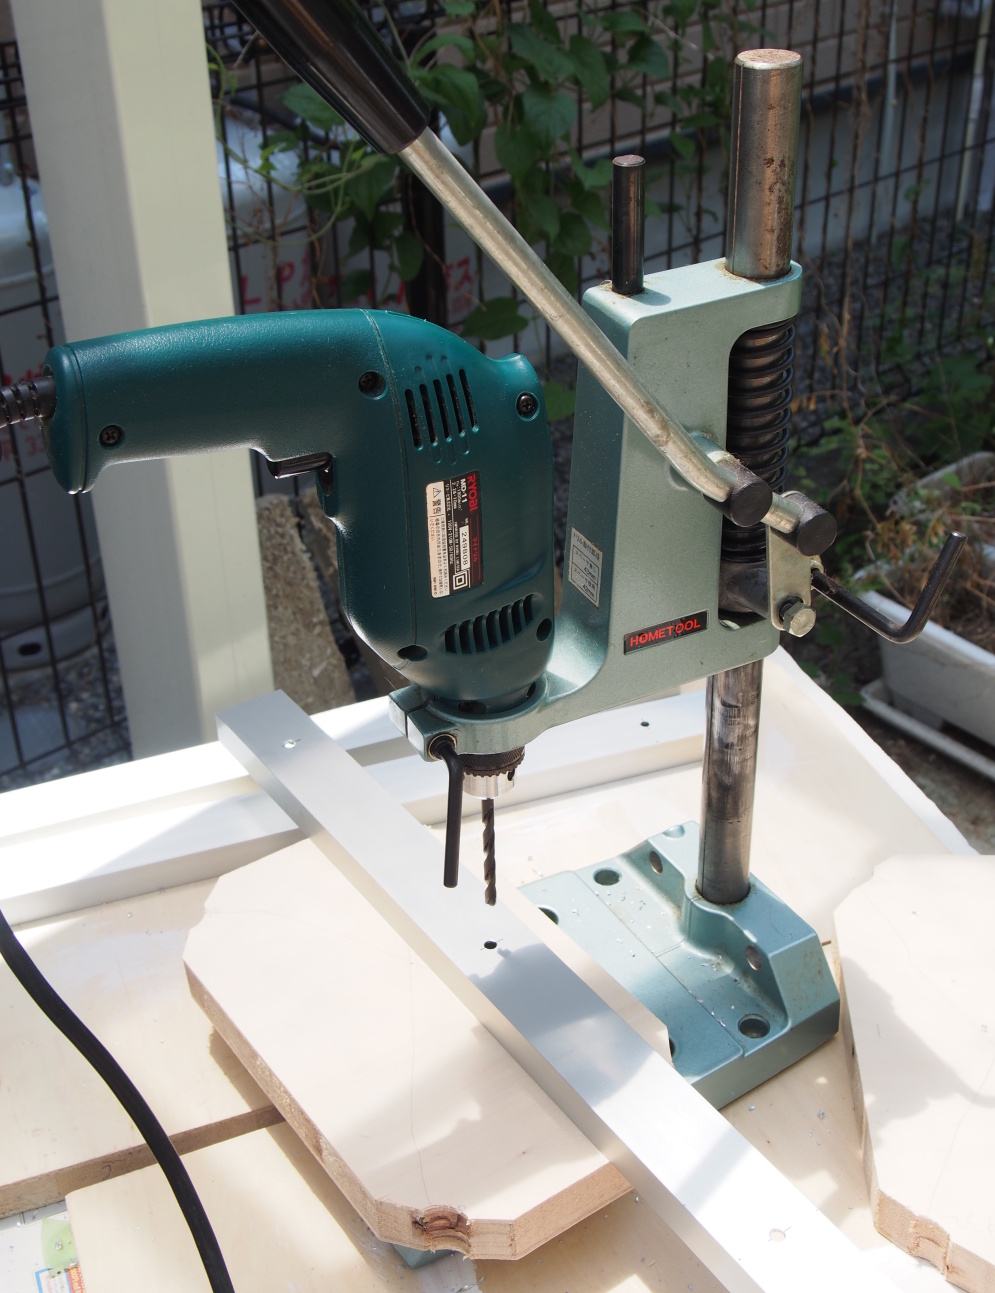
I drilled the guide screw holes exactly vertically with a power drill attached to the drill stand.
For the vent holes, I made small holes for the hole saw guide with the power drill attached
to the drill stand just like screw guide holes. Then I attached the hole
saw to the power drill and bored the vent holes with the tool on hand.
As for the rectangular cutouts in the side boards (BD6-7), I made four
holes at the corners of each coutout with the hole saw. After assembling
the main body of the rack, I cut out the vent holes into a rectangle shape
using a power jigsaw and a handmade straight ruler .
I tried to cut the sliced veneer with a metal scale and a roller cutter. But because it is natural wood (it has grain), I realized that it's difficult to cut it in a straight line with the roller cutter. I decided to cut it with a universal scissors, though the cut line could be slightly distorted.
I used the universal scissors to cut the carpet and the cork sheet.


")
")
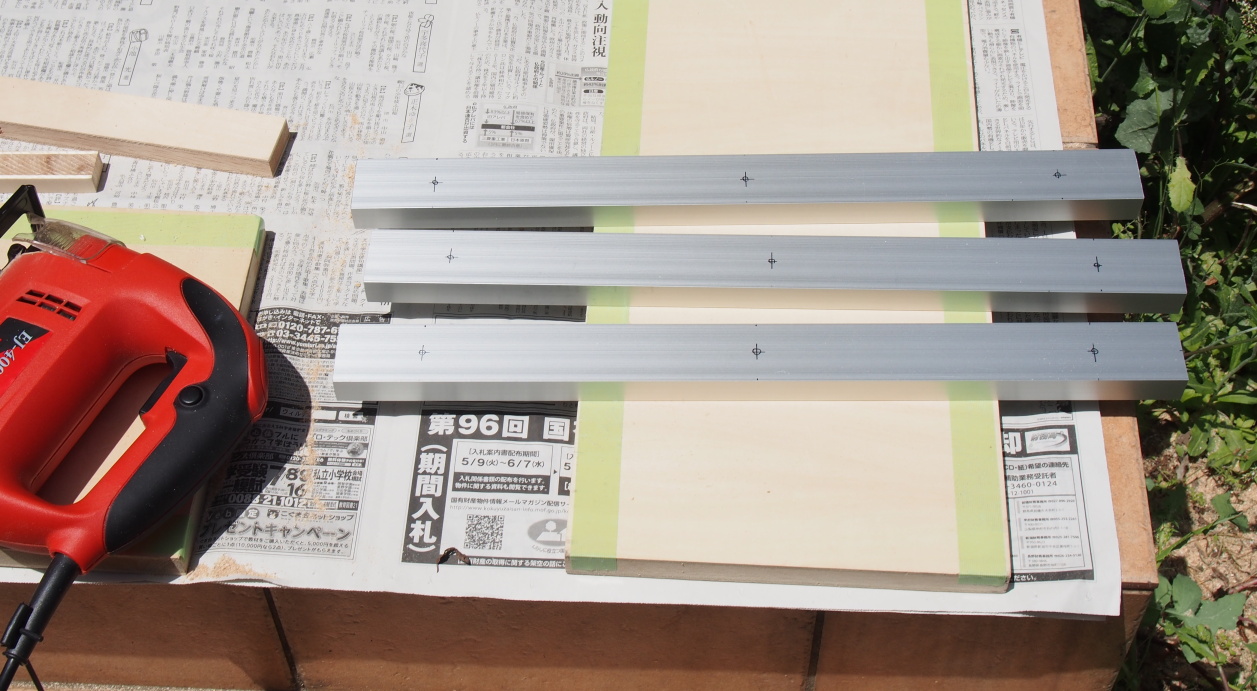
Metalwork
Only metal work of this project is processing the aluminum channel used
as reinforcement.
Three parts are cut out of the standard-sized aluminum channel using a
power jigsaw. Then screw holes are drilled with the power drill and the
drill stand.
Assembly
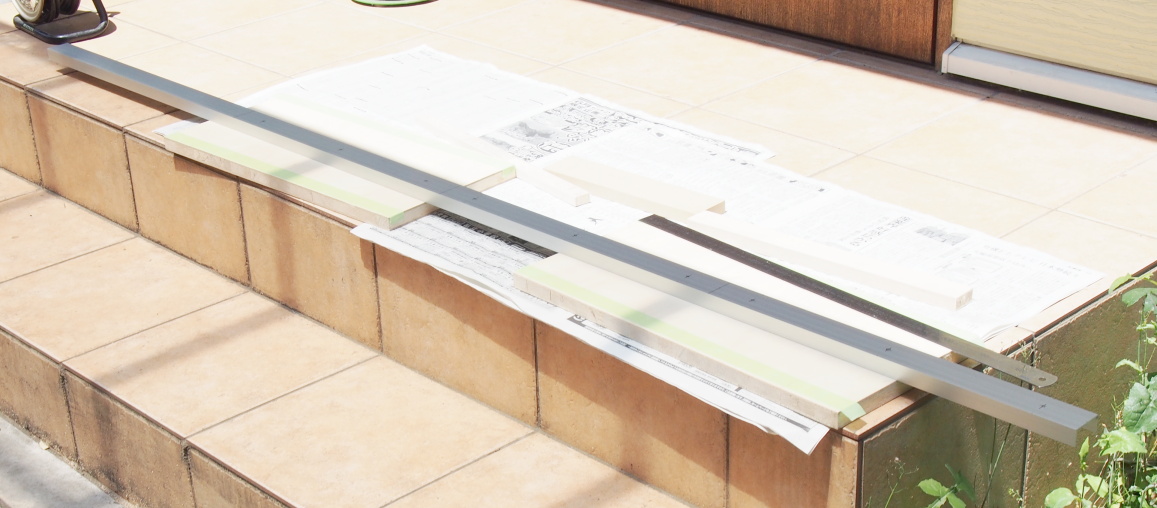
I assembled the rack following the manual.
To assemble the main body, first, place the back boards (BD8-9) on a flat place (entrance porch) and place the remaining wooden parts on it as shown in the drawing. Secondly, make temporary assembly using masking tape and check whether it can be assembled as designed. If there is not a problem, disassemble it. Finally, assemble it with an adhesive. I used Konishi #10132, which is well-known as "bond for woodworking". It is an inexpensive adhesive. The 180g bottle costs only 185 JPY. But it has enough adhesivity.
I failed in this step.
After applying the adhesive to the adhesive surface, the rack must be assembled
before the adhesive dries. I worked in a hurry, and I forgot to apply the
adhesive on some adhesive areas and assembled the rack. I disassembled
the rack immediately, and applied the adhesive to the areas I forgot. I
reassembled the rack just in time. However, the adhesive remained on some
surfaces where it wasn't supposed to be applied. It stuck when I disassembled
the rack. I wiped it with a wet cloth soon, but couldn't completely remove
the unwanted adhesive.
Because I am clumsy, this degree of failure is not unusual. It is rather
amazing that I made no mistakes in the earlier steps.
One more thing; though it's not a failure in this step, I noticed that I hadn't considered the dimensional error of the wood parts in the design. I found a place where the combined boards were not flush. I decided not to mind, since the error was a little.
After assembling with adhesive, before the adhesive dries, the rack is
fixed with the wood screws (coarse thread). At first, I inserted the screws
shallowly with a hand tool. After checking that there is no deviation in
the bonded parts, I tightened them with a power screwdriver.
I found that the coarse thread can be screwed much easier than conventional
wood screws. Since I chose the type of screw whose head gets into the wood,
the head didn't protrude out of the wood surface and looked neatly.
After tightening the screws, you can move the rack to any place you want.
There is no need to fix the rack with clamps.
Just to be on the safe side, I dried the rack all day and night. I cut out the vent holes of the side boards (BD6-7) the next day.
I temporarily fix the reinforcements (CH1-3) and checked the positions
of the screw holes. There was no error.
 placed on a flat place (entrance porch)")


")
")

Finish
Basically, I proceeded the steps according to the manual, but I reviewed the progress and modified some tasks with on-the-spot judgment.
The steps went on in the following order: filing and sanding with a power sander → gluing of cut surface tape and the sliced veneer → screwing the insert nuts → putting stickers → applying the wood wax → attaching reinforcements (CH1-3) → glueing the carpet on the granite base (BD10) - glueing the cork sheet on the granite boards (BD11, BD11').
I used a larger amount of wood wax than I had anticipated for MiniRack,
which I built before AR-416. So, the wax was short. I didn't buy another
can of the wax, but used color wood wax ('Antique Wax' manufactured by
Turner Color Works), instead. I have used it before for home-built furniture.
I applied it on unobtrusive furfaces such as the inside of the rack.
This color wax was as no good as the previous experience. I can never appliy
it evenly. There seems to be compatibility between wood and wood wax.
And, as I mentioned above, the adhesive accidentally stuck to some spots
other than the bonding surfaces in assembly. The wood wax cannot be applied
on those spots. This mistake also spoiled the looks of the rack. But I've
decided not to mind.
I didn't know that there are 3 types (type A, B, C) in this wax, until I actually used it. I saw the manufacturer's website before purchasing, but I don't think there was an explanation about the types (now it is written). I happened to have bought the Type A at a nearby DIY shop. It seems that this Type A is compatible with the Sino plywood.


")


 coated with color wood wax")
")
")
")
")
Installation, Adjustment, Measurement
Installation and Adjustment
This step was carried out as follows:
(1) Place the granite base (BD10) near the installation place.
(2) Place the main body on the base.
(3) Insert the Allen screws into the insert nuts of the lowest shelf (BD1).
(4) Screw the Allen screws with an Allen wrench so that the tips protrude
by about 5 mm under the bottom.
(5) Put a water level on the rack and adjust the four Allen screws so that
the rack becomes precisely horizontal.
Before placing the audio devices on the rack, move the rack to the position specified in the system design. Because the carpet is stuck on the bottom of the granite base, it's easy to slide it on the floor.
The installation work is completed by placing the audio devices on the
rack and cabling.
I realized at this time that with the devices on the rack, the overall
weight was too heavy to slide the rack on the floor. I wanted to adjust
the position a little, but it was impossible at all.


.")
 on the top of the main body.")

")
")
Measurement and Improvement
The measurement items are basic items such as dimension, weight, distortion, and vibration damping performance.
The dimensions were exactly as designed. There was no distortion, and all
the shelves were accurately leveled.
As for the weight, I didn't calculate anything in the design phase. I take
the measured weight to be the spec of AR-416.
The weight turned to be nearly 20kg only by the main body. I felt it was
unexpectedly heavy.
In order to evaluate the vibration-proof performance, I made measurement
of sine waves that were radiated from the loudspeakers and catched by the
pickup of the ADP on AR-416 Air. The SPL of the sine waves was 80dB at
the listening position.
The devices I used are as follows:
Oscillator: Kenwood AG-203D
Playbacksystem: PA-210 Simplicity, CD-211B A-NET, MA-208 ,MA-215 Arabesque,
MA-201C, SS-309A
ADP: Pioneer PLX-1000, Audio Technica AT33PTG/II
Phono EQ amp: HA-213, PA-210 Simplicity
Instruments: Panasonic Let's note CF-N9, Pico Technology PicoScope 6 &
PicoScope 4262, Phonic PAA3
The preamplifier PA-210 was used for both the output of sine waves and
amplification of the input signals. The input signals were amplified by
the phono EQ stage of PA-210 and measured by the measurement instrument
connected to its output (EQ OUT).
The procedure was as follows.
(1) Place a vinyl disc on the turntable and lift down the stylus. Leave
the turntable powered off.
(2) Turn on the oscillator and the playback system and output a 1 kHz sine
wave from the loudspeaker (left channel only).
(3) Place the acoustic measurement device PAA3 at the listening position
and adjust the volume so that the sound pressure becomes 80 dB.
(4) The frequency is changed in the range of 20Hz to 40kHz, and the output
voltage of EQ OUT at each frequency is measured. At the same time observe
the waveform.
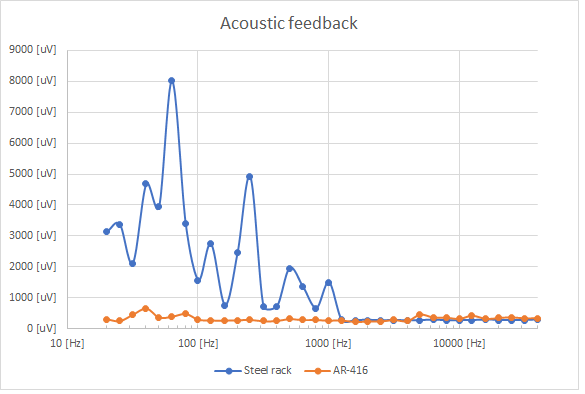
For comparison, I made measurement of the old rack (the old steel rack,
not for audio) before installation of AR-416. As expected, considerable
feedback was acknowledged in the bass range.
Soon after setting up AR-416, I started measurement, but I was stunned
because the data of 20 Hz measured first was almost the same as the old
rack. My confidence was almost shattered, but I soon considered how to
improve.
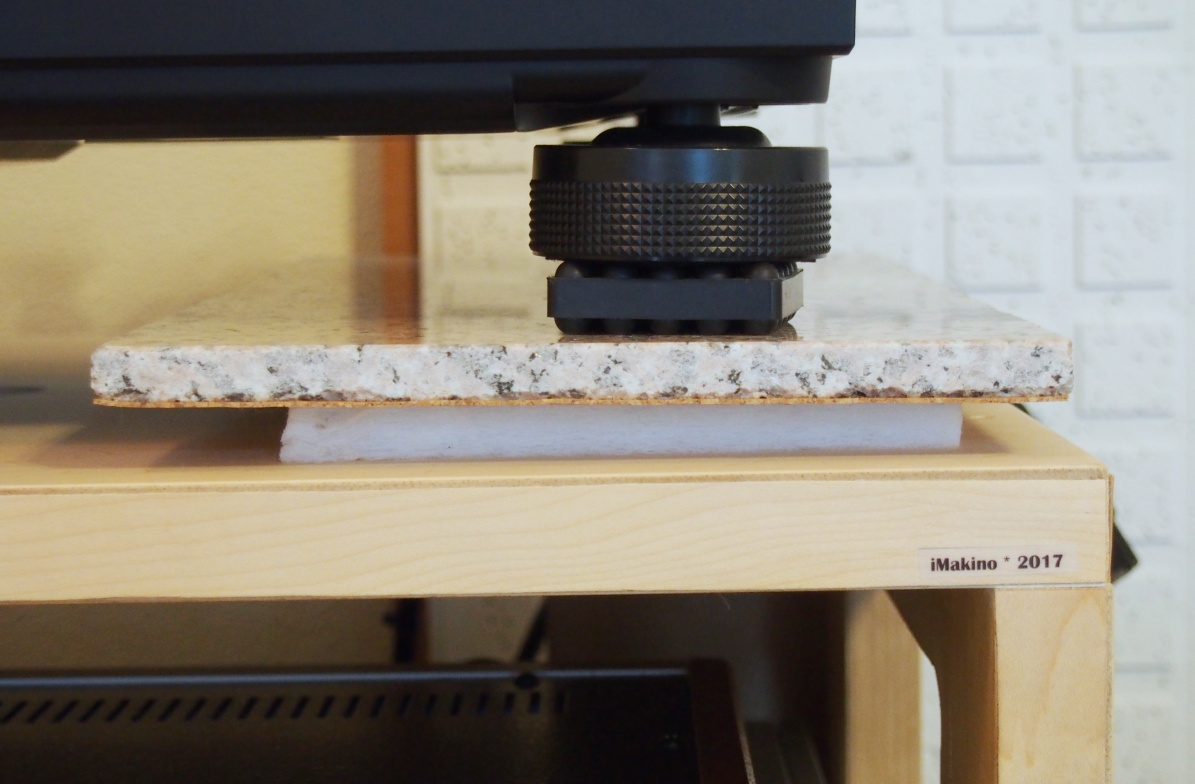
In order to block vibration in the very low frequency range, an insulator made of soft material is desirable. I remembered the insulator made of polyester fiber solidified in a plate shape which had been kept in a closet for a long time. I had intended to use it for the loudspeakers, but it is considerably softer than it looks, and the loudspeaker is staggering, so I quit using it. It is a product called White Kyuon (thickness 10mm type) manufactured by TOKYO Bouon.
I put the White Kyuon between the main body and the granite boards (BD11,
BD11'). This acoustic isolation successfully blocks the vibration in the
super bass region as I intended.
The two photos below show the White Kyuon I used. The figure shows the
data of the old steel rack (the blue curve) and AR-416 (the orange curve).
In this figure, the raw data (voltage of EQ OUT) are plotted without processing.
Noise from amplifier is included.
Both the racks seem to almost completely block 1kHz or higher. This is
due to two facts: (1) the vibrations of 1kHz or higher are likely absorbed
and reflected by the insulator and the spikes, (2) the EQ stage attenuates
high frequencies. Conversely, frequencies below 1kHz is enhanced by the
EQ stage.

My Own Review
Strength
Since I don't have know-how to measure the strength, it can't be expressed
by a numerical value, but I think more than enough strength has been achieved.
Adhering all the wooden parts made AR-416 far robuster than it appears.
Even when I stepped onto it and swayed from side to side, it kept rigid
and did not creake at all.
I opened large vent holes in the side boards (BD6-7), but this seems not
to affect the strength.
As of January 2019, I have already used AR-416 for 19 months, but warpage of the shelf boards has not occurred. It was a wise decision to attach the reinforcements (CH1-3) to the middle shelf boards (BD2-4) made of MDF, which is easy to warp.
Looks
The surfaces on which the clear wood wax (honey wax) was applied have been
finished more beautiful than I'd expected. The wood grain didn't come out
clearly, but it rather fits my taste.
On the other hand, the surfaces on which the color wood wax were applied
have become unsightly. Still, when I actually installed the audio devices,
the rack turned to be a good-looking rack because the unsightly surfaces
have been almost covered.
The color and texture of maple veneer are similar to sino, so the maple
veneer matches well to this rack.
The sliced veneer was cut with universal scissors, so the cut lines are
not perfectly straight. It was a wise decision that I cut it slightly narrower
than the width of the cut surfaces. For example, for a 24-mm-wide cut surfaces,
the veneer was cut to 22mm width. As a result, those less straight lines
are not noticeable.
There was a catch. I miscaluculated the quantity of the sliced veneer in
the design phase. I ran out of it during the work. I tried to order it
at once, but the maple was sold out at that time. No way but I ordered
a slightly more colorful one. Since I used the colorful one on the cut
surfaces of the vent holes, which are not noticeable from front, it did
not become a big problem. But I've decided to use CAD even for simple parts
in order to avoid this kind of problems in the future.
The coarse thread screw, which I used for the first time, is bad looking by itself. But, once it is driven into wood, the color of the screw melts into that of the wood, and it becomes inconspicuous. I was going to putty on the screw heads to cover up, but that was not necessary.
The exterior of AR-416 blends into the interior of the room (living room), which is based on whitish colors. I love it. I had been longing for such an audio rack for 15 years since I built my house. The wish has finally come true.
User-friendliness
It's natural that the size of AR-416 Air is just right, since I designed it to fulfil the requirements. Each audio device is accommodated neatly.
Heat is effectively let out, though it is a wooden rack, since I designed
it focusing on ventilation.
However, there is a problem that heat goes up to the upper tier if an audio
device that generates extreme heat like a tube power amplifier is placed.
The hot air flows through the vent holes in the shelf. This problem can
be avoided, since tube amps are not used in Gaudi II.
Actually, I installed the tube power amp MA-201C on the first shelf (the
bottom tier) and used it for three months after the completion of AR-416.
As expected the second shelf and its reinforcements became considerably
hot. The temperature of the reinforcements reached nearly 60 deg-C. But
the shelf didn't warp nor discolor.
The large vent holes in the side boards make it easy to connect and disconnect the cables. I can access the devices through the vent holes.
Sound Quality
I have experienced many times, many ways, that the sound quality of the
analog disc was significantly improved when I improved something in the
system, while the sound quality of the digital source didn't change much.
I experienced the same thing again.
Thanks to the thorough antivibration measures over the full band, the sound
of the analog disc has become clearer. The sound stage has expanded, and
the localization has become accurate. The sound makes me really pleasant.
It is noteworthy that the surface noise has dramatically decreased. When
a high quality record is being played, the blanks between the songs are
really quiet. Noise cannot be heard unless I'm particularly conscious of
it. This is more than expected.
The tonearm of the SL-1200 is an inexpensive one, priced about 6,000 JPY
if it is bought alone. But I found out that it can perfectly trace high
quality records in the vibration-free environment.
I wrote my review of SL-1200GR on the page"Commecial Products". This includes a review of AR-416 Air.
Anyway, I strongly believe that it is difficult to block vibration. I combined
many materials in this rack. From the floor to the ADP:
Floor → carpet (2mm thick) → granite (20mm thick) → spike (Allen screw)
→ main body → polyester fiber sound absorbing material (White Kyuon 10mm
thick) → cork sheet (1mm thick) → granite (12mm thick) → Hanenite rubber
insulator → ADP.
Without these, it is impossible to prevent sound waves from propagating.
Of course, the ADP has an insulator, but it is not enough obviously.