System Design of Gaudi
2011/04/03 created
2021/05/04 updated
The contents of this page were reprinted from the previous homepage of mine, 'Tonochi's Audio Room'. Some parts were edited.
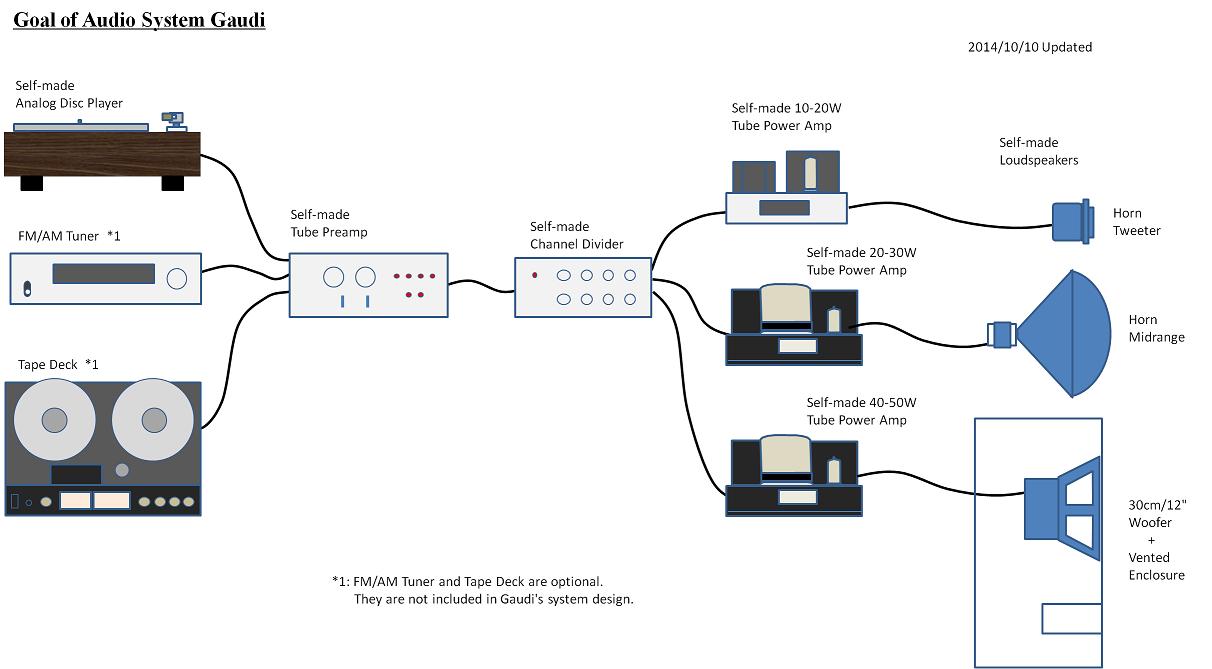
As a result of the thorough consideration, I determined to build the three-way
multi-amplifier system, and build the amplifiers and loudspeaker specialized
for it on my own.
First of all, I decided the basic specification of the loudspeaker: a three-way
multi-enclosure speaker system using a large-sized woofer, a horn midrange
and a horn tweeter.
Then I specified the spec of each amp according to the spec of the speaker.
I was going to make a total of five amplifiers: a preamp, a channel divider
(network), a power amp for the woofer, a power amp for the midrange and
a power amp for the tweeter.
In addition, I decided to build an analog disc player.
Selection of Loudspeaker Drivers
- Woofer
- To make sure the lower cutoff frequency is lower than 30Hz, f0 of the woofer should be 25Hz or lower. I searched for such woofers available, and found that almost all of them were 30cm (12 in.) or larger in diameter. A 38cm (15 in.) woofer requires a pretty large enclosure. I didn't have a enough room to install it in my room (approx. 13.2m2). So I decided to use 30cm woofers.
- Midrange
- Though I knew there were different opinions, I believed a horn-loaded driver was ideal because of its high efficiency that results from its ultra light diaphragm, powerful magnetic circuit and effect of the horn. Even now I still have the same belief. However, cheap horn-loaded drivers are not acceptable because a horn with poor processing accuracy possibly causes large distortion. I thought it would be the most expensive component in my audio system.
- Tweeter
- I decided to use horn-loaded tweeters for the same reason as the midrange. Unlike midrange drivers, various kinds of horn tweeters were available from cheap ones to high-grade ones. I had to select a high-grade one to avoid low-quality sound common among cheap horn tweeters.
Loudspeaker Enclosures
I employed multi-enclosure system so that each drive-unit can be separately upgraded. It matches the features of the multi-amp system.
The woofer enclosure was a vented box (bass reflex), because it was the
most compact while the desirable bass response can be obtained.
As for the midrange and tweeter, I decided to make baffles that match the
woofer enclosure, for enclosures were not necessary for the horn-loaded
drivers.
Specs of Power Amplifiers
The maximum output power of each power amp was specified after consideration of the loudspeaker driver's assumed sensitivity and the area of my room. For example, suppose the sensitivity is 95dB/W(@1m) and the output of the power amp is 10W, SPL of 105dB is obtained on the driver axis a distance 1m. The actual sound is louder with reflection from the boundaries. I thought 40-50W was more than enough.
- Power amp for woofer (woofer amp)
- Output power: 40-50W (assumed sensitivity of woofer: about 95dB/W); Frequency response: 15-50,000Hz; Input sensitivity: 1V.
- Power amp for midrange (midrange amp)
- Output power: 20-30W (assumed sensitivity of midrange: about 98dB/W); Frequency response: 15-50,000Hz; Input sensitivity: 1V.
- Power amp for tweeter (tweeter amp)
- Output power: 10-20W (assumed sensitivity of tweeter: more than 100dB/W); Frequency response: 1000-50,000Hz; Input sensitivity: 1V.
I decided all the power amps be tube type. This is because I thought a tube amp I had built at age of 15 was so successful. It was no less excellent in sound quality than Sansui AU-666 I owned then. I was confident in building a tube amp on my own that could be a match for high-grade manufactured amps.
Spec of Channel Divider (Network)
The parameters of the filters in the network such as fc (crossover frequency)
should be specified after the loudspeaker drivers are selected.
I decided the network has no switch that changes the parameters in the
network in order to simplify the circuitry. I would have to change parts
and/or the circuit, when I would like to change the parameters. There is
no product like this on the market, but it's natural to fix such a specification
if you build it on your own. The simplified circuitry not only turns to
an advantage in sound quality, but also leads to reduction of cost and
labor.
If the amplifying elements of the network are vacuum tubes, so many tubes are necessary. It results in too large a case. So I chose solid state. And I decided to use universal boards or PCBs in order to make it easier to update the circuit.
Spec of Preamplifier
I planned inputs and outputs as follows: two phono inputs, three line-level
inputs, two recording outputs and two preamp outputs.
I decided to add a tone control (bass and treble) and a tape monitor features
so that it can be used as the control center.
I put wide dynamic range before high SNR for the phono stage. I believed
a tube phono stage was better than a solid state one, because the tube
circuit had higher maximum output with high voltage power supply.
I was going to face many troubles due to this decision later. My preamps
would produce too much noise. I would realize that it was very difficult
to make a low-noise tube preamp. I should have give priority to high SNR.
But I was too optimistic at that time.
Other Equipment
I regarded the vinyl record as the main source for Gaudi, because it was the best media in sound quality in those days (I believe it is the best even now). The analog disc player was a key equipment, so I decided to build it on my own.
An FM tuner and a tape deck are optional. They are not included in Gaudi's system design.